Where the Wild Things are activities
•Descargar como DOC, PDF•
3 recomendaciones•25,647 vistas

Description of Where the Wild things are activities

Recomendados
Más contenido relacionado
Destacado
Destacado (14)
Similar a Where the Wild Things are activities
Más de Jacqui Sharp
Más de Jacqui Sharp (20)
Último
Último (20)
Where the Wild Things are activities
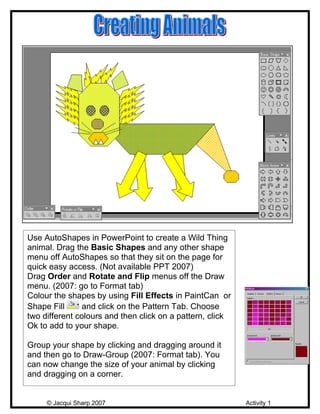
- 1. Use AutoShapes in PowerPoint to create a Wild Thing animal. Drag the Basic Shapes and any other shape menu off AutoShapes so that they sit on the page for quick easy access. (Not available PPT 2007) Drag Order and Rotate and Flip menus off the Draw menu. (2007: go to Format tab) Colour the shapes by using Fill Effects in PaintCan or Shape Fill and click on the Pattern Tab. Choose two different colours and then click on a pattern, click Ok to add to your shape. Group your shape by clicking and dragging around it and then go to Draw-Group (2007: Format tab). You can now change the size of your animal by clicking and dragging on a corner. © Jacqui Sharp 2007 Activity 1
- 2. Draw an animal in Paint or Artrage. Save the picture as a jpeg. Instructions. Insert the picture onto a slide in PowerPoint and then children can type a sentence about their animals. If you save the picture as a jpeg in a folder you will be able to use it again many times in this unit. © Jacqui Sharp 2007 Activity 2
- 3. Emergent, Early & Fluent Draw an animal in Paint or Artrage. Save the picture as a jpeg. Instructions. Create a Word template with a text box at the top and another text box with lines below. Instructions Insert the student’s picture.Print out the whole page. Children can then write on the publishing lines. © Jacqui Sharp 2007 Activity 3
- 4. Create your Wild Things from AutoShapes (Shapes in 2007). Children have to click and drag them to make the Wild Thing again; they can then compare them with the finished one. Remind children to always click and drag from the middle of the shape. © Jacqui Sharp 2007 Activity 4
- 5. Insert your Wild Thing into the Kidspiration ‘Wild Animal Description’ file and fill in the boxes describing your Wild Thing! © Jacqui Sharp 2007 Activity 5
- 6. Find a background photo (habitat) and insert into PowerPoint. Add a graphic of a Wild Thing. Add a text box and type in a story about what is happening. Duplicate that slide and add another graphic or two and update the story. Repeat these steps until the story is told. © Jacqui Sharp 2007 Activity 6
- 7. A rebus replaces words with pictures. Highlight the word and then insert a graphic or insert a photo . © Jacqui Sharp 2007 Activity 7
- 8. This is an activity that could be used at the end of the unit. Use children’s drawings in Paint, AutoShape animals. Take photos of students dressed up as Wild Things and photos of their art work. Insert these into an A –Z PowerPoint with Names for each letter of the alphabet and descriptions of the Wild Thing. © Jacqui Sharp 2007 Activity 8