SlideShare una empresa de Scribd logo
1 de 17
Descargar para leer sin conexión
Build Your OwnYurt

A complete guide to making a
Mongolian Ger
P. R. King

First edition 1995, Second edition 1997
Third edition, revised, updated, and expanded. 1997.
Copyright © 1995, 1997, 1998 Paul King all rights reserved.

Do not copy without permission, do not publish on other websites.
ISBN 09531763 0 4
For more detailed and up-to-date instructions see The Complete Yurt Handbook, Paul King, 2001
Build Your Own Yurt
The Yurt
Yurt is a word of Russian origin describing a circular trellis walled framed tent. The roof supported
by a conical or domed frame consisting of a number of ribs radiating from a central wooden wheel to
the top of the wall trellis. The yurt is traditionally covered with felt, made by beating and rolling wet
sheep fleece. There are three main types of yurt:
The Kirgiz yurt with bent-wood roof poles and crown and a domed overall shape. Used by the
Turkish speaking kirgiz, Kazak, Uzbek, and Turkmen people.
The two tiered yurt with a pointed roof and two layers of wall section placed one on top of the other.
Used by the Uzbek, and Arab peoples of Afghanistan.
The Mongol or Kalmuk ger with straight roof poles, a heavy timber crown, often supported by two
upright poles, and fitted with a wooden door. It is this type of yurt that will be described in this book.
The Mongolian Ger (describing a Mongolian's tent as a yurt may offend his/her national pride) is a
versatile dwelling with a proven pedigree, being home to the nomads of central Asia for many
centuries. The oldest complete yurt yet discovered was in a 13th century grave in the Khentei
Mountains of Mongolia. Discoveries at Pazaryk, Southern Siberia indicate that the technology to
make yurts was in use during the 4th century BC. The BBC Horizon series "Ice Mummies" suggests
that yurts were in use at this time. Throughout this time the design has changed little, the ger being
perfectly suited to a nomadic lifestyle in one of the worlds most inhospitable climates, with high winds
rain and snow, where winter temperatures regularly fall to -50ºC. To this day it is still the preferred
home to the majority of Mongolian people, the suburbs of the capital Ulaan Baatar consist entirely of
gers. The use of the other two yurt types has declined greatly this century.
This proven design is equally well suited to the many uses for moveable dwellings in this country.
The yurt can be insulated for winter use, the sides rolled up to admit a cooling breeze on hot days.
On clear nights one can lie in bed and watch the stars through the open crown. On wet nights there
is plenty of room for a group of friends to sit in comfort around a warm stove, tell stories and listen to
the storm outside. The atmosphere inside the yurt is one of warm, secure, solidity, while from the
outside the yurt radiates a welcoming glow.

Oxen carrying Kirgiz yurt and furnishings (after Murray, 1936)

2
Build Your Own Yurt
The Practical Yurt
As well as being an attractive and novel tent the yurt is probably the most practical temporary dwelling
available, being:
•Portable, a yurt with a twelve foot (3.7m) (or larger) diameter can be easily carried in a
small car, on a horse, in a handcart or even on a train or bus.
•Secure, the yurt can be fitted with a wooden door, which can be locked. The lattice work
walls ensure that entry cannot be gained even if the canvas is cut.
•Weather proof, the fact that it has proven itself in the cold, wind, rain and snow of Mongolia
for perhaps twenty five centuries is evidence for this.
•Warm in winter, being circular with a relatively low roof it is easy to heat, a woodburning
stove is ideal for this, open fires are often used in Mongolia, beware of the smoke and fire
hazard. Insulating layers can be sandwiched between the frame and cover. Felt is the
traditional insulating material, but blankets, carpets or bubble wrap can be used.
•Cool in summer, the sides of the yurt can be rolled up or removed to admit a cooling
breeze, for privacy the canvas walls can be replaced with reed mats.
•Inconspicuous, despite having ample headroom, the overall height of the structure is only
about seven feet allowing it to be hidden from unwanted attention by a hedge or scrub.
•Easy to erect, with a little practice the yurt can be erected or taken down in less than half an
hour. It is not difficult for one person to put it up.
•Easy to move, if you decide that you have pitched your ger in the wrong place you can, with
the help of a few friends, pick up the entire yurt and move it without any need to take it down
and re-erect it.
•Inexpensive, although it is easy to spend over £500 on the materials alone to build a yurt,
with a bit of imagination, shopping around and luck, it is quite easy to build a Yurt for well
under £100, (or even for nothing at all if you are lucky).
•Easy to build, anyone with a very basic knowledge of woodwork, sewing, a few simple tools
and plenty of spare time can build a yurt. This book will show you how.
•Environmentally friendly, coppicing of hazel, ash, chestnut or oak to provide poles
prolongs the life of the tree and enhances the fauna and flora of the woodland. The yurt is a
low-impact dwelling, causing no permanent damage to the land on which it is pitched. It can
even be moved every few days to prevent the grass underneath being killed.
•Long lasting, by using water and rot proof canvas the yurt can stand outside for several
years without harm. If only used occasionally it should last indefinitely. Broken components
are easy to replace. Pine frames used in Turkmen Anatolia last 50-70 years, willow frames
used by Uzbeks and Arabs in Afghanistan last 40-50 years. Felt covers last 3-5 years,
canvas covers should last a bit longer.
•Fun !, wherever you stay in your ger it is sure to attract the interest of fellow campers, it is
so much more than just another boring tent. For children and adults alike yurt camping is a
real break from the usual holiday accommodation. Impress your friends by swinging from the
crown. The sight of a complete yurt being carried from the inside, apparently a walking tent
always raises a laugh.

3
Building Your Ger
The entire process of building your yurt, from cutting the wood in the forest to moving into your
finished ger will require about 80-120 hours of work. The logical way to proceed is to start with the
walls, this being the most time consuming job, followed by the door frame, the crown, roof, and finally
the cover.
This book tells you how to make a ger with a diameter of ten feet (3m), walls four feet (1.2m) high and
a roof six and a half feet (2m) high at the crown. If you wish to make a yurt of a different size simply
alter the size and number of components (see table on page 7). If the ger is very large or to be used
in the winter when the roof may have to support a heavy weight of snow it may need two upright poles
to support the crown. These poles are fitted to all but the smallest gers in Mongolia but are of
symbolic, rather than structural significance.

Figure 1. Component parts of the ger (English, Mongolian)
Tools and Materials
To build your yurt you will need the following tools and materials:
Tools:
•A good sharp handsaw.
•A coping saw or electric jig-saw
•A Spokeshave.
•An electric drill.
•A 3.5mm drill bit.
•A 1" (25mm) wood drill bit.
•A sliding bevel.
•Four or more G-cramps.
•A workbench.
•A smoothing plane.
•A sharp knife.
•A strong sewing machine (an old Singer
hand machine is good)
Materials:
•95 wooden rods 5 feet (1.52m) long and approximately 1" (25mm) diameter,
or slats ½ x 1-2 inch (13x25-50mm)
•Strong nylon string, 80 yards (73m).
•40 square yards (34m²) of waterproof canvas.
•2 square yards (2m²) of plastic coated canvas.
•9 square feet (1m²) of 1 inch (25mm) thick timber, or 18 sq. feet (2m²) of ½ inch (13mm).
•26 yards (24 m) of rope.
•Wood glue.
•Linseed oil (one pint [500ml]).
•Strong thread to sew cover.
•60 brass eyelets (grommets).
Sources of Materials
Here are a few usefull names, telephone numbers and ideas for supply of materials:
Canvas
Tony Beal Ltd. (Glasgow) Tel. 0141 7732166
Mitco (Romford) Tel. 0181 5906070
Hazel poles
Try your local wildlife trust, or woodland estate manager.
Willow poles
Try one of the many farmers growing willow as a biomass fuel.
If you wish to make a yurt other than the size described in this book use the following table. The
instructions remain the same only the numbers of poles and dimensions are different.
Component dimensions (numbers*)

Yurt Dimensions
Diameter

Walls

Height

Wall poles

Roof poles

Crown Ø

8' (2.4m)

3'2" (1m)

5' (1.5m)

4' (1.2m)(48)

4' (16 or 32)

18" (45cm)

10' (3m)

4' (1.2m)

6'6" (2m)

5' (1.5m)(48)

5'(16 or 32)

2' (60cm)

11' (3.3m)

4' (1.2m)

7' (2.1m)

5'9" (1.75m)(48)5'6"(1.7m) (32) 2'6" (76cm)

12' (3.65m)

5' (1.5m)

7'6" (2.3m)

6'6" (2m) (56)

6' (1.83m)(36) 2'6" (76cm)

14' (4.2m)

5' (1.5m)

7'6" (2.3m)

6'6" (2m) (64)

7' (2.13m)(40) 2'6" (76cm)

16 (4.9m)'**

5' (1.5m)

8' (2.4m)

6'6" (2m) (72)

8' (2.4m)(45)

3' (91cm)

* Numbers given are those for complete poles allow another 14 poles to make the short lengths for
the ends of the khana.
** For the sixteen foot yurt make three khana sections, therefore allow an extra 21 for the ends.
Obviously, the bigger the yurt, the more canvas you will need to cover it:
Yurt diameter

Canvas requirements (square yards)

8' (2,4m)

30 (26m²)

10' (3m)

40 (34m²)

12' (3.7m)

50 (43m²)

14' (4.27m)

60 (51m²)

16' (4.8m)

70 (60m²)
The Walls
For the walls you will need 65 rods about an inch (25mm) in diameter and five feet (1.5m) long or
slats of sawn timber, these are traditionally willow. Hazel is stronger, more durable and easy to
obtain in many areas (Cut your hazel between October and March as it will last longer, the tree will
have a better chance of recovery and there is no risk of disturbing nesting birds). Broom handles or
hardwood batons are excellent, but a bit expensive and often from unsustainable sources. Sawn
green oak batons ½"x1½" (13x38mm) for the walls and 1¼"x1¼" (32x32mm) will cost £140-200 and
will make a yurt frame to last a lifetime. Sawmill offcuts may be useful and cheap.
If you are using willow or hazel remove the bark for an attractive light finish, this is most easily done
using a concave curved knife. Or leave the bark on for a more rustic look. Use the wood green
(unseasoned) so that any slightly bent poles will be pulled straight as they dry. If using slats, plane or
sandpaper them to give a smooth finish.
Drill seven 3.5mm holes, exactly nine inches (23cm) apart in each rod leaving two inches over at one
end and four at the other (Fig.2). If using poles of a different length keep the 9inch spacing but drill
more or less holes, as appropriate.

Figure 2. Hole spacing for the rods of the khana (wall section).
The easiest way to space these holes is to make a fixture:Take a piece of hardwood 11 inches long and drill two 3.5mm holes nine inches (23cm) apart
push a nail through one hole, after drilling the first hole in each rod place the nail on the
fixture in this hole you can now use the hole in the fixture as a guide to drill the second hole.
Repeat for the other five holes (Fig.3).
For an attractive durable finish treat the rods with boiled linseed oil.

Figure 3. Fixture used to ensure accurate spacing of holes.
The rods now need to be tied together to form the two wall sections or Khana. Take 24 full length
rods and tie them together by knotting one end of the string, passing it through the two corresponding
holes in two rods, pulling it very tight and knotting the other end. To facilitate threading heat the first
inch or so of the string and roll it between your fingers to form a solid leading end, be careful not to
burn yourself. Burn, rather than cut the string to prevent fraying. Repeat this process until all 24 rods
are joined to form the Khana. Finish the ends using shorter lengths of rod (Fig.4). Make another
Khana in exactly the same way.
Figure 4. The Khana or wall section, two or more of these tied together make up the walls of the yurt.
The Door
The simplest and most portable door for your yurt consists of two uprights of willow or hazel 1½-3
inches (38-75mm) in diameter and four feet (1.2m) long tapered at each end to fit into 1 inch (25mm)
holes drilled into the top and bottom of the frame. The top and bottom consists of lengths of the same
wood about three inches (75mm) in diameter and two feet six inches (75cm) long drilled at either end
to take the tapered ends of the uprights. The top part of the frame is drilled to take two of the roof
poles. The door consists of a canvas curtain, weighted at the bottom. This frame is easily
disassembled and strong (Fig.5).
Figure 5. A simple door frame can be
constructed in a few minutes

A more elaborate and weatherproof, but less
portable door can be made with a solid timber frame, fitted with a double or single door (download
available from www.woodlandyurts.co.uk), this is traditionally elaborately carved or painted. This door
can be made in its own separate frame which can be fitted to the front of the hazel door frame when
required. The making and decorating of such a door is beyond the scope of this book, so I will leave
it up to you to consult a carpentry book or use your own imagination if you wish to furnish your yurt
with such a grand entrance.
The Crown
The crown, or roof wheel is the most difficult part of the yurt to make. It consists of a wooden "wheel"
two and a half feet in diameter with hub held ten inches (25cm) above the height of the rim by eight
spokes. The rim has 32 holes drilled at an angle in the outside edge to take the roof poles. The
finished crown is elaborately decorated to form the major feature of the inside of the yurt (see
Douglas, 1962 for inspiration).

Figure 6. The crown.
The rim of the crown is made in sections, you will need twelve sections if you are using one inch
(25mm) timber or eight sections if you are using one and a half inch (38mm) timber. To make these
sections you will need a template;
Draw a circle two feet six inches (76cm) in diameter on a flat surface, then draw a circle two
feet (60cm) in diameter inside of the first one, now divide these circles exactly into quarters.
Trace one of these quarters onto paper and cut it out to form the template. For a more
durable and accurate template use thin plywood or hardboard.
Place the template on the timber and carefully draw around it. Cut out this shape using a coping saw
or an electric jig-saw, repeat this operation until you have the required number of sections.
The sections should now be glued and clamped together. Remove the clamps when the glue has set.
For extra strength drill two holes through each section into the one below and glue a dowel into each
of these holes, or use screws.
When the glue has set fully, tidy the outer and inner rims with a plane, spokeshave or electric sander.
Mark the outer rim of the crown with thirty two equally spaced points, just below the middle of its
width. Using an electric drill or a bit and brace, drill thirty two one inch (25mm) holes. These holes
°
should point upwards into the crown at an angle of about 30-35° .
To make the crown centre cut out eight spokes of 1½" (38mm) square timber 13 inches (33cm) long
°
with one end cut at 25° and the other at 115°. Drill and countersink each end (Fig.7). Make an
octagon of wood 2 inches (5cm) thick and 5 inches (12.5cm) across. Screw and glue the spokes,
octagon and rim together as shown in figure 5.
Thin willow or hazel rods can be used to make a more simple, but equally effective raised centre to
the crown.
Figure 7. One of eight spokes connecting the crown rim and centre.
Either paint the crown or give it a few coats of clear yacht varnish or Danish oil.
The Roof
You will need thirty two roof poles, each five feet (1.5m) long, these normally consist of the same rods
as are use to make the walls. If using thin slats for the walls these may not be rigid enough to support
the roof so thicker or square section timbers should be used. If using round section poles drill two
3.5mm holes, one inch (25mm) apart in one end and pass a piece of string through these to form a
loop, which fits over the top of a wall pole. The other end fits into the holes in the crown.

Figure 8. a. End of roof poles cut to fit khana top. b. pieces added to rectangular roof pole. c. Square
pole shaped to fit round hole.
If you are using square or rectangular section timber either cut a the ends as shown in figure 8 or
o
make blocks which can be glued and screwed to the end of the pole. Cut the sharp 90 top corner off
o
at an angle of 45 and smooth with sandpaper. Drill two holes and fit string loops as for round poles.
Ideally you should make square mortises in the crown to take the ends of the poles, but a much
quicker and perfectly adequate option is to round off the top three inches of the poles with a knife or
chisel to fit into the circular holes.
The Cover
The cover should be made from waterproof canvas. 12oz waterproof flame retardant cotton is the
best. If you use new waterproof canvas it will cost about £100 for the cover, flame retardant finish will
add another £30. Each yurt frame is unique in size and shape so it is not possible to make the cover
to a pre-made pattern. When the frame is finished put it up in the garden (when there is little risk of
rain) and make your cover to fit it. Ideally an industrial sewing machine should be used to sew the
heavy canvas. But if this is not available a perfectly adequate job can be done with an old Singer
hand sewing machine (available from most car boot sales or auctions for about £10), using strong
polyester thread. It will take about two and a half working days to make the complete cover.
The canvas will shrink slightly when it first gets wet so allow an overlap of at least eight inches (20cm)
between the roof and walls and make the walls at least three feet longer than the circumference of the
frame (minus door). Alternatively pre-shrink the canvas.
The cover is made in four sections:
The walls
Put up the yurt frame and measure the height and the circumference of the walls, excluding the door.
Make the cover the same height as the wall and three feet longer. Sew two widths of canvas together
(for this size yurt you will probably use one and a quarter widths of the roll) use a double seam. The
top sheet should overlap on the outside of the bottom one by about an inch so that rain runs off
easily. Make a good 1½ inch (38mm) hem at the top and at each end. It is a good idea to sew a 6-8
inch (15-20cm) wide length of plastic around the bottom of the wall, overlap it about an inch (25mm)
and sew it on the inside so that water is not directed into the yurt. Fit brass grommets into the top and
end hems of the wall at spacings equal to the distance between two crossovers at the top of the
khana. Tie a short string loop through each of the top grommets which will fit very loosely over the
top of one wall pole. Tie a three foot (1m) length of string to each of the end grommets.
Canvas on top
Canvas underneath
Figure 9. Arrangement of canvas sheets for the roof cover.
The Roof
Before you start work on the roof make sure you have plenty of space, thread, spare needles, and
good quality dressmaking pins. Put up the yurt frame and set up your sewing machine in a large
space next to it.
With reference to figure 6 lay a length of canvas over the frame and position as sheet A on the
diagram, allow at least a foot overlap at each end. Pin sheets B and C securely into position and
mark points X. Take these three sheets off and sew them together with a one inch overlap and a
double seam, do not sew beyond point X. Ensure that the top sheet always overlaps the lower one to
allow water to run off.
Place sheet A,B,C back onto the frame and pin sheet D into position. Mark points X. Take the cover
off and sew the first seam, then cut from points Y to Z, leaving a flap of 1½ (38mm) inches. Fold the
cut edge inside and sew the second seam. Do not sew beyond point X. Place the partly made cover
back on the frame and continue adding sheets in the same way.
When all of the sheets are sewn together fit this cover and mark the position of the crown opening.
Cut out this opening and sew strong webbing around the inner edge of the circle.
Finally fold, tuck and cut the ends of the sheets to hang down and overlap the walls by at least eight
inches (20cm) (less above the door). sew a 1½ inch (38mm) hem around the bottom and fit a pair of
brass grommets three inches (75mm) apart every three feet (1m).
The Crown cover
Make a three or four pointed canvas star, the centre of which is large enough to amply cover the
crown. Put one or two tucks in the central part to give a convex profile to fit over the raised crown
middle. attach five foot (1.5m) lengths of string to each point. It is easy to sew four triangular, or two
semi-circular clear plastic windows into this cover if desired (Fig. 10).
The Tension band
This is a band which passes around the top of the khana and the ends of the roof poles to hold them
in place, protect the roof cover from abrasion and as an additional safeguard against the weight of the
roof pushing the walls outwards.
Take a piece of canvas as long as the wall and eight inches (20cm) wide. Sew a strong hem along
either side of its length and a 1½ inch (38mm) hem at each end. Fit two brass grommets at either
end, one in each corner. At each end tie a 10 inch (25cm) piece of rope between the two grommets
to form a loop. Tie a three foot (1m) length of rope to each loop.

Figure 10. Three designs of crown cover.
Further refinements
The instructions so far have shown how to make the basic ger, complete in itself and ideal for most
uses. However, if you wish to use your yurt as a permanent home or in extreme weather conditions
some further refinements may be desirable.
Door
A solid wooden door which can be locked greatly improves the security and comfort of the ger. A
double brace and rail door, made with tongue and grooved pine and permanently fitted to a frame of
2"x2" (50x50mm) pine can be made in less than a day at a cost of about £25 (refer to a carpentry
book for instructions). Make the frame the same height as the yurt door frame with its inside width 2
inches (50mm) narrower, so that it overlaps the door entrance by an inch (25mm) either side. Screw
four blocks onto the back of the frame so that they fit snugly into the inner door frame (with the cover
fitted). Attach bolts or pieces of wood on pivots to the blocks to hold the door firmly in place.
Windows
Windows can be sewn into the wall or crown cover. A wall fitted window is easiest to make
separately and then sew it into an appropriately sized hole cut in the canvas. Make the clear plastic
window with a two inch (5cm) frame and reinforce it with canvas or webbing sewn horizontally and
vertically every six inches (15cm). A canvas blind which can be held open with tapes and shut with
Velcro is a simple and useful addition.
Insulation
Thick felt is the traditional insulating material. Old carpets, underlay, blankets, horticultural fleece, or
bubble wrap can also be used. The insulation is sandwiched between the frame and cover. The
insulation is held firmly in place and need only be cut roughly to size.
Decoration
The crown, roof poles and door are typically painted in bright colours using traditional patterns
(Douglas, 1962 shows good views of these designs). The khana may be painted or hung with wall
hangings. Traditionally, rugs are placed on the floor and there is an alter at the rear.
Extreme weatherproofing
For summer use the ger will stand up to most weather without being anchored to the ground. for
extra security three or four ropes can be tied to the roof cover securing rope. These ropes can be tied
down to strong wooden tent pegs driven into the ground. On an exposed site or in preparation for
winter gales three foot (1m) wooden stakes should be driven into the ground inside the yurt near the
door and at the khana junction. The frame can be securely tied to these stakes. To secure the cover
four ropes 25 feet (7.5m) long should be tied together in the form of a giant noughts and crosses grid.
This can be thrown over the yurt and pegged down tightly at eight points.
If the ger is likely to have to bear the weight of a thick snow covering two upright poles with 'T'
shaped tops (which can be tied to the crown) should be fitted to support the crown. These poles are
traditionally brightly painted and always kept in place.
Fire
A fire or stove is a pleasant luxury during the summer and a necessity for winter use. It is however,
as with any tent, potentially very dangerous to light a fire in the yurt do so at your own risk. A few
precautions and modifications can reduce this risk. The fire or stove is traditionally placed in the
centre of the yurt directly below the crown, in a small yurt this location might prove too intrusive so a
stove can be placed towards the side. A traditional open fire with smoke leaving through the crown
seems like a pleasant idea but the yurt rapidly fills with thick smoke and so is completely impractical,
this problem can be reduced slightly by using charcoal but make sure there is plenty of ventilation.
A metal woodburning stove is a much more practical solution. The smallest stove will provide more
than enough heat. Both the stove and the flue-pipe will become extremely hot during use and any
combustible material (wood or canvas) in contact with these will catch fire. Wood or canvas within a
few inches of the stove or flue-pipe will rapidly char. To reduce any fire risk it is necessary to keep
the flue-pipe separated from the frame and cover. This is achieved by making a collar of aluminium
sheet. For a central stove remove one of the eight crown spokes and fill the gap with a piece of
aluminium with a hole cut in it to take the flue-pipe. A similar aluminium sheet must be sewn or joined
with Velcro to the crown cover. The use of Velcro allows the aluminium to be replaced with
waterproof canvas or plastic if the stove is not in place. For a side mounted stove leave a space of at
least 12 inches (30cm) between the stove and the wall. Remove one of the roof poles above the
stove to leave a gap, cut a hole in the canvas in this space. Cut out an 18 inch (45cm) square of
aluminium sheet with a round hole in the centre to take the flue-pipe. Smooth the edges and corners
and bend the sides down slightly with the fold two inches (50mm) from the edge. Use Velcro to join
this sheet to the canvas, make a flap in the cover to overlap this plate and allow water to run off (
Fig.11).

Figure 11. Aluminium collars to prevent hot flue-pipe burning yurt.
Steam bending
If you prefer the Kirgiz design of yurt with its bent roof and wall poles you will need to do some steam
bending. A steam box consists of a long wooden box or large diameter plastic pipe with a small hole
at one end to let the steam out and a pipe at the other to let steam in. The steam is provided by a
very large water filled kettle or five gallon (20 litre) metal drum place over a fire, a pipe carries steam
from this boiler to the steam box. The poles are placed in the box and steamed for 40 minutes to an
hour. While still hot the poles must be bent to the require shape around a former and held or clamped
there until cool. Make sure the steam has somewhere to escape from the system or there will be an
explosion, also guard against burns from hot water, steam and fire. For a more comprehensive guide
to steam bending see The Complete Yurt Handbook.
Timber floor
If the yurt is to be used as a semi-permanent dwelling a timber floor raised two inches off of the
ground on bearers of treated 2"x2" (50x50mm) timber will improve comfort greatly. Make the floor to
fit exactly, from plywood, chipboard or toungue and grooved pine. By drilling holes in the bottom of
the door frame and in the floor in front of the stove air to feed the fire is drawn under the floor, rather
than through any gaps in the yurt, reducing draughts and further improving comfort.
Tradition and Etiquette
Having been home to the many tribes and cultures of central Asia for millennia a great deal of
traditions, superstition, religious significance and custom has built up surrounding the yurt.
Spiritual significance
To the Mongolian people the ger is more than just a simple dwelling, in its construction the whole
universe is represented: The roof represents the sky and the smoke hole the sun. The hearth
contains the five basic earth elements of earth, wood, fire, metal, and water (metal in the grate and
water in the kettle). For the Buryat Mongols the fire contains the house deity and is therefore sacred,
offerings are thrown on every morning. No rubbish is burned on the fire and outsiders should not take
a light from it. The two upright roof poles supporting the crown are of symbolic importance rather than
a structural necessity.
The Mongolian people are predominantly Buddhist, and a shrine is set up opposite the door, people
sleep with their heads towards this altar. In Muslim areas the people sleep in the opposite direction
with their heads towards the south facing door, roughly the direction of Mecca.
Setting up home
The family yurt is usually obtained as a gift from the brides parents on a couples marriage. The frame
should last a lifetime, but the felt covers need replacing every three to five years. The yurt is set up
with the door facing south. When families camp together during the winter the group of yurts or aul
are set in a circle with the opening to the south. The roof poles and crown are carried in through the
door, it is considered bad luck to pass them over the wall.
The interior furnishings and seating arrangements are always the same. The altar is placed opposite
the door at the back of the yurt. The hearth or stove is in the middle of the floor with firewood or other
fuel in front and a low table behind. The western side is the domain of the men, male visitors and
honoured guests sit this side, where saddles, tools and airag (fermented mares milk) are kept. The
women and children use the eastern side, where rugs, bedding, food, cutlery, crockery and water are
stored. Servants, poor visitors and any sick or very young animals that need nursing sit near the
entrance.

Figure 12. Traditional furnishing and seating in the ger.
Etiquette
Traditionally, anyone stopping outside of a ger is invited in for a meal, a sheep is killed for the feast
(more practical on the lonely steppes of Mongolia than in this overcrowded island). When entering
the yurt it is considered impolite to step on the threshold or to hold onto the ropes. The traditional
greeting offered by the visitor consists of four questions: are you well?, is your family well?, are your
cattle/sheep fat?, is the grass good? the answer to each of these questions is yes, whatever the
reality. After exchanging greetings the guest is offered tea, followed by airag and then yoghurt.
Visitors to a Kalmuk yurt are offered arak, distilled spirit of airag, three glasses must be drunk in rapid
succession. Following these formalities men exchange snuff and the party can become more
relaxed. At the meal the guest carves and shares the meat.
There are a number of rules which guests should follow. All weapons should be left outside, do not
step on the threshold, point your feet at or put rubbish on the fire. Do not sit with your back to the
altar, whistle, write in red pen, step over older people or point a knife at anyone. One should take at
least a little of any food or drink offered. When offered arak or vodka flick a small amount to the sky,
the wind and the earth before drinking.
Putting up Your Yurt
1.
Unfold the wall sections and place them upright in an approximate circle.
2.

Tie two ends together, overlapping slightly. tie the other two ends to the door frame.

3.

Adjust the position of the walls until they are perfectly circular. Use two poles held end to end
to check that the diameter is exactly the same at several points.

4.

Tie a strong rope around the top of the walls. This step is very important, to fit the roof
without this band around the Yurt will cause serious damage.

5.

Ask a friend to hold the crown above their head in the centre of the yurt.

6.

Fit the string loop of each roof pole over the top of a wall pole and fit the other ends into the
holes in the crown.

7.

Tie the tension band tightly around the entire yurt at the point
poles meet.

8.

Pull the crown hard down to ensure that it is level and that all of the roof poles are securely
seated.

9.

Fit the wall cover.

10.

Fit the roof cover and tie it down with a rope passing through the grommets.

11.

Tuck the plastic skirt under the bottoms of the wall poles.

12.

Fit the door.
HAPPY YURTING!

where the wall and roof
Bibliography
Andrews, Peter Alford, 1997. Nomad tent Types of the Middle East: Part1: Framed Tents (2
volumes). Dr Ludwig Reichert. Wiesbaden.
Anon. 1973. Shelter. Shelter publications, Inc. California.
Blue Evening Star, 1995. Tipis and Yurts: Authentic Designs for circular shelters. Lark Books,
Asheville, North Carolina, USA.
Charmichael, Peter. 1991. Nomads. Collins and Brown, London.
Curtin, Jeremiah. 1908. The Mongols: A History. Combined Books, Pensylvania.
Dineley, Mark. 1935. The Turkomans of Persia. The Geographical Magazine, Vol.1, No. 2, June
1935, pp. 151-162.
Douglas, William O. 1962. Journey to Outer Mongolia. National Geographic. Vol.121, No.3, March
1962. pp 289-345.
Faegre, Torvald. 1979. Tents: Architecture of the Nomads. John Murray, London.
Fairlie, Simon. 1996. Low Impact Development. Jon Carpenter, Oxfordshire.
Fine Woodworking (ed), 1985. Bending Wood. The Taunton Press, Newtown, CT.
Greenway, Paul. Story, Robert. Latiffe, Gabriel. 1997. Mongolia: Travel Survival Kit (2nd Ed.). Lonely
Planet. Victoria, Australia.
Jagchid, Sechin and Paul Hyer. 1979. Mongolia's Culture and Society. Westview Press. Boulder,
Colarado.
King, P. R. 1998. Build Your Own Yurt: A complete guide to Making a Mongolian Ger (3rd Ed.) P. R.
King, Clevedon.
King, P.R. 1999. The Weekend Yurt: Make a Mongolian Ger in two weekends, simple step by step
instructions. P.R. King, Clevedon.
King, P.R. 1999. Ger: the Mongolian Yurt. Skyviews. Issue 14. pp13-15.
King, P. R. 2001. The Complete Yurt Handbook. Eco-Logic books, Bristol.
Marshall, Robert. 1993. Storm From The East: From Ghengis Khan to Kublai Khan. Penguin/BBC
Books.
Michaud, Roland and Sabrina. 1985. Caravans to Tartary. Thames and Hudson, London.
Murray, Edward, 1936.
January 1936. pp 1-57.
Place, Steve, 1997.
Machynlleth.

With the Nomads of Central Asia.

How to build a Yurt.

National Geographic. Vol.69. No.1,

Centre For Alternative Technology Factsheet. CAT,

Sjöberg, Gunilla Paetau, 1996. Felt: New Directions for an Ancient Craft. Interveave Press Inc.,
Colarado.
Structure Constructor, 1997.
Yorkshire.

How to build your low impact dwelling.

Structure Constructor,

Tseltum N. 1988. Mongolian Architecture. State Publishing House, Ulaan Bataar.
Yunden Ya., Zorig G., Erdene Ch. 1991. This is Mongolia. Ulaan Baatar.

Más contenido relacionado

La actualidad más candente

Active energy efficiency in the built environment2
Active energy efficiency in the built environment2Active energy efficiency in the built environment2
Active energy efficiency in the built environment2Dipal Gudhka
 
Intelligent building (Link in Description for Download)
Intelligent building  (Link in Description for Download)Intelligent building  (Link in Description for Download)
Intelligent building (Link in Description for Download)Dimple Poddar
 
Wooden partition & wall paneling
Wooden partition & wall paneling Wooden partition & wall paneling
Wooden partition & wall paneling vaibhav ghodke
 
Vernacular architecture of gujarat
Vernacular architecture of gujaratVernacular architecture of gujarat
Vernacular architecture of gujaratBala Hari Krishnan S
 
Aluminium Windows.pdf
Aluminium Windows.pdfAluminium Windows.pdf
Aluminium Windows.pdfNikhil Raut
 
Rammed earth as Building material
Rammed earth  as Building materialRammed earth  as Building material
Rammed earth as Building materialHuzefa Malik
 
104875110 vernacular-architecture-of-hills-india-130926123709-phpapp02
104875110 vernacular-architecture-of-hills-india-130926123709-phpapp02104875110 vernacular-architecture-of-hills-india-130926123709-phpapp02
104875110 vernacular-architecture-of-hills-india-130926123709-phpapp02Sevajothi Crafts
 
Elements of energy efficient buildings
Elements of energy efficient buildingsElements of energy efficient buildings
Elements of energy efficient buildingsUbaid Mushtaq Mir
 
Gobhai mountain lodge
Gobhai mountain lodgeGobhai mountain lodge
Gobhai mountain lodgeUma M
 
Gujarat vernecular architecture
Gujarat vernecular architectureGujarat vernecular architecture
Gujarat vernecular architecturebipinmalik
 
Brick Construction - Laurie Baker Center
Brick Construction - Laurie Baker CenterBrick Construction - Laurie Baker Center
Brick Construction - Laurie Baker CenterAsz My
 
bhonga vernacular architecture of gujarat
bhonga vernacular architecture of gujaratbhonga vernacular architecture of gujarat
bhonga vernacular architecture of gujaratAniruddh Dubey
 
Privacy (architectural behaviour)
Privacy (architectural behaviour)Privacy (architectural behaviour)
Privacy (architectural behaviour)Anuoluwaposimi
 
Difference between Traditional and Vernacular architecture
Difference between Traditional and Vernacular architecture Difference between Traditional and Vernacular architecture
Difference between Traditional and Vernacular architecture Ar. Prerna Chouhan
 
vernacular architecture in Hot and dry climate
vernacular architecture in Hot and dry climate vernacular architecture in Hot and dry climate
vernacular architecture in Hot and dry climate Sumit Ranjan
 
Collapsible door
Collapsible doorCollapsible door
Collapsible doorjagrutib22
 

La actualidad más candente (20)

Active energy efficiency in the built environment2
Active energy efficiency in the built environment2Active energy efficiency in the built environment2
Active energy efficiency in the built environment2
 
Intelligent building (Link in Description for Download)
Intelligent building  (Link in Description for Download)Intelligent building  (Link in Description for Download)
Intelligent building (Link in Description for Download)
 
Wooden partition & wall paneling
Wooden partition & wall paneling Wooden partition & wall paneling
Wooden partition & wall paneling
 
Vernacular architecture of gujarat
Vernacular architecture of gujaratVernacular architecture of gujarat
Vernacular architecture of gujarat
 
Aluminium Windows.pdf
Aluminium Windows.pdfAluminium Windows.pdf
Aluminium Windows.pdf
 
Rammed earth as Building material
Rammed earth  as Building materialRammed earth  as Building material
Rammed earth as Building material
 
low cost mud construction
low cost mud constructionlow cost mud construction
low cost mud construction
 
104875110 vernacular-architecture-of-hills-india-130926123709-phpapp02
104875110 vernacular-architecture-of-hills-india-130926123709-phpapp02104875110 vernacular-architecture-of-hills-india-130926123709-phpapp02
104875110 vernacular-architecture-of-hills-india-130926123709-phpapp02
 
Intelligent buildings
Intelligent buildingsIntelligent buildings
Intelligent buildings
 
Waffle slab
Waffle slabWaffle slab
Waffle slab
 
Elements of energy efficient buildings
Elements of energy efficient buildingsElements of energy efficient buildings
Elements of energy efficient buildings
 
Gobhai mountain lodge
Gobhai mountain lodgeGobhai mountain lodge
Gobhai mountain lodge
 
Gujarat vernecular architecture
Gujarat vernecular architectureGujarat vernecular architecture
Gujarat vernecular architecture
 
9. Ventilation
9. Ventilation9. Ventilation
9. Ventilation
 
Brick Construction - Laurie Baker Center
Brick Construction - Laurie Baker CenterBrick Construction - Laurie Baker Center
Brick Construction - Laurie Baker Center
 
bhonga vernacular architecture of gujarat
bhonga vernacular architecture of gujaratbhonga vernacular architecture of gujarat
bhonga vernacular architecture of gujarat
 
Privacy (architectural behaviour)
Privacy (architectural behaviour)Privacy (architectural behaviour)
Privacy (architectural behaviour)
 
Difference between Traditional and Vernacular architecture
Difference between Traditional and Vernacular architecture Difference between Traditional and Vernacular architecture
Difference between Traditional and Vernacular architecture
 
vernacular architecture in Hot and dry climate
vernacular architecture in Hot and dry climate vernacular architecture in Hot and dry climate
vernacular architecture in Hot and dry climate
 
Collapsible door
Collapsible doorCollapsible door
Collapsible door
 

Destacado

Orientaçãoes para utilização de dejetos humanos na agricultura
Orientaçãoes para utilização de dejetos humanos na agriculturaOrientaçãoes para utilização de dejetos humanos na agricultura
Orientaçãoes para utilização de dejetos humanos na agriculturaSofia Lemos
 
Raffles International Institute_Forms of business ownership AUS
Raffles International Institute_Forms of business ownership AUSRaffles International Institute_Forms of business ownership AUS
Raffles International Institute_Forms of business ownership AUSSandra Draskovic
 
Design and social responsibility, industrial heritage
Design and social responsibility, industrial heritageDesign and social responsibility, industrial heritage
Design and social responsibility, industrial heritageSandra Draskovic
 
Raffles International Institute_Procurement methods
Raffles International  Institute_Procurement methodsRaffles International  Institute_Procurement methods
Raffles International Institute_Procurement methodsSandra Draskovic
 
Raffles Institute_Staircase planning
Raffles Institute_Staircase planningRaffles Institute_Staircase planning
Raffles Institute_Staircase planningSandra Draskovic
 
Permacultura prática
Permacultura práticaPermacultura prática
Permacultura práticaMarina Utsch
 
монгол гэрийн Vvсэл хөгжил.2 yronhii docx
монгол гэрийн Vvсэл хөгжил.2 yronhii docxмонгол гэрийн Vvсэл хөгжил.2 yronhii docx
монгол гэрийн Vvсэл хөгжил.2 yronhii docxtengisbold123
 
Mongol geriin butets
Mongol geriin butetsMongol geriin butets
Mongol geriin butetsGegeen_73
 
Raffles Institute_Design past and present_Middle ages
Raffles Institute_Design past and present_Middle agesRaffles Institute_Design past and present_Middle ages
Raffles Institute_Design past and present_Middle agesSandra Draskovic
 
монгол гэр
монгол гэрмонгол гэр
монгол гэрotgoo0616
 
New Moderns - Deutsche Werkbund, Bauhaus, Expressionism
New Moderns - Deutsche Werkbund, Bauhaus, ExpressionismNew Moderns - Deutsche Werkbund, Bauhaus, Expressionism
New Moderns - Deutsche Werkbund, Bauhaus, ExpressionismSandra Draskovic
 
Eclecticism, origin, principles and applications
Eclecticism, origin, principles and applicationsEclecticism, origin, principles and applications
Eclecticism, origin, principles and applicationsSandra Draskovic
 
De stijl, Neo-plasticism, Gerit Rietveld
De stijl, Neo-plasticism, Gerit RietveldDe stijl, Neo-plasticism, Gerit Rietveld
De stijl, Neo-plasticism, Gerit RietveldSandra Draskovic
 
Retail design and planning or How to design GREAT STORE
Retail design and planning or How to design GREAT STORERetail design and planning or How to design GREAT STORE
Retail design and planning or How to design GREAT STORESandra Draskovic
 

Destacado (19)

The Mongolian Yurt
The Mongolian YurtThe Mongolian Yurt
The Mongolian Yurt
 
Capturing heat
Capturing heatCapturing heat
Capturing heat
 
Divulgação timor
Divulgação timorDivulgação timor
Divulgação timor
 
Orientaçãoes para utilização de dejetos humanos na agricultura
Orientaçãoes para utilização de dejetos humanos na agriculturaOrientaçãoes para utilização de dejetos humanos na agricultura
Orientaçãoes para utilização de dejetos humanos na agricultura
 
Raffles International Institute_Forms of business ownership AUS
Raffles International Institute_Forms of business ownership AUSRaffles International Institute_Forms of business ownership AUS
Raffles International Institute_Forms of business ownership AUS
 
Design and social responsibility, industrial heritage
Design and social responsibility, industrial heritageDesign and social responsibility, industrial heritage
Design and social responsibility, industrial heritage
 
Raffles International Institute_Procurement methods
Raffles International  Institute_Procurement methodsRaffles International  Institute_Procurement methods
Raffles International Institute_Procurement methods
 
Raffles Institute_Staircase planning
Raffles Institute_Staircase planningRaffles Institute_Staircase planning
Raffles Institute_Staircase planning
 
Permacultura prática
Permacultura práticaPermacultura prática
Permacultura prática
 
монгол гэрийн Vvсэл хөгжил.2 yronhii docx
монгол гэрийн Vvсэл хөгжил.2 yronhii docxмонгол гэрийн Vvсэл хөгжил.2 yronhii docx
монгол гэрийн Vvсэл хөгжил.2 yronhii docx
 
монгол гэр
монгол гэрмонгол гэр
монгол гэр
 
Mongol geriin butets
Mongol geriin butetsMongol geriin butets
Mongol geriin butets
 
Raffles Institute_Design past and present_Middle ages
Raffles Institute_Design past and present_Middle agesRaffles Institute_Design past and present_Middle ages
Raffles Institute_Design past and present_Middle ages
 
монгол гэр
монгол гэрмонгол гэр
монгол гэр
 
New Moderns - Deutsche Werkbund, Bauhaus, Expressionism
New Moderns - Deutsche Werkbund, Bauhaus, ExpressionismNew Moderns - Deutsche Werkbund, Bauhaus, Expressionism
New Moderns - Deutsche Werkbund, Bauhaus, Expressionism
 
Eclecticism, origin, principles and applications
Eclecticism, origin, principles and applicationsEclecticism, origin, principles and applications
Eclecticism, origin, principles and applications
 
De stijl, Neo-plasticism, Gerit Rietveld
De stijl, Neo-plasticism, Gerit RietveldDe stijl, Neo-plasticism, Gerit Rietveld
De stijl, Neo-plasticism, Gerit Rietveld
 
Retail design and planning or How to design GREAT STORE
Retail design and planning or How to design GREAT STORERetail design and planning or How to design GREAT STORE
Retail design and planning or How to design GREAT STORE
 
Mонгол гэр
Mонгол гэрMонгол гэр
Mонгол гэр
 

Similar a Build Your Own Yurt

Winter camping tent with stove jack
Winter camping tent with stove jackWinter camping tent with stove jack
Winter camping tent with stove jackTrack Tour
 
History of Round Homes: From Mongolian Gers to Modern Yurts
History of Round Homes: From Mongolian Gers to Modern YurtsHistory of Round Homes: From Mongolian Gers to Modern Yurts
History of Round Homes: From Mongolian Gers to Modern YurtsPacificYurts
 
How to build primitive shelters
How to build primitive sheltersHow to build primitive shelters
How to build primitive sheltersKevin schmidt
 
Build Your Own Underground Root Cellar.pdf
Build Your Own Underground Root Cellar.pdfBuild Your Own Underground Root Cellar.pdf
Build Your Own Underground Root Cellar.pdfrioderroming1974
 
Haleys how to guide powerpoint[1]
Haleys how to guide powerpoint[1]Haleys how to guide powerpoint[1]
Haleys how to guide powerpoint[1]hdow4118
 
바구니직조기법 총람
바구니직조기법 총람바구니직조기법 총람
바구니직조기법 총람Seongwon Kim
 
Types of Roofing and Roofing Materials
Types of Roofing and Roofing MaterialsTypes of Roofing and Roofing Materials
Types of Roofing and Roofing MaterialsShayne Galo
 
Low cost construction
Low cost construction Low cost construction
Low cost construction Brijesh Alig
 
REARING EQUIPMENT IN SERICULTURE . pptx
REARING EQUIPMENT IN SERICULTURE . pptxREARING EQUIPMENT IN SERICULTURE . pptx
REARING EQUIPMENT IN SERICULTURE . pptxVISHALI SELVAM
 
Andaman and nicobar houses (vernacular architecture india)
Andaman and nicobar houses (vernacular architecture india)Andaman and nicobar houses (vernacular architecture india)
Andaman and nicobar houses (vernacular architecture india)Mudra Redkar
 
Rattan tutorial by kevin graybeal
Rattan tutorial by kevin graybealRattan tutorial by kevin graybeal
Rattan tutorial by kevin graybealAnibal Ruben Reyes
 
Paper castle to build
Paper castle   to buildPaper castle   to build
Paper castle to buildkty09
 

Similar a Build Your Own Yurt (20)

Winter camping tent with stove jack
Winter camping tent with stove jackWinter camping tent with stove jack
Winter camping tent with stove jack
 
History of Round Homes: From Mongolian Gers to Modern Yurts
History of Round Homes: From Mongolian Gers to Modern YurtsHistory of Round Homes: From Mongolian Gers to Modern Yurts
History of Round Homes: From Mongolian Gers to Modern Yurts
 
How to build primitive shelters
How to build primitive sheltersHow to build primitive shelters
How to build primitive shelters
 
Build Your Own Underground Root Cellar.pdf
Build Your Own Underground Root Cellar.pdfBuild Your Own Underground Root Cellar.pdf
Build Your Own Underground Root Cellar.pdf
 
sports goods
sports goodssports goods
sports goods
 
Basicshelterbuilding
BasicshelterbuildingBasicshelterbuilding
Basicshelterbuilding
 
Haleys how to guide powerpoint[1]
Haleys how to guide powerpoint[1]Haleys how to guide powerpoint[1]
Haleys how to guide powerpoint[1]
 
바구니직조기법 총람
바구니직조기법 총람바구니직조기법 총람
바구니직조기법 총람
 
Types of Roofing and Roofing Materials
Types of Roofing and Roofing MaterialsTypes of Roofing and Roofing Materials
Types of Roofing and Roofing Materials
 
Low cost construction
Low cost construction Low cost construction
Low cost construction
 
Kites
KitesKites
Kites
 
Fish-Traps-and-Pots.pptx
Fish-Traps-and-Pots.pptxFish-Traps-and-Pots.pptx
Fish-Traps-and-Pots.pptx
 
REARING EQUIPMENT IN SERICULTURE . pptx
REARING EQUIPMENT IN SERICULTURE . pptxREARING EQUIPMENT IN SERICULTURE . pptx
REARING EQUIPMENT IN SERICULTURE . pptx
 
CARPETS
CARPETSCARPETS
CARPETS
 
Types and care of tents
Types and care of tentsTypes and care of tents
Types and care of tents
 
Andaman and nicobar houses (vernacular architecture india)
Andaman and nicobar houses (vernacular architecture india)Andaman and nicobar houses (vernacular architecture india)
Andaman and nicobar houses (vernacular architecture india)
 
Rattan tutorial by kevin graybeal
Rattan tutorial by kevin graybealRattan tutorial by kevin graybeal
Rattan tutorial by kevin graybeal
 
Timber roofs
Timber roofsTimber roofs
Timber roofs
 
Interior design
Interior designInterior design
Interior design
 
Paper castle to build
Paper castle   to buildPaper castle   to build
Paper castle to build
 

Último

PHX May 2024 Corporate Presentation Final
PHX May 2024 Corporate Presentation FinalPHX May 2024 Corporate Presentation Final
PHX May 2024 Corporate Presentation FinalPanhandleOilandGas
 
Falcon's Invoice Discounting: Your Path to Prosperity
Falcon's Invoice Discounting: Your Path to ProsperityFalcon's Invoice Discounting: Your Path to Prosperity
Falcon's Invoice Discounting: Your Path to Prosperityhemanthkumar470700
 
Famous Olympic Siblings from the 21st Century
Famous Olympic Siblings from the 21st CenturyFamous Olympic Siblings from the 21st Century
Famous Olympic Siblings from the 21st Centuryrwgiffor
 
SEO Case Study: How I Increased SEO Traffic & Ranking by 50-60% in 6 Months
SEO Case Study: How I Increased SEO Traffic & Ranking by 50-60%  in 6 MonthsSEO Case Study: How I Increased SEO Traffic & Ranking by 50-60%  in 6 Months
SEO Case Study: How I Increased SEO Traffic & Ranking by 50-60% in 6 MonthsIndeedSEO
 
Value Proposition canvas- Customer needs and pains
Value Proposition canvas- Customer needs and painsValue Proposition canvas- Customer needs and pains
Value Proposition canvas- Customer needs and painsP&CO
 
Eluru Call Girls Service ☎ ️93326-06886 ❤️‍🔥 Enjoy 24/7 Escort Service
Eluru Call Girls Service ☎ ️93326-06886 ❤️‍🔥 Enjoy 24/7 Escort ServiceEluru Call Girls Service ☎ ️93326-06886 ❤️‍🔥 Enjoy 24/7 Escort Service
Eluru Call Girls Service ☎ ️93326-06886 ❤️‍🔥 Enjoy 24/7 Escort ServiceDamini Dixit
 
FULL ENJOY Call Girls In Majnu Ka Tilla, Delhi Contact Us 8377877756
FULL ENJOY Call Girls In Majnu Ka Tilla, Delhi Contact Us 8377877756FULL ENJOY Call Girls In Majnu Ka Tilla, Delhi Contact Us 8377877756
FULL ENJOY Call Girls In Majnu Ka Tilla, Delhi Contact Us 8377877756dollysharma2066
 
Organizational Transformation Lead with Culture
Organizational Transformation Lead with CultureOrganizational Transformation Lead with Culture
Organizational Transformation Lead with CultureSeta Wicaksana
 
Call Girls In Majnu Ka Tilla 959961~3876 Shot 2000 Night 8000
Call Girls In Majnu Ka Tilla 959961~3876 Shot 2000 Night 8000Call Girls In Majnu Ka Tilla 959961~3876 Shot 2000 Night 8000
Call Girls In Majnu Ka Tilla 959961~3876 Shot 2000 Night 8000dlhescort
 
The Abortion pills for sale in Qatar@Doha [+27737758557] []Deira Dubai Kuwait
The Abortion pills for sale in Qatar@Doha [+27737758557] []Deira Dubai KuwaitThe Abortion pills for sale in Qatar@Doha [+27737758557] []Deira Dubai Kuwait
The Abortion pills for sale in Qatar@Doha [+27737758557] []Deira Dubai Kuwaitdaisycvs
 
BAGALUR CALL GIRL IN 98274*61493 ❤CALL GIRLS IN ESCORT SERVICE❤CALL GIRL
BAGALUR CALL GIRL IN 98274*61493 ❤CALL GIRLS IN ESCORT SERVICE❤CALL GIRLBAGALUR CALL GIRL IN 98274*61493 ❤CALL GIRLS IN ESCORT SERVICE❤CALL GIRL
BAGALUR CALL GIRL IN 98274*61493 ❤CALL GIRLS IN ESCORT SERVICE❤CALL GIRLkapoorjyoti4444
 
Malegaon Call Girls Service ☎ ️82500–77686 ☎️ Enjoy 24/7 Escort Service
Malegaon Call Girls Service ☎ ️82500–77686 ☎️ Enjoy 24/7 Escort ServiceMalegaon Call Girls Service ☎ ️82500–77686 ☎️ Enjoy 24/7 Escort Service
Malegaon Call Girls Service ☎ ️82500–77686 ☎️ Enjoy 24/7 Escort ServiceDamini Dixit
 
Cracking the Cultural Competence Code.pptx
Cracking the Cultural Competence Code.pptxCracking the Cultural Competence Code.pptx
Cracking the Cultural Competence Code.pptxWorkforce Group
 
Call Girls Service In Old Town Dubai ((0551707352)) Old Town Dubai Call Girl ...
Call Girls Service In Old Town Dubai ((0551707352)) Old Town Dubai Call Girl ...Call Girls Service In Old Town Dubai ((0551707352)) Old Town Dubai Call Girl ...
Call Girls Service In Old Town Dubai ((0551707352)) Old Town Dubai Call Girl ...allensay1
 
Cheap Rate Call Girls In Noida Sector 62 Metro 959961乂3876
Cheap Rate Call Girls In Noida Sector 62 Metro 959961乂3876Cheap Rate Call Girls In Noida Sector 62 Metro 959961乂3876
Cheap Rate Call Girls In Noida Sector 62 Metro 959961乂3876dlhescort
 
Call Girls Kengeri Satellite Town Just Call 👗 7737669865 👗 Top Class Call Gir...
Call Girls Kengeri Satellite Town Just Call 👗 7737669865 👗 Top Class Call Gir...Call Girls Kengeri Satellite Town Just Call 👗 7737669865 👗 Top Class Call Gir...
Call Girls Kengeri Satellite Town Just Call 👗 7737669865 👗 Top Class Call Gir...amitlee9823
 
Business Model Canvas (BMC)- A new venture concept
Business Model Canvas (BMC)-  A new venture conceptBusiness Model Canvas (BMC)-  A new venture concept
Business Model Canvas (BMC)- A new venture conceptP&CO
 
Nelamangala Call Girls: 🍓 7737669865 🍓 High Profile Model Escorts | Bangalore...
Nelamangala Call Girls: 🍓 7737669865 🍓 High Profile Model Escorts | Bangalore...Nelamangala Call Girls: 🍓 7737669865 🍓 High Profile Model Escorts | Bangalore...
Nelamangala Call Girls: 🍓 7737669865 🍓 High Profile Model Escorts | Bangalore...amitlee9823
 
JAYNAGAR CALL GIRL IN 98274*61493 ❤CALL GIRLS IN ESCORT SERVICE❤CALL GIRL
JAYNAGAR CALL GIRL IN 98274*61493 ❤CALL GIRLS IN ESCORT SERVICE❤CALL GIRLJAYNAGAR CALL GIRL IN 98274*61493 ❤CALL GIRLS IN ESCORT SERVICE❤CALL GIRL
JAYNAGAR CALL GIRL IN 98274*61493 ❤CALL GIRLS IN ESCORT SERVICE❤CALL GIRLkapoorjyoti4444
 

Último (20)

PHX May 2024 Corporate Presentation Final
PHX May 2024 Corporate Presentation FinalPHX May 2024 Corporate Presentation Final
PHX May 2024 Corporate Presentation Final
 
Falcon's Invoice Discounting: Your Path to Prosperity
Falcon's Invoice Discounting: Your Path to ProsperityFalcon's Invoice Discounting: Your Path to Prosperity
Falcon's Invoice Discounting: Your Path to Prosperity
 
Famous Olympic Siblings from the 21st Century
Famous Olympic Siblings from the 21st CenturyFamous Olympic Siblings from the 21st Century
Famous Olympic Siblings from the 21st Century
 
SEO Case Study: How I Increased SEO Traffic & Ranking by 50-60% in 6 Months
SEO Case Study: How I Increased SEO Traffic & Ranking by 50-60%  in 6 MonthsSEO Case Study: How I Increased SEO Traffic & Ranking by 50-60%  in 6 Months
SEO Case Study: How I Increased SEO Traffic & Ranking by 50-60% in 6 Months
 
Value Proposition canvas- Customer needs and pains
Value Proposition canvas- Customer needs and painsValue Proposition canvas- Customer needs and pains
Value Proposition canvas- Customer needs and pains
 
(Anamika) VIP Call Girls Napur Call Now 8617697112 Napur Escorts 24x7
(Anamika) VIP Call Girls Napur Call Now 8617697112 Napur Escorts 24x7(Anamika) VIP Call Girls Napur Call Now 8617697112 Napur Escorts 24x7
(Anamika) VIP Call Girls Napur Call Now 8617697112 Napur Escorts 24x7
 
Eluru Call Girls Service ☎ ️93326-06886 ❤️‍🔥 Enjoy 24/7 Escort Service
Eluru Call Girls Service ☎ ️93326-06886 ❤️‍🔥 Enjoy 24/7 Escort ServiceEluru Call Girls Service ☎ ️93326-06886 ❤️‍🔥 Enjoy 24/7 Escort Service
Eluru Call Girls Service ☎ ️93326-06886 ❤️‍🔥 Enjoy 24/7 Escort Service
 
FULL ENJOY Call Girls In Majnu Ka Tilla, Delhi Contact Us 8377877756
FULL ENJOY Call Girls In Majnu Ka Tilla, Delhi Contact Us 8377877756FULL ENJOY Call Girls In Majnu Ka Tilla, Delhi Contact Us 8377877756
FULL ENJOY Call Girls In Majnu Ka Tilla, Delhi Contact Us 8377877756
 
Organizational Transformation Lead with Culture
Organizational Transformation Lead with CultureOrganizational Transformation Lead with Culture
Organizational Transformation Lead with Culture
 
Call Girls In Majnu Ka Tilla 959961~3876 Shot 2000 Night 8000
Call Girls In Majnu Ka Tilla 959961~3876 Shot 2000 Night 8000Call Girls In Majnu Ka Tilla 959961~3876 Shot 2000 Night 8000
Call Girls In Majnu Ka Tilla 959961~3876 Shot 2000 Night 8000
 
The Abortion pills for sale in Qatar@Doha [+27737758557] []Deira Dubai Kuwait
The Abortion pills for sale in Qatar@Doha [+27737758557] []Deira Dubai KuwaitThe Abortion pills for sale in Qatar@Doha [+27737758557] []Deira Dubai Kuwait
The Abortion pills for sale in Qatar@Doha [+27737758557] []Deira Dubai Kuwait
 
BAGALUR CALL GIRL IN 98274*61493 ❤CALL GIRLS IN ESCORT SERVICE❤CALL GIRL
BAGALUR CALL GIRL IN 98274*61493 ❤CALL GIRLS IN ESCORT SERVICE❤CALL GIRLBAGALUR CALL GIRL IN 98274*61493 ❤CALL GIRLS IN ESCORT SERVICE❤CALL GIRL
BAGALUR CALL GIRL IN 98274*61493 ❤CALL GIRLS IN ESCORT SERVICE❤CALL GIRL
 
Malegaon Call Girls Service ☎ ️82500–77686 ☎️ Enjoy 24/7 Escort Service
Malegaon Call Girls Service ☎ ️82500–77686 ☎️ Enjoy 24/7 Escort ServiceMalegaon Call Girls Service ☎ ️82500–77686 ☎️ Enjoy 24/7 Escort Service
Malegaon Call Girls Service ☎ ️82500–77686 ☎️ Enjoy 24/7 Escort Service
 
Cracking the Cultural Competence Code.pptx
Cracking the Cultural Competence Code.pptxCracking the Cultural Competence Code.pptx
Cracking the Cultural Competence Code.pptx
 
Call Girls Service In Old Town Dubai ((0551707352)) Old Town Dubai Call Girl ...
Call Girls Service In Old Town Dubai ((0551707352)) Old Town Dubai Call Girl ...Call Girls Service In Old Town Dubai ((0551707352)) Old Town Dubai Call Girl ...
Call Girls Service In Old Town Dubai ((0551707352)) Old Town Dubai Call Girl ...
 
Cheap Rate Call Girls In Noida Sector 62 Metro 959961乂3876
Cheap Rate Call Girls In Noida Sector 62 Metro 959961乂3876Cheap Rate Call Girls In Noida Sector 62 Metro 959961乂3876
Cheap Rate Call Girls In Noida Sector 62 Metro 959961乂3876
 
Call Girls Kengeri Satellite Town Just Call 👗 7737669865 👗 Top Class Call Gir...
Call Girls Kengeri Satellite Town Just Call 👗 7737669865 👗 Top Class Call Gir...Call Girls Kengeri Satellite Town Just Call 👗 7737669865 👗 Top Class Call Gir...
Call Girls Kengeri Satellite Town Just Call 👗 7737669865 👗 Top Class Call Gir...
 
Business Model Canvas (BMC)- A new venture concept
Business Model Canvas (BMC)-  A new venture conceptBusiness Model Canvas (BMC)-  A new venture concept
Business Model Canvas (BMC)- A new venture concept
 
Nelamangala Call Girls: 🍓 7737669865 🍓 High Profile Model Escorts | Bangalore...
Nelamangala Call Girls: 🍓 7737669865 🍓 High Profile Model Escorts | Bangalore...Nelamangala Call Girls: 🍓 7737669865 🍓 High Profile Model Escorts | Bangalore...
Nelamangala Call Girls: 🍓 7737669865 🍓 High Profile Model Escorts | Bangalore...
 
JAYNAGAR CALL GIRL IN 98274*61493 ❤CALL GIRLS IN ESCORT SERVICE❤CALL GIRL
JAYNAGAR CALL GIRL IN 98274*61493 ❤CALL GIRLS IN ESCORT SERVICE❤CALL GIRLJAYNAGAR CALL GIRL IN 98274*61493 ❤CALL GIRLS IN ESCORT SERVICE❤CALL GIRL
JAYNAGAR CALL GIRL IN 98274*61493 ❤CALL GIRLS IN ESCORT SERVICE❤CALL GIRL
 

Build Your Own Yurt

  • 1. Build Your OwnYurt A complete guide to making a Mongolian Ger P. R. King First edition 1995, Second edition 1997 Third edition, revised, updated, and expanded. 1997. Copyright © 1995, 1997, 1998 Paul King all rights reserved. Do not copy without permission, do not publish on other websites. ISBN 09531763 0 4 For more detailed and up-to-date instructions see The Complete Yurt Handbook, Paul King, 2001
  • 2. Build Your Own Yurt The Yurt Yurt is a word of Russian origin describing a circular trellis walled framed tent. The roof supported by a conical or domed frame consisting of a number of ribs radiating from a central wooden wheel to the top of the wall trellis. The yurt is traditionally covered with felt, made by beating and rolling wet sheep fleece. There are three main types of yurt: The Kirgiz yurt with bent-wood roof poles and crown and a domed overall shape. Used by the Turkish speaking kirgiz, Kazak, Uzbek, and Turkmen people. The two tiered yurt with a pointed roof and two layers of wall section placed one on top of the other. Used by the Uzbek, and Arab peoples of Afghanistan. The Mongol or Kalmuk ger with straight roof poles, a heavy timber crown, often supported by two upright poles, and fitted with a wooden door. It is this type of yurt that will be described in this book. The Mongolian Ger (describing a Mongolian's tent as a yurt may offend his/her national pride) is a versatile dwelling with a proven pedigree, being home to the nomads of central Asia for many centuries. The oldest complete yurt yet discovered was in a 13th century grave in the Khentei Mountains of Mongolia. Discoveries at Pazaryk, Southern Siberia indicate that the technology to make yurts was in use during the 4th century BC. The BBC Horizon series "Ice Mummies" suggests that yurts were in use at this time. Throughout this time the design has changed little, the ger being perfectly suited to a nomadic lifestyle in one of the worlds most inhospitable climates, with high winds rain and snow, where winter temperatures regularly fall to -50ºC. To this day it is still the preferred home to the majority of Mongolian people, the suburbs of the capital Ulaan Baatar consist entirely of gers. The use of the other two yurt types has declined greatly this century. This proven design is equally well suited to the many uses for moveable dwellings in this country. The yurt can be insulated for winter use, the sides rolled up to admit a cooling breeze on hot days. On clear nights one can lie in bed and watch the stars through the open crown. On wet nights there is plenty of room for a group of friends to sit in comfort around a warm stove, tell stories and listen to the storm outside. The atmosphere inside the yurt is one of warm, secure, solidity, while from the outside the yurt radiates a welcoming glow. Oxen carrying Kirgiz yurt and furnishings (after Murray, 1936) 2
  • 3. Build Your Own Yurt The Practical Yurt As well as being an attractive and novel tent the yurt is probably the most practical temporary dwelling available, being: •Portable, a yurt with a twelve foot (3.7m) (or larger) diameter can be easily carried in a small car, on a horse, in a handcart or even on a train or bus. •Secure, the yurt can be fitted with a wooden door, which can be locked. The lattice work walls ensure that entry cannot be gained even if the canvas is cut. •Weather proof, the fact that it has proven itself in the cold, wind, rain and snow of Mongolia for perhaps twenty five centuries is evidence for this. •Warm in winter, being circular with a relatively low roof it is easy to heat, a woodburning stove is ideal for this, open fires are often used in Mongolia, beware of the smoke and fire hazard. Insulating layers can be sandwiched between the frame and cover. Felt is the traditional insulating material, but blankets, carpets or bubble wrap can be used. •Cool in summer, the sides of the yurt can be rolled up or removed to admit a cooling breeze, for privacy the canvas walls can be replaced with reed mats. •Inconspicuous, despite having ample headroom, the overall height of the structure is only about seven feet allowing it to be hidden from unwanted attention by a hedge or scrub. •Easy to erect, with a little practice the yurt can be erected or taken down in less than half an hour. It is not difficult for one person to put it up. •Easy to move, if you decide that you have pitched your ger in the wrong place you can, with the help of a few friends, pick up the entire yurt and move it without any need to take it down and re-erect it. •Inexpensive, although it is easy to spend over £500 on the materials alone to build a yurt, with a bit of imagination, shopping around and luck, it is quite easy to build a Yurt for well under £100, (or even for nothing at all if you are lucky). •Easy to build, anyone with a very basic knowledge of woodwork, sewing, a few simple tools and plenty of spare time can build a yurt. This book will show you how. •Environmentally friendly, coppicing of hazel, ash, chestnut or oak to provide poles prolongs the life of the tree and enhances the fauna and flora of the woodland. The yurt is a low-impact dwelling, causing no permanent damage to the land on which it is pitched. It can even be moved every few days to prevent the grass underneath being killed. •Long lasting, by using water and rot proof canvas the yurt can stand outside for several years without harm. If only used occasionally it should last indefinitely. Broken components are easy to replace. Pine frames used in Turkmen Anatolia last 50-70 years, willow frames used by Uzbeks and Arabs in Afghanistan last 40-50 years. Felt covers last 3-5 years, canvas covers should last a bit longer. •Fun !, wherever you stay in your ger it is sure to attract the interest of fellow campers, it is so much more than just another boring tent. For children and adults alike yurt camping is a real break from the usual holiday accommodation. Impress your friends by swinging from the crown. The sight of a complete yurt being carried from the inside, apparently a walking tent always raises a laugh. 3
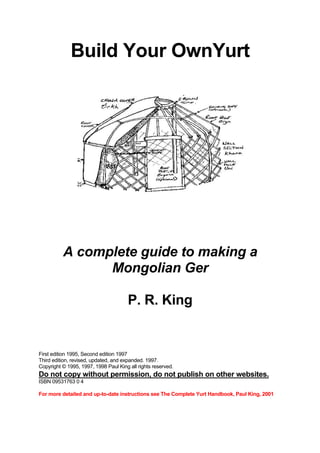
  • 4. Building Your Ger The entire process of building your yurt, from cutting the wood in the forest to moving into your finished ger will require about 80-120 hours of work. The logical way to proceed is to start with the walls, this being the most time consuming job, followed by the door frame, the crown, roof, and finally the cover. This book tells you how to make a ger with a diameter of ten feet (3m), walls four feet (1.2m) high and a roof six and a half feet (2m) high at the crown. If you wish to make a yurt of a different size simply alter the size and number of components (see table on page 7). If the ger is very large or to be used in the winter when the roof may have to support a heavy weight of snow it may need two upright poles to support the crown. These poles are fitted to all but the smallest gers in Mongolia but are of symbolic, rather than structural significance. Figure 1. Component parts of the ger (English, Mongolian) Tools and Materials To build your yurt you will need the following tools and materials: Tools: •A good sharp handsaw. •A coping saw or electric jig-saw •A Spokeshave. •An electric drill. •A 3.5mm drill bit. •A 1" (25mm) wood drill bit. •A sliding bevel. •Four or more G-cramps. •A workbench. •A smoothing plane. •A sharp knife. •A strong sewing machine (an old Singer hand machine is good) Materials: •95 wooden rods 5 feet (1.52m) long and approximately 1" (25mm) diameter, or slats ½ x 1-2 inch (13x25-50mm) •Strong nylon string, 80 yards (73m). •40 square yards (34m²) of waterproof canvas. •2 square yards (2m²) of plastic coated canvas. •9 square feet (1m²) of 1 inch (25mm) thick timber, or 18 sq. feet (2m²) of ½ inch (13mm). •26 yards (24 m) of rope. •Wood glue. •Linseed oil (one pint [500ml]). •Strong thread to sew cover. •60 brass eyelets (grommets). Sources of Materials Here are a few usefull names, telephone numbers and ideas for supply of materials: Canvas Tony Beal Ltd. (Glasgow) Tel. 0141 7732166 Mitco (Romford) Tel. 0181 5906070 Hazel poles Try your local wildlife trust, or woodland estate manager. Willow poles Try one of the many farmers growing willow as a biomass fuel.
  • 5. If you wish to make a yurt other than the size described in this book use the following table. The instructions remain the same only the numbers of poles and dimensions are different. Component dimensions (numbers*) Yurt Dimensions Diameter Walls Height Wall poles Roof poles Crown Ø 8' (2.4m) 3'2" (1m) 5' (1.5m) 4' (1.2m)(48) 4' (16 or 32) 18" (45cm) 10' (3m) 4' (1.2m) 6'6" (2m) 5' (1.5m)(48) 5'(16 or 32) 2' (60cm) 11' (3.3m) 4' (1.2m) 7' (2.1m) 5'9" (1.75m)(48)5'6"(1.7m) (32) 2'6" (76cm) 12' (3.65m) 5' (1.5m) 7'6" (2.3m) 6'6" (2m) (56) 6' (1.83m)(36) 2'6" (76cm) 14' (4.2m) 5' (1.5m) 7'6" (2.3m) 6'6" (2m) (64) 7' (2.13m)(40) 2'6" (76cm) 16 (4.9m)'** 5' (1.5m) 8' (2.4m) 6'6" (2m) (72) 8' (2.4m)(45) 3' (91cm) * Numbers given are those for complete poles allow another 14 poles to make the short lengths for the ends of the khana. ** For the sixteen foot yurt make three khana sections, therefore allow an extra 21 for the ends. Obviously, the bigger the yurt, the more canvas you will need to cover it: Yurt diameter Canvas requirements (square yards) 8' (2,4m) 30 (26m²) 10' (3m) 40 (34m²) 12' (3.7m) 50 (43m²) 14' (4.27m) 60 (51m²) 16' (4.8m) 70 (60m²)
  • 6. The Walls For the walls you will need 65 rods about an inch (25mm) in diameter and five feet (1.5m) long or slats of sawn timber, these are traditionally willow. Hazel is stronger, more durable and easy to obtain in many areas (Cut your hazel between October and March as it will last longer, the tree will have a better chance of recovery and there is no risk of disturbing nesting birds). Broom handles or hardwood batons are excellent, but a bit expensive and often from unsustainable sources. Sawn green oak batons ½"x1½" (13x38mm) for the walls and 1¼"x1¼" (32x32mm) will cost £140-200 and will make a yurt frame to last a lifetime. Sawmill offcuts may be useful and cheap. If you are using willow or hazel remove the bark for an attractive light finish, this is most easily done using a concave curved knife. Or leave the bark on for a more rustic look. Use the wood green (unseasoned) so that any slightly bent poles will be pulled straight as they dry. If using slats, plane or sandpaper them to give a smooth finish. Drill seven 3.5mm holes, exactly nine inches (23cm) apart in each rod leaving two inches over at one end and four at the other (Fig.2). If using poles of a different length keep the 9inch spacing but drill more or less holes, as appropriate. Figure 2. Hole spacing for the rods of the khana (wall section). The easiest way to space these holes is to make a fixture:Take a piece of hardwood 11 inches long and drill two 3.5mm holes nine inches (23cm) apart push a nail through one hole, after drilling the first hole in each rod place the nail on the fixture in this hole you can now use the hole in the fixture as a guide to drill the second hole. Repeat for the other five holes (Fig.3). For an attractive durable finish treat the rods with boiled linseed oil. Figure 3. Fixture used to ensure accurate spacing of holes. The rods now need to be tied together to form the two wall sections or Khana. Take 24 full length rods and tie them together by knotting one end of the string, passing it through the two corresponding holes in two rods, pulling it very tight and knotting the other end. To facilitate threading heat the first inch or so of the string and roll it between your fingers to form a solid leading end, be careful not to burn yourself. Burn, rather than cut the string to prevent fraying. Repeat this process until all 24 rods are joined to form the Khana. Finish the ends using shorter lengths of rod (Fig.4). Make another Khana in exactly the same way.
  • 7. Figure 4. The Khana or wall section, two or more of these tied together make up the walls of the yurt. The Door The simplest and most portable door for your yurt consists of two uprights of willow or hazel 1½-3 inches (38-75mm) in diameter and four feet (1.2m) long tapered at each end to fit into 1 inch (25mm) holes drilled into the top and bottom of the frame. The top and bottom consists of lengths of the same wood about three inches (75mm) in diameter and two feet six inches (75cm) long drilled at either end to take the tapered ends of the uprights. The top part of the frame is drilled to take two of the roof poles. The door consists of a canvas curtain, weighted at the bottom. This frame is easily disassembled and strong (Fig.5). Figure 5. A simple door frame can be constructed in a few minutes A more elaborate and weatherproof, but less portable door can be made with a solid timber frame, fitted with a double or single door (download available from www.woodlandyurts.co.uk), this is traditionally elaborately carved or painted. This door can be made in its own separate frame which can be fitted to the front of the hazel door frame when required. The making and decorating of such a door is beyond the scope of this book, so I will leave it up to you to consult a carpentry book or use your own imagination if you wish to furnish your yurt with such a grand entrance.
  • 8. The Crown The crown, or roof wheel is the most difficult part of the yurt to make. It consists of a wooden "wheel" two and a half feet in diameter with hub held ten inches (25cm) above the height of the rim by eight spokes. The rim has 32 holes drilled at an angle in the outside edge to take the roof poles. The finished crown is elaborately decorated to form the major feature of the inside of the yurt (see Douglas, 1962 for inspiration). Figure 6. The crown. The rim of the crown is made in sections, you will need twelve sections if you are using one inch (25mm) timber or eight sections if you are using one and a half inch (38mm) timber. To make these sections you will need a template; Draw a circle two feet six inches (76cm) in diameter on a flat surface, then draw a circle two feet (60cm) in diameter inside of the first one, now divide these circles exactly into quarters. Trace one of these quarters onto paper and cut it out to form the template. For a more durable and accurate template use thin plywood or hardboard. Place the template on the timber and carefully draw around it. Cut out this shape using a coping saw or an electric jig-saw, repeat this operation until you have the required number of sections. The sections should now be glued and clamped together. Remove the clamps when the glue has set. For extra strength drill two holes through each section into the one below and glue a dowel into each of these holes, or use screws. When the glue has set fully, tidy the outer and inner rims with a plane, spokeshave or electric sander. Mark the outer rim of the crown with thirty two equally spaced points, just below the middle of its width. Using an electric drill or a bit and brace, drill thirty two one inch (25mm) holes. These holes ° should point upwards into the crown at an angle of about 30-35° . To make the crown centre cut out eight spokes of 1½" (38mm) square timber 13 inches (33cm) long ° with one end cut at 25° and the other at 115°. Drill and countersink each end (Fig.7). Make an octagon of wood 2 inches (5cm) thick and 5 inches (12.5cm) across. Screw and glue the spokes, octagon and rim together as shown in figure 5. Thin willow or hazel rods can be used to make a more simple, but equally effective raised centre to the crown.
  • 9. Figure 7. One of eight spokes connecting the crown rim and centre. Either paint the crown or give it a few coats of clear yacht varnish or Danish oil. The Roof You will need thirty two roof poles, each five feet (1.5m) long, these normally consist of the same rods as are use to make the walls. If using thin slats for the walls these may not be rigid enough to support the roof so thicker or square section timbers should be used. If using round section poles drill two 3.5mm holes, one inch (25mm) apart in one end and pass a piece of string through these to form a loop, which fits over the top of a wall pole. The other end fits into the holes in the crown. Figure 8. a. End of roof poles cut to fit khana top. b. pieces added to rectangular roof pole. c. Square pole shaped to fit round hole. If you are using square or rectangular section timber either cut a the ends as shown in figure 8 or o make blocks which can be glued and screwed to the end of the pole. Cut the sharp 90 top corner off o at an angle of 45 and smooth with sandpaper. Drill two holes and fit string loops as for round poles. Ideally you should make square mortises in the crown to take the ends of the poles, but a much quicker and perfectly adequate option is to round off the top three inches of the poles with a knife or chisel to fit into the circular holes.
  • 10. The Cover The cover should be made from waterproof canvas. 12oz waterproof flame retardant cotton is the best. If you use new waterproof canvas it will cost about £100 for the cover, flame retardant finish will add another £30. Each yurt frame is unique in size and shape so it is not possible to make the cover to a pre-made pattern. When the frame is finished put it up in the garden (when there is little risk of rain) and make your cover to fit it. Ideally an industrial sewing machine should be used to sew the heavy canvas. But if this is not available a perfectly adequate job can be done with an old Singer hand sewing machine (available from most car boot sales or auctions for about £10), using strong polyester thread. It will take about two and a half working days to make the complete cover. The canvas will shrink slightly when it first gets wet so allow an overlap of at least eight inches (20cm) between the roof and walls and make the walls at least three feet longer than the circumference of the frame (minus door). Alternatively pre-shrink the canvas. The cover is made in four sections: The walls Put up the yurt frame and measure the height and the circumference of the walls, excluding the door. Make the cover the same height as the wall and three feet longer. Sew two widths of canvas together (for this size yurt you will probably use one and a quarter widths of the roll) use a double seam. The top sheet should overlap on the outside of the bottom one by about an inch so that rain runs off easily. Make a good 1½ inch (38mm) hem at the top and at each end. It is a good idea to sew a 6-8 inch (15-20cm) wide length of plastic around the bottom of the wall, overlap it about an inch (25mm) and sew it on the inside so that water is not directed into the yurt. Fit brass grommets into the top and end hems of the wall at spacings equal to the distance between two crossovers at the top of the khana. Tie a short string loop through each of the top grommets which will fit very loosely over the top of one wall pole. Tie a three foot (1m) length of string to each of the end grommets.
  • 11. Canvas on top Canvas underneath Figure 9. Arrangement of canvas sheets for the roof cover.
  • 12. The Roof Before you start work on the roof make sure you have plenty of space, thread, spare needles, and good quality dressmaking pins. Put up the yurt frame and set up your sewing machine in a large space next to it. With reference to figure 6 lay a length of canvas over the frame and position as sheet A on the diagram, allow at least a foot overlap at each end. Pin sheets B and C securely into position and mark points X. Take these three sheets off and sew them together with a one inch overlap and a double seam, do not sew beyond point X. Ensure that the top sheet always overlaps the lower one to allow water to run off. Place sheet A,B,C back onto the frame and pin sheet D into position. Mark points X. Take the cover off and sew the first seam, then cut from points Y to Z, leaving a flap of 1½ (38mm) inches. Fold the cut edge inside and sew the second seam. Do not sew beyond point X. Place the partly made cover back on the frame and continue adding sheets in the same way. When all of the sheets are sewn together fit this cover and mark the position of the crown opening. Cut out this opening and sew strong webbing around the inner edge of the circle. Finally fold, tuck and cut the ends of the sheets to hang down and overlap the walls by at least eight inches (20cm) (less above the door). sew a 1½ inch (38mm) hem around the bottom and fit a pair of brass grommets three inches (75mm) apart every three feet (1m). The Crown cover Make a three or four pointed canvas star, the centre of which is large enough to amply cover the crown. Put one or two tucks in the central part to give a convex profile to fit over the raised crown middle. attach five foot (1.5m) lengths of string to each point. It is easy to sew four triangular, or two semi-circular clear plastic windows into this cover if desired (Fig. 10). The Tension band This is a band which passes around the top of the khana and the ends of the roof poles to hold them in place, protect the roof cover from abrasion and as an additional safeguard against the weight of the roof pushing the walls outwards. Take a piece of canvas as long as the wall and eight inches (20cm) wide. Sew a strong hem along either side of its length and a 1½ inch (38mm) hem at each end. Fit two brass grommets at either end, one in each corner. At each end tie a 10 inch (25cm) piece of rope between the two grommets to form a loop. Tie a three foot (1m) length of rope to each loop. Figure 10. Three designs of crown cover.
  • 13. Further refinements The instructions so far have shown how to make the basic ger, complete in itself and ideal for most uses. However, if you wish to use your yurt as a permanent home or in extreme weather conditions some further refinements may be desirable. Door A solid wooden door which can be locked greatly improves the security and comfort of the ger. A double brace and rail door, made with tongue and grooved pine and permanently fitted to a frame of 2"x2" (50x50mm) pine can be made in less than a day at a cost of about £25 (refer to a carpentry book for instructions). Make the frame the same height as the yurt door frame with its inside width 2 inches (50mm) narrower, so that it overlaps the door entrance by an inch (25mm) either side. Screw four blocks onto the back of the frame so that they fit snugly into the inner door frame (with the cover fitted). Attach bolts or pieces of wood on pivots to the blocks to hold the door firmly in place. Windows Windows can be sewn into the wall or crown cover. A wall fitted window is easiest to make separately and then sew it into an appropriately sized hole cut in the canvas. Make the clear plastic window with a two inch (5cm) frame and reinforce it with canvas or webbing sewn horizontally and vertically every six inches (15cm). A canvas blind which can be held open with tapes and shut with Velcro is a simple and useful addition. Insulation Thick felt is the traditional insulating material. Old carpets, underlay, blankets, horticultural fleece, or bubble wrap can also be used. The insulation is sandwiched between the frame and cover. The insulation is held firmly in place and need only be cut roughly to size. Decoration The crown, roof poles and door are typically painted in bright colours using traditional patterns (Douglas, 1962 shows good views of these designs). The khana may be painted or hung with wall hangings. Traditionally, rugs are placed on the floor and there is an alter at the rear. Extreme weatherproofing For summer use the ger will stand up to most weather without being anchored to the ground. for extra security three or four ropes can be tied to the roof cover securing rope. These ropes can be tied down to strong wooden tent pegs driven into the ground. On an exposed site or in preparation for winter gales three foot (1m) wooden stakes should be driven into the ground inside the yurt near the door and at the khana junction. The frame can be securely tied to these stakes. To secure the cover four ropes 25 feet (7.5m) long should be tied together in the form of a giant noughts and crosses grid. This can be thrown over the yurt and pegged down tightly at eight points. If the ger is likely to have to bear the weight of a thick snow covering two upright poles with 'T' shaped tops (which can be tied to the crown) should be fitted to support the crown. These poles are traditionally brightly painted and always kept in place. Fire A fire or stove is a pleasant luxury during the summer and a necessity for winter use. It is however, as with any tent, potentially very dangerous to light a fire in the yurt do so at your own risk. A few precautions and modifications can reduce this risk. The fire or stove is traditionally placed in the centre of the yurt directly below the crown, in a small yurt this location might prove too intrusive so a stove can be placed towards the side. A traditional open fire with smoke leaving through the crown seems like a pleasant idea but the yurt rapidly fills with thick smoke and so is completely impractical, this problem can be reduced slightly by using charcoal but make sure there is plenty of ventilation. A metal woodburning stove is a much more practical solution. The smallest stove will provide more than enough heat. Both the stove and the flue-pipe will become extremely hot during use and any combustible material (wood or canvas) in contact with these will catch fire. Wood or canvas within a few inches of the stove or flue-pipe will rapidly char. To reduce any fire risk it is necessary to keep the flue-pipe separated from the frame and cover. This is achieved by making a collar of aluminium sheet. For a central stove remove one of the eight crown spokes and fill the gap with a piece of aluminium with a hole cut in it to take the flue-pipe. A similar aluminium sheet must be sewn or joined with Velcro to the crown cover. The use of Velcro allows the aluminium to be replaced with waterproof canvas or plastic if the stove is not in place. For a side mounted stove leave a space of at least 12 inches (30cm) between the stove and the wall. Remove one of the roof poles above the stove to leave a gap, cut a hole in the canvas in this space. Cut out an 18 inch (45cm) square of
  • 14. aluminium sheet with a round hole in the centre to take the flue-pipe. Smooth the edges and corners and bend the sides down slightly with the fold two inches (50mm) from the edge. Use Velcro to join this sheet to the canvas, make a flap in the cover to overlap this plate and allow water to run off ( Fig.11). Figure 11. Aluminium collars to prevent hot flue-pipe burning yurt. Steam bending If you prefer the Kirgiz design of yurt with its bent roof and wall poles you will need to do some steam bending. A steam box consists of a long wooden box or large diameter plastic pipe with a small hole at one end to let the steam out and a pipe at the other to let steam in. The steam is provided by a very large water filled kettle or five gallon (20 litre) metal drum place over a fire, a pipe carries steam from this boiler to the steam box. The poles are placed in the box and steamed for 40 minutes to an hour. While still hot the poles must be bent to the require shape around a former and held or clamped there until cool. Make sure the steam has somewhere to escape from the system or there will be an explosion, also guard against burns from hot water, steam and fire. For a more comprehensive guide to steam bending see The Complete Yurt Handbook. Timber floor If the yurt is to be used as a semi-permanent dwelling a timber floor raised two inches off of the ground on bearers of treated 2"x2" (50x50mm) timber will improve comfort greatly. Make the floor to fit exactly, from plywood, chipboard or toungue and grooved pine. By drilling holes in the bottom of the door frame and in the floor in front of the stove air to feed the fire is drawn under the floor, rather than through any gaps in the yurt, reducing draughts and further improving comfort. Tradition and Etiquette Having been home to the many tribes and cultures of central Asia for millennia a great deal of traditions, superstition, religious significance and custom has built up surrounding the yurt. Spiritual significance To the Mongolian people the ger is more than just a simple dwelling, in its construction the whole universe is represented: The roof represents the sky and the smoke hole the sun. The hearth contains the five basic earth elements of earth, wood, fire, metal, and water (metal in the grate and water in the kettle). For the Buryat Mongols the fire contains the house deity and is therefore sacred, offerings are thrown on every morning. No rubbish is burned on the fire and outsiders should not take a light from it. The two upright roof poles supporting the crown are of symbolic importance rather than a structural necessity. The Mongolian people are predominantly Buddhist, and a shrine is set up opposite the door, people sleep with their heads towards this altar. In Muslim areas the people sleep in the opposite direction with their heads towards the south facing door, roughly the direction of Mecca. Setting up home The family yurt is usually obtained as a gift from the brides parents on a couples marriage. The frame should last a lifetime, but the felt covers need replacing every three to five years. The yurt is set up
  • 15. with the door facing south. When families camp together during the winter the group of yurts or aul are set in a circle with the opening to the south. The roof poles and crown are carried in through the door, it is considered bad luck to pass them over the wall. The interior furnishings and seating arrangements are always the same. The altar is placed opposite the door at the back of the yurt. The hearth or stove is in the middle of the floor with firewood or other fuel in front and a low table behind. The western side is the domain of the men, male visitors and honoured guests sit this side, where saddles, tools and airag (fermented mares milk) are kept. The women and children use the eastern side, where rugs, bedding, food, cutlery, crockery and water are stored. Servants, poor visitors and any sick or very young animals that need nursing sit near the entrance. Figure 12. Traditional furnishing and seating in the ger. Etiquette Traditionally, anyone stopping outside of a ger is invited in for a meal, a sheep is killed for the feast (more practical on the lonely steppes of Mongolia than in this overcrowded island). When entering the yurt it is considered impolite to step on the threshold or to hold onto the ropes. The traditional greeting offered by the visitor consists of four questions: are you well?, is your family well?, are your cattle/sheep fat?, is the grass good? the answer to each of these questions is yes, whatever the reality. After exchanging greetings the guest is offered tea, followed by airag and then yoghurt. Visitors to a Kalmuk yurt are offered arak, distilled spirit of airag, three glasses must be drunk in rapid succession. Following these formalities men exchange snuff and the party can become more relaxed. At the meal the guest carves and shares the meat. There are a number of rules which guests should follow. All weapons should be left outside, do not step on the threshold, point your feet at or put rubbish on the fire. Do not sit with your back to the altar, whistle, write in red pen, step over older people or point a knife at anyone. One should take at least a little of any food or drink offered. When offered arak or vodka flick a small amount to the sky, the wind and the earth before drinking.
  • 16. Putting up Your Yurt 1. Unfold the wall sections and place them upright in an approximate circle. 2. Tie two ends together, overlapping slightly. tie the other two ends to the door frame. 3. Adjust the position of the walls until they are perfectly circular. Use two poles held end to end to check that the diameter is exactly the same at several points. 4. Tie a strong rope around the top of the walls. This step is very important, to fit the roof without this band around the Yurt will cause serious damage. 5. Ask a friend to hold the crown above their head in the centre of the yurt. 6. Fit the string loop of each roof pole over the top of a wall pole and fit the other ends into the holes in the crown. 7. Tie the tension band tightly around the entire yurt at the point poles meet. 8. Pull the crown hard down to ensure that it is level and that all of the roof poles are securely seated. 9. Fit the wall cover. 10. Fit the roof cover and tie it down with a rope passing through the grommets. 11. Tuck the plastic skirt under the bottoms of the wall poles. 12. Fit the door. HAPPY YURTING! where the wall and roof
  • 17. Bibliography Andrews, Peter Alford, 1997. Nomad tent Types of the Middle East: Part1: Framed Tents (2 volumes). Dr Ludwig Reichert. Wiesbaden. Anon. 1973. Shelter. Shelter publications, Inc. California. Blue Evening Star, 1995. Tipis and Yurts: Authentic Designs for circular shelters. Lark Books, Asheville, North Carolina, USA. Charmichael, Peter. 1991. Nomads. Collins and Brown, London. Curtin, Jeremiah. 1908. The Mongols: A History. Combined Books, Pensylvania. Dineley, Mark. 1935. The Turkomans of Persia. The Geographical Magazine, Vol.1, No. 2, June 1935, pp. 151-162. Douglas, William O. 1962. Journey to Outer Mongolia. National Geographic. Vol.121, No.3, March 1962. pp 289-345. Faegre, Torvald. 1979. Tents: Architecture of the Nomads. John Murray, London. Fairlie, Simon. 1996. Low Impact Development. Jon Carpenter, Oxfordshire. Fine Woodworking (ed), 1985. Bending Wood. The Taunton Press, Newtown, CT. Greenway, Paul. Story, Robert. Latiffe, Gabriel. 1997. Mongolia: Travel Survival Kit (2nd Ed.). Lonely Planet. Victoria, Australia. Jagchid, Sechin and Paul Hyer. 1979. Mongolia's Culture and Society. Westview Press. Boulder, Colarado. King, P. R. 1998. Build Your Own Yurt: A complete guide to Making a Mongolian Ger (3rd Ed.) P. R. King, Clevedon. King, P.R. 1999. The Weekend Yurt: Make a Mongolian Ger in two weekends, simple step by step instructions. P.R. King, Clevedon. King, P.R. 1999. Ger: the Mongolian Yurt. Skyviews. Issue 14. pp13-15. King, P. R. 2001. The Complete Yurt Handbook. Eco-Logic books, Bristol. Marshall, Robert. 1993. Storm From The East: From Ghengis Khan to Kublai Khan. Penguin/BBC Books. Michaud, Roland and Sabrina. 1985. Caravans to Tartary. Thames and Hudson, London. Murray, Edward, 1936. January 1936. pp 1-57. Place, Steve, 1997. Machynlleth. With the Nomads of Central Asia. How to build a Yurt. National Geographic. Vol.69. No.1, Centre For Alternative Technology Factsheet. CAT, Sjöberg, Gunilla Paetau, 1996. Felt: New Directions for an Ancient Craft. Interveave Press Inc., Colarado. Structure Constructor, 1997. Yorkshire. How to build your low impact dwelling. Structure Constructor, Tseltum N. 1988. Mongolian Architecture. State Publishing House, Ulaan Bataar. Yunden Ya., Zorig G., Erdene Ch. 1991. This is Mongolia. Ulaan Baatar.