SlideShare una empresa de Scribd logo
Acrocanthosaurus
1.
Begin with a square, white side up, with both diagonals precreased.
Valley fold the lower left side to the
horizontal center line, bisecting the
angle on the left corner, but crease
only where the fold intersects the
lower right side. Unfold.
2.
Valley fold the bottom corner to
the center of the square, again
creasing only on the right side.
Unfold.
3.
Valley fold the bottom point up so
that the intersection of the edge of
the paper and the angle bisector
from Step 1 lays on the crease line
from Step 2. Rotate the paper 180°.
4.
Reverse fold the top sides in to
the center line, creating a small
preliminary base at the top. The
next diagrams are enlarged.
180°
5.
Valley fold the sides of the
preliminary base at the top to the
center line and unfold.
6.
Petal fold on the creases from
Step 5.
7.
Valley fold the petal back down.
8.
Valley fold the lower edges to the
center, bisecting the lower point on
each side, and unfold. Because of
the proportions used in Steps 1-3,
the side corners of the paper should
lie right at the lower tip of the petal
fold at the top when the edges are
at the center line.
9.
Valley fold the top point (including
the bird base assembly) down
along a line that connects the tops
of the angle bisectors from Step 8.
This crease should go across the
very tip of the petal fold. Unfold.
10.
Valley fold the entire model in half,
right side over left. Rotate the
model 90° counterclockwise (the
thick point including the petal fold
will be on the left).
90°
11.
Valley fold the thick point at the left
down to the bottom point and
unfold.
12.
Valley fold the thick point at the left
down to the intersection of the edge
and the angle bisector from Step 8
and unfold.
13.
Double reverse fold the thick, left
point inwards on the crease from
Step 11 and back out on the crease
from Step 12.
14.
Valley fold the upper part of the
paper (including the upper part of
the thick, petal folded assembly
inside) as far upwards as it will
naturally fall.
15.
The result. Unfold the top flap
back down.
16.
Turn the paper over from
side-to-side.
17.
Fold the top flap up again, as in
Step 14.
18.
Turn over from side-to-side.
The next diagrams are
enlarged.
19.
Valley fold the left half of the
model (top flap only) over the
right, creating a vertical line
connecting the top and
bottom points, and unfold.
20.
Squash fold the left hand
part of the upeprmost flap
to the right. The lower left
point of the fold lies where
many layers are locked
together.
20.
Squash fold the left hand part
of the upeprmost flap to the
right. The lower left point of
the fold lies where many
layers are locked together.
Valley fold the top flap at the
lower right of the squash to
the vertical central line and
unfold.
21.
Swivel fold on the crease you
made in Step 21. An
additional valley fold will be
made that connects the
corner at the lower left and
the upper end of the crease
made in Step 21.
22.
Wrap the small flap on the
surface underneath.
23.
Valley fold the topmost flap on
the right over to the left,
incorporating a rabbit ear in
the triangle.
24.
Unfold the flap and rabbit ear
from Step 24. Turn the model
over side-to-side.
25.
Fold the petal at right back up along the existing
crease.
26.
The loose colored triangle that lies on top of the point
at the bottom is connected to some paper that is
currently trapped inside the model. Grabbing the
circled points, pull them gently apart and away from
each other to expose it; in doing so, the upper half of
the model will also swing up.
27. 28.
Pull out the trapped layer of paper, wrapping it around
the the raised edge at the lower right (this is a
diamond-shaped layer of paper when unfolded; as you
do this, or unfold it, unwrap the paper, and refold it).
The freed paper at the bottom of the petal fold at right
will swing up. This is a difficult move.
29.
Now the rectangle of paper is free, and sticking up in this diagram. Flatten
the model by pushing the freed flap and the points to which it is connected
down. The point at right that is connected to the petal fold goes the left, and
the larger point at the bottom valley folds up and to the left on a new crease.
Valley fold the top flap down and to the right.
30.
Swivel the flap to the left. The valley fold at right and the vertical
mountain fold are on existing creases. The right portion of the flap
swivels downwards, and the left side swivels up and to the left.
31.
Valley fold over and over three times to narrow the
white flap. Only the first crease is new.
32.
1
2
3
Valley fold the narrow flap and point at the bottom
over to the right and unfold.
33.
Reverse fold the flap through on the crease from Step
33.
34.
Narrow the colored flap with two swivel folds. One narrows the flap
covering the large point at the bottom; the other narows the colored
point to the right, but note that it does not continue all the way to the
tip of the point. Note that the swivel should go through the
intersection (circled) of the flaps beneath (indicated by the x-ray
lines).
35.
The result. Turn the model over from
top-to-bottom.
36.
37.
38.
Valley fold the large flap at the bottom up as
far as possible. Repeat Steps 20-35 in mirror image on this
side.
20-35 x1
Pull out paper under the two broad points at
left, unfolding the petal fold and associated
paper.
39. 40.
Fold the model in half, bringing the top
portion down over the bottom. The next
series of diagrams are reduced in size.
41.
Unsink the chevron-shaped paper from
between the layers.
42.
Spread squash the angled layer in the
center. The valley fold on the top layer is on
an existing crease. Repeat behind.
43.
Valley fold the narrow flap at the left back
down. Repeat behind.
44.
Closed sink the flap inside. This is not easy
because it's difficult to reach inside the
model at this point without unfolding a lot of
the model. Repeat behind.
45.
Valley fold the tall, narrow flap at right over to
the left; repeat behind.
46.
Closed sink this flap inside, as well. Repeat
behind.
47.
Valley fold the upper half of the model down
along a line even with the top of the point at
left.
48.
Valley fold the flap up at an angle. The fold
line connects the very tip at the right with the
point along the top edge at left.
49.
Bring a layer from underneath the fin flap to
the surface. This is something like unsinking
a layer. This need not be repeated behind;
in fact, this move will return symmetry of the
layers to the model.
50.
Swivel fold the top layers to narrow both the
leg and the tail. Note that while the leg is
folded along an angle bisector, the tail is not,
and the flap goes further down than its
present lower edge. Repeat behind.
51.
Swivel fold the top layers of the leg and tail
again. As before, the leg flap gets bisected;
the tail flap should line up with the edge
beneath. Repeat behind.
Fold the narrow, white flap on the bottom of
the tail inside. Repeat behind.
52.
Valley fold the narrow flap on top the leg over
to the right; repeat behind.
53.
Closed sink the flap inside to narrow the leg.
Repeat behind.
54.
Double reverse fold the point at left up. The first
reverse fold is hidden beneath the triangular points
and is indicated by the x-ray and mountain fold lines;
the second reverse fold is indicated by the vertical
valley fold line.
55.
Outside reverse fold the flap on the right along the
edge of the arm points below. This occurs on an
existing crease. The next diagrams are enlarged.
56.
Outside reverse fold the flap again, bisecting
the arm (lower) points.
57.
Inside crimp the arms in half, bringing the head down a
bit. In order to do this effectively and without ripping the
paper, you will have to push in (like an open sink) the bit
of the hump on the back that is hidden inside the neck
(indicated by the x-ray line).
58.
Outside crimp the head down. Note that the
crease lines for the crimp do not meet on the
top of the neck — you'll have to spread some
paper and push out a bit from the inside to do
this.
59.
Narrow the neck by mountain folding some of
the flap in front inside; as you do this, a small
bit of the bottom of the head will be squashed
into a gusset inside. Repeat behind.
60.
Reverse fold the tip of the snout. Closed sink
the point on the hump on the back to make
the hump roughly of equal height along the
back (it will still get shorter along the tail).
61.
Rabbit-ear the thick arm points and swing
them upwards. Reverse fold the tips of the
leg points to form feet. Repeat both folds
behind.
62.
Fold hands down at the ends of the arms. Dent in some
of the paper on the legs to shape the knee and ankle.
Repeat behind. Inside the neck, closed sink some of the
middle layer upwards to form a continuation of the hump
on the back on the top of the neck.
63.
Finished Acrocanthosaurus

Más contenido relacionado

Similar a Acrocanthosaurus.pdf

Similar a Acrocanthosaurus.pdf (20)

Origami -papiroflexia_-_300_modelos
Origami  -papiroflexia_-_300_modelosOrigami  -papiroflexia_-_300_modelos
Origami -papiroflexia_-_300_modelos
 
Nat
NatNat
Nat
 
Napkin making
Napkin makingNapkin making
Napkin making
 
Acrocanthosaurus
AcrocanthosaurusAcrocanthosaurus
Acrocanthosaurus
 
Arrowhrt
ArrowhrtArrowhrt
Arrowhrt
 
Bee
BeeBee
Bee
 
How to Make an Easy Origami Butterfly_Group 4.pdf
How to Make an Easy Origami Butterfly_Group 4.pdfHow to Make an Easy Origami Butterfly_Group 4.pdf
How to Make an Easy Origami Butterfly_Group 4.pdf
 
Flores mama 001
Flores mama 001Flores mama 001
Flores mama 001
 
Abeja.pdf
Abeja.pdfAbeja.pdf
Abeja.pdf
 
Abeja.pdf
Abeja.pdfAbeja.pdf
Abeja.pdf
 
Origami [Near 300 Project 990 Pages]
Origami [Near 300 Project 990 Pages]Origami [Near 300 Project 990 Pages]
Origami [Near 300 Project 990 Pages]
 
3D Origami: Triangular Box
3D Origami: Triangular Box3D Origami: Triangular Box
3D Origami: Triangular Box
 
Balrog
BalrogBalrog
Balrog
 
Cestinha patch
Cestinha patchCestinha patch
Cestinha patch
 
Lesson 3
Lesson 3Lesson 3
Lesson 3
 
Lesson 3
Lesson 3Lesson 3
Lesson 3
 
Practical lesson design aero plane
Practical lesson design aero planePractical lesson design aero plane
Practical lesson design aero plane
 
How To Make a Corner Bookmark
How To Make a Corner BookmarkHow To Make a Corner Bookmark
How To Make a Corner Bookmark
 
Making Trihexaflexagons
Making TrihexaflexagonsMaking Trihexaflexagons
Making Trihexaflexagons
 
Pinwheel withdegrees
Pinwheel withdegreesPinwheel withdegrees
Pinwheel withdegrees
 

Más de DomnicaCampoverde

Más de DomnicaCampoverde (7)

afbcol.pdf
afbcol.pdfafbcol.pdf
afbcol.pdf
 
Acebo con vela.pdf
Acebo con vela.pdfAcebo con vela.pdf
Acebo con vela.pdf
 
Adorno para botella.pdf
Adorno para botella.pdfAdorno para botella.pdf
Adorno para botella.pdf
 
Adorno.pdf
Adorno.pdfAdorno.pdf
Adorno.pdf
 
Abrigo
AbrigoAbrigo
Abrigo
 
Adorno estrella.pdf
Adorno estrella.pdfAdorno estrella.pdf
Adorno estrella.pdf
 
PACKAGING 2 - DISPOSITIVOS DE CIERRRE.pdf
PACKAGING 2 - DISPOSITIVOS DE CIERRRE.pdfPACKAGING 2 - DISPOSITIVOS DE CIERRRE.pdf
PACKAGING 2 - DISPOSITIVOS DE CIERRRE.pdf
 

Último

Week of Action 2022_EIT Climate-KIC_Headers
Week of Action 2022_EIT Climate-KIC_HeadersWeek of Action 2022_EIT Climate-KIC_Headers
Week of Action 2022_EIT Climate-KIC_Headersekinlvnt
 
Pitch Presentation for Service Design in Technology
Pitch Presentation for Service Design in TechnologyPitch Presentation for Service Design in Technology
Pitch Presentation for Service Design in TechnologyJaime Brown
 
一比一原版格林威治大学毕业证成绩单如何办理
一比一原版格林威治大学毕业证成绩单如何办理一比一原版格林威治大学毕业证成绩单如何办理
一比一原版格林威治大学毕业证成绩单如何办理cyebo
 
The Impact of Artificial Intelligence on Modern Healthcare.pptx
The Impact of Artificial Intelligence on Modern Healthcare.pptxThe Impact of Artificial Intelligence on Modern Healthcare.pptx
The Impact of Artificial Intelligence on Modern Healthcare.pptxDoraemon495609
 
Research about Venice ppt for grade 6f anas
Research about Venice ppt for grade 6f anasResearch about Venice ppt for grade 6f anas
Research about Venice ppt for grade 6f anasanasabutalha2013
 
FW25-26 Fashion Key Items Trend Book Peclers Paris
FW25-26 Fashion Key Items Trend Book Peclers ParisFW25-26 Fashion Key Items Trend Book Peclers Paris
FW25-26 Fashion Key Items Trend Book Peclers ParisPeclers Paris
 
Recycled Modular Low Cost Construction .pdf
Recycled Modular Low Cost Construction .pdfRecycled Modular Low Cost Construction .pdf
Recycled Modular Low Cost Construction .pdfjeffreycarroll14
 
Dos And Dont's Of Logo Design For 2024..
Dos And Dont's Of Logo Design For 2024..Dos And Dont's Of Logo Design For 2024..
Dos And Dont's Of Logo Design For 2024..GB Logo Design
 
Heuristic Evaluation of System & Application
Heuristic Evaluation of System & ApplicationHeuristic Evaluation of System & Application
Heuristic Evaluation of System & ApplicationJaime Brown
 
Extended Reality(XR) Development in immersive design
Extended Reality(XR) Development in immersive designExtended Reality(XR) Development in immersive design
Extended Reality(XR) Development in immersive designGOWSIKRAJA PALANISAMY
 
Claire's designing portfolio presentation
Claire's designing portfolio presentationClaire's designing portfolio presentation
Claire's designing portfolio presentationssuser8fae18
 
Second Order Systems Qhhhhhhhhuestions.pptx
Second Order Systems Qhhhhhhhhuestions.pptxSecond Order Systems Qhhhhhhhhuestions.pptx
Second Order Systems Qhhhhhhhhuestions.pptxjoshuaclack73
 
Knowing, Understanding and Planning Cities- Role and Relevance Physical Plan...
Knowing, Understanding and Planning Cities- Role and Relevance  Physical Plan...Knowing, Understanding and Planning Cities- Role and Relevance  Physical Plan...
Knowing, Understanding and Planning Cities- Role and Relevance Physical Plan...JIT KUMAR GUPTA
 
Design lessons from Singapore | Volume 3
Design lessons from Singapore | Volume 3Design lessons from Singapore | Volume 3
Design lessons from Singapore | Volume 3Remy Rey De Barros
 
Abdulaziz Tariq Abdulaziz Mustafa CV 2024
Abdulaziz Tariq Abdulaziz Mustafa CV 2024Abdulaziz Tariq Abdulaziz Mustafa CV 2024
Abdulaziz Tariq Abdulaziz Mustafa CV 2024Abdulaziz Mustafa
 
National-Learning-Camp 2024 deped....pptx
National-Learning-Camp 2024 deped....pptxNational-Learning-Camp 2024 deped....pptx
National-Learning-Camp 2024 deped....pptxAlecAnidul
 
bobbi goods amelie y ximena # Bobbie gods forever
bobbi goods amelie y ximena # Bobbie gods foreverbobbi goods amelie y ximena # Bobbie gods forever
bobbi goods amelie y ximena # Bobbie gods foreverRamrezRodrguezKarlaN
 
Common Designing Mistakes and How to avoid them
Common Designing Mistakes and How to avoid themCommon Designing Mistakes and How to avoid them
Common Designing Mistakes and How to avoid themmadhavlakhanpal29
 
Heidi Livengood's Professional CADD Portfolio
Heidi Livengood's Professional CADD PortfolioHeidi Livengood's Professional CADD Portfolio
Heidi Livengood's Professional CADD PortfolioHeidiLivengood
 
一比一原版谢菲尔德大学毕业证成绩单如何办理
一比一原版谢菲尔德大学毕业证成绩单如何办理一比一原版谢菲尔德大学毕业证成绩单如何办理
一比一原版谢菲尔德大学毕业证成绩单如何办理cyebo
 

Último (20)

Week of Action 2022_EIT Climate-KIC_Headers
Week of Action 2022_EIT Climate-KIC_HeadersWeek of Action 2022_EIT Climate-KIC_Headers
Week of Action 2022_EIT Climate-KIC_Headers
 
Pitch Presentation for Service Design in Technology
Pitch Presentation for Service Design in TechnologyPitch Presentation for Service Design in Technology
Pitch Presentation for Service Design in Technology
 
一比一原版格林威治大学毕业证成绩单如何办理
一比一原版格林威治大学毕业证成绩单如何办理一比一原版格林威治大学毕业证成绩单如何办理
一比一原版格林威治大学毕业证成绩单如何办理
 
The Impact of Artificial Intelligence on Modern Healthcare.pptx
The Impact of Artificial Intelligence on Modern Healthcare.pptxThe Impact of Artificial Intelligence on Modern Healthcare.pptx
The Impact of Artificial Intelligence on Modern Healthcare.pptx
 
Research about Venice ppt for grade 6f anas
Research about Venice ppt for grade 6f anasResearch about Venice ppt for grade 6f anas
Research about Venice ppt for grade 6f anas
 
FW25-26 Fashion Key Items Trend Book Peclers Paris
FW25-26 Fashion Key Items Trend Book Peclers ParisFW25-26 Fashion Key Items Trend Book Peclers Paris
FW25-26 Fashion Key Items Trend Book Peclers Paris
 
Recycled Modular Low Cost Construction .pdf
Recycled Modular Low Cost Construction .pdfRecycled Modular Low Cost Construction .pdf
Recycled Modular Low Cost Construction .pdf
 
Dos And Dont's Of Logo Design For 2024..
Dos And Dont's Of Logo Design For 2024..Dos And Dont's Of Logo Design For 2024..
Dos And Dont's Of Logo Design For 2024..
 
Heuristic Evaluation of System & Application
Heuristic Evaluation of System & ApplicationHeuristic Evaluation of System & Application
Heuristic Evaluation of System & Application
 
Extended Reality(XR) Development in immersive design
Extended Reality(XR) Development in immersive designExtended Reality(XR) Development in immersive design
Extended Reality(XR) Development in immersive design
 
Claire's designing portfolio presentation
Claire's designing portfolio presentationClaire's designing portfolio presentation
Claire's designing portfolio presentation
 
Second Order Systems Qhhhhhhhhuestions.pptx
Second Order Systems Qhhhhhhhhuestions.pptxSecond Order Systems Qhhhhhhhhuestions.pptx
Second Order Systems Qhhhhhhhhuestions.pptx
 
Knowing, Understanding and Planning Cities- Role and Relevance Physical Plan...
Knowing, Understanding and Planning Cities- Role and Relevance  Physical Plan...Knowing, Understanding and Planning Cities- Role and Relevance  Physical Plan...
Knowing, Understanding and Planning Cities- Role and Relevance Physical Plan...
 
Design lessons from Singapore | Volume 3
Design lessons from Singapore | Volume 3Design lessons from Singapore | Volume 3
Design lessons from Singapore | Volume 3
 
Abdulaziz Tariq Abdulaziz Mustafa CV 2024
Abdulaziz Tariq Abdulaziz Mustafa CV 2024Abdulaziz Tariq Abdulaziz Mustafa CV 2024
Abdulaziz Tariq Abdulaziz Mustafa CV 2024
 
National-Learning-Camp 2024 deped....pptx
National-Learning-Camp 2024 deped....pptxNational-Learning-Camp 2024 deped....pptx
National-Learning-Camp 2024 deped....pptx
 
bobbi goods amelie y ximena # Bobbie gods forever
bobbi goods amelie y ximena # Bobbie gods foreverbobbi goods amelie y ximena # Bobbie gods forever
bobbi goods amelie y ximena # Bobbie gods forever
 
Common Designing Mistakes and How to avoid them
Common Designing Mistakes and How to avoid themCommon Designing Mistakes and How to avoid them
Common Designing Mistakes and How to avoid them
 
Heidi Livengood's Professional CADD Portfolio
Heidi Livengood's Professional CADD PortfolioHeidi Livengood's Professional CADD Portfolio
Heidi Livengood's Professional CADD Portfolio
 
一比一原版谢菲尔德大学毕业证成绩单如何办理
一比一原版谢菲尔德大学毕业证成绩单如何办理一比一原版谢菲尔德大学毕业证成绩单如何办理
一比一原版谢菲尔德大学毕业证成绩单如何办理
 

Acrocanthosaurus.pdf

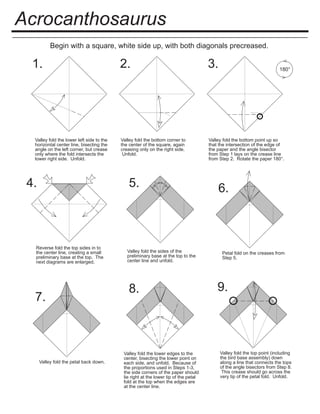
  • 1. Acrocanthosaurus 1. Begin with a square, white side up, with both diagonals precreased. Valley fold the lower left side to the horizontal center line, bisecting the angle on the left corner, but crease only where the fold intersects the lower right side. Unfold. 2. Valley fold the bottom corner to the center of the square, again creasing only on the right side. Unfold. 3. Valley fold the bottom point up so that the intersection of the edge of the paper and the angle bisector from Step 1 lays on the crease line from Step 2. Rotate the paper 180°. 4. Reverse fold the top sides in to the center line, creating a small preliminary base at the top. The next diagrams are enlarged. 180° 5. Valley fold the sides of the preliminary base at the top to the center line and unfold. 6. Petal fold on the creases from Step 5. 7. Valley fold the petal back down. 8. Valley fold the lower edges to the center, bisecting the lower point on each side, and unfold. Because of the proportions used in Steps 1-3, the side corners of the paper should lie right at the lower tip of the petal fold at the top when the edges are at the center line. 9. Valley fold the top point (including the bird base assembly) down along a line that connects the tops of the angle bisectors from Step 8. This crease should go across the very tip of the petal fold. Unfold.
  • 2. 10. Valley fold the entire model in half, right side over left. Rotate the model 90° counterclockwise (the thick point including the petal fold will be on the left). 90° 11. Valley fold the thick point at the left down to the bottom point and unfold. 12. Valley fold the thick point at the left down to the intersection of the edge and the angle bisector from Step 8 and unfold. 13. Double reverse fold the thick, left point inwards on the crease from Step 11 and back out on the crease from Step 12. 14. Valley fold the upper part of the paper (including the upper part of the thick, petal folded assembly inside) as far upwards as it will naturally fall. 15. The result. Unfold the top flap back down. 16. Turn the paper over from side-to-side. 17. Fold the top flap up again, as in Step 14. 18. Turn over from side-to-side. The next diagrams are enlarged. 19. Valley fold the left half of the model (top flap only) over the right, creating a vertical line connecting the top and bottom points, and unfold. 20. Squash fold the left hand part of the upeprmost flap to the right. The lower left point of the fold lies where many layers are locked together. 20. Squash fold the left hand part of the upeprmost flap to the right. The lower left point of the fold lies where many layers are locked together.
  • 3. Valley fold the top flap at the lower right of the squash to the vertical central line and unfold. 21. Swivel fold on the crease you made in Step 21. An additional valley fold will be made that connects the corner at the lower left and the upper end of the crease made in Step 21. 22. Wrap the small flap on the surface underneath. 23. Valley fold the topmost flap on the right over to the left, incorporating a rabbit ear in the triangle. 24. Unfold the flap and rabbit ear from Step 24. Turn the model over side-to-side. 25. Fold the petal at right back up along the existing crease. 26.
  • 4. The loose colored triangle that lies on top of the point at the bottom is connected to some paper that is currently trapped inside the model. Grabbing the circled points, pull them gently apart and away from each other to expose it; in doing so, the upper half of the model will also swing up. 27. 28. Pull out the trapped layer of paper, wrapping it around the the raised edge at the lower right (this is a diamond-shaped layer of paper when unfolded; as you do this, or unfold it, unwrap the paper, and refold it). The freed paper at the bottom of the petal fold at right will swing up. This is a difficult move. 29. Now the rectangle of paper is free, and sticking up in this diagram. Flatten the model by pushing the freed flap and the points to which it is connected down. The point at right that is connected to the petal fold goes the left, and the larger point at the bottom valley folds up and to the left on a new crease. Valley fold the top flap down and to the right. 30. Swivel the flap to the left. The valley fold at right and the vertical mountain fold are on existing creases. The right portion of the flap swivels downwards, and the left side swivels up and to the left. 31. Valley fold over and over three times to narrow the white flap. Only the first crease is new. 32. 1 2 3
  • 5. Valley fold the narrow flap and point at the bottom over to the right and unfold. 33. Reverse fold the flap through on the crease from Step 33. 34. Narrow the colored flap with two swivel folds. One narrows the flap covering the large point at the bottom; the other narows the colored point to the right, but note that it does not continue all the way to the tip of the point. Note that the swivel should go through the intersection (circled) of the flaps beneath (indicated by the x-ray lines). 35. The result. Turn the model over from top-to-bottom. 36. 37. 38. Valley fold the large flap at the bottom up as far as possible. Repeat Steps 20-35 in mirror image on this side. 20-35 x1
  • 6. Pull out paper under the two broad points at left, unfolding the petal fold and associated paper. 39. 40. Fold the model in half, bringing the top portion down over the bottom. The next series of diagrams are reduced in size. 41. Unsink the chevron-shaped paper from between the layers. 42. Spread squash the angled layer in the center. The valley fold on the top layer is on an existing crease. Repeat behind. 43. Valley fold the narrow flap at the left back down. Repeat behind. 44. Closed sink the flap inside. This is not easy because it's difficult to reach inside the model at this point without unfolding a lot of the model. Repeat behind. 45. Valley fold the tall, narrow flap at right over to the left; repeat behind. 46. Closed sink this flap inside, as well. Repeat behind.
  • 7. 47. Valley fold the upper half of the model down along a line even with the top of the point at left. 48. Valley fold the flap up at an angle. The fold line connects the very tip at the right with the point along the top edge at left. 49. Bring a layer from underneath the fin flap to the surface. This is something like unsinking a layer. This need not be repeated behind; in fact, this move will return symmetry of the layers to the model. 50. Swivel fold the top layers to narrow both the leg and the tail. Note that while the leg is folded along an angle bisector, the tail is not, and the flap goes further down than its present lower edge. Repeat behind. 51. Swivel fold the top layers of the leg and tail again. As before, the leg flap gets bisected; the tail flap should line up with the edge beneath. Repeat behind. Fold the narrow, white flap on the bottom of the tail inside. Repeat behind. 52. Valley fold the narrow flap on top the leg over to the right; repeat behind. 53. Closed sink the flap inside to narrow the leg. Repeat behind. 54.
  • 8. Double reverse fold the point at left up. The first reverse fold is hidden beneath the triangular points and is indicated by the x-ray and mountain fold lines; the second reverse fold is indicated by the vertical valley fold line. 55. Outside reverse fold the flap on the right along the edge of the arm points below. This occurs on an existing crease. The next diagrams are enlarged. 56. Outside reverse fold the flap again, bisecting the arm (lower) points. 57. Inside crimp the arms in half, bringing the head down a bit. In order to do this effectively and without ripping the paper, you will have to push in (like an open sink) the bit of the hump on the back that is hidden inside the neck (indicated by the x-ray line). 58. Outside crimp the head down. Note that the crease lines for the crimp do not meet on the top of the neck — you'll have to spread some paper and push out a bit from the inside to do this. 59. Narrow the neck by mountain folding some of the flap in front inside; as you do this, a small bit of the bottom of the head will be squashed into a gusset inside. Repeat behind. 60.
  • 9. Reverse fold the tip of the snout. Closed sink the point on the hump on the back to make the hump roughly of equal height along the back (it will still get shorter along the tail). 61. Rabbit-ear the thick arm points and swing them upwards. Reverse fold the tips of the leg points to form feet. Repeat both folds behind. 62. Fold hands down at the ends of the arms. Dent in some of the paper on the legs to shape the knee and ankle. Repeat behind. Inside the neck, closed sink some of the middle layer upwards to form a continuation of the hump on the back on the top of the neck. 63. Finished Acrocanthosaurus