
Recomendados
Más contenido relacionado
Destacado
Destacado (16)
Similar a Layout Guidelines for PSoC CapSense Applications
Similar a Layout Guidelines for PSoC CapSense Applications (16)
Último
Último (20)
Layout Guidelines for PSoC CapSense Applications
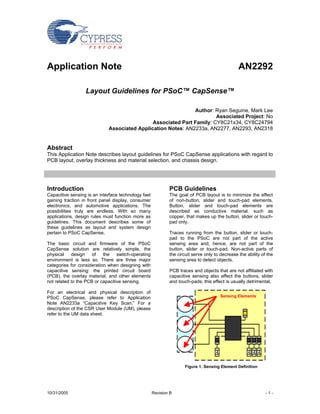
- 1. Application Note AN2292 Layout Guidelines for PSoC™ CapSense™ Author: Ryan Seguine, Mark Lee Associated Project: No Associated Part Family: CY8C21x34, CY8C24794 Associated Application Notes: AN2233a, AN2277, AN2293, AN2318 Abstract This Application Note describes layout guidelines for PSoC CapSense applications with regard to PCB layout, overlay thickness and material selection, and chassis design. Introduction PCB Guidelines Capacitive sensing is an interface technology fast The goal of PCB layout is to minimize the effect gaining traction in front panel display, consumer of non-button, slider and touch-pad elements. electronics, and automotive applications. The Button, slider and touch-pad elements are possibilities truly are endless. With so many described as conductive material, such as applications, design rules must function more as copper, that makes up the button, slider or touch- guidelines. This document describes some of pad only. these guidelines as layout and system design pertain to PSoC CapSense. Traces running from the button, slider or touch- pad to the PSoC are not part of the active The basic circuit and firmware of the PSoC sensing area and, hence, are not part of the CapSense solution are relatively simple, the button, slider or touch-pad. Non-active parts of physical design of the switch-operating the circuit serve only to decrease the ability of the environment is less so. There are three major sensing area to detect objects. categories for consideration when designing with capacitive sensing: the printed circuit board PCB traces and objects that are not affiliated with (PCB), the overlay material, and other elements capacitive sensing also affect the buttons, slider not related to the PCB or capacitive sensing. and touch-pads; this effect is usually detrimental. For an electrical and physical description of PSoC CapSense, please refer to Application Sensing Elements Note AN2233a “Capacitive Key Scan.” For a description of the CSR User Module (UM), please refer to the UM data sheet. Figure 1. Sensing Element Definition 10/31/2005 Revision B -1-
- 2. AN2292 The goal of PCB layout should be to minimize these interactions or, if they cannot be minimized, Ground Plane make them uniform for all capacitive elements. While the CSR User Module does contain algorithms that adjust for differences in native capacitance across objects in an array, it is good Sensor Pad practice to keep things as balanced as possible. The following sections describe the most obvious factors and give guidance for board layout. Gap Buttons A button is a single capacitive object connected to the PSoC. It does not need to react to fine changes in capacitance created by partial coverage of the activation area by a conductive Figure 3. Large Button with Ground Plane object, such as a finger. A button needs only to determine the presence or absence of a conductive object. Size All things being equal, larger buttons are typically Shape better. Two buttons connected to the PSoC with In many capacitive switch designs, the two identical traces will have different sensitivities if "plates" of the sensing capacitor are actually they are different in size. adjacent PCB pads or traces. Some example button shapes are shown in Figure 2. The effective button area seen by the PSoC is the large conductive pad at the end of the trace Figure 2 shows a variety of button shapes that (Figure 1). A general rule of thumb (no pun can be used with capacitive touch sensing. The intended) is to size the button to the contact area top row of buttons in Figure 2 shows inter- of the finger. This is demonstrated in Figure 4. digitated traces for use where the cover of the “Wasted” “Wasted” switch is very thin. This construction allows for Button Finger greater isolation of active buttons when button Area Finger Thumb Area pitch is very small. The bottom row of buttons in the figure shows single large pads, well spaced from a surrounding ground plane, allowing for longer range sensing. Figure 4. Button Size and Finger Size Larger buttons are more sensitive. However, the upper limit of button size is set by the effective area of the conductive object to be sensed (approximately 0.8 inches in the case of a human thumb). Figure 5 shows the general trend in button sensitivity versus button size. Figure 2. Button Shapes Functional Limit (Max Finger Size) An example of a single large button shape Sensitivity surrounded by a ground plane is shown in Figure 3. Button Size (Area) Figure 5. Button Size versus Sensitivity 10/31/2005 Revision B -2-
- 3. AN2292 For sensing through thicker materials (>2.5 mm), buttons with a diameter of at least 0.4 inches (10 mm) are recommended. Smaller buttons can work, but performance is diminished. Button-Button Spacing When button pitch is small and buttons are very close together, there may be interaction between buttons. Capacitive elements should be tied to ground when not active to minimize this interaction and decrease sensitivity to noise. Inputs associated with unused capacitive buttons should be programmed to the “Strong” GPIO drive mode. Figure 7. Button Capacitance, Cp, as a Function of Button-Ground Clearance Button-Ground Clearance and Button Diameter When possible, the ground plane should be placed on the same layer of the board as the buttons. The clearance between the button and Effect of Metal Backing Under Buttons ground plane plays an important role in setting Figure 6 shows details of the button side of the the capacitance of the button. This button circuit board. The non-button side of the board is capacitance is denoted as Cp in this Application not shown, but it is recommended that a metal fill Note. Electric field lines fringing between a button area be located under the button to control the and the ground plane are illustrated in Figure 6. capacitance of the button. The metal backing Cp is related to this electric field. increases the signal level of the button counts without increasing the noise level. For a 0.062” Ground Button Ground (1.57 mm) thick FR4 board, the raw counts from the button without a finger present increase with a metal backing by anywhere from 2% to 20%, depending on a number of factors of the configuration. The raw counts with a finger on the Figure 6. Button-Ground Plane Fringing Fields button will also increase with this metal backing, but by a slightly smaller amount. This difference in response tends to regulate the sensitivity The capacitance Cp decreases as the clearance (difference in counts). Sensitivity does not surrounding the button is increased. An example improve with a metal layer below the buttons, but of this dependence of Cp on the gap is shown in the raw counts increase. Figure 7 for three button sizes (5 mm, 10 mm, 15 mm diameter). In this example, the board is The metal backing can be left floating or FR4 material with thickness of 0.062 inches (1.57 grounded, since this setting will have little effect mm), there is no overlay on top of the buttons, on the sensitivity of the buttons. There may be the ground plane is on top of the board with the other reasons to float or ground this metal buttons, and there is no metal layer under the backing, but button sensitivity is not one of these buttons. reasons. A good starting point for most designs is to use a Noise button diameter of 10 mm and a button-ground The relaxation oscillator configured by the CSR plane clearance of 0.020-inch (0.5 mm). User Module contains a current source that is digitally programmable. This current source is a Digital-to-Analog Converter (DAC). The parameter ScanSpeed is set in software using the function SetScanSpeed. This function is described in the CSR User Module data sheet. For a given DAC current level, increasing ScanSpeed increases the number of counts from the buttons. The CSR User Module can be configured to operate in either the period measurement or frequency measurement method. 10/31/2005 Revision B -3-
- 4. AN2292 In both methods, if n is the number of counts, then n grows linearly with ScanSpeed, and the noise envelope grows as the square root of n. Looking at these relations between noise, counts and ScanSpeed, it is seen that the ratio of counts-to-noise scales as the square root of ScanSpeed. This means that if your system can tolerate longer scan rates for the buttons, you can improve the signal-to-noise ratio (SNR) by increasing the ScanSpeed. The DAC current at the heart of the relaxation oscillator in the CSR User Module is set in software by the function SetDacCurrent. As is common in analog circuits, the noise level drops with increasing bias current. In one application, it was observed that a DAC current of 8.8 µA Figure 8. Average Counts as a Function of Overlay produced a 3-sigma noise level of +/-10%, 4.4 µA Thickness produced +/-20%, and 2.2 µA produced +/-30%. These noise levels are for raw counts with a finger touching the buttons. When no buttons are touched, the noise level is well below 1% of the signal level. If the sensitivity is high, then DAC current can be decreased to save power without sacrificing button performance. With thick overlays or in noisy environments, there may not be enough noise margin at a given current level. In this situation, there may be no choice but to increase the DAC current to make the buttons work. The overlay thickness influences the noise level. The measured characteristics presented in Figures 8, 9 and 10 demonstrate how increasing Figure 9. Envelope of Noise as a Function of overlay thickness relates to noise. In Figure 8, Overlay Thickness with Finger on Button average raw button counts with and without a finger on the buttons are shown as a function of overlay thickness. The 3-sigma noise envelope is shown in Figures 9 and 10, in absolute counts and as a percentage of average raw counts as a function of overlay thickness. The noise level with a finger touching the button is highly dependent on the environment. The finger acts as an antenna that couples noise into the buttons from fluorescents lights, electric motors, and other noise sources. Figure 10. Envelope of Noise as a Percent of the Average Counts The CSR User Module contains a finger threshold and a noise threshold, which are illustrated in Figure 11. These parameters are set in the Device Editor of PSoC Designer. Counts will change when a finger is placed on the button. 10/31/2005 Revision B -4-
- 5. AN2292 When the change rises above the finger o CButton is the button capacitance threshold, the button is set to the ON state. o VBG is the bandgap voltage of CSR When the change falls below the noise threshold, o Icharge is the DAC current the button is set to the OFF state. The noise o tx is a constant due to CSR internals envelopes define a Design Margin as shown in Figure 11. The finger and noise thresholds need CButton is either Cp, the capacitance with no finger to be set as shown. The noise threshold is set present, or Cp + CF, the increased capacitance of above the noise envelope associated with no the button with a finger present. VBG is 1.3V. tx is finger on the button. The finger threshold is set 0.2us. Icharge is set in software, with 8.8 µA being below the noise envelope associated with a a good starting point for designs. Currents lower finger on the button. As mentioned previously, than this increase the noise level of the counts. the noise associated with the finger on the button Currents higher than this increase the power is highly dependent on noise sources that are consumption of the system. To set Icharge at 8.8 present in the environment where the buttons are µA, the function SetDacCurrent is passed the used. parameters 0x80 and 0 (128*0.069 µA). See the CSR User Module for more details on this function. Tcharge is typically set in the range of 10 µs to 20 µs. Longer charge times lead to slower scan rates. Shorter charge times lead to quantization effects, as discussed later in this section. Counts are accumulated in the CSR User Module over a time period, Tcount, that is set by the ScanSpeed parameter. In period measurement: Tcount = (ScanSpeed –2)* Tcharge (2) Figure 11. Finger and Noise Threshold Levels In frequency measurement: Determine the Design Margin Tcount = (ScanSpeed –2)/ (fclock / 255) (3) Button Design Example Time for a design example. Let’s say you are an where: experienced PSoC user that wants to use CapSense buttons in a project. The CSR User fclock is 24 MHz. Module data sheet contains example code that provides a good stating point for the software Using the period measurement method, the side of the design. Here is a list of things to presence of a finger on the buttons increases the define: button diameter and ground clearance, raw counts, n, of the button. Using the frequency board material, board thickness, overlay material, measurement method, the presence of a finger overlay thickness, button scan rate and CSR decreases the counts. Equations (4) and (5) method. The DAC current level and ScanSpeed describe this. In period measurement: will be determined as part of the design process. Refer to Application Note AN2233a for more n = Tcount * fclock (4) background on CapSense. In frequency measurement: Let’s select a button diameter of 10 mm and 1 mm clearance, board material of FR4, board n = Tcount / Tcharge (5) thickness of 0.062” (1.57 mm), overlay material of acrylic, and overlay thickness of 1 mm. This allows us to use the graph in Figure 7 to The period measurement method is used for this determine Cp. With no overlay, the button has a example, with a scan rate, Tcount, of Cp of 14.1 pF. This value includes the routing approximately 40 µsec per button. Using capacitance and PSoC pin capacitance. The Equation (1): relaxation oscillator has a ramp time, Tcharge , which is found with Equation (1). Tcharge = 14.1pF * 1.3V / 8.8 µA + 0.2 µs = 2.28 µs (6) Tcharge = CButton * VBG / Icharge +tx (1) Using Equation (2): 40us = (ScanSpeed –2)* 2.28 µs (7) 10/31/2005 Revision B -5-
- 6. AN2292 Rearranging Equation (7), and solving for an Sensitivity and Quantization Error integer ScanSpeed: The nominal frequency of the relaxation oscillator, fosc, is the reciprocal of the charge time ScanSpeed = 20, and Tcount =41 µs (8) without a finger on the button: Using Equation (4), when a finger is not present, fosc = 1 / Tcharge (13) the switch is unactuated, and the raw count is given by: The sensitivity of the system is the difference in counts between a finger on the button and no n = 41 µs * 24 MHz = 984 counts (9) finger. The counts using the period method decrease with a finger present, so sensitivity As seen in Figure 8, the 1 mm overlay should using the period measurement method is: increase the counts using the period method approximately 10%. senitivity = nfinger – n (14) nfinger = 984 * 1.1 = 1082 counts (10) Counts using the frequency measurement method increase with a finger present, so The noise level without a finger on the button is sensitivity using the frequency method is: very low, less than 1% of baseline counts. The noise level with a finger on the button is a senitivity = n – nfinger (15) function of the overlay thickness. From Figure 10, with a 1 mm overlay, the noise level with a finger The PSoC responds to the comparator in the present is approximately 1.2%. Plugging the 3- relaxation oscillator in sync with the 24 MHz sigma noise levels into Equations (9) and (10), clock: the estimates of the button counts are: Tsync = 1/fclock * INT( Tcharge * fclock) (16) n = 984 +/- 5 counts (11) Using the period measurement method, an nfinger = 1082 +/- 13 counts (12) estimate of sensitivity that includes quantization effects is found by substituting Tsync for Tcharge in The button counts without a finger present vary Equation (2). Figure 13 shows the period method randomly between 979 and 989 counts. The sensitivity as a function of fosc. The parameters in button counts with a finger on the button will vary this example are ScanSpeed of 20, Cbutton = between 1069 and 1095 counts. The design 15 pF without a finger and 16.5 pF with a finger. margin between a finger on and off the button is With DAC current of 2.2 µA, the relaxation 1069 – 989 = 80 counts. oscillator will be approximately 100 kHz, which is the recommended operating frequency. Note that That is the theory of operation. The system was sensitivity using the period method decreases as configured, and then counts were monitored the nominal relaxation oscilllator frequency during a button press so that the theory could be increases, and the function is smooth even compared to actual performance. Figure 12 though quantization effects are included. shows the raw counts of the system during the Increasing the oscillator frequency to speed up button press. The measured response agrees the scan rate of the buttons decreases the quite well with predictions. sensitivity of the buttons. This is one of the trade- offs to consider when designing a system using the period measurement method. Figure 12. Measured Counts of a Button Press Figure 13. Estimate of Button Sensitivity using Event for Design Example Period Measurement Including Quantization Effects 10/31/2005 Revision B -6-
- 7. AN2292 Sensitivity is computed in a similar manner using With a high oscillator frequency, small changes in the frequency measurement method. Figure 14 system parameters lead to large changes in shows frequency method sensitivity as a function sensitivity. It is possible for sensitivity to drop to of fosc. The parameters in this example are zero as shown in Figure 15. ScanSpeed of 255, Cbutton = 15 pF without a finger and 16.5 pF with a finger. With DAC Sliders current of 2.2 µA, the relaxation oscillator is A slider is a set of contiguous capacitive objects approximately 100 kHz. connected to the PSoC that are placed in a single line. Sliders are typically linear, running only along a single axis, however, they can follow a contour to any shape provided that it does not intersect any other capacitive sensing element. Sliders use differential capacitance changes between adjacent capacitive elements to determine centroid (center of mass) position of a conductive object with greater resolution than is native using an interpolation algorithm. Size and Layout While the general principle of larger elements being longer holds true for sliders as well, there is an upper limit of effectiveness. It is important that Figure 14. Estimate of Button Sensitivity using a conductive object, such as a finger, not be able Frequency Measurement Including Quantization to couple to only one element of a slider at a Effects time. This is because interpolated position requires data from more than one element. Note that sensitivity using the frequency method increases as the nominal relaxation oscilllator To ensure that a conductive object couples to frequency increases. more than one element, each element must be small enough so that the finger overlaps its Increasing the oscillator frequency to speed up outside edge. However, it must also be large the scan rate of the buttons increases the enough to function (sense) through the sensitivity of the buttons. This is an advantage of application overlay. using the frequency measurement method, but this advantage has limits. When the oscillator Since a slider element is in effect a button frequency is set to 1 MHz or higher, the sandwiched between two other buttons, the same sensitivity of the buttons is not well defined, as sizing practices apply to slider elements as to shown in Figure 15. buttons. The area of a slider element should be the same as a 0.4-inch (1.0 cm) button, 0.125 2 2 inches (3.14 cm ). Again, it is possible to utilize slider elements that are smaller than this, but their sensitivity will be diminished. To create more overlap between slider elements, which provides better differential change between elements, a saw tooth pattern can be used. This pattern can have any number of points, though one or two points is often enough. Figure 16 shows this design with relative dimensions. Figure 15. Quantization Effects seen in Frequency Measurement at High Frequency It is temping to set the oscillator frequency between 2.0 - 2.5 MHz using the frequency method to take advantage of the high sensitivity, but this is not recommended. 10/31/2005 Revision B -7-
- 8. AN2292 10mm 8mm Because sensing pins, when not being actively 4mm 4mm sensed by the PSoC, are grounded, an active slider element is surrounded on both sides by 8mm 8mm more ground. For this reason, the same spacing 1mm between slider elements should be used, 0.020 inches (0.5 mm). Decreasing this spacing does 8mm 8mm bring the buttons closer together, however, the positive impact of buttons being closer together 5mm 4mm for interpolation is outweighed by additional fringe capacitance between slider elements during sensing. 8mm 8mm Diplexing If IOs are at a premium, connecting two slider 4mm 4mm elements to a single PSoC pin increases the 10mm 8mm number of slider elements that can be sensed by Figure 16. Slider Element Shapes the PSoC (and thus the lineal distance) two-fold. The CSR User Module Wizard allows the user to select this as an option, however, the pin Spacing assignment for elements in the slider is Slider element spacing with regard to the prescribed. An example of a diplexed slider is surrounding ground plane is the same as for shown in Figure 17. Six is the minimum practical buttons. The 0.020 inches (0.5 mm) between the number of pins to use in a diplexed slider. Table slider element and the ground plane reduces the 1 shows some basic diplexing tables. Figures 18 fringe capacitance between the two enough that and 19 represent the data collected by the PSoC its impact on sensing is low. relative to finger position. In Figures 18 and 19, note that the capacitance of both elements connected to the PSoC pin increases. Though changes in capacitance are detected in more than one place, there is only one location (of the two) at which all the adjacent elements have a higher capacitance than the baseline. 0 1 2 3 4 5 0 3 1 4 2 5 Figure 17. Diplexed Slider Basic Example (Six Pins) 10/31/2005 Revision B -8-
- 9. AN2292 Table 1. Common Diplexing Tables 6 Pins, 12 Elements 8 Pins, 16 Elements 10 Pins, 20 Elements 0 0 0 1 1 1 2 2 2 3 3 3 4 4 4 5 5 5 0 6 6 3 7 7 1 0 8 4 3 9 2 6 0 5 1 3 4 6 7 9 2 1 5 4 7 2 5 8 Finger Figure 18. Slider Data from Finger Press on Left Side of Slider Finger Figure 19. Slider Data from Finger Press on Right Side of Slider 10/31/2005 Revision B -9-
- 10. AN2292 Touch-Pads A touch-pad, like a slider, is a collection of capacitive elements that detect the position of a conductive object, such as finger, to a resolution Y1 greater than that which is native. Touch-pads are capable of defining position on two axes. Y2 However, this added functionality comes at a price: overlay material is limited to 0.5 mm and Y3 sensing area is diminished. X1 X2 X3 Size The size of a touch-pad is a product of the design Figure 21. Octagon Touch-Pad Layout requirements but is restricted by the physical limitations of capacitive element size. As in a slider, it is necessary for the conductive object to In both of the above layouts and for touch-pads in contact or couple to more than one element. general, it is good practice to surround the touch- pad with a ground plane that follows the contours Patterns of the sensing elements. This is to simulate the There are many different patterns that can be effect of the grounded sensing elements that used in touch-pad applications. These patterns surround elements on the inside when only one involve two sets of capacitive elements: x- and y- pin of the PSoC device is active. axes. The patterns of x- and y-corresponding elements must overlap in their coverage of the Traces that run to the touch-pad from the PSoC area, not in absolute terms but rather to ensure are on the bottom layer of a 2-layer PCB. It is that a finger press is detected by more than one important to extend all traces to the end of the row and column. Multiple x- and y-dimension board; this makes PSoC pins along a given detection is a requirement for interpolation, access behave more uniformly. covered in the slider description. Non-CapSense PCB Elements Note that the following patterns are suggestions When designing for capacitive sensing, it is only. These suggestions do not guarantee important to account for more than just the circuit freedom from existing patents. that is involved directly with the sensing. The entire circuit has an effect on the capacitance of The goal of any touch-pad layout pattern is to the sensor elements and their traces. Most often, maximize the area covered by conductive PCB elements have a negative effect on material, such as copper, in relation to the sensitivity. Hardware elements such as spaces necessary to define the rows and capacitors, connectors, resistors, other ICs, etc., columns. Shapes such as triangles, squares, add to the CP (native capacitance) of buttons to hexagons, octagons, etc., are all viable options. which they make contact. Traces, even those not Examples of some of these shapes are shown in involved with sensing, can couple to sensing Figures 20 and 21. elements. High-frequency communication lines can impact the relaxation oscillator. It is for this reason and many others that the whole of board layout must be considered and optimized for Y1 capacitive sensing. Y2 Y3 Board Dimensions PCB dimensions are most often determined by Y4 the physical limitations of the design, be they Y5 small or large. Board Area X1 X2 X3 For capacitive sensing, the total board area is not important. What is important is the area covered Figure 20. Hexagon Touch-Pad Layout by the sensing elements and traces. It is good practice to keep this area down by keeping the distance between the PSoC and the sensors to a minimum. Centering the PSoC among the sensor elements is one way to ensure optimized board area. 10/31/2005 Revision B - 10 -
- 11. AN2292 Board Thickness Also, keeping traces on the side of the PCB Standard PCB thicknesses does not routinely opposite the user decreases the impact of a create a problem for capacitive sensing. Designs finger on the traces, ensuring that all capacitive built on 0.020-, 0.047-, and 0.063-inch thick change on the sensor pin is from the finger’s (or PCBs are quite capable of sensing through other conducting object’s) interaction with the necessary material overlays. Thinner FR4 or active sensing area, and not from interaction even Kapton may sacrifice some sensitivity. If between the finger and trace. design guidelines do not exist for a circuit board material or board thickness required for an Do not run capacitive sensing traces in close application, it is recommended that a PCB be proximity with and parallel to high-frequency prototyped with representative buttons and communication lines, such as an I2C or SPI ground plane so that Cp can be characterized. master. The frequency in communication lines As board thicknesses decreases, Cp increases. can alter the performance of the oscillator and As discussed earlier in this Application Note, impair performance of the capacitive sensors. If it sensitivity is controlled by Cp, so board thickness is necessary to cross communication lines with plays an important role in the performance of the sensor pins, be sure the intersection is CapSense system. orthogonal, as shown in Figures 22 and 23. A metal layer or ground plane under the buttons COM on the non-button side of the circuit board is often helpful. If a multi-layer board is used, the area under switches on inner layers should be clear. COM Refer to the Button section of this Application Note for a discussion of the effect of metal backing under buttons. Capacitive Sensing Traces Bad Good A described above, traces that run from the PSoC to the sensors decrease the sensitivity of Figure 22. Multi-Layer Treatment of Sensing and the sensors by increasing CP and decreasing the Communication Lines SNR. The signal is decreased by the trace length because it adds parallel capacitance to the sensing circuit that does not interact with finger COM position, and therefore does not contribute to the signal. Noise is increased by trace length because the trace picks up noise from both in- circuit and external noise sources. Length Shortening trace lengths from the PSoC to the sensor reduces the opportunity for other design elements to couple to sensing traces. Make traces from the PSoC to the sensor as short as PSoC possible. Use the minimum number of vias consistent with routing for minimum length. Width Trace width adds to the sensor CP by adding copper area to the system. It also increases coupling to elements on other layers by way of PSoC COM the increased copper area. Trace widths between 0.0065 inches and 0.008 inches suffice for most Bad Good applications. Figure 23. Same-Layer Treatment of Sensing and Placement Communication Lines Placement of capacitive sense traces must minimize interaction with other design elements, including other capacitive sense traces, whenever possible. 10/31/2005 Revision B - 11 -
- 12. AN2292 One effective method for reducing the interaction When board height restrictions are important and between communication traces and sensor there are elements on the non-sensor side of the traces is to isolate each by port assignment. PCB, traces can run along the same layer as the Figure 24 shows a basic version of this isolation buttons or not. The ground plane should be for a 32-pin QFN package. Communication and placed on the non-sensor side and cover area addressing pins are assigned to Port 1. Sensing even underneath the buttons. is achieved on the other three ports. Because each function is isolated, the PSoC can be % Fill oriented so that there is no crossing for For designs that have the ground plane on the communication and sensing traces. sensor layer, a 40% fill protects the sensing traces while not interacting with them too much. For designs that have the ground plane on the To Sensors non-sensor layer and require shielding from other design elements, a 60-80% fill protects the circuit. A 100% fill is not necessary and only serves to increase the CP value of each sensor To Sensors To Sensors without offering any appreciable protection over 60-80%. To Communication Figure 24. Port Isolation for Communication and Sensing 40% 80% Ground Plane Most work with a ground plane in CapSense Figure 25. Partial Ground Fill circuits seeks to decrease the interaction between ground and the sensing traces. Other Board Elements However, there are cases when interaction Other PCB elements, such as connectors, between ground and the sensing traces is both capacitors, resistors, and other ICs, impact prescribed and welcome. The ground plane in sensing and sensitivity by coupling to capacitive most applications should be on the sensor side of sensors and traces. Efforts made to limit this the board. Refer to the Button section of this interaction will improve the SNR and ultimately Application Note for a discussion on buttons, the the sensitivity of the sensor circuit. ground plane, and the clearance between them. Sensing lines that are attached to other board In designs where vertical height restrictions are elements, such as ISSP programming headers, aggressive and metal and other objects are are more sensitive to external noise and have a positioned near the sensing PCB, a ground plane higher CP value due to the increased area of between the sensors protects the circuit and metal in the line. It is recommended that sensing yields more consistent results at some cost in lines in capacitive sensing applications be sensitivity. Often the most important aspect of connected to sensors only. This means avoiding sensing is reliability of the data. This is increased placing switches on the programming pins, P1[0] with a constant interaction between metal and and P1[1]. sensing elements. Sensor and sensing traces near large metal Location elements on the circuit will interact with these When board height restrictions are not important objects. This interaction is most often detrimental. and there is nothing of consequence close to the It is recommended that sensor and sensing non-sensor side of the PCB, run the sense traces traces be isolated from other circuit elements. along the non-sensor layer of the PCB and via This is especially true of antennae and other them to the sensors. The ground plane is located signal sending/receiving elements. Refer to on the top layer of the board to protect the Application Note AN2318 “EMC Design system from accidental detection through Considerations for PSoC CapSense(TM) interaction with the sense lines rather than the Applications“ for information on this topic. sensors. 10/31/2005 Revision B - 12 -
- 13. AN2292 Overlay Table 2. Dielectric Constants of Common Materials It is rare that a design gives the end user access to the bare PCB or one using only soldermask. Material εr Rather, there is usually a material overlay across Air 1.0 the surface of the PCB that protects the user Formica 4.6 – 4.9 from the circuit and the circuit from the environment. Glass (Standard) 7.6 – 8.0 Glass (Ceramic) 6.0 Properties Mylar® 3.2 Overlays in CapSense applications MUST not be Plexiglass 2.8 conductive. Metals and other conductive ABS 3.8 – 4.5 materials do not form the dielectric of the Wood 1.2 – 2.5 capacitor when placed between two conductive plates, such as the finger and the sensor. Air, with a dielectric on 1.0, is not well suited to The capacitance of a parallel plate capacitor is capacitive sensing applications. In fact, it is four given in Equation (17). times more difficult to sense through air as it is to sense through ABS plastic. This does not necessarily translate into four times the sensitivity ε rε 0 A C= (17) with an ABS overlay as compared to air. A high d dielectric constant material will have slightly higher counts as compared to a different material The geometry of this simple system is captured in with the same overlay thickness of a lower dielectric constant. It is for this reason the air the ratio A/d. A is the area of the conductive gaps between sensors and the overlay material plates, d is the distance between the plates, εr is are not recommended. Eliminating air gaps is the dielectric constant (permittivity) of the also a good practice from a mechanical point of material between the sensors, and ε0 is the view. See the Adhesives section below. permittivity of free space. A design parameter that has a bigger influence The geometry of the capacitive sensor is more on raw counts than the dielectric constant of the complex than the parallel plate capacitor. The overlay material is the clearance between the conductors in the sensor include the finger and button and ground plane. Raw counts can be PCB copper. In general, the geometry of this increased more easily through adjustment of this capacitive system is captured by the function clearance than through selection of the overlay. f(A,d). Equation (18) states the relation between It is good that the system has this characteristic geometry, the dielectric constant, and the system since the dielectric constant of the overlay capacitance. material may not be well controlled from batch to batch, while PCB features are tightly controlled. C = ε r ε 0 f ( A, d ) (18) Thickness Overlay thickness is inversely proportional to Like the parallel plate capacitor, the capacitance sensitivity, as shown in Figure 26. See the Button of the sensor is directly proportional to εr . section of this Application Note for a specific example of this characteristic. Different Materials Dielectric constants of some common overlay materials are listed in Table 2. Materials with dielectrics between 2.0 and 8.0 are well suited to capacitive sensing applications. Sensitivity Overlay Thickness Figure 26. Overlay Thickness versus Sensitivity 10/31/2005 Revision B - 13 -
- 14. AN2292 Table 3 lists the recommended maximum overlay Chassis thicknesses for PSoC CapSense applications. The chassis of a CapSense application, as discussed with reference to specific design Table 3. Design Element Overlay Thickness elements in the previous sections, impacts the sensitivity of capacitive sensors by interacting Design Element ε with the sensors and the traces from the IC to the Button <4.0 mm sensors. Slider <1.0 mm The three most common chassis design Touch-Pad <0.5 mm elements that impact sensing are metal support structures, communication cables, and Adhesives separation between the sensing PCB and the Overlay materials must not have intermittent overlay material. contact with the sensing PCB. To ensure constant contact, an adhesive may be necessary. The latter is discussed in the Overlay section When choosing an adhesive, it is important that it above. Metal support structures must be kept not be able to hold a charge at all. Use of away from sensing elements and traces when “double-sided tape” will impair performance of the possible. Where support structures are capacitive sensing circuit since the tape itself has necessary, non-metal structures are some conductive charge absorptive properties. recommended. If metal is required, a bottom-side ground plane of 80% fill is recommended to Two widely used adhesives for overlays are protect the circuit. made by 3M, 467 and 468. Both these adhesives are sticky on two sides and do not hold a charge. Communication cables and wires interact with the They have been commonly used by label and sensing elements by imposing their own high- membrane switch manufacturers for years and frequency signals on that of the relaxation are considered industry standard. They are also oscillator. Communication cables must be kept thin enough not to impair sensing. For complete away from sensors and traces when possible or information on these adhesives and to find out shielded from sensors through the use of an how to get samples for prototyping, see the 80%-fill ground plane. Refer to Application Note “Products” page of the 3M web site at AN2318 for information on this topic. http://www.3m.com. Conclusion The nature of capacitive sensing, the mystery of electric fields, creates some difficult challenges in design. There is no silver bullet for all designs. Rather, there are only functional, empirical design guidelines to help layout and design engineers find the golden path to design. Capacitive sensing may take multiple design revisions to find the best layout for the application. However, knowledge of what has worked in the past and an understanding of the physics at work can reduce design revisions and accelerate design time. 10/31/2005 Revision B - 14 -
- 15. AN2292 About the Authors Name: Ryan Seguine Title: Product Marketing Engineer Background: BS, University of Washington 2004 Contact: rxi@cypress.com Name: Mark Lee Title: Senior Applications Engineer Background: PhD, University of Washington Electrical Engineering, 1992 Contact: olr@cypress.com Cypress Semiconductor 2700 162nd Street SW, Building D Lynnwood, WA 98087 Phone: 800.669.0557 Fax: 425.787.4641 http://www.cypress.com/ Copyright © 2005 Cypress Semiconductor Corporation. All rights reserved. "Programmable System-on-Chip," PSoC, PSoC Designer and PSoC Express are trademarks of Cypress Semiconductor Corp. All other trademarks or registered trademarks referenced herein are the property of their respective owners. The information contained herein is subject to change without notice. Made in the U.S.A. 10/31/2005 Revision B - 15 -