
Recomendados
Más contenido relacionado
La actualidad más candente
La actualidad más candente (20)
Destacado
Destacado (12)
Similar a Ap ar netting
Similar a Ap ar netting (20)
Último
Último (20)
Ap ar netting
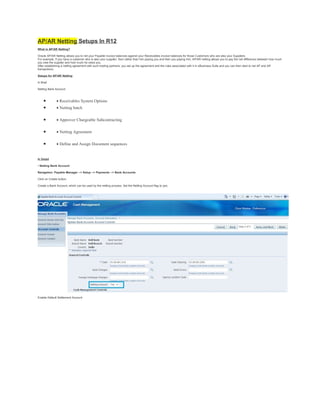
- 1. AP/AR Netting Setups In R12 What is AP/AR Netting? Oracle AP/AR Netting allows you to net your Payable invoice balances against your Receivables invoice balances for those Customers who are also your Suppliers. For example, If you have a customer who is also your supplier, then rather than him paying you and then you paying him, AP/AR netting allows you to pay the net difference between how much you owe the supplier and how much he owes you. After establishing a netting agreement with such trading partners, you set up the agreement and the rules associated with it in eBusiness Suite and you can then start to net AP and AR transactions. Setups for AP/AR Netting: In Brief Netting Bank Account • • Receivables System Options • • Netting batch • • Approver Chargeable Subcontracting • • Netting Agreement • • Define and Assign Document sequences In Detail • Netting Bank Account Navigation: Payable Manager --> Setup --> Payments --> Bank Accounts Click on Create button. Create a Bank Account, which can be used by the netting process. Set the Netting Account flag to yes. Enable Default Settlement Account
- 2. Assign this bank account to the seeded Receivables receipt class “AP/AR Netting” Navigation: Receivable Manager --> Setup --> Receipts --> Receipts Class. Query AP/AR Netting and then click on Bank Accounts and assign the Netting bank account.
- 3. • Receivables System Options Check the “Allow payment of unrelated transactions”check box under the Receivables system options, if you want to create netting agreements across multiple unrelated customers. Navigation: Receivable Manager --> Setup --> System --> System Options.
- 4. • Netting batch approver If approval is required for a netting agreement, the approver must be set up as a contact for the trading partner (Customer / Supplier). The contact must be setup with an email address. • Chargeable Subcontracting Navigation: System administrator --> Profile --> Systems When the Profile option “Chargeable Subcontracting Enabled” is set to: Yes – This will select invoices that were matched to purchase orders with outsourced assemblies by the netting process. No – This will select invoices that were matched to purchase orders without outsourced assemblies by the netting process. D (disregard) – This means all eligible invoices will be selected for netting irrespective of whether or not they are matched to purchase orders. • Netting Agreement Create netting agreement to setup the rules that will decide which transactions are selected for netting and how they are ordered and processed once selected. Navigation: Receivable Manager --> Receipts --> Netting --> Netting Agreement. Click on Create Agreement.
- 5. Enter the information click on Next. Enter Supplier Name and Customer Name Click on Next and then Finsh. Define and Assign Document Sequential Numbering. Define Sequential Numbering:
- 6. Navigation: System Administrator --> Application --> Sequential Numbering --> Define. Assign Document Sequential to categories: Navigation: System Administrator --> Application --> Sequential Numbering -->Assign Document Tab: Assignment Tab:
- 7. Criteria used for Selecting AP Invoices: • Transaction due date must be less than or equal to AP scheduled payment due date. • AP scheduled payment due date must be between the Netting Agreement Start Date and End Date. • Only invoices for the Supplier and supplier sites (if specified) in the agreement are selected. • Only invoices with the selected invoice types in the agreement are included. • Operating unit of the invoices must be the same as the operating unit of the batch. • Invoices must be approved • Invoices must not be on Hold • Invoices that have already been included in a batch that is not yet in status ‘Complete’ are not included. • Locking AP invoices: o Selected AP invoices are locked by populating AP_PAYMENT_SCHEDULES.Checkrun_id Column for the selected invoices o The same Checkrun_id value is populated in FUN_NET_BATCHES.Checkrun_Id for the given batch Criteria used for Selecting AR Transactions: • AR Payment Schedule due date must be less than or equal to transaction date mentioned in Netting. • AR payment schedule date should be between the Agreement Start Date and end date. • Transactions must be complete • Only Transactions for customer and customer sites (if specified) in the agreement are selected. • Only transactions with the selected transaction types in the agreement are included. • Operating unit of the transactions must be the same as the operating unit of the batch. • The Receipt method associated with the transaction should not have a Payment_type_code = ‘CREDIT_CARD’ • Transaction must not be in dispute • Payment schedule status must be open • Transaction must not be a prepayment (RA_CUSTOMER_TRX.PREPAYMENT_FLAG = ‘N’) Criteria used for ordering the transactions: • Invoices and transactions are first ordered by Supplier and Customer priority associated in the agreement. • They are then ordered by Netting order rule selected in the agreement. • The priority is important as this determines which transaction/invoice will be netted first. What happens when we submit a Netting Batch? The following validations are performed when a netting batch is submitted, as there might be a time lag between when the batch is created and when the batch is submitted. It is also possible that the batch may have been modified. • If the current date has passed the batch settlement date, then the batch is set to status ‘SUSPENDED’ and the AP invoices are unlocked. • AP and AR balances for transactions are validated again. If the validation fails then the batch is set to status ‘ERROR’ and the AP invoices are unlocked. • If the batch has passed all validations, it is sent for approval, if approval is required, else the settle Netting batch process is initiated. How Netting Batches are settled? • Validation o The process starts off with the validation of AR transactions. This is necessary as the AR transactions are not locked when the netting batch is created and therefore there is a possibility that the AR transaction may have been modified since it was included in the netting batch o If any validations fail, the batch is set to Cancelled Status. o Validations are also performed to check whether the GL, AR, and AP periods are open for the batch
- 8. settlement date. If not, then the batch is set to status ‘ERROR’ and an error message is displayed in the Report log. • Derive Netting Bank Details o Netting bank details like bank account name, bank account owner and number are derived based on the FUN_AGREEMENTS.bank_account_id for the given batch. Settle AP invoices o Invoices in each batch are grouped by vendor, vendor site and invoice currency code. o AP payment APIs are called to process the payments. These APIs return the check id which is updated in FUN_NET_AP_INVS_ALL.Check_ID • Settle AR transactions o AR receipt APIs are called to create and apply the receipts. These APIs return the receipt id which is updated in FUN_NET_AR_TXNS.RECEIPT_ID o If all processing goes through successfully then the batch is set to COMPLETE and the AP invoices and netting agreements are unlocked. What are various Netting Batch Statuses? Netting Batch Status Event RUNNING User creates the netting batch SELECTED Review Batch option is set to YES ERROR Error encountered while validating or selecting transactions SUSPENDED Current date has gone passed the batch settlement date CLEARING Review batch option is set to NO but no approval is required. SUBMITTED Review batch option is set to NO and approval is required. REJECTED Batch has been reversed APPROVED User approves batch requiring approval COMPLETE Netting process completed for transactions REVERSING User chooses to reverse the batch REVERSED Batch has been reversed What tables are involved? AP/AR Netting engine is owned by ‘Oracle Financials Common Modules’ (FUN) Product. All tables behind the scene will be stored under the FUN schema. Information related to Netting is stored in the following tables: Table Name Table Purpose FUN_NET_AR_TRX_TYPES_ALL Netting Agreement – Transaction types of AR FUN_NET_AP_INV_TYPES_ALL Netting Agreement – Transaction types of AP FUN_NET_AGREEMENTS_ALL Netting Agreement – Details FUN_NET_SUPPLIERS_ALL Netting Agreement – Supplier Details FUN_NET_CUSTOMERS_ALL Netting Agreement – Customer Details FUN_NET_BATCHES_ALL Netting Batch – Details FUN_NET_AR_TXNS_ALL Netting Batch – Details of AR transactions FUN_NET_AP_INVS_AL Netting Batch – Details of AP invoices AP/AR Netting automatically compares Payables to Receivables and creates the appropriate transaction in each system to net supplier invoices and customer invoices. With this functionality, A receivables user can • View netted receipt details directly from the receipt • Create Netting Agreements and Netting Batches With this functionality, there is significant increase in user productivity and effectiveness because of tight integration and automation. You can access the process via: • Navigation: Receipts > Netting > Netting Batch • Navigation: Receipts > Netting > Netting Agreement • Receipts > Receipts > Action Menu : AP/AR Netting After Querying a netted receipt, the user can see more details about the batch by
- 9. selecting AP/AR Netting from the Action menu. This launches the AP/AR Netting batch window. Netted Receipts are created automatically by the AP/AR Netting process and cannot be updated by the user from the Receipts Workbench As we have seen Contra charging has been replaced by AP/AR Netting, lets take a setup walk though to use this functionality. 1.Define netting control account Setup>Financials>Flex field>key>values 2.Create bank Setup>payment>Bank and Bank Branches You should note ,Payment document is not required for netting bank account. 3.Go to receivables responsibility, receipt class definition form Setup>Receipts>Receipt class Query the 'AP/AR Netting' receipt class which is a seeded one.
- 10. 4. Attach your bank account in this receipt class. 5.Go to system options, transaction and customer tabbed region, there enable 'Allow payment of Unrelated Transactions'check box
- 11. 6. Create netting agreement Receipts>Netting>Netting Agreement 7. Enter an Invoice in Payables, validate and run create accounting. 8. Enter a transaction in receivables.
- 12. 9. Create Netting Batch Receipts >Netting >Netting Batch 10. Query your netting batch and see the status as Complete. also click on view report icon on right side.click on run push button, you can see the final netting report. 11.Go to view>request>find You can see 3 concurrent request programs • Create Netting batch • Settle netting batch • Netting Data Extract 12.Now go to receipts and query the AP/AR netting receipt. 13.Now Go to Tools >view Accounting, you can see Netting control account (defined in first step a) debited and receivable account credited. 14. Now go to payables and query your invoice number and click the tab view payments. You can see the payment details and copy the document number. 15.Query your copied payment document number.What you can see the payment type as Netting . 16.Click actions button and enable the check box create accounting . 17.Go to tools>view accounting .You can see the accounting entry • 1. AP/AR Netting
- 13. • 2. Netting When a trading partner is both a customer and a supplier, you may choose to offset open receivables’against open payables’ items. Netting Agreements add trading partner terms as well as deploying company controls. A selection program automatically pulls information from Oracle Receivables and Oracle Payables taking into consideration discounts, late fees, and withholding taxes prior to determining the final netting amount. A review process and trading partner approval afford further verification to support the netting event. • 3. Per-Requisites Setups Required for AP/AR Netting - Define netting control account Receivables System Options Create bank- “Netting Account” flag to Yes Receipt class -‘AP/AR Netting’ Attach your bank account in this receipt class Netting Batch Approver Profile: Chargeable Subcontracting Enabled Document sequencing for AP & AR Netting Agreement • 4. Receivables System Options-Enable check box “Allow Payment of Unrelated Transactions” • 5. Netting Bank Account • 6. Receipt Class –Creation Method AP/AR Netting • 7. Attach Bank Account to Receipt Class • 8. Profile Option: Chargeable Subcontracting Enabled“Yes”- Only invoices that were matched to purchase orders with outsourced assemblies would be selected by the netting process.“No”- Only invoices that were matched to purchase orders without outsourced assemblies would be selected by the netting process.“D”- All eligible invoices will be selected for netting irrespective of whether or not they are matched to purchase orders. • 9. Document Sequencing Category Receivables- AP/AR Netting Payables- Netting payments • 10. Netting Agreement Payables -> Payment -> Netting Receivables -> Receipt -> Netting • 11. Entering Netting Batch • 12. Request Create Netting Batch Settle Netting Batch Netting Data Extract • 13. Query Receipt • 14. Query Payments Note- No Payment Document is to be Attached After a R12 upgrade, you will notice a new feature in Payables – AP/AR Netting. You can use the feature when a vendor is also a customer and you wish to offset their AP invoices with your
- 14. AR invoices. This new netting feature replaces contra-charging and Federal Financials netting in 11i. The 10 steps to setup AP/AR Netting are: 1. Create a Netting Bank 2. Create a Netting Bank Branch 3. Create a Bank Branch Contact (optional) 4. Create Receipt Class 5. Associate netting bank with the new receipt class 6. Add receipt method (define in the receipt class) to the customers you wish to net. 7. Create a Netting Agreement 8. Add suppliers and customers to the netting agreement. 9. Create Document Sequences of type Automatic, one for Payables and one for Receivables 10. Assign defined sequences AR End to End Configuration of AR in R12 There are few key steps that are to be configured outside of AR 1. Define Ledger with LE 2. Define Operating Unit and link to Ledger and LE 3. Define atleast one Inventory Item Organization 4. Define Item Validation Organization in Order Management – We can share this menu, if we don’t implement OM
- 15. 5. Define Tax in EB Tax. 6. Define banks, branches and accounts – Possible to configure through AR, if security is enabled through UMX security wizard 7. Define or Assign key profile option values to AR responsibilities Define all the following setup using Receivables Manager responsibility: Define System Option Define system options to customize your Receivables environment. During Receivables setup, you specify your accounts, customer and invoice parameters, and how the Auto Invoice and Automatic Receipts programs will run. Setup>System>System Option Define system option for each Operating Unit.
- 16. Define Payment Terms Receivables lets you define standard payment terms for your customers to specify the due date and discount date for their open items. Payment terms can include a discount percent for early payment and you can assign multiple discounts to each payment term line. For example, the payment term '2% 10, Net 30' indicates that a customer is allowed a two percent discount if payment is received within 10 days; after 10 days, the entire balance is due within 30 days of the transaction date with no applicable discount. Setup>Transaction>Payment Term Define Transaction Type Use transaction types to define the accounting for the debit memos, credit memos, on-account credits, chargebacks, commitments, invoices, and bills receivable you create in Receivables.
- 17. Transaction types also determine whether your transaction entries update your customers' balances and whether Receivables posts these transactions to your general ledger. Setup>Transaction>Transaction Type Define this for each operating unit. Define transaction type for atleast Invoi ce, Deposit, Credit Memo and Debit Memo transaction classes. Define Transaction Source Batch sources control the standard transaction type assigned to a transaction and determine whether Receivables automatically numbers your transactions and transaction batches. Active transaction batch sources appear as list of values choices in the Transactions, Transactions Summary, and Credit Transactions windows, and for bills receivable in the Bills Receivable and Bills Receivable Transaction Batches windows. Setup>Transaction>Source
- 18. Define this for each operating unit. Select Type as ‘Imported’, if invoice is to be imported into AR from third party/legacy/external systems. Define Memo Lines Standard memo lines are lines that you assign to a transaction when the item is not an inventory item (for example, 'Consulting Services'). You can assign memo lines to debit memos, on-account credits, debit memo reversals, chargebacks, commitments, and invoices. Receivables display your standard memo lines as list of values choices during credit memo entry in the Credit Transactions window and during invoice entry in the Lines window. When you create chargebacks and debit memo reversals, you can either use the standard line that Receivables provides or enter your own. You can create an unlimited number of standard memo lines. Setup>Transaction>Memo Lines
- 19. Define this for each operating unit. This is particularly important, if we implement AGIS. Define Accounting Rules Define accounting rules to create revenue recognition schedules for your invoices. Accounting rules determine the number of periods and percentage of total revenue to record in each accounting period. You can use accounting rules with transactions that you import into Receivables using Auto Invoice and with invoices that you create manually in the Transaction windows. You can define an unlimited number of accounting rules. This is generally applicable to project based invoices, property invoices etc. Setup>Transaction>Accounting Rules
- 20. Define Auto Accounting Define Auto Accounting to specify how you want Receivables to determine the default general ledger accounts for transactions that you enter manually or import using Auto Invoice. Receivables creates default accounts for revenue, receivable, freight, tax, unearned revenue, unbilled receivable, late charges, bills receivables accounts, and Auto Invoice clearing (suspense) accounts using this information. Setup>Transaction>Auto Accounting
- 21. Define this for each operating Unit. Define this atleast for revenue, receivable, freight, tax, unearned revenue, unbilled receivable, bills receivables accounts, and Auto Invoice clearing. Tax code will default from EB Tax, which can be updated/modified here in this auto accounting window. Define Approval Limit Use the Approval Limits window to define approval limits for Adjustments, Receipt Written off, Credit memo refund and Credit memo Setup>Transaction>Approval Limit
- 22. Define this for each user. Define Receivables Activities Define receivables activities to default accounting information for certain activities, such as miscellaneous cash, discounts, late charges, adjustments, and receipt write-off applications. Setup>Receipts>Receivables Activities
- 23. Define this for each operating unit. This can be configured only after EB Tax configuration. Define Auto Cash Rule set - Optional configuration Define Auto Cash Rule Sets to determine the sequence of Auto Cash Rules that Post Quick Cash uses to update your customer's account balances. You specify the sequence and the Auto Cash Rules for each Auto Cash Rule Set. The Auto Cash Rule Sets you define display as list of values choices in the Customers, Customer Addresses, Customer Profile Classes, and the System Options windows. Post Quick Cash first checks the customer site, then the customer profile class, and finally at the system options level to determine the Auto Cash Rule Set to use. Setup>Receipts>Auto Cash Rule Set
- 24. Define Application Rule Set – We can use seeded configuration Use the Application Rules Sets window to review existing and define new application rule sets. Application rule sets specify the default payment steps for your receipt applications and how discounts affect the open balance for each type of associated charges. By defining your own application rule set, you can determine how Receivables reduces the balance due for a transaction's line, tax, freight, and late charges. Setup>Receipt>Application Rule Set
- 25. Define Receipt Classes Define receipt classes to determine the required processing steps for receipts to which you assign receipt methods with this class. These steps include confirmation, remittance, and reconciliation. You can specify any combination of these processing steps with one exception: if you confirm and reconcile, then you must also remit. If you enter No for all three of these steps, Receivables automatically creates receipts assigned to this receipt class with a status of Cleared. Setup>Receipt>Receipt Classes
- 26. Define this for each operating unit. Only header window is not OU based but bank accounts window are OU specific. This requires some experience to use this configuration. Basic configuration is simple but it is key configuration to handle various receipts like Credit Card integration, Auto lock box, Bill of Exchange, and Factoring. This requires very good practice and knowledge on Function Capturing Process as well. Define Receipt Sources Define receipt batch sources to provide default values for the receipt class, receipt method, and remittance bank account fields for receipts you add to a receipt batch. You can accept these default values or enter new ones. Receipt batch sources can use either automatic or manual batch numbering. Setup>Receipt>Receipt Sources
- 27. Define this for each operating unit. This is for grouping of receipt class, payment method and bank account. Define Collector Receivables let you define collectors and assign them to a profile class, or directly to a customer account or site. When you assign a collector to a profile class, that collector becomes the collector for all customers assigned that profile class. You can modify collector assignments for your customers in the Customers pages, and for your profile classes in the Customer Profile Classes window. Setup>Collections>Collector
- 28. Employee needs to be configured and Collector setup is to be done in CRM. Define Aging bucket Aging buckets are time periods you can use to review and report on your open receivables. For example, the 4-Bucket Aging bucket that Receivables provides consists of four periods: -999 to 0 days current, 1 to 30 days past due, 31-61 days past due, and 61-91 days past due. When you create your Collections reports, you can specify an aging bucket and 'as of date', and Receivables will group the transactions and their amounts in the appropriate days past due period. Setup>Collection>Aging Buckets and Interest Tiers
- 29. Define Statement Cycles Define statement cycles to determine when to send statements to your customers. You enter statement cycles when you define or modify individual customer and site profile classes in the Customer Profile Classes window. Setup>Print>Statement Cycles
- 30. Define this for each operating unit. Customer statement will use this cycle. Define standard message – Optional Define standard messages to provide the text that Receivables prints on the bottom of your customer's statements, debit memos, and interest invoices. You can use messages to inform your customers of special promotions or to make your printed documents more personal. Setup>Print>Standard message
- 31. This message can be used in Customer Statement. Define Profile Class Use Customer Profiles to group customer accounts with similar creditworthiness, business volume, payment cycles, and late charge policies. For each profile class you can define information such as credit limits, payment terms, statement cycles, invoicing, and discount information. You can also define amount limits for your late charges and statements for each currency in which you do business. Customers>Profile Classes
- 32. This is important for consolidated billing, late charges, profile class based strategy in collections and very important configuration for business in real time. Define Customers – Initially customers will be migrated from external/legacy/older version of Oracle EBS. Define Remit to address Setup>Print>Remit to address
- 33. Open or Close AR accounting period Open and close accounting periods in your calendar to control the recording of accounting information for these periods. Receivables lets you open future accounting periods while your current period is still open. Receivables also lets you reopen previously closed accounting periods and enter receivables activities without transferring transactions to the general ledger when you set your accounting periods to 'Future.' Control>Accounting>Open or Close periods
- 34. **** This is ledger based. Open / Close the period in one OU will Open / Close the period in another OU as long as bot the OU shares the same Ledger