SlideShare una empresa de Scribd logo
1 de 7
Descargar para leer sin conexión
HP1160/1320/P2015TECH

            Technical Instructions                    Supplies                                                    Tools        1
        CORPORATE                                                                              Drill
        LOS ANGELES, USA          99% Alcohol            Lint-free Cloth
                                                                                               3/32-inch Drill Bit
        US 1 800 394.9900         Conductive Grease      Toner
        Int’l +1 818 837.8100                                                                  Needle-nose Pliers
                                  Cotton Swab            Wiper Blade
        FAX 1 800 394.9910                                                                     Small, Flat-blade Screwdriver
        Int’l +1 818 838.7047     Drum
                                                                                               Phillips-head Screwdriver
                                                                                               Utility Knife
        ATLANTA, USA
        US 1 877 676.4223
        Int’l +1 678 919.1189
        FAX 1 877 337.7976       Photo 1
        Int’l +1 770 516.7794
                                                                              Step 1
        KANSAS CITY, USA                                                      Place the cartridge on the workbench with
        US 1 913 871.1700                                                     the toner hopper toward you. Open the
        FAX 1 913 888.0626
                                                                              drum shutter and lift the right side of the
        MIAMI, USA                                                            shutter. This will dislodge the drum shutter
        US 1 800 595.4297
        Int’l +1 305 594.3396                                                 from its cradle. (See Photo 1)
        FAX 1 800 522.8640
        Int’l +1 305 594.3309

        NEW YORK, USA
        US 1 800 431.7884
        Int’l +1 631 588.7300    Photo 2
        FAX 1 800 431.8812                                                    Step 2
        Int’l +1 631 588.7333
                                                                              Slide the shutter to the right to remove the
        TORONTO, CAN
        CAN 1 877 848.0818
                                                                              shutter post from the cradle. (See Photo 2)
        Int’l +1 905 712.9501                                                 Set the drum shutter aside. Do not lose
        FAX 1 877 772.6773                                                    the tension spring found on the end of the
        Int’l +1 905 712.9502
                                                                              shutter. (See Photo 3)
        BUENOS AIRES, ARG
        ARG 0810 444.2656
        Int’l +011 4583.5900
        FAX +011 4584.3100

        MELBOURNE, AUS           Photo 3
        AUS 1 800 003. 100
        Int’l +62 03 9561.8102
        FAX 1 800 004.302
        Int’l +62 03 9561-7751

        SYDNEY, AUS
        AUS 1 800 003.100
        Int’l +62 02 9648.2630
        FAX 1800 004.302
        Int’l +62 02 9548.2635

        MONTEVIDEO, URY
        URY 02 902.2001
        Int’l +5982 902.2001
        FAX +5982 900.0858       Photo 4

        JOHANNESBURG, S.A.
                                                                              Step 3
        S.A. +27 11 974.6155                                                  Flip the cartridge over so the drum is
        FAX +27 11 974.3593
                                                                              facing up. (See Photo 4)
        SÃO PAULO, BRAZIL
        Int’l +55 11 5524.8000

        RAANANA, ISRAEL
        ISR 09 760.12.39
        Int’l +972 9760.12.39
        ISR 052.38.555.82
        Int’l +972 5238.555.82

 E-mail: info@futuregraphicsllc.com                                        Website:        www.futuregraphicsllc.com
REV. 5/31/07
2                                                      HP 1160/1320/P2015 Technical Instructions

                                            Photo 8
                                                              Step 6
                                                              Separate the two sections of the
Step 4                                                        cartridge. (See Photo 8)
Using a 3/32-inch drill bit, drill a
hole into the square holes on the
back of the waste hopper.
(See Photos 5 & 6)


Photo 5

                                            Photo 9
                                                              Step 7
                                                              Using a utility knife, cut two small notches
                                                              in the plastic that surrounds the drum
                                                              contact axle. Photo 9 and Photo 10


Photo 6


                                            Photo 10


Step 5
If the cartridge pins are
not pushed out the ends of the
cartridge, use a small, flat-blade          Photo 11
screwdriver to push the pins out                              Step 8
the end of the cartridge.                                     With needlenose pliers, grab the drum
(See Photo 7) Grab the pins using                             contact axle and pull the axle out from the
needlenose pliers and remove                                  end of the waste hopper. (See Photos 11)
the pins.


Photo 7


                                            Photo 12
                                                              Step 9
                                                              Carefully lift up on the non-gear end of the
                                                              drum and slide the drum out of the bear-
                                                              ing end cap. (See Photos 12) If the drum is
                                                              going to be reused, place it in a protected
                                                              area away from the light.

    Need trust-worthy, detailed Technical
    Instructions for another engine?
    Visit: www.futuregraphicsllc.com
HP 1160/1320/P2015 Technical Instructions                                                                                   3

Photo 13
                                   Step 10
                                   Lift out the PCR. (See Photo 13) Clean the
                                   PCR using mild soap and water.                Step 15
                                                                                 Apply padding powder to the
                                                                                 drum. Install the drive gear
                                                                                 into the bearing end cap. Slide
                                                                                 the drum’s contact axle into
                                                                                 the end of the waste hopper.
                                                                                 (See Photo 18) Rotate the drum
                                                                                 to ensure that the drum
                                                                                 and wiper blade are properly
Photo 14
                                                                                 lubricated. Clean the padding
                                   Step 11
                                                                                 powder off the PCR using a
                                   Remove the two screws holding the wiper       lint-free cloth. Set the waste
                                   blade. (See Photo 14)                         hopper aside in a protected area
                                                                                 away from the light.


                                                                                Photo 18


Photo 15
                                    Step 12
                                    Remove the wiper blade. (See Photo 15)
                                    Clean the waste hopper using dry,
                                    compressed air or a vacuum.


                                    Step 13                                      Step 16
                                    Apply padding powder to the wiper            The gear housing end cap on
                                    blade. Place the blade onto the waste        the toner hopper is sonically
                                    hopper and install the two screws that       welded to the toner hopper.
Photo 16                            hold the blade in place. (See Photo 16)      Place a small, flat-blade screw-
                                                                                 driver at the base of each plas-
                                                                                 tic weld and carefully pry up.
                                                                                 (See Photo 19)


                                    Step 14
                                    Clean the PCR saddles using a cotton        Photo 19
                                    swab and alcohol. Apply new conductive
                                    grease to the black conductive saddle
                                    and put the clean PCR into place.
Photo 17                            (See Photo 17)


                                                                                   Need help with a particular remanu-
                                                                                   facturing problem?
                                                                                   Call the Technical Resource Center from
                                                                                   8am - 5pm PST: 800 394.9900
4                                                 HP 1160/1320/P2015 Technical Instructions

                                        Photo 22
                                                              Step 19
                                                              Before the end cap can be removed,
                                                              Hewlett-Packard has also sonically weld-
 Step 17                                                      ed the alignment pin that holds the mag
 Using a 3/32 inch drill bit, drill a                         roller stabilizing bar in place. This weld has
 hole into the gear housing end                               to be broken as well. Insert a flat-blade
 cap where the two plastic welds                              screwdriver between the stabilizing bar
 hold the end cap to the toner                                and the toner hopper. (See Photo 22)
 hopper.                                                      Carefully pry the gear housing end cap
 (See Photo 20)                                               away from the toner hopper. Remove the
                                                              end cap.
                                        Photo 23
Photo 20
                                                              Step 20
                                                              Remove the three gears from the end of
                                                              the cartridge, leaving the toner agitator
                                                              gear. (See Photo 23)


                                        Photo 24

 Step 18                                                      Step 21
 Insert a small, flat-blade screw-                            Rotate the cartridge 180°. Remove the
 driver between the toner hopper                              two screws holding the contact end cap to
 and the gear housing end cap                                 the toner hopper.
 next to the sonic welds.                                     (See Photo 24)
 Carefully pry the end cap away
 from the toner hopper.
 (See Photo 21)


                                        Photo 25
Photo 21                                                      Step 22
                                                              The alignment pin that holds the contact
                                                              end plate is sonically welded to the toner
                                                              hopper. Insert a small, flat-blade screw-
                                                              driver between the contact plate and the
                                                              toner hopper. Carefully pry the contact
                                                              plate away from the toner hopper. (See
                                                              Photo 25)


                                        Photo 26
                                                              Step 23
                                                              Carefully remove the mag roller from the
                                                              toner hopper. (See Photo 26)


E-mail: info@futuregraphicsllc.com                 Website:          www.futuregraphicsllc.com
HP 1160/1320/P2015 Technical Instructions                                                                                      5

Photo 27
                                    Step 24
                                    Remove the mag roller stabilizing bar,
                                    and the mag roller bushings from the            Step 29
                                    ends of the mag roller. (See Photo 27)          Using a small, flat-blade screw-
                                    Clean the mag roller first with com-            driver, push the seal exit port
                                    pressed air or a vacuum, then use a mag         plug from the end of the toner
                                    roller cleaner. Clean the mag roller bush-      hopper. (See Photo 32) Carefully
                                    ings using alcohol and a lint-free cloth.       clean the seal area. Once most
                                                                                    of the toner is removed from the
                                                                                    seal area, clean again using a
                                                                                    cotton swab and alcohol.
Photo 28
                                    Step 25
                                    Remove the two screws holding the doc-
                                    tor blade. (See Photo 28)                      Photo 32


Photo 29
                                    Step 26
                                    Remove the plastic scrapers from the
                                    ends of the doctor blade and remove the
                                    blade. (See Photo 29) Clean the doctor          Step 30
                                    blade using alcohol and a lint-free cloth.      Remove the seal liner from the
                                    Empty the remaining toner from the toner        back of the seal and adhere the
                                    hopper. Clean the toner hopper using dry,       seal to the toner hopper. Slide
                                    compressed air or a vacuum.                     the tail of the seal through the
                                                                                    seal exit port and reinstall the
                                                                                    seal exit port plug.
                                                                                    (See Photo 33)
Photo 30
                                    Step 27
                                    Remove the white plastic wall that is stuck
                                    to the top of the mag roller opening using     Photo 33
                                    a flat-blade screwdriver or a utility knife.
                                    (See Photo 30)


Photo 31
                                    Step 28
                                    Remove the doctor blade end foams from
                                    each side of the toner hopper.
                                    (See Photo 31)
                                    Fill the hopper with toner.


                                                                                      Need help with a particular remanu-
                                                                                      facturing problem?
                                                                                      Call the Technical Resource Center from
                                                                                      8am - 5pm PST: 800 394.9900
6                                              HP 1160/1320/P2015 Technical Instructions

                                     Photo36
                                                            Step 33
                                                            Place the clean mag roller bushings onto
                                                            the end of the mag roller. The white bush-
 Step 31                                                    ing goes on the gear end and the black
 Install the doctor blade end                               bushing goes on the contact end. Install
 foams onto each side of the                                the mag roller stabilizing bar onto the gear
 toner hopper.                                              end of the mag roller and set the mag
 (See Photo 34)                                             roller into the toner hopper. (See Photo 36)


                                     Photo 37


                                                            Step 34
Photo 34
                                                            Slide the tail of the seal through the con-
                                                            tact end cap and place the end cap into
                                                            position. Install the two screws that hold
                                                            the end cap in place. (See Photo 37)


                                     Photo 38
                                                            Step 35
                                                            Place the three gears onto the end of the
                                                            cartridge. (See Photo 38)
 Step 32
 Install the clean or new doctor
 blade onto the hopper. Place
 the scrapers on each end of the
 doctor blade and install the two                           Step 36
 screws that hold the blade in                              Install the gear housing end cap onto the
 place.                                                     end of the toner hopper. Secure the end
 (See Photo 35)                                             cap with two screws.
                                     Photo 39
                                                            (See Photos 39)


                                                            Step 37
                                                            Join the toner hopper and waste hopper
                                                            together. Install the two cartridge pins that
Photo 35
                                                            hold the cartridge together.
                                                            (See Photos 40 & 41)


                                     Photo 40              Photo 41


E-mail: info@futuregraphicsllc.com              Website:              www.futuregraphicsllc.com
HP 1160/1320/P2015 Technical Instructions                                                                                                           7


Photo 42                                       Photo 43
                                                                                                       Step 38
                                                                                                       Place the drum shutter onto the waste
                                                                                                       hopper so that the tension spring fits into
                                                                                                       its slot. (See Photo 42) Press down on each
                                                                                                       end to lock the drum shutter posts into
                                                                                                       position. (See Photo 43)

                                                                                                       Test the cartridge.


 A First Look at the HP LaserJet 1160/1320/P2015
  In September 2004, Hewlett- Packard                                                                       seconds, which is .5 seconds slower
(HP) released two new, entry-level                                                                          than the LaserJet 1300.
monochrome printers based on the same
Canon print engine. The LaserJet 1160                                                                         Both the LaserJet 1160 and LaserJet
(Q5933A), which is the base model,                                                                          1320 series printers have a monthly duty
is a non-networking machine capable                                                                         cycle of 10,000 pages. Each machine
of printing 20 pages per minute at                                                                          ships with a standard yield cartridge
600 x 600 dpi with HP REt and FastRes                                                                       (Q5949A) that prints 2,500 pages at
1200 technology. The LaserJet 1160 sells                                                                    5% coverage. The standard yield cartridge
for $329.99 on HP’s website.                                                                                sells for $103.40. A high yield cartridge
                                                   sells at for $104. The whole LaserJet                    (Q5949X) is also available from HP. The
  The HP LaserJet 1320 is available in             1320 family prints at 22 pages per minute                high yield cartridge sells for $189.20, yields
four different models. The LaserJet 1320           at 1200 x 1200 dpi.                                      6,000 pages and can only be used in the
(Q5927A) is the base model which that                                                                       LaserJet 1320 series printers.
sells for $389. The networked LaserJet               The LaserJet 1160 and LaserJet 1320
1320n (Q5928A) has a list price of $500.           feature a 133 MHz Motorola V4 Coldfire                     This How To article is a first look at the
HP’s LaserJet 1320nwwn (Q5929A) is a               processor, and each machine comes                        new HP LaserJet 1160 and HP LaserJet
wireless network-ready printer that fea-           standard with 16MB of RAM. Additional                    1320 cartridges. Products for this new
tures Bluetooth technology and sells for           memory can be added to the LaserJet                      engine are still in development , but this
$450. Lastly, the LaserJet 1320tn                  1320, up to 144MB. Both printer models                   will give you a good look atindication of
(Q5930A), which is network ready and               have instant- on fuser technology that                   what you remanufacturers are up against.
supports a second 250-sheet paper tray,            can deliver the first page out in 8.5


Cross Reference:                                                                Cross Reference:
HP LaserJet 1160                                                                HP LaserJet P2015 Printer
HP LaserJet 1320                                                                HP LaserJet P2015d Printer
HP LaserJet 1320n                                                               HP LaserJet P2015dn Printer
HP LaserJet 1320nw                                                              HP LaserJet P2015x Printer
HP LaserJet 1320tn

Supplies Part Number:                                                           Supplies Part Number:
Q5949A 2,500pgs (for both LaserJet 1160 and 1320)                               Q7553A 3000 pgs
Q5949X 6,000pgs (only for the LaserJet 1320)                                    Q7553X 7000 pgs

                          Future Graphics (FG) is a distributor of compatible replacement parts and products for imagining equipment.
             None of FG's products are genuine OEM replacement parts and no affiliation or sponsorship is to be implied between FG and any OEM.


E-mail: info@futuregraphicsllc.com                                                         Website:              www.futuregraphicsllc.com

Más contenido relacionado

La actualidad más candente

Manual de Recarga Samsung ML 1630 | SCX 4500
Manual de Recarga Samsung ML 1630 | SCX 4500Manual de Recarga Samsung ML 1630 | SCX 4500
Manual de Recarga Samsung ML 1630 | SCX 4500Valejet
 
Manual de Recarga Xerox Phaser 5400 13R495
Manual de Recarga Xerox Phaser 5400 13R495Manual de Recarga Xerox Phaser 5400 13R495
Manual de Recarga Xerox Phaser 5400 13R495Valejet
 
Manual de Recarga Sharp 1010 | 1020 | 1041 | 1200 | 1220 | 1250 | AL1000
Manual de Recarga Sharp  1010 | 1020 | 1041 | 1200 | 1220 | 1250 | AL1000Manual de Recarga Sharp  1010 | 1020 | 1041 | 1200 | 1220 | 1250 | AL1000
Manual de Recarga Sharp 1010 | 1020 | 1041 | 1200 | 1220 | 1250 | AL1000Valejet
 
Manual de Recarga HP P1005 P1006 P1505.
Manual de Recarga HP P1005 P1006 P1505.Manual de Recarga HP P1005 P1006 P1505.
Manual de Recarga HP P1005 P1006 P1505.Valejet
 
Manual de Recarga Xerox N24 N32 N40 113R173
Manual de Recarga Xerox N24 N32 N40 113R173Manual de Recarga Xerox N24 N32 N40 113R173
Manual de Recarga Xerox N24 N32 N40 113R173Valejet
 
Manual de Recarga HP Canon WX C3909A.
Manual de Recarga HP Canon WX C3909A.Manual de Recarga HP Canon WX C3909A.
Manual de Recarga HP Canon WX C3909A.Valejet
 
Manual de Recarga HP Canon EX 92298A.
Manual de Recarga HP Canon EX 92298A.Manual de Recarga HP Canon EX 92298A.
Manual de Recarga HP Canon EX 92298A.Valejet
 
Manual de Recarga Xerox Phaser 6130 1320 106R01278
Manual de Recarga Xerox Phaser 6130 1320 106R01278Manual de Recarga Xerox Phaser 6130 1320 106R01278
Manual de Recarga Xerox Phaser 6130 1320 106R01278Valejet
 
Manual de Recarga HP P3005 | M3027 | M3035.
Manual de Recarga HP P3005 | M3027 | M3035.Manual de Recarga HP P3005 | M3027 | M3035.
Manual de Recarga HP P3005 | M3027 | M3035.Valejet
 
Manual de Recarga Lexmark E120.
Manual de Recarga Lexmark E120.Manual de Recarga Lexmark E120.
Manual de Recarga Lexmark E120.Valejet
 
Manual Recarga HP P3015 | CE525.
Manual Recarga HP P3015 | CE525.Manual Recarga HP P3015 | CE525.
Manual Recarga HP P3015 | CE525.Valejet
 
Manual de Recarga Minolta QMS 2400
Manual de Recarga Minolta QMS 2400Manual de Recarga Minolta QMS 2400
Manual de Recarga Minolta QMS 2400Valejet
 
Manual de Recarga Ricoh Type 1135
Manual de Recarga Ricoh Type 1135Manual de Recarga Ricoh Type 1135
Manual de Recarga Ricoh Type 1135Valejet
 
Manual de Recarga Minolta 2300 DL
Manual de Recarga Minolta 2300 DLManual de Recarga Minolta 2300 DL
Manual de Recarga Minolta 2300 DLValejet
 
Hp 1500 2500
Hp 1500 2500Hp 1500 2500
Hp 1500 2500Valejet
 
Manual de Recarga HP Canon AX C3906A.
Manual de Recarga HP Canon AX C3906A.Manual de Recarga HP Canon AX C3906A.
Manual de Recarga HP Canon AX C3906A.Valejet
 

La actualidad más candente (18)

Hp 5200
Hp 5200Hp 5200
Hp 5200
 
Manual de Recarga Samsung ML 1630 | SCX 4500
Manual de Recarga Samsung ML 1630 | SCX 4500Manual de Recarga Samsung ML 1630 | SCX 4500
Manual de Recarga Samsung ML 1630 | SCX 4500
 
Manual de Recarga Xerox Phaser 5400 13R495
Manual de Recarga Xerox Phaser 5400 13R495Manual de Recarga Xerox Phaser 5400 13R495
Manual de Recarga Xerox Phaser 5400 13R495
 
Manual de Recarga Sharp 1010 | 1020 | 1041 | 1200 | 1220 | 1250 | AL1000
Manual de Recarga Sharp  1010 | 1020 | 1041 | 1200 | 1220 | 1250 | AL1000Manual de Recarga Sharp  1010 | 1020 | 1041 | 1200 | 1220 | 1250 | AL1000
Manual de Recarga Sharp 1010 | 1020 | 1041 | 1200 | 1220 | 1250 | AL1000
 
Manual de Recarga HP P1005 P1006 P1505.
Manual de Recarga HP P1005 P1006 P1505.Manual de Recarga HP P1005 P1006 P1505.
Manual de Recarga HP P1005 P1006 P1505.
 
Manual de Recarga Xerox N24 N32 N40 113R173
Manual de Recarga Xerox N24 N32 N40 113R173Manual de Recarga Xerox N24 N32 N40 113R173
Manual de Recarga Xerox N24 N32 N40 113R173
 
Manual de Recarga HP Canon WX C3909A.
Manual de Recarga HP Canon WX C3909A.Manual de Recarga HP Canon WX C3909A.
Manual de Recarga HP Canon WX C3909A.
 
Manual de Recarga HP Canon EX 92298A.
Manual de Recarga HP Canon EX 92298A.Manual de Recarga HP Canon EX 92298A.
Manual de Recarga HP Canon EX 92298A.
 
Manual de Recarga Xerox Phaser 6130 1320 106R01278
Manual de Recarga Xerox Phaser 6130 1320 106R01278Manual de Recarga Xerox Phaser 6130 1320 106R01278
Manual de Recarga Xerox Phaser 6130 1320 106R01278
 
Manual de Recarga HP P3005 | M3027 | M3035.
Manual de Recarga HP P3005 | M3027 | M3035.Manual de Recarga HP P3005 | M3027 | M3035.
Manual de Recarga HP P3005 | M3027 | M3035.
 
Manual de Recarga Lexmark E120.
Manual de Recarga Lexmark E120.Manual de Recarga Lexmark E120.
Manual de Recarga Lexmark E120.
 
Hp 2100
Hp 2100Hp 2100
Hp 2100
 
Manual Recarga HP P3015 | CE525.
Manual Recarga HP P3015 | CE525.Manual Recarga HP P3015 | CE525.
Manual Recarga HP P3015 | CE525.
 
Manual de Recarga Minolta QMS 2400
Manual de Recarga Minolta QMS 2400Manual de Recarga Minolta QMS 2400
Manual de Recarga Minolta QMS 2400
 
Manual de Recarga Ricoh Type 1135
Manual de Recarga Ricoh Type 1135Manual de Recarga Ricoh Type 1135
Manual de Recarga Ricoh Type 1135
 
Manual de Recarga Minolta 2300 DL
Manual de Recarga Minolta 2300 DLManual de Recarga Minolta 2300 DL
Manual de Recarga Minolta 2300 DL
 
Hp 1500 2500
Hp 1500 2500Hp 1500 2500
Hp 1500 2500
 
Manual de Recarga HP Canon AX C3906A.
Manual de Recarga HP Canon AX C3906A.Manual de Recarga HP Canon AX C3906A.
Manual de Recarga HP Canon AX C3906A.
 

Destacado

Manual de Recarga Lexmark Optra M410 | M412
Manual de Recarga Lexmark Optra M410 | M412Manual de Recarga Lexmark Optra M410 | M412
Manual de Recarga Lexmark Optra M410 | M412Valejet
 
Brother tn 350 330 360
Brother tn 350 330 360Brother tn 350 330 360
Brother tn 350 330 360Valejet
 
Hp 4500 cmy
Hp 4500 cmyHp 4500 cmy
Hp 4500 cmyValejet
 
Canon mf6500
Canon mf6500Canon mf6500
Canon mf6500Valejet
 
Manual de Recarga HP CP2025.
Manual de Recarga HP CP2025.Manual de Recarga HP CP2025.
Manual de Recarga HP CP2025.Valejet
 
Manual de Recarga Lexmark C520 | C524 | C532 | C534.
Manual de Recarga Lexmark C520 | C524 | C532 | C534.Manual de Recarga Lexmark C520 | C524 | C532 | C534.
Manual de Recarga Lexmark C520 | C524 | C532 | C534.Valejet
 

Destacado (6)

Manual de Recarga Lexmark Optra M410 | M412
Manual de Recarga Lexmark Optra M410 | M412Manual de Recarga Lexmark Optra M410 | M412
Manual de Recarga Lexmark Optra M410 | M412
 
Brother tn 350 330 360
Brother tn 350 330 360Brother tn 350 330 360
Brother tn 350 330 360
 
Hp 4500 cmy
Hp 4500 cmyHp 4500 cmy
Hp 4500 cmy
 
Canon mf6500
Canon mf6500Canon mf6500
Canon mf6500
 
Manual de Recarga HP CP2025.
Manual de Recarga HP CP2025.Manual de Recarga HP CP2025.
Manual de Recarga HP CP2025.
 
Manual de Recarga Lexmark C520 | C524 | C532 | C534.
Manual de Recarga Lexmark C520 | C524 | C532 | C534.Manual de Recarga Lexmark C520 | C524 | C532 | C534.
Manual de Recarga Lexmark C520 | C524 | C532 | C534.
 

Similar a Hp 1160 1320 p2015

Manual de Recarga Lexmark E320 | E322
Manual de Recarga Lexmark E320 | E322Manual de Recarga Lexmark E320 | E322
Manual de Recarga Lexmark E320 | E322Valejet
 
Hp 2600 1600 2605
Hp 2600 1600 2605Hp 2600 1600 2605
Hp 2600 1600 2605Valejet
 
Manual de Recarga Samsung 5050 | 5100 | 5500 | ML 5000
Manual de Recarga Samsung 5050 | 5100 | 5500 | ML 5000Manual de Recarga Samsung 5050 | 5100 | 5500 | ML 5000
Manual de Recarga Samsung 5050 | 5100 | 5500 | ML 5000Valejet
 
Hp 5500 c olor
Hp 5500 c olorHp 5500 c olor
Hp 5500 c olorValejet
 
Manual de Recarga Samsung ML 1440 | ML 1450 | ML 1451 | ML 6040 | ML6060D6
Manual de Recarga Samsung ML 1440 | ML 1450 | ML 1451 | ML 6040 | ML6060D6Manual de Recarga Samsung ML 1440 | ML 1450 | ML 1451 | ML 6040 | ML6060D6
Manual de Recarga Samsung ML 1440 | ML 1450 | ML 1451 | ML 6040 | ML6060D6Valejet
 
Hp 4700 4730 mfp
Hp 4700 4730 mfpHp 4700 4730 mfp
Hp 4700 4730 mfpValejet
 
Brother 720 dr 200
Brother 720 dr 200Brother 720 dr 200
Brother 720 dr 200Valejet
 
Manual de Recarga Samsung ML 1710 | SCX 4216 | SCX 4200 | SCX 4100
Manual de Recarga Samsung ML 1710 | SCX 4216 | SCX 4200 | SCX 4100Manual de Recarga Samsung ML 1710 | SCX 4216 | SCX 4200 | SCX 4100
Manual de Recarga Samsung ML 1710 | SCX 4216 | SCX 4200 | SCX 4100Valejet
 
Brother hl 1240 toner tn-430
Brother hl 1240 toner tn-430Brother hl 1240 toner tn-430
Brother hl 1240 toner tn-430Valejet
 
Brother 720 dr 250
Brother 720 dr 250Brother 720 dr 250
Brother 720 dr 250Valejet
 
Manual de Recarga Samsung ML 1210 | ML 1510 | ML 1610 | ML 1710 | ML 2010
Manual de Recarga Samsung ML 1210 | ML 1510 | ML 1610 | ML 1710 | ML 2010Manual de Recarga Samsung ML 1210 | ML 1510 | ML 1610 | ML 1710 | ML 2010
Manual de Recarga Samsung ML 1210 | ML 1510 | ML 1610 | ML 1710 | ML 2010Valejet
 
Manual de Recarga Samsung CLP 600 CLP 650
Manual de Recarga Samsung CLP 600 CLP 650Manual de Recarga Samsung CLP 600 CLP 650
Manual de Recarga Samsung CLP 600 CLP 650Valejet
 
Manual de Recarga HP Canon VX C3903A.
Manual de Recarga HP Canon VX C3903A.Manual de Recarga HP Canon VX C3903A.
Manual de Recarga HP Canon VX C3903A.Valejet
 
Brother hl 1240 drum
Brother hl 1240 drumBrother hl 1240 drum
Brother hl 1240 drumValejet
 
Brother tn 350 hl2040
Brother tn 350 hl2040Brother tn 350 hl2040
Brother tn 350 hl2040Valejet
 

Similar a Hp 1160 1320 p2015 (19)

Hp 1300
Hp 1300Hp 1300
Hp 1300
 
Manual de Recarga Lexmark E320 | E322
Manual de Recarga Lexmark E320 | E322Manual de Recarga Lexmark E320 | E322
Manual de Recarga Lexmark E320 | E322
 
Hp 2600 1600 2605
Hp 2600 1600 2605Hp 2600 1600 2605
Hp 2600 1600 2605
 
Manual de Recarga Samsung 5050 | 5100 | 5500 | ML 5000
Manual de Recarga Samsung 5050 | 5100 | 5500 | ML 5000Manual de Recarga Samsung 5050 | 5100 | 5500 | ML 5000
Manual de Recarga Samsung 5050 | 5100 | 5500 | ML 5000
 
Hp 5500 c olor
Hp 5500 c olorHp 5500 c olor
Hp 5500 c olor
 
Manual de Recarga Samsung ML 1440 | ML 1450 | ML 1451 | ML 6040 | ML6060D6
Manual de Recarga Samsung ML 1440 | ML 1450 | ML 1451 | ML 6040 | ML6060D6Manual de Recarga Samsung ML 1440 | ML 1450 | ML 1451 | ML 6040 | ML6060D6
Manual de Recarga Samsung ML 1440 | ML 1450 | ML 1451 | ML 6040 | ML6060D6
 
Hp 4700 4730 mfp
Hp 4700 4730 mfpHp 4700 4730 mfp
Hp 4700 4730 mfp
 
Brother 720 dr 200
Brother 720 dr 200Brother 720 dr 200
Brother 720 dr 200
 
Hp 8100
Hp 8100Hp 8100
Hp 8100
 
Manual de Recarga Samsung ML 1710 | SCX 4216 | SCX 4200 | SCX 4100
Manual de Recarga Samsung ML 1710 | SCX 4216 | SCX 4200 | SCX 4100Manual de Recarga Samsung ML 1710 | SCX 4216 | SCX 4200 | SCX 4100
Manual de Recarga Samsung ML 1710 | SCX 4216 | SCX 4200 | SCX 4100
 
Brother hl 1240 toner tn-430
Brother hl 1240 toner tn-430Brother hl 1240 toner tn-430
Brother hl 1240 toner tn-430
 
Brother 720 dr 250
Brother 720 dr 250Brother 720 dr 250
Brother 720 dr 250
 
Hp 4000
Hp 4000Hp 4000
Hp 4000
 
Manual de Recarga Samsung ML 1210 | ML 1510 | ML 1610 | ML 1710 | ML 2010
Manual de Recarga Samsung ML 1210 | ML 1510 | ML 1610 | ML 1710 | ML 2010Manual de Recarga Samsung ML 1210 | ML 1510 | ML 1610 | ML 1710 | ML 2010
Manual de Recarga Samsung ML 1210 | ML 1510 | ML 1610 | ML 1710 | ML 2010
 
Manual de Recarga Samsung CLP 600 CLP 650
Manual de Recarga Samsung CLP 600 CLP 650Manual de Recarga Samsung CLP 600 CLP 650
Manual de Recarga Samsung CLP 600 CLP 650
 
Hp 5000
Hp 5000Hp 5000
Hp 5000
 
Manual de Recarga HP Canon VX C3903A.
Manual de Recarga HP Canon VX C3903A.Manual de Recarga HP Canon VX C3903A.
Manual de Recarga HP Canon VX C3903A.
 
Brother hl 1240 drum
Brother hl 1240 drumBrother hl 1240 drum
Brother hl 1240 drum
 
Brother tn 350 hl2040
Brother tn 350 hl2040Brother tn 350 hl2040
Brother tn 350 hl2040
 

Más de Valejet

Manual de Recarga Xerox 4118 6R1278
Manual de Recarga Xerox 4118 6R1278Manual de Recarga Xerox 4118 6R1278
Manual de Recarga Xerox 4118 6R1278Valejet
 
Manual de Recarga Samsung 4725ELS | 4725F | 4725FN | SCX-4725
Manual de Recarga Samsung 4725ELS | 4725F | 4725FN | SCX-4725Manual de Recarga Samsung 4725ELS | 4725F | 4725FN | SCX-4725
Manual de Recarga Samsung 4725ELS | 4725F | 4725FN | SCX-4725Valejet
 
Manual de Recarga Samsung ML 2251N | ML 2251NP | ML 2251W | ML 2250
Manual de Recarga Samsung ML 2251N | ML 2251NP | ML 2251W | ML 2250Manual de Recarga Samsung ML 2251N | ML 2251NP | ML 2251W | ML 2250
Manual de Recarga Samsung ML 2251N | ML 2251NP | ML 2251W | ML 2250Valejet
 
Manual de Recarga Samsung CLP 610N | CLP 660N | CLP 610 CLP 660 Espanhol
Manual de Recarga Samsung CLP 610N | CLP 660N | CLP 610 CLP 660 EspanholManual de Recarga Samsung CLP 610N | CLP 660N | CLP 610 CLP 660 Espanhol
Manual de Recarga Samsung CLP 610N | CLP 660N | CLP 610 CLP 660 EspanholValejet
 
Manual de Recarga Samsung CLP 600
Manual de Recarga Samsung CLP 600Manual de Recarga Samsung CLP 600
Manual de Recarga Samsung CLP 600Valejet
 
Manual de Recarga Samsung CLP 500 CLP 550
Manual de Recarga Samsung CLP 500 CLP 550Manual de Recarga Samsung CLP 500 CLP 550
Manual de Recarga Samsung CLP 500 CLP 550Valejet
 
Manual de Recarga Okidata C7000 | C7100 Espanhol
Manual de Recarga Okidata C7000 | C7100 EspanholManual de Recarga Okidata C7000 | C7100 Espanhol
Manual de Recarga Okidata C7000 | C7100 EspanholValejet
 
Manual de Recarga Okidata C5500 | 6100 Espanhol
Manual de Recarga Okidata C5500 | 6100 EspanholManual de Recarga Okidata C5500 | 6100 Espanhol
Manual de Recarga Okidata C5500 | 6100 EspanholValejet
 
Manual de Recarga Okidata C5100 Espanhol
Manual de Recarga Okidata C5100 EspanholManual de Recarga Okidata C5100 Espanhol
Manual de Recarga Okidata C5100 EspanholValejet
 
Manual de Recarga Okidata C3400
Manual de Recarga Okidata C3400Manual de Recarga Okidata C3400
Manual de Recarga Okidata C3400Valejet
 
Manual de Recarga Okidata 9000 Espanhol
Manual de Recarga Okidata 9000 EspanholManual de Recarga Okidata 9000 Espanhol
Manual de Recarga Okidata 9000 EspanholValejet
 
Manual de Recarga Okidata 7100 Espanhol.
Manual de Recarga Okidata 7100 Espanhol.Manual de Recarga Okidata 7100 Espanhol.
Manual de Recarga Okidata 7100 Espanhol.Valejet
 
Manual de Recarga Lexmark T430
Manual de Recarga Lexmark T430Manual de Recarga Lexmark T430
Manual de Recarga Lexmark T430Valejet
 
Manual de Recarga Lexmark T420
Manual de Recarga Lexmark T420Manual de Recarga Lexmark T420
Manual de Recarga Lexmark T420Valejet
 

Más de Valejet (14)

Manual de Recarga Xerox 4118 6R1278
Manual de Recarga Xerox 4118 6R1278Manual de Recarga Xerox 4118 6R1278
Manual de Recarga Xerox 4118 6R1278
 
Manual de Recarga Samsung 4725ELS | 4725F | 4725FN | SCX-4725
Manual de Recarga Samsung 4725ELS | 4725F | 4725FN | SCX-4725Manual de Recarga Samsung 4725ELS | 4725F | 4725FN | SCX-4725
Manual de Recarga Samsung 4725ELS | 4725F | 4725FN | SCX-4725
 
Manual de Recarga Samsung ML 2251N | ML 2251NP | ML 2251W | ML 2250
Manual de Recarga Samsung ML 2251N | ML 2251NP | ML 2251W | ML 2250Manual de Recarga Samsung ML 2251N | ML 2251NP | ML 2251W | ML 2250
Manual de Recarga Samsung ML 2251N | ML 2251NP | ML 2251W | ML 2250
 
Manual de Recarga Samsung CLP 610N | CLP 660N | CLP 610 CLP 660 Espanhol
Manual de Recarga Samsung CLP 610N | CLP 660N | CLP 610 CLP 660 EspanholManual de Recarga Samsung CLP 610N | CLP 660N | CLP 610 CLP 660 Espanhol
Manual de Recarga Samsung CLP 610N | CLP 660N | CLP 610 CLP 660 Espanhol
 
Manual de Recarga Samsung CLP 600
Manual de Recarga Samsung CLP 600Manual de Recarga Samsung CLP 600
Manual de Recarga Samsung CLP 600
 
Manual de Recarga Samsung CLP 500 CLP 550
Manual de Recarga Samsung CLP 500 CLP 550Manual de Recarga Samsung CLP 500 CLP 550
Manual de Recarga Samsung CLP 500 CLP 550
 
Manual de Recarga Okidata C7000 | C7100 Espanhol
Manual de Recarga Okidata C7000 | C7100 EspanholManual de Recarga Okidata C7000 | C7100 Espanhol
Manual de Recarga Okidata C7000 | C7100 Espanhol
 
Manual de Recarga Okidata C5500 | 6100 Espanhol
Manual de Recarga Okidata C5500 | 6100 EspanholManual de Recarga Okidata C5500 | 6100 Espanhol
Manual de Recarga Okidata C5500 | 6100 Espanhol
 
Manual de Recarga Okidata C5100 Espanhol
Manual de Recarga Okidata C5100 EspanholManual de Recarga Okidata C5100 Espanhol
Manual de Recarga Okidata C5100 Espanhol
 
Manual de Recarga Okidata C3400
Manual de Recarga Okidata C3400Manual de Recarga Okidata C3400
Manual de Recarga Okidata C3400
 
Manual de Recarga Okidata 9000 Espanhol
Manual de Recarga Okidata 9000 EspanholManual de Recarga Okidata 9000 Espanhol
Manual de Recarga Okidata 9000 Espanhol
 
Manual de Recarga Okidata 7100 Espanhol.
Manual de Recarga Okidata 7100 Espanhol.Manual de Recarga Okidata 7100 Espanhol.
Manual de Recarga Okidata 7100 Espanhol.
 
Manual de Recarga Lexmark T430
Manual de Recarga Lexmark T430Manual de Recarga Lexmark T430
Manual de Recarga Lexmark T430
 
Manual de Recarga Lexmark T420
Manual de Recarga Lexmark T420Manual de Recarga Lexmark T420
Manual de Recarga Lexmark T420
 

Hp 1160 1320 p2015

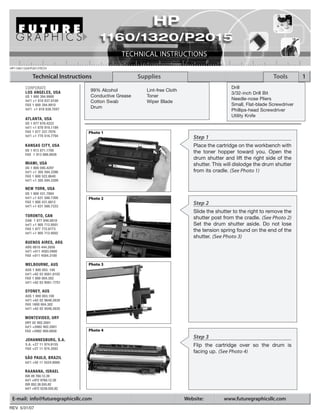
  • 1. HP1160/1320/P2015TECH Technical Instructions Supplies Tools 1 CORPORATE Drill LOS ANGELES, USA 99% Alcohol Lint-free Cloth 3/32-inch Drill Bit US 1 800 394.9900 Conductive Grease Toner Int’l +1 818 837.8100 Needle-nose Pliers Cotton Swab Wiper Blade FAX 1 800 394.9910 Small, Flat-blade Screwdriver Int’l +1 818 838.7047 Drum Phillips-head Screwdriver Utility Knife ATLANTA, USA US 1 877 676.4223 Int’l +1 678 919.1189 FAX 1 877 337.7976 Photo 1 Int’l +1 770 516.7794 Step 1 KANSAS CITY, USA Place the cartridge on the workbench with US 1 913 871.1700 the toner hopper toward you. Open the FAX 1 913 888.0626 drum shutter and lift the right side of the MIAMI, USA shutter. This will dislodge the drum shutter US 1 800 595.4297 Int’l +1 305 594.3396 from its cradle. (See Photo 1) FAX 1 800 522.8640 Int’l +1 305 594.3309 NEW YORK, USA US 1 800 431.7884 Int’l +1 631 588.7300 Photo 2 FAX 1 800 431.8812 Step 2 Int’l +1 631 588.7333 Slide the shutter to the right to remove the TORONTO, CAN CAN 1 877 848.0818 shutter post from the cradle. (See Photo 2) Int’l +1 905 712.9501 Set the drum shutter aside. Do not lose FAX 1 877 772.6773 the tension spring found on the end of the Int’l +1 905 712.9502 shutter. (See Photo 3) BUENOS AIRES, ARG ARG 0810 444.2656 Int’l +011 4583.5900 FAX +011 4584.3100 MELBOURNE, AUS Photo 3 AUS 1 800 003. 100 Int’l +62 03 9561.8102 FAX 1 800 004.302 Int’l +62 03 9561-7751 SYDNEY, AUS AUS 1 800 003.100 Int’l +62 02 9648.2630 FAX 1800 004.302 Int’l +62 02 9548.2635 MONTEVIDEO, URY URY 02 902.2001 Int’l +5982 902.2001 FAX +5982 900.0858 Photo 4 JOHANNESBURG, S.A. Step 3 S.A. +27 11 974.6155 Flip the cartridge over so the drum is FAX +27 11 974.3593 facing up. (See Photo 4) SÃO PAULO, BRAZIL Int’l +55 11 5524.8000 RAANANA, ISRAEL ISR 09 760.12.39 Int’l +972 9760.12.39 ISR 052.38.555.82 Int’l +972 5238.555.82 E-mail: info@futuregraphicsllc.com Website: www.futuregraphicsllc.com REV. 5/31/07
  • 2. 2 HP 1160/1320/P2015 Technical Instructions Photo 8 Step 6 Separate the two sections of the Step 4 cartridge. (See Photo 8) Using a 3/32-inch drill bit, drill a hole into the square holes on the back of the waste hopper. (See Photos 5 & 6) Photo 5 Photo 9 Step 7 Using a utility knife, cut two small notches in the plastic that surrounds the drum contact axle. Photo 9 and Photo 10 Photo 6 Photo 10 Step 5 If the cartridge pins are not pushed out the ends of the cartridge, use a small, flat-blade Photo 11 screwdriver to push the pins out Step 8 the end of the cartridge. With needlenose pliers, grab the drum (See Photo 7) Grab the pins using contact axle and pull the axle out from the needlenose pliers and remove end of the waste hopper. (See Photos 11) the pins. Photo 7 Photo 12 Step 9 Carefully lift up on the non-gear end of the drum and slide the drum out of the bear- ing end cap. (See Photos 12) If the drum is going to be reused, place it in a protected area away from the light. Need trust-worthy, detailed Technical Instructions for another engine? Visit: www.futuregraphicsllc.com
  • 3. HP 1160/1320/P2015 Technical Instructions 3 Photo 13 Step 10 Lift out the PCR. (See Photo 13) Clean the PCR using mild soap and water. Step 15 Apply padding powder to the drum. Install the drive gear into the bearing end cap. Slide the drum’s contact axle into the end of the waste hopper. (See Photo 18) Rotate the drum to ensure that the drum and wiper blade are properly Photo 14 lubricated. Clean the padding Step 11 powder off the PCR using a Remove the two screws holding the wiper lint-free cloth. Set the waste blade. (See Photo 14) hopper aside in a protected area away from the light. Photo 18 Photo 15 Step 12 Remove the wiper blade. (See Photo 15) Clean the waste hopper using dry, compressed air or a vacuum. Step 13 Step 16 Apply padding powder to the wiper The gear housing end cap on blade. Place the blade onto the waste the toner hopper is sonically hopper and install the two screws that welded to the toner hopper. Photo 16 hold the blade in place. (See Photo 16) Place a small, flat-blade screw- driver at the base of each plas- tic weld and carefully pry up. (See Photo 19) Step 14 Clean the PCR saddles using a cotton Photo 19 swab and alcohol. Apply new conductive grease to the black conductive saddle and put the clean PCR into place. Photo 17 (See Photo 17) Need help with a particular remanu- facturing problem? Call the Technical Resource Center from 8am - 5pm PST: 800 394.9900
  • 4. 4 HP 1160/1320/P2015 Technical Instructions Photo 22 Step 19 Before the end cap can be removed, Hewlett-Packard has also sonically weld- Step 17 ed the alignment pin that holds the mag Using a 3/32 inch drill bit, drill a roller stabilizing bar in place. This weld has hole into the gear housing end to be broken as well. Insert a flat-blade cap where the two plastic welds screwdriver between the stabilizing bar hold the end cap to the toner and the toner hopper. (See Photo 22) hopper. Carefully pry the gear housing end cap (See Photo 20) away from the toner hopper. Remove the end cap. Photo 23 Photo 20 Step 20 Remove the three gears from the end of the cartridge, leaving the toner agitator gear. (See Photo 23) Photo 24 Step 18 Step 21 Insert a small, flat-blade screw- Rotate the cartridge 180°. Remove the driver between the toner hopper two screws holding the contact end cap to and the gear housing end cap the toner hopper. next to the sonic welds. (See Photo 24) Carefully pry the end cap away from the toner hopper. (See Photo 21) Photo 25 Photo 21 Step 22 The alignment pin that holds the contact end plate is sonically welded to the toner hopper. Insert a small, flat-blade screw- driver between the contact plate and the toner hopper. Carefully pry the contact plate away from the toner hopper. (See Photo 25) Photo 26 Step 23 Carefully remove the mag roller from the toner hopper. (See Photo 26) E-mail: info@futuregraphicsllc.com Website: www.futuregraphicsllc.com
  • 5. HP 1160/1320/P2015 Technical Instructions 5 Photo 27 Step 24 Remove the mag roller stabilizing bar, and the mag roller bushings from the Step 29 ends of the mag roller. (See Photo 27) Using a small, flat-blade screw- Clean the mag roller first with com- driver, push the seal exit port pressed air or a vacuum, then use a mag plug from the end of the toner roller cleaner. Clean the mag roller bush- hopper. (See Photo 32) Carefully ings using alcohol and a lint-free cloth. clean the seal area. Once most of the toner is removed from the seal area, clean again using a cotton swab and alcohol. Photo 28 Step 25 Remove the two screws holding the doc- tor blade. (See Photo 28) Photo 32 Photo 29 Step 26 Remove the plastic scrapers from the ends of the doctor blade and remove the blade. (See Photo 29) Clean the doctor Step 30 blade using alcohol and a lint-free cloth. Remove the seal liner from the Empty the remaining toner from the toner back of the seal and adhere the hopper. Clean the toner hopper using dry, seal to the toner hopper. Slide compressed air or a vacuum. the tail of the seal through the seal exit port and reinstall the seal exit port plug. (See Photo 33) Photo 30 Step 27 Remove the white plastic wall that is stuck to the top of the mag roller opening using Photo 33 a flat-blade screwdriver or a utility knife. (See Photo 30) Photo 31 Step 28 Remove the doctor blade end foams from each side of the toner hopper. (See Photo 31) Fill the hopper with toner. Need help with a particular remanu- facturing problem? Call the Technical Resource Center from 8am - 5pm PST: 800 394.9900
  • 6. 6 HP 1160/1320/P2015 Technical Instructions Photo36 Step 33 Place the clean mag roller bushings onto the end of the mag roller. The white bush- Step 31 ing goes on the gear end and the black Install the doctor blade end bushing goes on the contact end. Install foams onto each side of the the mag roller stabilizing bar onto the gear toner hopper. end of the mag roller and set the mag (See Photo 34) roller into the toner hopper. (See Photo 36) Photo 37 Step 34 Photo 34 Slide the tail of the seal through the con- tact end cap and place the end cap into position. Install the two screws that hold the end cap in place. (See Photo 37) Photo 38 Step 35 Place the three gears onto the end of the cartridge. (See Photo 38) Step 32 Install the clean or new doctor blade onto the hopper. Place the scrapers on each end of the doctor blade and install the two Step 36 screws that hold the blade in Install the gear housing end cap onto the place. end of the toner hopper. Secure the end (See Photo 35) cap with two screws. Photo 39 (See Photos 39) Step 37 Join the toner hopper and waste hopper together. Install the two cartridge pins that Photo 35 hold the cartridge together. (See Photos 40 & 41) Photo 40 Photo 41 E-mail: info@futuregraphicsllc.com Website: www.futuregraphicsllc.com
  • 7. HP 1160/1320/P2015 Technical Instructions 7 Photo 42 Photo 43 Step 38 Place the drum shutter onto the waste hopper so that the tension spring fits into its slot. (See Photo 42) Press down on each end to lock the drum shutter posts into position. (See Photo 43) Test the cartridge. A First Look at the HP LaserJet 1160/1320/P2015 In September 2004, Hewlett- Packard seconds, which is .5 seconds slower (HP) released two new, entry-level than the LaserJet 1300. monochrome printers based on the same Canon print engine. The LaserJet 1160 Both the LaserJet 1160 and LaserJet (Q5933A), which is the base model, 1320 series printers have a monthly duty is a non-networking machine capable cycle of 10,000 pages. Each machine of printing 20 pages per minute at ships with a standard yield cartridge 600 x 600 dpi with HP REt and FastRes (Q5949A) that prints 2,500 pages at 1200 technology. The LaserJet 1160 sells 5% coverage. The standard yield cartridge for $329.99 on HP’s website. sells for $103.40. A high yield cartridge sells at for $104. The whole LaserJet (Q5949X) is also available from HP. The The HP LaserJet 1320 is available in 1320 family prints at 22 pages per minute high yield cartridge sells for $189.20, yields four different models. The LaserJet 1320 at 1200 x 1200 dpi. 6,000 pages and can only be used in the (Q5927A) is the base model which that LaserJet 1320 series printers. sells for $389. The networked LaserJet The LaserJet 1160 and LaserJet 1320 1320n (Q5928A) has a list price of $500. feature a 133 MHz Motorola V4 Coldfire This How To article is a first look at the HP’s LaserJet 1320nwwn (Q5929A) is a processor, and each machine comes new HP LaserJet 1160 and HP LaserJet wireless network-ready printer that fea- standard with 16MB of RAM. Additional 1320 cartridges. Products for this new tures Bluetooth technology and sells for memory can be added to the LaserJet engine are still in development , but this $450. Lastly, the LaserJet 1320tn 1320, up to 144MB. Both printer models will give you a good look atindication of (Q5930A), which is network ready and have instant- on fuser technology that what you remanufacturers are up against. supports a second 250-sheet paper tray, can deliver the first page out in 8.5 Cross Reference: Cross Reference: HP LaserJet 1160 HP LaserJet P2015 Printer HP LaserJet 1320 HP LaserJet P2015d Printer HP LaserJet 1320n HP LaserJet P2015dn Printer HP LaserJet 1320nw HP LaserJet P2015x Printer HP LaserJet 1320tn Supplies Part Number: Supplies Part Number: Q5949A 2,500pgs (for both LaserJet 1160 and 1320) Q7553A 3000 pgs Q5949X 6,000pgs (only for the LaserJet 1320) Q7553X 7000 pgs Future Graphics (FG) is a distributor of compatible replacement parts and products for imagining equipment. None of FG's products are genuine OEM replacement parts and no affiliation or sponsorship is to be implied between FG and any OEM. E-mail: info@futuregraphicsllc.com Website: www.futuregraphicsllc.com