5 time saving tips for photograph restoration
•
0 likes•296 views

Photo restoration needs you to consider many factors. Here, you can see some tips that help you in achieving results that meet excellence.

Recommended
Recommended
More Related Content
Recently uploaded
Recently uploaded (20)
Featured
Featured (20)
5 time saving tips for photograph restoration
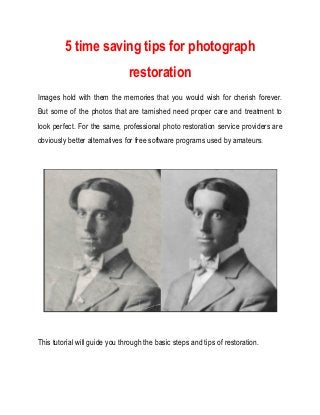
- 1. 5 time saving tips for photograph restoration Images hold with them the memories that you would wish for cherish forever. But some of the photos that are tarnished need proper care and treatment to look perfect. For the same, professional photo restoration service providers are obviously better alternatives for free software programs used by amateurs. This tutorial will guide you through the basic steps and tips of restoration.
- 2. 1. Patch and Healing Brush Tool After the image to be enhanced is opened in Photoshop, the patch tool should be selected. It works as a marquee tool here also. Select the area which needs to be patched. Then select another location with similar properties without letting the mouse button leave. Patch tool is a real timesaver and a good way to start the process. Healing brush tool will remove any spots or dark areas in the image. Be sure to check if any left outs do occur. It can be solved by using the Clone Stamp Tool. 2. Check for imperfections If the image chosen is a portrait, check for any imperfections caused due to torn or faded pictures. If an eye or a part of the nose is missing, then a rough marquee selection has to be made on the available part and then copy the
- 3. selection to the new layer. After pasting, do use the Free Transform tool to flip the selection. Now align the eye or affected part accordingly. 3. Masking the layer
- 4. We will need to mask certain areas to hide irrelevant parts. White conceals masked areas and black reveals. Always keep this in mind. Also remember that X is the hotkey to switch between the colors. Using a brush with lower opacity helps to paint certain areas away. Playing with masks is what most professional photo restoration service providers are adept in. 4. Fixing the edges Final fixation of edges can be done using the Clone Stamp Tool. Always remember to lower the opacity just to land softer strokes. Hard brushes are always inadequate in restoration practices. If everything is finished, then merge the layers down but don’t forget to keep the basic layers unspoiled. If you are
- 5. unsure how to proceed then get help from a photo editing company who can help you better. 5. Final preparation and Noise Removal Noise reduction has to be done to clear the picture. Filter to reduce noise can be used. It is located in Noise submenu of Filter menu. Sharpening the image is a commonly used method to make restored photos look good. High Pass filter comes handy during the stage. If the picture is intended to be printed then sharpen them a bit more because printers do tend to blur out the result. Most of the times the process of restoring a vintage photo requires the assistance of image restoration service providers since photos can be of different shapes and sizes. Practices followed remain more or less the same.
- 6. Experimenting with tools is a good way to know more about their features but don’t forget to play only in the restored layers and not the basic ones. Also read Restore your photos in an easier and effective manner with these three remarkably effective tips Let’s talk. We are looking forward to create awesomeness for you.