Black pine needle & candle pruning
•
2 likes•799 views

This document provides guidance on pruning needles and candles on black pine bonsai trees. It recommends thinning needles in the fall or winter, removing more from the top third of the tree and less from the bottom third. Candle pruning involves removing the smallest buds first, then medium, then large buds to balance growth. The second set of buds should be reduced to two buds per tip. White pines require a different approach, removing only second and third year needles and pinching candles strongest to weakest.

Recommended
More Related Content
Viewers also liked
Viewers also liked (16)
Similar to Black pine needle & candle pruning
Similar to Black pine needle & candle pruning (9)
Recently uploaded
Recently uploaded (6)
Black pine needle & candle pruning
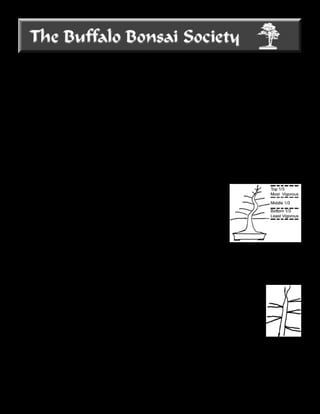
- 1. BLACK PINES: NEEDLE & CANDLE PRUNING NOTE: This article is a consolidation of two presentations given to Buffalo Bonsai Members by fellow members Dan Zak and Mike Coppola. Any of the procedures described herein should ONLY be done on HEALTHY trees, since removal of needles and candles REDUCES SAP FLOW (nourishment) within the branches. In addition, it must be noted that the procedures described are for Black Pines (Two Needle Pines). White Pines (Five Needle) are handled DIFFERENTLY! Please refer to the side bar on White Pines at the end of this article for some of the most obvious differences. You should refer to specific articles on White Pine with more in depth coverage prior to working on White Pines. BLACK PINE NEEDLE PRUNING: In late Fall or early Winter, thin the needles of the branches based on the procedure described below. When removing needles, be sure not to destroy the sheaths holding the needles (they are located at the base of each two needle set). By pulling the needles straight out, you will not destroy the sheath. An alternate method would be to cut the needles just above the sheath with a scissors. The reason you do not want to destroy the sheath is so the buds at the base of the sheath are not destroyed. If you definitely do not want any future budding in a specific area, then it doesn’t matter if the sheaths get damaged. Start by dividing the tree into three horizontal sec ions. The top third is where the most t vigorous growth takes place on two needle pines. The bottom third area is where the least vigorous growth is found. Reduce the needles in each section of the tree to the number of “two needle sets” specified in the following chart. Note there are two columns. The one on the left indicates the number of needle sets that should be left on each branch within that third of the tree when you thin out in late Fall/early Winter. The next column shows the number of needle sets to reduce to in early Spring. SECTION EARLY WINTER Feb/Early March* Top Third 6 - 8 needle sets 2 - 4 needle sets Middle Third 8 - 10 needle sets 4 - 6 needle sets Bottom Third 10 - 12 needle sets 6 - 8 needle sets * Once buds begin to grow, this procedure is not effective. NOTE: If a specific branch is weaker than the rest in a specific section, leave all or more needles than the rest of the branches in that section. When removing needle sets, the remaining sets should alternate just like branches are desired to alternate on a bonsai. See sketch to right. Hopefully, buds (and ultimately, new branches) will develop at the bases of some of these needle sets. On cork bark Black Pines, increase the number of needle sets that are left on. In addition, only do the procedure (covered in the next section) of candle pruning and reduction every 2nd year – giving the tree a chance to rest & recuperate between procedures. When buds start growing in the Spring, begin fertilizing the tree lightly. Then 10 - 14 days later increase the feritlizer amount used. For example, if you use fertilizer cakes, start out by placing them 4" apart. Then increase the number of cakes so that they are 2" apart. After the buds are about 1/2" in length, remove fertilizer cakes. DO NOT HOLD BACK WATER to try to reduce needle size. Needle reduction is accomplished by the combination of Continued on Pg. 2
- 2. Buffalo Bonsai Society Pg 2 0f 2 Black Pine Needle & Candle Pruning, Cont. from Pg. 1 needle and candle pruning - not the reduction of water intake. Black pines like water, but good drainage is essential. You are now ready to begin the next phase: Candle Pruning. BLACK PINE CANDLE PRUNING: FIRST SET OF BUDS; When you have about three sizes of candles and at the time you can begin to see the needles about to begin to pop from the candles, you start the pinching sequence of removing candles. You begin with the buds (candles) that are the SMALLEST. When pinching candles, do it by supporting the base of the branch below the candle with one hand. Then, with your other hand, grab the candle with your thumb and forefinger and pull the candle off with a slight twist. DO NOT USE SCISSORS. After about 10-12 days, you will see the buds you pinched above start to sprout buds from their bases. That is when you are ready to pinch the MIDDLE size candles. Again, in another 10 -12 days, you should notice buds sprouting from the medium size buds you pinched back. That is when you pinch back the LARGE buds. Since Black Pines grow all season long, if you pinched the stronger candles first, the second set of buds would still continue to grow at a faster pace than the buds generated by the removal of the middle and weaker sets of buds, so that you will be unable to BALANCE the candle length and strength of the tree. By pinching the smaller candles first, you are enabled to both balance the length of all the candles (thus the length of the needles) and the overall strength of the tree. In addition, candle pruning results in shorter branch internodes. NOTE: Do NOT remove the weakest buds on the tree. In addition, if you desire to have a shorter branch grow longer, do NOT remove the candle on that branch. SECOND SET OF BUDS; Once your second set of buds begin to push out, it is time to restart your fertilizing program. Each branch should produce a second set of buds with about 2-5 buds on each tip. You need to reduce each tip to just TWO BUDS. If the tip has more than two buds, remove the largest and the smallest, until you have two buds remaining. Repeat this procedure for each branch. WIRING: Wiring should initially be done in March. Copper wire is preferred since it has better holding power and you will be able to use a thinner wire to achieve a similar strength than aluminum would require. Always wire the ends of the branches on pines so that they face upwards. Wire should be kept on for 6-7 months or until branch swelling occurs. WHITE PINES • Do NOT remove this years needles. You only remove second/third year needles. They are usually brown anyway. • You Pinch Candles in half starting with the STRONGEST FIRST. Since White Pines only grow in the Spring, once you pinch the stronger candles, they aren’t going to continue to lengthen very much, if any (as do Black Pines). • The most vigorous part of the tree is the outer extremities of the tree, with the weakest part being the center of the tree. • You do not FERTILIZE until the after the candles open. • White Pines like to be drier than Black Pines.