An introduction to workflow-based programming with Node-RED
•
20 recomendaciones•20,651 vistas

This is an introduction to Node-RED for beginners. The tutorial explains step-by-step how to implement a basic chat server.

Recomendados
Más contenido relacionado
La actualidad más candente
La actualidad más candente (20)
Similar a An introduction to workflow-based programming with Node-RED
Similar a An introduction to workflow-based programming with Node-RED (20)
Más de Boris Adryan
Más de Boris Adryan (20)
Último
Último (20)
An introduction to workflow-based programming with Node-RED
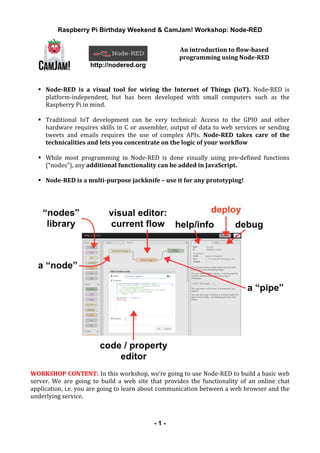
- 1. Raspberry Pi Birthday Weekend & CamJam! Workshop: Node-RED - 1 - http://nodered.org An introduction to flow-based programming using Node-RED ! Node-RED is a visual tool for wiring the Internet of Things (IoT). Node-‐RED is platform-‐independent, but has been developed with small computers such as the Raspberry Pi in mind. ! Traditional IoT development can be very technical: Access to the GPIO and other hardware requires skills in C or assembler, output of data to web services or sending tweets and emails requires the use of complex APIs. Node-RED takes care of the technicalities and lets you concentrate on the logic of your workflow ! While most programming in Node-‐RED is done visually using pre-‐defined functions (“nodes”), any additional functionality can be added in JavaScript. ! Node-RED is a multi-purpose jackknife – use it for any prototyping! WORKSHOP CONTENT: In this workshop, we’re going to use Node-‐RED to build a basic web server. We are going to build a web site that provides the functionality of an online chat application, i.e. you are going to learn about communication between a web browser and the underlying service.
- 2. Raspberry Pi Birthday Weekend & CamJam! Workshop: Node-RED - 2 - Technical background: For this workshop, you will find a Raspberry Pi with Node-‐RED already installed. While the installation of Node-‐RED software is relatively easy, it would be difficult to include this step within the time constraints of the exercise. For completeness, this is what’s happened to a fresh and up-‐to-‐date Raspian installation on your SD card: 1. Install node.js and npm as per: http://nodered.org/docs/hardware/raspberrypi.html 2. Clone Node-‐RED from Github and install as described here: http://nodered.org/docs/getting-started/installation.html Note: To leverage the power of Node-‐RED, consider installing nodes for email or raw GPIO access as well. The latter is described here: http://nodered.org/docs/hardware/raspberrypi.html 1) Exercise: Starting Node-RED as Raspberry Pi user Node-‐RED can be installed as a service on the Raspberry Pi, i.e. as a program that’s always executed when your Pi is running. However, this is only useful if you want to commit your Pi for this particular use as it can consume considerable resources. For everyone else, it’s recommended to start Node-‐RED only when needed: 1. Open the LXTerminal to see a console that allows you to enter Linux commands. 2. Change into the Node-‐RED directory by issuing “cd node-‐red”. 3. Start Node-‐RED by typing “node red.js”. You should now see Node-‐RED starting up – that may take a few seconds: Congratulations. You’re now ready for the exercises. Node-‐RED represents a server on the basis of node.js and interacts with the user through a graphical user interface. It can be reached on port 1880. To use Node-RED, open a web browser and direct it to http://localhost:1880 It’s useful to remember that Node-‐RED acts as a server in your entire network. That is, if your Raspberry Pi’s internal IP address is something like 192.x.x.x, every computer in your network can open the Node-‐RED GUI through http://192.x.x.x:1880. You can make your system more restricted/secure by following the configuration advice on http://nodered.org/docs/configuration.html.
- 3. Raspberry Pi Birthday Weekend & CamJam! Workshop: Node-RED - 3 - 2) Exercise: Your first flow – this is a recap for those who attended the last course The best way to explain “a flow” is by creating one. In this mini flow, we’re going to inject a value into our debug window (refer to page 1 for what the GUI elements are called). 1. Open the Epiphany Web Browser. (It supports JavaScript better than Midori). 2. In the address line, enter localhost:1880. You will then see the Node-‐RED GUI. 3. Drag and drop an “inject” node from the nodes library into the flow editor (once you’ve chosen the inject node, you should see some general explanation about its functionality in the info pane – no need to read that now). 4. Drag and drop a “debug” node from the nodes library into the flow editor. 5. Create a pipe between the inject and debug nodes by drawing a connection between their small grey rounded rectangles. 6. Change from the info pane to the debug pane (upper right). 7. Deploy (=start) your flow. 8. Once deployed, press the left blue rectangle that’s attached to the inject node. Check what’s happening in the debug pane. 3) Exercise: Setting up a static website It is very easy to set up a very basic web server in Node-‐RED. 1. From the input panel, chose a “http” node. 2. Change the properties of your http node so that it will respond to GET requests to /mypage from a browser. 3. Add a “template” node (from the function panel), and a “http response” node from the output panel. 4. Wire your flow together as shown below: 5. Deploy your flow. 6. Once deployed, open a separate browser window and enter localhost:1880/mypage. A note on addresses and ports: Web servers have their own numerical addresses, e.g. a special table (called DNS) resolves the BBC website to 212.58.246.103. Each address can have thousands of communication channels (called ports). A standard webpage call uses port 80 by default. Your own machine is always called “localhost” and resolves to 127.0.0.1. A default Node-‐RED server can be opened on port 1880. Does the address http://localhost:1880/mypage make more sense to you now?
- 4. Raspberry Pi Birthday Weekend & CamJam! Workshop: Node-RED - 4 - 4) Exercise: The anatomy and function of a template node Our previous Node-‐RED workflow hides the complexity of the client " server communication via the hypertext transfer protocol (“http”) (which sits on top of another protocol, TCP/IP, which sits on top of… …you get the gist). We don’t need to care how the browser talks to the server. One technicality that we can’t fully get around in this workshop is HTML, the hypertext markup language. It’s the code that describes how a website is supposed to look. It’s beyond the scope of this course to teach you all goodness of HTML, a good entry point for further explorations is here: http://www.w3schools.com/html. What you need to remember, however, is that the template node encapsulates a minimal HTML page. So indeed returns <!DOCTYPE html> <html> <head> </head> <body> This is the payload: {{payload}} </body> </html> which instructs the browser to show the text you’ve seen in Exercise 3. In the next exercise, we will use additional HTML code to add some styling to our website, and we will learn to use the moustache {{ }} format to add dynamic content to it. 1. Drag and drop a “function” node into the flow editor. Call it “where things happen”. Stick it in between the http-‐in and the template node. 2. Edit the function: Add msg.payload = "Hello, Pi"; in the line before return msg; 3. Change the template into This is the <b>message</b>: {{payload}} 4. Deploy your flow and check out localhost:1880/mypage. Note: If you know HTML, have a play with other style tags. You can even embed CSS!
- 5. Raspberry Pi Birthday Weekend & CamJam! Workshop: Node-RED - 5 - 5) Exercise: Retain state So far our Node-‐RED flow is strictly linear: Once the /mypage is requested, the function populates the variable payload with “Hello, Pi”, the template node embeds this payload into the HTML that’s returned to the server. How can we put other things into the payload? 1. Wire your inject node from Exercise 1 to the function node. Modify the inject node to send the string “Have a nice day” as payload, with “new message” as topic. 2. Edit the function node to contain the following JavaScript: 3. Deploy the flow. 4. Look at localhost:1880/mypage in your web browser. Note what you see. 5. Click on the rounded rectangle on the left of your inject node. 6. Reload localhost:1880/mypage. Note what you see. Can you make sense of your observation in the light of your JavaScript code from step 2? A bit of background: By default, most wires between nodes are topic/payload pairs, a bit like emails have subject and body. However, the default msg variable can always be extended, and in the case of the http nodes contain an entire http response object. The context variable is available in the function node to retain information between different executions of the node. In our example, if the input message msg arrives from the injection node (having the topic “new message”), we populate context.value with the payload “Have a nice day” and leave the node. If the input arrives from the /mypage http node, we evaluate whether something is present in the context variable. If not, we deliver the payload “never got anything” for rendering in the template node, otherwise we take it from the context. The special case context.global is a variable that persist between executions of a node and are globally available to all other function nodes. More about messages and context variables can be found here: http://nodered.org/docs/writing-functions.html
- 6. Raspberry Pi Birthday Weekend & CamJam! Workshop: Node-RED - 6 - 6) Exercise: Returning the result of a web form to Node-RED So far our interaction between the server and the client was rather unidirectional. Following the http request, us injecting or not injecting a message determined the actual outcome. Now, we extend the example so that the return value is dependant on the user’s input. 1. Drag and drop a “http” input node, a “template” node and a “http“ output node into your flow. Set the input node to respond to GET request on /login. Wire the nodes together as shown below: 2. Add the following HTML to your template node: <form action="http://localhost:1880/chat" method="post"> <b>User</b><br> <input type="text" name="user"/><br> <button type="submit">Submit</button> </form> 3. Add another set of four nodes to your flow. Configure the http input node to respond to POST requests at /chat. This is how your server is going to react to form submissions: 4. Edit the function node to extract the content of the incoming input field “user” (if not empty) and assign it to our standard payload: if (msg.req.body["user"] != "") { msg.payload = msg.req.body["user"] } return msg; 5. The template node can simply say: The user’s name is: {{payload}} 6. Deploy and test your flow at localhost:1880/login. Does it do what you expect? If so: Congratulations, you’re now seeing the key ingredients to a basic chat server. Exercise 7: Putting it all together In the next step we’re going to put all of our new skills together. To build a basic chat server, all we need is a little more trickery with the context.global to retain our conversation (we’re going to use context.global.dialog), some HTML concept called iframe to separate an input field from the conversation, and a bit of client-‐sided JavaScript to auto-‐update the iframe.
- 7. Raspberry Pi Birthday Weekend & CamJam! Workshop: Node-RED - 7 - 1. Rewrite the function node following the /chat http input like this: if (msg.req.body["user"] != "") { msg.payload = msg.req.body["user"] } if (msg.req.body["message"] != undefined) { context.global.dialog += msg.req.body["user"]+':'+msg.req.body["message"]+"<BR>"; } context.global.dialog = context.global.dialog || ""; return msg; 2. The template node hides most of the trickery: <iframe src="http://localhost:1880/dialog" name="iframe_a" width="90%" height="70%"></iframe> <form name="frm" action="http://localhost:1880/chat" method="post"> <b>Message from {{payload}}</b><br> <input type="text" name="message" size="90%"/> <input type="hidden" name="user" value="{{payload}}"><br> <button type="submit">Submit</button> </form> <SCRIPT language="JavaScript"> window.setInterval("reloadIFrame();", 1000); function reloadIFrame() { window.frames["iframe_a"].location.reload(); } </SCRIPT> 3. We need another set of http input, function, template and http out nodes. These will represent the /dialog page that’s shown in the iframe. The code is fairly simple. 4. Add to function node node following the /dialog http input msg.payload = context.global.dialog; before return msg; 5. The template node just says: {{payload}} 6. Deploy your web server. Open localhost:1880/login from two different browser windows and login with different identities. Both windows will update their iframe once a second, showing /dialog as it continues to grow on the server with lines that are sent via the form field “message” from either client.
- 8. Raspberry Pi Birthday Weekend & CamJam! Workshop: Node-RED - 8 - Further explanations and suggestions for experiments: So far all code refers to localhost:1880. It is possible to change the default port, allowing addresses without the addition of :1880 (see http://nodered.org/docs/configuration.html). Furthermore, localhost is only visible on your own machine. You can change localhost to your Raspberry Pi’s local IP address (often something like 192.168.x.x or 172.x.x.x) and request your chat server from any other computer within your local network. These changes would impact the address that’s specified in the HTML form definitions. Node-‐RED is an incredibly powerful framework that allows you to do things in very little time. The official directory of flows donated to the community is here http://flows.nodered.org and they can easily be imported by copying & pasting the JSON-‐formatted code. A few suggestions and examples that I have described over the past months are here: ! Triggering Node-RED with drawings: The Aestheticodes project uses a QR code like method to encode information in beautiful drawings. Draw a picture, take a photograph with your mobile and trigger the debug node doing that: http://logic.sysbiol.cam.ac.uk/?p=1514 ! Control Minecraft with Node-RED: The Minecraft Pi Edition can be controlled through Python, but that may not be easily accessible for everyone. With a MQTT-‐to-‐Minecraft bridge, the Node-‐RED inject nodes can be used to control Steve: http://logic.sysbiol.cam.ac.uk/?p=1499 ! Got an AirPi shield? Monitor your room climate with AirPi and Node-RED: http://logic.sysbiol.cam.ac.uk/?p=1423 ! The first CamJam Node-RED tutorial that teaches radio communication through Ciseco radio modules is available here: http://www.slideshare.net/BorisAdryan/node-red- coursecamjamjuly2014