How to make a Guitar - Part 1.pdf
•
0 likes•77 views

the first of 2 parts about DIY guitar

Recommended
More Related Content
Similar to How to make a Guitar - Part 1.pdf
Similar to How to make a Guitar - Part 1.pdf (20)
More from David Johnston
Recently uploaded
Recently uploaded (15)
How to make a Guitar - Part 1.pdf
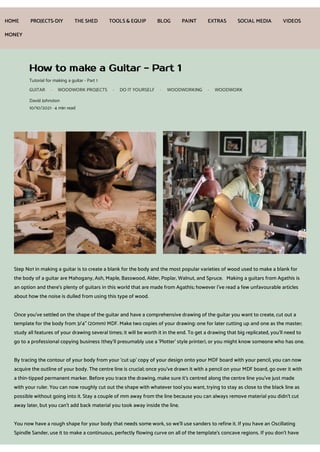
- 1. How to make a Guitar - Part 1 Tutorial for making a guitar - Part 1 GUITAR · WOODWORK PROJECTS · DO IT YOURSELF · WOODWORKING · WOODWORK David Johnston 10/10/2021 · 4 min read Step No1 in making a guitar is to create a blank for the body and the most popular varieties of wood used to make a blank for the body of a guitar are Mahogany, Ash, Maple, Basswood, Alder, Poplar, Walnut, and Spruce. Making a guitars from Agathis is an option and there's plenty of guitars in this world that are made from Agathis; however I've read a few unfavourable articles about how the noise is dulled from using this type of wood. Once you've settled on the shape of the guitar and have a comprehensive drawing of the guitar you want to create, cut out a template for the body from 3/4" (20mm) MDF. Make two copies of your drawing: one for later cutting up and one as the master; study all features of your drawing several times; it will be worth it in the end. To get a drawing that big replicated, you'll need to go to a professional copying business (they'll presumably use a 'Plotter' style printer), or you might know someone who has one. By tracing the contour of your body from your ‘cut up' copy of your design onto your MDF board with your pencil, you can now acquire the outline of your body. The centre line is crucial; once you've drawn it with a pencil on your MDF board, go over it with a thin-tipped permanent marker. Before you trace the drawing, make sure it's centred along the centre line you've just made with your ruler. You can now roughly cut out the shape with whatever tool you want, trying to stay as close to the black line as possible without going into it. Stay a couple of mm away from the line because you can always remove material you didn't cut away later, but you can't add back material you took away inside the line. You now have a rough shape for your body that needs some work, so we'll use sanders to refine it. If you have an Oscillating Spindle Sander, use it to make a continuous, perfectly flowing curve on all of the template's concave regions. If you don't have HOME PROJECTS-DIY THE SHED TOOLS& EQUIP BLOG PAINT EXTRAS SOCIAL MEDIA VIDEOS MONEY
- 2. an OSS, make do with what you have or can afford. Instead of sitting and sanding the board in one spot, move the template along the curve as you sand it. Only if you have a significant lump that needs to be brought down to level with the curve should you sand a region without moving. This repeated sanding process will assist in perfecting the curve and making it smooth and consistent. It's now time to work on the convex areas of the template now that you've completed and approved the concave regions. We'll use the palm sander for this and the reason for this is that it has a flat bottom surface, which means it will sand off all high points but won't sand lower and lower spots because it's flat and the surface is convex, resulting in some wonderful uniformity. Sand the convex portions using the same method of testing your progress with light profiles until they, too, flow flawlessly and you are satisfied. Create your template for the headstock shape using the same procedures as before, then continue on to the final template you'll need to make, which is the template for your neck and fretboard. You can use the same template for the fretboard as you did for the neck. Simply measure the width of the neck at the nut and at any point further down the neck, say the 12th or 24th fret for convenience, and then tape a perfectly straight piece of wood along one edge of the taper you've drawn out between the nut and the point you chose further down the neck with strong double sided tape. Use a template bearing guided router bit to route down this straight piece, then repeat for the other side of the fretboard taper, and you'll have a wonderful neck and fretboard taper. Now is the time to cut out the excess wood where the nut will go, as well as the end of your neck tenon. If you want to use a router to route your neck pocket, round off the ends of the template so that the tenon end is at the same radius as the router bit. This will provide a beautiful tight fit. This template can be used to route the entire neck or just the fretboard by placing the fretboard wood at the nut and then centre it. There are many various ways to create a guitar neck and fretboard; practically all electric guitar fret boards have some form of radius, and different people prefer different radiuses. Making a guitar can potentially necessitate spending a lot of money on specialist tools, which may be necessary if you want perfection and time is a concern, but if you're attentive and meticulous, you can make an outstanding guitar on a very small budget. Remember, people made guitars a long time ago, long before any of the sophisticated equipment we have today were ever considered; in fact, the first guitars are said to have been invented in Spain in the 15th century. The final shaping of the neck and headstock is also a matter of personal preference; the majority of the shaping may be done using an angle grinder and a carving wheel, then everything can be perfected with hand sanding. The fretboard is a delicate task that demands extreme precision and accuracy. Fill up the little holes drilled on the edge of the fretboard for the side dots that identify individual frets with epoxy. If you want to take a break from the fretboard, finish shaping the body of the guitar by carving a contour on the back and cutting a bevel on the front, both of which will make playing the guitar much more comfortable. This is the end of Part 1 – stay tuned for Part 2 Disclaimer This site contains affiliate links to products. I may receive a commission for purchases made through these links. However, this does not impact any review, comment or comparison I might make. I try my best to keep things fair and balanced, in order to help you make the best choice for you.
- 3. Get in touch Name* Your name Last name Your last name Your email* Your email address Message* Enter your message Submit Address Po Box 784 Muswellbrook, NSW, Australia, 2333 Contacts 0448-687-451 glwwoz1@gmail.com © glzwoodworking 2021 > 2022 - All Rights Reserved GLZWoodworking is a participant in the Amazon Services LLC Associates Program, an affiliate advertising program designed to provide a means for sites to earn advertising fees by advertising and linking to amazon.com