SlideShare una empresa de Scribd logo
1 de 3
Descargar para leer sin conexión
Difficulty Level: 2 (Mostly Easy)
Time to complete: 2-5 minutes per bulb
Tools needed: Spudger (trim removal tool), dainty fingers, sun glasses
Part 1 - Trunk
The trunk is the easiest place to work in, and most likely the part of the car that will benefit the most
from the ultra-bright bulbs, so we'll start here.
1. If you have the premium lighting package, then you will have three bulbs in the
trunk/boot; one facing down from inside the hatch, and two in the trim below the
loading shelf; one on each side, facing inwards. Proceed to step 3. If you do not have
the premium package, you'll only have the bulb in the hatch. The good news is that
Tesla still ran the wires for the other two locations (yay), but you have to work a little
to find them (boo), and locations vary, depending on the age of your Model S. If you
are not comfortable removing trim pieces, stop now, and seek professional help. This
is an easy process, but some owners understandably do not like pulling bits of their car
off.
2. If your car is 2014 or later, you should be able to pull the soft black trim away to
reveal the light connectors. If you have an earlier model, then you might have to pop
the loading shelf off, for this you'll need some heavier-duty trim removal tools. You
should find the drivers' side connector taped under the charge port. This is a high-
voltage area, so although everything is shielded, do NOT work in this area when
charging the car. The passenger side light is normally tucked into the corner, towards
the opening of the trunk. Both wires can be identified by the presence of a 2-pin
connector - please refer to the photos.
2a. You will also have to remove the punch-outs for each of the lights; the locations
are shown in the photo above.
3. Starting with the hatch light, find your spudger and wedge it into the small
recess on one of the shorter sides on the bulb, as shown in the photo, then simply pry the bulb out. For the
other two bulbs, since they're in the soft trim, they'll come out very easily using the
spudger, or if you're tough, just use your fingers to pop them out.
4. Disconnecting the old bulb is very easy when you know how. The picture shows
a small plastic lever that's part of the 2-pin plug. Simply push that down with the
spudger or a finger nail, and the connector should release. If it doesn't, just pull on
the bulb a little as you're pushing down on the connector. Once you've done this
once, the others will be a breeze.
5. To install your new ultra-bright bulbs, simply push them onto the connectors until you hear the click of the plastic pin
popping back into place. Depending on how long you've taken so far, the lights might have timed out and gone off, so
don't be alarmed if you're not immediately blinded by the new lights, just close and re-open door to turn them back on.
6. Finally, push the lights home into their socket by using two thumbs to push them in with equal pressure on each side. Do not fully push one side in,
then the other, as this might cause the plastic to crack.
Part 2 - Frunk
This one is easy. There's only one bulb, located below the locking latch
on the leading-edge of the frunk.
1. Remove from the connector as described in Step 4 above. Then don your sunglasses and install your ultra-bright bulb
as described in Step 5 above, and push the bulb back into place as described in Step 6.
2. As before, find your spudger and dig it into the small nook on the shorter edge of the bulb, then just pry it out.
Part 3 - Puddle Lights
If you have the premium lighting package, then each door has a white light on the bottom of the door
trim shining onto the ground. If you do not have the premium lighting package, then we do not
recommend trying to find the wires and removing the punch-out from the doors; seek professional help.
1. You're probably going to have to lay on the floor to do these, so park your Model S in the living room, or find a nice bit
of carpet to lay on.
2. The door trim is quite soft, so the bulbs pop out as described in Step 4, and then follow Steps 5 - 6 to complete the
installation. You will need ot use some force to get the spudger under the bulb to extract it.
3. Keep the carpet out to kneel om you're planning on doing the foot-well lights....
Part 4 - Foot well lights
There's four of these. The front ones are located in the trim directly above where your feet hang out,
which on the drivers-side means that the pedals get in the way a bit.
The rear ones, are fitted to a small plastic bracket that sits on a bar below the front seats. In early Model S's the rear
lights were part of the premium lighting package, so you might not have them, but the wiring is there. You will, however,
need the bracket that snaps onto the bar as shown in the photo. You can purchase the brackets here.
1. Let's start at the front. Now you've done a few of these bulbs you're a pro. That's good, becuase the drivers' one is a
pain to pop out because the pedals get in the way. The technique is still the same though, you just need to really dig the
spudger into the small nook on one short side of the bulb, and pry it out. It might take a few tries, but it'll come. The
passenger side is the same, but easier without the pedals to get in the way. follow Steps 5 - 6 above to complete the
installation.
2. To the back of the car we go. Raise the seat you want to work on to its highest position, and then tilt the seatback forward as far as it will go.
3. You can then see the lights, fitted into a bracket that snaps on and off a support bar.
4. To make the replacement easier, pull the bracket, complete with the bulb, away from the bar. The spring clips holding it on the bar are mean and
angry, so mind your fingers (the author speaks from experience).
5. Now pop the bulb out of the assembly. You'll need to use the spudger to do this, and also try to squeeze the clips that are part of the bulb inwards
to help release it. The bracket is very rigid plastic, so the bulb needs a little more encouragement to pop out.
6. Once you have the bulb released, replace as described above, refit the bulb and then the bracket to the support bar. Repeat the same for the other
seat.
Bonus Part 5 - Glove box
If you want a dazzling glove box, you can also replace the bulb in there. The process is the same as described above for all the other bulbs, but the
bulb is quite difficult to remove; if the spudger doesn't pry it out, you might need to revert to a small screwdriver, but in doing so you might crack the
old bulb, so take care.
EVANNEX LED Lighting Upgrade Kit for Tesla Model S

Más contenido relacionado

Más de EVANNEX Aftermarket Tesla Accessories

Electric Vehicle University - MS 312 Tips for Model S Owners, Charging
Electric Vehicle University - MS 312 Tips for Model S Owners, ChargingElectric Vehicle University - MS 312 Tips for Model S Owners, Charging
Electric Vehicle University - MS 312 Tips for Model S Owners, ChargingEVANNEX Aftermarket Tesla Accessories
 

Más de EVANNEX Aftermarket Tesla Accessories (20)

Tesla Model X Rear Lighted T Installation Guide
Tesla Model X Rear Lighted T Installation GuideTesla Model X Rear Lighted T Installation Guide
Tesla Model X Rear Lighted T Installation Guide
 
Front Air Dam Protection Kit for Tesla Model S/X/3 by EVANNEX
Front Air Dam Protection Kit for Tesla Model S/X/3 by EVANNEXFront Air Dam Protection Kit for Tesla Model S/X/3 by EVANNEX
Front Air Dam Protection Kit for Tesla Model S/X/3 by EVANNEX
 
Window Control Covers
Window Control CoversWindow Control Covers
Window Control Covers
 
Tesla Presentation
Tesla PresentationTesla Presentation
Tesla Presentation
 
EVANNEX Trunk Organizer for Tesla Model X
EVANNEX Trunk Organizer for Tesla Model XEVANNEX Trunk Organizer for Tesla Model X
EVANNEX Trunk Organizer for Tesla Model X
 
EVANNEX Glove Box Bumper Installation
EVANNEX Glove Box Bumper InstallationEVANNEX Glove Box Bumper Installation
EVANNEX Glove Box Bumper Installation
 
JB Straubel Keynote
JB Straubel KeynoteJB Straubel Keynote
JB Straubel Keynote
 
Getting Ready for Model 3 by Roger Pressman - Table of Contents
Getting Ready for Model 3 by Roger Pressman - Table of ContentsGetting Ready for Model 3 by Roger Pressman - Table of Contents
Getting Ready for Model 3 by Roger Pressman - Table of Contents
 
EVANNEX LED Lighting Upgrade Kit for Tesla Model X
EVANNEX LED Lighting Upgrade Kit for Tesla Model XEVANNEX LED Lighting Upgrade Kit for Tesla Model X
EVANNEX LED Lighting Upgrade Kit for Tesla Model X
 
EVANNEX License Plate Frame Bracket for Tesla Model X
EVANNEX License Plate Frame Bracket for Tesla Model XEVANNEX License Plate Frame Bracket for Tesla Model X
EVANNEX License Plate Frame Bracket for Tesla Model X
 
EVANNEX Cubby Compartment Instructions for Tesla Model S and X
EVANNEX Cubby Compartment Instructions for Tesla Model S and XEVANNEX Cubby Compartment Instructions for Tesla Model S and X
EVANNEX Cubby Compartment Instructions for Tesla Model S and X
 
EVANNEX EcoHitch for Tesla Model S Install Guide
EVANNEX EcoHitch for Tesla Model S Install GuideEVANNEX EcoHitch for Tesla Model S Install Guide
EVANNEX EcoHitch for Tesla Model S Install Guide
 
Rear Center Console Insert Installation Guide
Rear Center Console Insert Installation GuideRear Center Console Insert Installation Guide
Rear Center Console Insert Installation Guide
 
EVANNEX - Lighted Emblem Installation Guide for Tesla Model S
EVANNEX - Lighted Emblem Installation Guide for Tesla Model SEVANNEX - Lighted Emblem Installation Guide for Tesla Model S
EVANNEX - Lighted Emblem Installation Guide for Tesla Model S
 
Electric Vehicle University - MS 312 Tips for Model S Owners, Charging
Electric Vehicle University - MS 312 Tips for Model S Owners, ChargingElectric Vehicle University - MS 312 Tips for Model S Owners, Charging
Electric Vehicle University - MS 312 Tips for Model S Owners, Charging
 
Electric Vehicle University - 220b ECONOMICS OF EV OWNERSHIP
Electric Vehicle University - 220b ECONOMICS OF EV OWNERSHIPElectric Vehicle University - 220b ECONOMICS OF EV OWNERSHIP
Electric Vehicle University - 220b ECONOMICS OF EV OWNERSHIP
 
Electric Vehicle University - 220a ECONOMICS OF EV OWNERSHIP
Electric Vehicle University - 220a ECONOMICS OF EV OWNERSHIPElectric Vehicle University - 220a ECONOMICS OF EV OWNERSHIP
Electric Vehicle University - 220a ECONOMICS OF EV OWNERSHIP
 
Electric Vehicle University - 210b EV BATTERY TECHNOLOGY
Electric Vehicle University - 210b EV BATTERY TECHNOLOGYElectric Vehicle University - 210b EV BATTERY TECHNOLOGY
Electric Vehicle University - 210b EV BATTERY TECHNOLOGY
 
Electric Vehicle University - 210c EV BATTERY TECHNOLOGY
Electric Vehicle University - 210c EV BATTERY TECHNOLOGYElectric Vehicle University - 210c EV BATTERY TECHNOLOGY
Electric Vehicle University - 210c EV BATTERY TECHNOLOGY
 
Electric Vehicle University - 210a EV BATTERY TECHNOLOGY
Electric Vehicle University - 210a EV BATTERY TECHNOLOGYElectric Vehicle University - 210a EV BATTERY TECHNOLOGY
Electric Vehicle University - 210a EV BATTERY TECHNOLOGY
 

Último

(办理学位证)墨尔本大学毕业证(Unimelb毕业证书)成绩单留信学历认证原版一模一样
(办理学位证)墨尔本大学毕业证(Unimelb毕业证书)成绩单留信学历认证原版一模一样(办理学位证)墨尔本大学毕业证(Unimelb毕业证书)成绩单留信学历认证原版一模一样
(办理学位证)墨尔本大学毕业证(Unimelb毕业证书)成绩单留信学历认证原版一模一样whjjkkk
 
Equity & Freight Electrification by Jose Miguel Acosta Cordova
Equity & Freight Electrification by Jose Miguel Acosta CordovaEquity & Freight Electrification by Jose Miguel Acosta Cordova
Equity & Freight Electrification by Jose Miguel Acosta CordovaForth
 
EPA Funding Opportunities for Equitable Electric Transportation by Mike Moltzen
EPA Funding Opportunities for Equitable Electric Transportationby Mike MoltzenEPA Funding Opportunities for Equitable Electric Transportationby Mike Moltzen
EPA Funding Opportunities for Equitable Electric Transportation by Mike MoltzenForth
 
原版1:1定制中央昆士兰大学毕业证(CQU毕业证)#文凭成绩单#真实留信学历认证永久存档
原版1:1定制中央昆士兰大学毕业证(CQU毕业证)#文凭成绩单#真实留信学历认证永久存档原版1:1定制中央昆士兰大学毕业证(CQU毕业证)#文凭成绩单#真实留信学历认证永久存档
原版1:1定制中央昆士兰大学毕业证(CQU毕业证)#文凭成绩单#真实留信学历认证永久存档208367051
 
Call Girls Vastrapur 7397865700 Ridhima Hire Me Full Night
Call Girls Vastrapur 7397865700 Ridhima Hire Me Full NightCall Girls Vastrapur 7397865700 Ridhima Hire Me Full Night
Call Girls Vastrapur 7397865700 Ridhima Hire Me Full Nightssuser7cb4ff
 
办理昆士兰科技大学毕业证QUT毕业证留信学历认证
办理昆士兰科技大学毕业证QUT毕业证留信学历认证办理昆士兰科技大学毕业证QUT毕业证留信学历认证
办理昆士兰科技大学毕业证QUT毕业证留信学历认证jdkhjh
 
办理(PITT毕业证书)美国匹兹堡大学毕业证成绩单原版一比一
办理(PITT毕业证书)美国匹兹堡大学毕业证成绩单原版一比一办理(PITT毕业证书)美国匹兹堡大学毕业证成绩单原版一比一
办理(PITT毕业证书)美国匹兹堡大学毕业证成绩单原版一比一F La
 
办理阿德莱德大学毕业证Adelaide毕业证留信学历认证
办理阿德莱德大学毕业证Adelaide毕业证留信学历认证办理阿德莱德大学毕业证Adelaide毕业证留信学历认证
办理阿德莱德大学毕业证Adelaide毕业证留信学历认证jdkhjh
 
办理学位证(MLU文凭证书)哈勒 维滕贝格大学毕业证成绩单原版一模一样
办理学位证(MLU文凭证书)哈勒 维滕贝格大学毕业证成绩单原版一模一样办理学位证(MLU文凭证书)哈勒 维滕贝格大学毕业证成绩单原版一模一样
办理学位证(MLU文凭证书)哈勒 维滕贝格大学毕业证成绩单原版一模一样umasea
 
248649330-Animatronics-Technical-Seminar-Report-by-Aswin-Sarang.pdf
248649330-Animatronics-Technical-Seminar-Report-by-Aswin-Sarang.pdf248649330-Animatronics-Technical-Seminar-Report-by-Aswin-Sarang.pdf
248649330-Animatronics-Technical-Seminar-Report-by-Aswin-Sarang.pdfkushkruthik555
 
call girls in Jama Masjid (DELHI) 🔝 >༒9953330565🔝 genuine Escort Service 🔝✔️✔️
call girls in Jama Masjid (DELHI) 🔝 >༒9953330565🔝 genuine Escort Service 🔝✔️✔️call girls in Jama Masjid (DELHI) 🔝 >༒9953330565🔝 genuine Escort Service 🔝✔️✔️
call girls in Jama Masjid (DELHI) 🔝 >༒9953330565🔝 genuine Escort Service 🔝✔️✔️9953056974 Low Rate Call Girls In Saket, Delhi NCR
 
(办理学位证)(Rice毕业证)莱斯大学毕业证成绩单修改留信学历认证原版一模一样
(办理学位证)(Rice毕业证)莱斯大学毕业证成绩单修改留信学历认证原版一模一样(办理学位证)(Rice毕业证)莱斯大学毕业证成绩单修改留信学历认证原版一模一样
(办理学位证)(Rice毕业证)莱斯大学毕业证成绩单修改留信学历认证原版一模一样gfghbihg
 
英国Bradford学位证,布拉德福德大学毕业证书1:1制作
英国Bradford学位证,布拉德福德大学毕业证书1:1制作英国Bradford学位证,布拉德福德大学毕业证书1:1制作
英国Bradford学位证,布拉德福德大学毕业证书1:1制作yjvk25x9
 
(办理学位证)(Toledo毕业证)托莱多大学毕业证成绩单修改留信学历认证原版一模一样
(办理学位证)(Toledo毕业证)托莱多大学毕业证成绩单修改留信学历认证原版一模一样(办理学位证)(Toledo毕业证)托莱多大学毕业证成绩单修改留信学历认证原版一模一样
(办理学位证)(Toledo毕业证)托莱多大学毕业证成绩单修改留信学历认证原版一模一样gfghbihg
 
办理乔治布朗学院毕业证成绩单|购买加拿大文凭证书
办理乔治布朗学院毕业证成绩单|购买加拿大文凭证书办理乔治布朗学院毕业证成绩单|购买加拿大文凭证书
办理乔治布朗学院毕业证成绩单|购买加拿大文凭证书zdzoqco
 
907MTAMount Coventry University Bachelor's Diploma in Engineering
907MTAMount Coventry University Bachelor's Diploma in Engineering907MTAMount Coventry University Bachelor's Diploma in Engineering
907MTAMount Coventry University Bachelor's Diploma in EngineeringFi sss
 
Can't Roll Up Your Audi A4 Power Window Let's Uncover the Issue!
Can't Roll Up Your Audi A4 Power Window Let's Uncover the Issue!Can't Roll Up Your Audi A4 Power Window Let's Uncover the Issue!
Can't Roll Up Your Audi A4 Power Window Let's Uncover the Issue!Mint Automotive
 
Building a Future Where Everyone Can Ride and Drive Electric by Bridget Gilmore
Building a Future Where Everyone Can Ride and Drive Electric by Bridget GilmoreBuilding a Future Where Everyone Can Ride and Drive Electric by Bridget Gilmore
Building a Future Where Everyone Can Ride and Drive Electric by Bridget GilmoreForth
 
办理萨省大学毕业证成绩单|购买加拿大USASK文凭证书
办理萨省大学毕业证成绩单|购买加拿大USASK文凭证书办理萨省大学毕业证成绩单|购买加拿大USASK文凭证书
办理萨省大学毕业证成绩单|购买加拿大USASK文凭证书zdzoqco
 

Último (20)

(办理学位证)墨尔本大学毕业证(Unimelb毕业证书)成绩单留信学历认证原版一模一样
(办理学位证)墨尔本大学毕业证(Unimelb毕业证书)成绩单留信学历认证原版一模一样(办理学位证)墨尔本大学毕业证(Unimelb毕业证书)成绩单留信学历认证原版一模一样
(办理学位证)墨尔本大学毕业证(Unimelb毕业证书)成绩单留信学历认证原版一模一样
 
Equity & Freight Electrification by Jose Miguel Acosta Cordova
Equity & Freight Electrification by Jose Miguel Acosta CordovaEquity & Freight Electrification by Jose Miguel Acosta Cordova
Equity & Freight Electrification by Jose Miguel Acosta Cordova
 
EPA Funding Opportunities for Equitable Electric Transportation by Mike Moltzen
EPA Funding Opportunities for Equitable Electric Transportationby Mike MoltzenEPA Funding Opportunities for Equitable Electric Transportationby Mike Moltzen
EPA Funding Opportunities for Equitable Electric Transportation by Mike Moltzen
 
原版1:1定制中央昆士兰大学毕业证(CQU毕业证)#文凭成绩单#真实留信学历认证永久存档
原版1:1定制中央昆士兰大学毕业证(CQU毕业证)#文凭成绩单#真实留信学历认证永久存档原版1:1定制中央昆士兰大学毕业证(CQU毕业证)#文凭成绩单#真实留信学历认证永久存档
原版1:1定制中央昆士兰大学毕业证(CQU毕业证)#文凭成绩单#真实留信学历认证永久存档
 
Call Girls Vastrapur 7397865700 Ridhima Hire Me Full Night
Call Girls Vastrapur 7397865700 Ridhima Hire Me Full NightCall Girls Vastrapur 7397865700 Ridhima Hire Me Full Night
Call Girls Vastrapur 7397865700 Ridhima Hire Me Full Night
 
办理昆士兰科技大学毕业证QUT毕业证留信学历认证
办理昆士兰科技大学毕业证QUT毕业证留信学历认证办理昆士兰科技大学毕业证QUT毕业证留信学历认证
办理昆士兰科技大学毕业证QUT毕业证留信学历认证
 
办理(PITT毕业证书)美国匹兹堡大学毕业证成绩单原版一比一
办理(PITT毕业证书)美国匹兹堡大学毕业证成绩单原版一比一办理(PITT毕业证书)美国匹兹堡大学毕业证成绩单原版一比一
办理(PITT毕业证书)美国匹兹堡大学毕业证成绩单原版一比一
 
办理阿德莱德大学毕业证Adelaide毕业证留信学历认证
办理阿德莱德大学毕业证Adelaide毕业证留信学历认证办理阿德莱德大学毕业证Adelaide毕业证留信学历认证
办理阿德莱德大学毕业证Adelaide毕业证留信学历认证
 
办理学位证(MLU文凭证书)哈勒 维滕贝格大学毕业证成绩单原版一模一样
办理学位证(MLU文凭证书)哈勒 维滕贝格大学毕业证成绩单原版一模一样办理学位证(MLU文凭证书)哈勒 维滕贝格大学毕业证成绩单原版一模一样
办理学位证(MLU文凭证书)哈勒 维滕贝格大学毕业证成绩单原版一模一样
 
248649330-Animatronics-Technical-Seminar-Report-by-Aswin-Sarang.pdf
248649330-Animatronics-Technical-Seminar-Report-by-Aswin-Sarang.pdf248649330-Animatronics-Technical-Seminar-Report-by-Aswin-Sarang.pdf
248649330-Animatronics-Technical-Seminar-Report-by-Aswin-Sarang.pdf
 
Hot Sexy call girls in Pira Garhi🔝 9953056974 🔝 escort Service
Hot Sexy call girls in Pira Garhi🔝 9953056974 🔝 escort ServiceHot Sexy call girls in Pira Garhi🔝 9953056974 🔝 escort Service
Hot Sexy call girls in Pira Garhi🔝 9953056974 🔝 escort Service
 
call girls in Jama Masjid (DELHI) 🔝 >༒9953330565🔝 genuine Escort Service 🔝✔️✔️
call girls in Jama Masjid (DELHI) 🔝 >༒9953330565🔝 genuine Escort Service 🔝✔️✔️call girls in Jama Masjid (DELHI) 🔝 >༒9953330565🔝 genuine Escort Service 🔝✔️✔️
call girls in Jama Masjid (DELHI) 🔝 >༒9953330565🔝 genuine Escort Service 🔝✔️✔️
 
(办理学位证)(Rice毕业证)莱斯大学毕业证成绩单修改留信学历认证原版一模一样
(办理学位证)(Rice毕业证)莱斯大学毕业证成绩单修改留信学历认证原版一模一样(办理学位证)(Rice毕业证)莱斯大学毕业证成绩单修改留信学历认证原版一模一样
(办理学位证)(Rice毕业证)莱斯大学毕业证成绩单修改留信学历认证原版一模一样
 
英国Bradford学位证,布拉德福德大学毕业证书1:1制作
英国Bradford学位证,布拉德福德大学毕业证书1:1制作英国Bradford学位证,布拉德福德大学毕业证书1:1制作
英国Bradford学位证,布拉德福德大学毕业证书1:1制作
 
(办理学位证)(Toledo毕业证)托莱多大学毕业证成绩单修改留信学历认证原版一模一样
(办理学位证)(Toledo毕业证)托莱多大学毕业证成绩单修改留信学历认证原版一模一样(办理学位证)(Toledo毕业证)托莱多大学毕业证成绩单修改留信学历认证原版一模一样
(办理学位证)(Toledo毕业证)托莱多大学毕业证成绩单修改留信学历认证原版一模一样
 
办理乔治布朗学院毕业证成绩单|购买加拿大文凭证书
办理乔治布朗学院毕业证成绩单|购买加拿大文凭证书办理乔治布朗学院毕业证成绩单|购买加拿大文凭证书
办理乔治布朗学院毕业证成绩单|购买加拿大文凭证书
 
907MTAMount Coventry University Bachelor's Diploma in Engineering
907MTAMount Coventry University Bachelor's Diploma in Engineering907MTAMount Coventry University Bachelor's Diploma in Engineering
907MTAMount Coventry University Bachelor's Diploma in Engineering
 
Can't Roll Up Your Audi A4 Power Window Let's Uncover the Issue!
Can't Roll Up Your Audi A4 Power Window Let's Uncover the Issue!Can't Roll Up Your Audi A4 Power Window Let's Uncover the Issue!
Can't Roll Up Your Audi A4 Power Window Let's Uncover the Issue!
 
Building a Future Where Everyone Can Ride and Drive Electric by Bridget Gilmore
Building a Future Where Everyone Can Ride and Drive Electric by Bridget GilmoreBuilding a Future Where Everyone Can Ride and Drive Electric by Bridget Gilmore
Building a Future Where Everyone Can Ride and Drive Electric by Bridget Gilmore
 
办理萨省大学毕业证成绩单|购买加拿大USASK文凭证书
办理萨省大学毕业证成绩单|购买加拿大USASK文凭证书办理萨省大学毕业证成绩单|购买加拿大USASK文凭证书
办理萨省大学毕业证成绩单|购买加拿大USASK文凭证书
 

EVANNEX LED Lighting Upgrade Kit for Tesla Model S

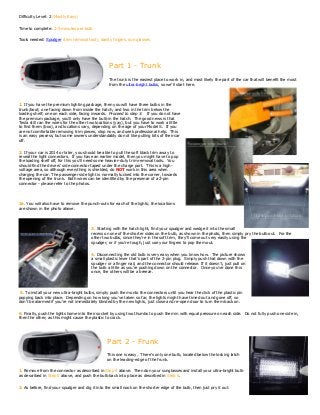
  • 1. Difficulty Level: 2 (Mostly Easy) Time to complete: 2-5 minutes per bulb Tools needed: Spudger (trim removal tool), dainty fingers, sun glasses Part 1 - Trunk The trunk is the easiest place to work in, and most likely the part of the car that will benefit the most from the ultra-bright bulbs, so we'll start here. 1. If you have the premium lighting package, then you will have three bulbs in the trunk/boot; one facing down from inside the hatch, and two in the trim below the loading shelf; one on each side, facing inwards. Proceed to step 3. If you do not have the premium package, you'll only have the bulb in the hatch. The good news is that Tesla still ran the wires for the other two locations (yay), but you have to work a little to find them (boo), and locations vary, depending on the age of your Model S. If you are not comfortable removing trim pieces, stop now, and seek professional help. This is an easy process, but some owners understandably do not like pulling bits of their car off. 2. If your car is 2014 or later, you should be able to pull the soft black trim away to reveal the light connectors. If you have an earlier model, then you might have to pop the loading shelf off, for this you'll need some heavier-duty trim removal tools. You should find the drivers' side connector taped under the charge port. This is a high- voltage area, so although everything is shielded, do NOT work in this area when charging the car. The passenger side light is normally tucked into the corner, towards the opening of the trunk. Both wires can be identified by the presence of a 2-pin connector - please refer to the photos. 2a. You will also have to remove the punch-outs for each of the lights; the locations are shown in the photo above. 3. Starting with the hatch light, find your spudger and wedge it into the small recess on one of the shorter sides on the bulb, as shown in the photo, then simply pry the bulb out. For the other two bulbs, since they're in the soft trim, they'll come out very easily using the spudger, or if you're tough, just use your fingers to pop them out. 4. Disconnecting the old bulb is very easy when you know how. The picture shows a small plastic lever that's part of the 2-pin plug. Simply push that down with the spudger or a finger nail, and the connector should release. If it doesn't, just pull on the bulb a little as you're pushing down on the connector. Once you've done this once, the others will be a breeze. 5. To install your new ultra-bright bulbs, simply push them onto the connectors until you hear the click of the plastic pin popping back into place. Depending on how long you've taken so far, the lights might have timed out and gone off, so don't be alarmed if you're not immediately blinded by the new lights, just close and re-open door to turn them back on. 6. Finally, push the lights home into their socket by using two thumbs to push them in with equal pressure on each side. Do not fully push one side in, then the other, as this might cause the plastic to crack. Part 2 - Frunk This one is easy. There's only one bulb, located below the locking latch on the leading-edge of the frunk. 1. Remove from the connector as described in Step 4 above. Then don your sunglasses and install your ultra-bright bulb as described in Step 5 above, and push the bulb back into place as described in Step 6. 2. As before, find your spudger and dig it into the small nook on the shorter edge of the bulb, then just pry it out.
  • 2. Part 3 - Puddle Lights If you have the premium lighting package, then each door has a white light on the bottom of the door trim shining onto the ground. If you do not have the premium lighting package, then we do not recommend trying to find the wires and removing the punch-out from the doors; seek professional help. 1. You're probably going to have to lay on the floor to do these, so park your Model S in the living room, or find a nice bit of carpet to lay on. 2. The door trim is quite soft, so the bulbs pop out as described in Step 4, and then follow Steps 5 - 6 to complete the installation. You will need ot use some force to get the spudger under the bulb to extract it. 3. Keep the carpet out to kneel om you're planning on doing the foot-well lights.... Part 4 - Foot well lights There's four of these. The front ones are located in the trim directly above where your feet hang out, which on the drivers-side means that the pedals get in the way a bit. The rear ones, are fitted to a small plastic bracket that sits on a bar below the front seats. In early Model S's the rear lights were part of the premium lighting package, so you might not have them, but the wiring is there. You will, however, need the bracket that snaps onto the bar as shown in the photo. You can purchase the brackets here. 1. Let's start at the front. Now you've done a few of these bulbs you're a pro. That's good, becuase the drivers' one is a pain to pop out because the pedals get in the way. The technique is still the same though, you just need to really dig the spudger into the small nook on one short side of the bulb, and pry it out. It might take a few tries, but it'll come. The passenger side is the same, but easier without the pedals to get in the way. follow Steps 5 - 6 above to complete the installation. 2. To the back of the car we go. Raise the seat you want to work on to its highest position, and then tilt the seatback forward as far as it will go. 3. You can then see the lights, fitted into a bracket that snaps on and off a support bar. 4. To make the replacement easier, pull the bracket, complete with the bulb, away from the bar. The spring clips holding it on the bar are mean and angry, so mind your fingers (the author speaks from experience). 5. Now pop the bulb out of the assembly. You'll need to use the spudger to do this, and also try to squeeze the clips that are part of the bulb inwards to help release it. The bracket is very rigid plastic, so the bulb needs a little more encouragement to pop out. 6. Once you have the bulb released, replace as described above, refit the bulb and then the bracket to the support bar. Repeat the same for the other seat. Bonus Part 5 - Glove box If you want a dazzling glove box, you can also replace the bulb in there. The process is the same as described above for all the other bulbs, but the bulb is quite difficult to remove; if the spudger doesn't pry it out, you might need to revert to a small screwdriver, but in doing so you might crack the old bulb, so take care.