1. August 26, 2014
Lab Notebook Setup
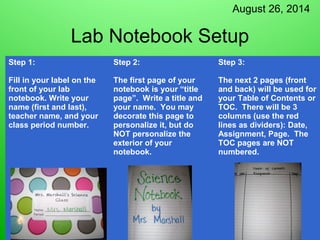
Step 1:
Fill in your label on the
front of your lab
notebook. Write your
name (first and last),
teacher name, and your
class period number.
Step 2:
The first page of your
notebook is your “title
page”. Write a title and
your name. You may
decorate this page to
personalize it, but do
NOT personalize the
exterior of your
notebook.
Step 3:
The next 2 pages (front
and back) will be used for
your Table of Contents or
TOC. There will be 3
columns (use the red
lines as dividers): Date,
Assignment, Page. The
TOC pages are NOT
numbered.
2. August 26, 2014
Lab Notebook Setup
Step 4:
The next page (4th page
in the notebook) will be
your “Reference TOC”.
This is set up the same
was as the normal TOC
(front and back with
columns), but will be
used for Reference
Materials in the back of
your notebook.
Step 5:
Starting with the very
next page (5th in the
notebook), begin
numbering every page in
the upper right hand
corner. Start numbering
with “1” and you should
reach “96” if you have a
100 page notebook.
Step 6:
Glue your Lab
Notebook Guidelines
to the inside of the
front cover.
3. August 26, 2014
Lab Notebook Setup
Step 7:
Title the last 10 pages
of your notebook
“Reference
Materials”. This
should be pg. 87-96.
Use page 86 as the
title page for your
Reference TOC, and
label it accordingly.
Step 8:
Glue the Scientific
Method Steps onto
the first page of your
Reference section.
Don’t forget to add
this to your
Reference TOC.
Step 9:
Glue your Variables
in an Experiment
sheet onto the back
of the first Reference
page. Call this “87 b”
in your Reference
TOC.
4. August 26, 2014
Lab Notebook Setup
Step 10:
Glue the SI Measurement sheet
onto the next Reference page
(should be pg. 88). Add this to
your Reference TOC.
Step 11:
Glue the Metric System Units
sheet onto the back of the second
reference page. Call this “pg. 88
b” in your Reference TOC.