
Recomendados
Más contenido relacionado
La actualidad más candente
La actualidad más candente (20)
Destacado
Similar a Access4
Similar a Access4 (20)
Último
Último (20)
Access4
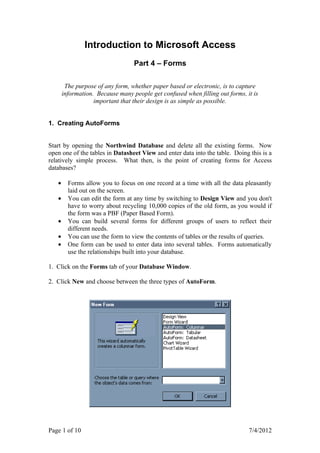
- 1. Introduction to Microsoft Access Part 4 – Forms The purpose of any form, whether paper based or electronic, is to capture information. Because many people get confused when filling out forms, it is important that their design is as simple as possible. 1. Creating AutoForms Start by opening the Northwind Database and delete all the existing forms. Now open one of the tables in Datasheet View and enter data into the table. Doing this is a relatively simple process. What then, is the point of creating forms for Access databases? • Forms allow you to focus on one record at a time with all the data pleasantly laid out on the screen. • You can edit the form at any time by switching to Design View and you don't have to worry about recycling 10,000 copies of the old form, as you would if the form was a PBF (Paper Based Form). • You can build several forms for different groups of users to reflect their different needs. • You can use the form to view the contents of tables or the results of queries. • One form can be used to enter data into several tables. Forms automatically use the relationships built into your database. 1. Click on the Forms tab of your Database Window. 2. Click New and choose between the three types of AutoForm. Page 1 of 10 7/4/2012
- 2. The three types of AutoForm are: Columnar Produces a simple one-record-per-form view Tabular Shows multiple records on a form Datasheet Produces a form that looks almost exactly like a table in Datasheet View. 3. Choose the Columnar AutoForm and select the Customers Table. You should end up with something like this: 4. Give the form a title and save it. Your Task Try creating a Tabular AutoForm and a Datasheet AutoForm, both based on the Customers Table. Compare the layout of the three forms. 1. Which layout is the simplest? 2. What is the point of creating a Datasheet form, when you could just open a table in Datasheet View to enter data? 3. What is the advantage of the Tabular form? 4. Was there any problem with the layout of the Tabular AutoForm? Page 2 of 10 7/4/2012
- 3. 2. Creating a Form with the Form Wizard The Form Wizard is much more versatile than the AutoForms and it allows you to select fields from several tables and/or queries. 1. Go to the Forms tab of your Database Window. Click New and then Double Click the Form Wizard. 2. Select the fields you want to use in your form from any table or query. If you use more than one table or query, the Wizard will ask you how you want the form to be arranged. 3. You will be asked what layout you want. Choose between Columnar, Tabular, Datasheet and Justified (Columnar produces the simplest layout). 4. You can then choose the colour and background styles. Choose the standard option to begin with because many of these colour options slow down the performance of your form. 5. Name your form and then click Finish. Your Task 1. Delete the three forms that were created with AutoForm. 2. Using the Form Wizard, create a form what uses fields from more than one table. Think carefully about the sort of forms that Northwind will need and create a form that will suit their purposes. 3. Test the form by entering a few records. Is data entry intuitive and problem-free? 4. What do each of these buttons at the bottom of the form do? 5. Evaluate your form. Did the Form Wizard produce a perfect form? Are there any layout problems? How could the layout be improved? Page 3 of 10 7/4/2012
- 4. 3. Taking the Form into Design View 1. With your form open, click the Design View button. If you have previously worked with reports, this screen will be familiar to you because it is very similar to the Reports Design View. Objects can be moved, edited, re-sized and aligned in exactly the same way. 2. Click the appropriate button in the Toolbox to enter lines and boxes. Resize or move them with the Pointer tool. When an object is selected, the large selection handle moves the object and the other selection handles resize the object. Large selection handle moves an object line Small selection handles resize an object Square/rectangle 3. You can change the colour of any object. You can alter the Line/Border Width and you can add special effects. The Format Painter is a useful way of applying the same visual style to all your labels and/or data boxes. OLE Objects can be added to forms, just as they can be added to reports. 4. You have a Header and Footer, in which you can place objects that will appear at the top or bottom of your form. 5. Just as in the Report Design View, you can double-click on any Object (e.g. a data box, a label or a form section) to bring up a Properties dialog box. Click the Form Properties button to make changes that affect the behaviour of the whole form. Your Task Improve the layout of your form, change the colour scheme, add a header and preview the results. Page 4 of 10 7/4/2012
- 5. 4. Change the Tab Order When people enter data into a form, they usually use the Tab key to move between fields. If you move the data boxes around in Design View you will notice, when you preview the Form in Form View that Access has remembered the old tab order. This will be confusing for people using the form. The solution is to return to Design View and update the Tab Order. 1. Select Tab Order from the View Menu. The Tab Order dialog box appears: 2. Click on the grey button next to a field and drag it to the desired position. 3. When you're satisfied, click OK and test the new tab order in Form View. Your Task 1. Change the order of the data boxes on your form. Then update the Tab Order. 2. Add the date and time to the Form Footer (the process for doing this is the same as for reports). 3. Remove the Scroll Bars from your form. To achieve this, you will need to edit the Form Properties. 4. Preview the results of these changes in Form View. Page 5 of 10 7/4/2012
- 6. 5. Subforms A Subform is a "form within a form". The form in the example below is based on two tables called Categories and Products. The main form is based on the Categories table and the Products table is the subform. When the Beverages Category is selected, the Products subform displays only products in that category. You will use the Northwind Database to create a form based on the Orders table that uses the Products table as a subform. The purpose of creating this subform is: • Whilst employees are taking orders, they can see the details of the items being ordered. • The employee can change data in the Products table without leaving the Orders form. 1. Start the Form Wizard. 2. Add fields from the Orders table and the Products table. 3. You are then asked how you want to view the data. If you view by the Orders table, you ensure that Orders is the form and Products is the subform. 4. Choose a Tabular or a Datasheet view. 5. Complete the wizard and your form is created. Notice how the wizard has helpfully created some combo (drop-down) boxes to aid data entry in certain fields. For Discussion 1. Why is it important to make sure that relationships are set up properly before creating a subform? 2. How do the combo boxes contribute to data validation? Page 6 of 10 7/4/2012
- 7. 6. Adding a Subform to an Existing Form 1. Create a second form based on the Orders table. We want a simple form as quickly as possible, so use the Columnar AutoReport to make the form. 2. Switch to Design View and enlarge the Detail Section so that there is room for the subform: 3. Ensure that the Control Wizards Control are turned on and click the SubForm/ Wizards on Subreport button on the Toolbox: Subform/ Subreport 4. Add the subform to your form and a wizard will start. Simply tell the wizard that you want to base the subform on the Products table and it will create the subform for you. Ignore the page about linked fields. 5. Re-size the subform as necessary and preview the results in Form View. Then return to Design View and open the subform's Properties. Customise your subform by adding a Border Colour and a Special Effect. Your Task 1. Turn the Control Wizards off and then try to create a subform. What do you notice? 2. Your boss has asked you to make some changes to the form that prevent users from closing, moving or re-sizing the form while they're working on it. Open the Form Properties and make some changes that will achieve this. Page 7 of 10 7/4/2012
- 8. 7. Combo Boxes and List Boxes Combo boxes are drop-down lists that the Form Wizard, will often create for you. These boxes help with Data Validation by forcing the user to choose an answer from a list. If an operator has to choose an option from a list, there is no danger that s/he will type in something that is invalid. You can also set a Default Value. 1. Open the Music Database that you created in Introduction to Access Part One. 2. Create a form using the Form Wizard based on the Albums table. It is important to use Form Wizard and not the AutoForms because only Form Wizard automatically generates combo boxes. 3. Test the form. You should notice that the combo box is listing the ID numbers of the artists and music categories and not the names. This form will clearly be difficult to fill in. 4. Take the form into Design View. Open the Properties for the first combo box. Make the Column Count 2: 5. Preview the results. The form should now be listing both the ArtistID and the ArtistName. We could do without the ID altogether though, so take the form back into Design View and change Column Widths to 0 (zero). Preview the form again and it should only list the names of the artists. This is now a much easier form to work with. Your Task 1. Go back to Design View and delete the combo box for the Category field. 2. From the Toolbox create a List Box (make sure the Control Wizards are on). 3. Base the List Box on the Category field of the Category table. Make sure you tell the wizard to store the value selected in the Categories field of the Albums table. 4. Align the fields in the form and make the Vertical Spacing equal. 5. Add visual effects to the List Box by editing the Properties. 6. Test your form by adding details of some albums. Do you need to change the Tab Order? 7. Set a Default Value for your list box. Page 8 of 10 7/4/2012
- 9. 7. Keyboard Shortcuts F2 Select an entire field Ctrl+; Insert the Current Date Ctrl+: Insert the Current Time Ctrl+Enter Insert a Line Break (use it in a memo or large text field) Ctrl++ Add New Record Ctrl+- Delete the Current Record Shift+Enter Save the Record Ctrl+Z Undo the last change you made (don't rely on this) Ctrl+Enter Open the selected object in Design View Alt+F4 Quit Access 8. Summary (from the Access Help file) Page 9 of 10 7/4/2012
- 10. Page 10 of 10 7/4/2012