
Recomendados
Más contenido relacionado
La actualidad más candente
La actualidad más candente (19)
Similar a Cubase instruction guide
Similar a Cubase instruction guide (20)
Más de JoshGmanMcLean
Más de JoshGmanMcLean (20)
Último
Último (20)
Cubase instruction guide
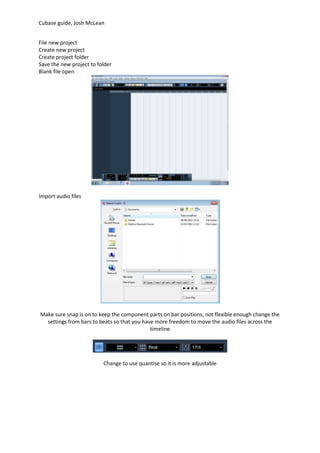
- 1. Cubase guide, Josh McLean File new project Create new project Create project folder Save the new project to folder Blank file open Import audio files Make sure snap is on to keep the component parts on bar positions, not flexible enough change the settings from bars to beats so that you have more freedom to move the audio files across the timeline Change to use quantise so it is more adjustable
- 2. Cubase guide, Josh McLean Once tracks inserted onto your arrange page To copy a audio file hold Alt left click and drag the file across After doing this a couple of times and added in other files make a tempo with them With the selct bar at the top make sure that covers the files and then press the loop button on the transport bar to make the files only stay in the little loop which you are trying to create. To edit the individual sound press the ‘e’ button on the arrange window which you are wanting to edit
- 3. Cubase guide, Josh McLean To adjust the sound go to audio tab then mixer on the drop down menu this allows you to change the volume of the individual tracks To fade in or out the sound the 3 blue adjustable tabs at the stop you move those to how you want them Affects you are able to add in the insert column
- 4. Cubase guide, Josh McLean Insert sockets are for dynamics On the edit for the individual track, this opens the capabilities for the single file instead of the overall sound file When you add dynamic to individual sounds this is what you will adjust the ‘compressor for example To add an effect such as reverb to an individual file you right click on the arrange window and press the ADD FX tab then change it to your specification, press the wet only button on the mixer
- 5. Cubase guide, Josh McLean Which turns the mix up to full, on this option you can choose the specification which I chose ‘drum medium snare’ for the reverberation exit this and it will be on the arrange window Now when you come to edit a indivudal file the reverb or effect option you chose is accessable to the individual audio file option. On the right the sends option click there, the rever is ‘called FX1- Roomworks’ A limiter is a type of compressor designed for a specific purpose — to limit the level of a signal to a certain threshold. Whereas a compressor will begin smoothly reducing the gain above the threshold, a limiter will almost completely prevent any additional gain above the threshold. A limiter is like a compressor set to a very high compression ratio (at least 10:1, more commonly 20:1 or more). The graph below shows a limiting ratio of infinity to one, i.e. there is no gain at all above the threshold. http://www.mediacollege.com/audio/processing/limiter/ A noise gate or gate is an electronic device or software that is used to control the volume of an audio signal. Gating is the use of a gate. Comparable to a compressor, which attenuates signals above a threshold, noise gates attenuate signals which register below the threshold. However, noise gates attenuate signals by a fixed amount, known as the range. In its most simple form, a noise gate allows a signal to pass through only when it is above a set threshold: the gate is 'open'. If the signal falls below the threshold no signal is allowed to pass (or the signal is substantially attenuated): the gate is 'closed'. A noise gate is used when the level of the 'signal' is above the level of the 'noise'. The threshold is set above the level of the 'noise' and so when there is no 'signal' the gate is closed. A noise gate does not remove noise from the signal. When the gate is open both the signal and the noise will pass through. Gates typically feature 'attack', 'release', and 'hold' settings and may feature a 'look-ahead' function. http://en.wikipedia.org/wiki/Noise_gate