SlideShare a Scribd company logo
1 of 3
Download to read offline
Installation
                                                                                      Instructions
                                                                                      & Recommended
                                                                                        Procedures

                 The included CALIBRE Remote Control is used to allow the driver to adjust settings on the
                 CALIBRE and to mute audio alerts during prolonged encounters. It may be mounted virtually
                 anywhere inside the vehicle with the included double stick tape or remain unmounted.


Warning LED(s)
                                                                                    FRONT                                        REAR
                                                                                    ALERT                                        ALERT
1. Consult with vehicle owner about LED location. For best visibili-
   ty, choose a mounting location as close to the vehicle gauges
   as possible.
2. Check for proper clearance behind the area where the LED(s)
                                                                                      E LED                         LED
   will be installed (approximately 1”) and drill a 3/16” hole in the             WHIT IRE                     BLUE E
                                                                                    W                            WIR
   chosen location for the LED(s). CALIBRE DL models require the
   mounting of a second LED for rear radar warnings.                                                            GREY LED WIRE
                                                                                   GREY LED WIRE

3. Route all of the LED wires under the dash per DIAGRAM A1.                                          DIAGRAM A1

Warning Pod(s)

1. Consult with vehicle owner about Pod location. For best visibility,                        FRONT
                                                                                            WARNING POD
                                                                                                                     REAR
                                                                                                                  WARNING POD
   choose a mounting location as close to the vehicle gauges as
   possible.
2. Before mounting the Warning Pod(s), clean both the Pod surface
   and desired mounting location on the dash with isopropyl alcohol.
3. Position the Warning Pod(s) on the dash with the provided double                  “O” RING                                “O” RING
                                                                                       TAPE                                    TAPE
   stick “O” ring tape. CALIBRE DL-P models require the mounting
   of a second Pod for rear radar warnings.
                                                                                                                          G
                                                                                                                 UE
                                                                                                 TE


                                                                                                        G


                                                                                                                           R
                                                                                                         R
                                                                                               HI


                                                                                                               BL


                                                                                                                            EY
                                                                                                          EY
                                                                                              W


4. Route the black cable(s) from the Warning Pod(s) through or under
   the dash per DIAGRAM B1.
                                                                                                      DIAGRAM B1

Interior Network Module
1. Remove the under dash
                                                               INTERIOR NETWORK
   panel and mount the Interior                                     MODULE
                                                                                                                 INTERIOR NETWORK
                                                                                                                      MODULE
   Network Module using the                         WIRE TIE

   supplied cable ties to the                                          WIRE TIE
   existing factory wire looms,
                                                                                                                                 WIRE TIES
   brackets, or other support
   structures as per DIAGRAM
   C1. The Interior Network
   Module can be mounted
   horizontally or vertically
   under the dash.
2. Connect the LED, ignition-
   on, and ground wires per the
   separate enclosed block
   diagram sheet.                   HORIZONTAL MOUNT                      DIAGRAM C1                      VERTICAL MOUNT
Amplified Speaker
1. Route the amplified speaker cable around a panel
   edge and reattach the under dash panel per
   DIAGRAM D1.
2. For maximum audio output and concealment,                              DASH PANEL
   mount the amplified speaker to the outside of the
                                                                                             SPEAKER
   under dash panel with the supplied screws per                           SPEAKER
                                                                            CABLE
   DIAGRAM D1.


NOTE:       If the vehicle is not equipped with an under
            dash panel (e.g., Porsche), mount the ampli-                        SCREWS
            fied speaker to existing factory wire looms,
            brackets, or support structures with the
            supplied cable ties.
                                                                                       DIAGRAM D1

Front Radar Receiver
1. Choose a mounting location in the front of the vehicle per DIAGRAM E1. The radar receiver can be mounted
   horizontally or vertically provided the arrows are pointing forward, towards the road ahead.
2. Mount the front radar receiver with the supplied screws or wire ties to the vehicle’s structure per DIAGRAM E1.
3. Route the wires to the desired connection point and connect per the separate enclosed block diagram sheet.

NOTE:        All radar receivers can be mounted behind plastic, rubber, or fiberglass up to 1/4” thick. Do not
             mount radar receiver behind metal, carbon fiber or chromed plastic.


                              RADAR
                             RECEIVER


                                  SELF-
                                 TAPPING
                                 SCREWS                                                    RADAR
                                                                                          RECEIVER
                            METAL                                                           SELF-
                           SUPPORT                                                        TAPPING
                                                                                          SCREWS


                      VERTICAL                                                         HORIZONTAL
                       MOUNT                                                             MOUNT

                                                         DIAGRAM E1


REAR RADAR RECEIVER
1. The rear radar receiver can be fastened to the vehicle using
   the supplied self-tapping screws or cable ties. See DIAGRAM F1.
2. Route the rear radar receiver cable into trunk through factory
   grommet.
3. If a factory grommet is not available, use the provided strain
   relief:
   a. Choose a location in the trunk compartment as close to
      the radar receiver as possible.                                                                   METAL
                                                                                                       SUPPORT
   b. Drill a 1/2” hole into the chosen location for the strain relief.
   c. Install the strain relief and tighten the mounting nut securely.
   d. Route the rear radar receiver cable through the strain                                           RECEIVER
                                                                                                       SCREWS
      relief, leaving a little slack in the receiver cable.
   e. Tighten the waterproof gasket nut to create a water-                     REAR RADAR RECEIVER
                                                                              (BEHIND BUMPER COVER)
      proof seal.
4. Connect wires per the separate enclosed block diagram sheet.                               DIAGRAM F1
                                                                                                                  44586-1 07/07
1. The Calibre radar receivers are interchangeable. It’s the wire color code that differentiates
   between front or rear radar. When you cut the cables to length, remember that the White wire
   is battery power for the front receiver and the Blue wire is battery power for the rear receiver.
   If the same color is used for both the front and the rear receivers only one receiver will be recognized.

2. Calibre radar receiver cables and EX Defuser cables should be cut to length. If the additional
   wire is “balled up” it can act as an “RF” choke and cause operational anomalies.

3. Calibre radar receiver cables and EX Defuser cables are color-coded the same. The connections
   are Brown to Brown, Yellow to Yellow, and Black to Black to Ground.

4. The ground wires on the Interior Network Module and the radar receivers should be connected
   to an independent ground and not connected to a factory ground wire or lug.

5. The radar receivers and the Interior Network Module should never have their power wires or
   ground wires connected to each other or to the same power or ground point.

6. The Interior Network Module must be connected to an isolated source of +12 Volt Ignition-on
   and should not be connected in parallel with any other aftermarket accessory. Use of a factory
   wire of less than 16ga requires an Ignition control relay.

7. The radar receivers should be connected to +12 volt battery power. A +12 volt Ignition-on
   source is an option if battery power is not available.

8. Do not reset the Calibre system components when doing a new installation or a re-installation
   of original components. A reset should only be done when a radar receiver or Interior Network
   Module has been replaced. Replacement of a handheld remote or the addition of an EX
   Defuser does not require that a reset be done.

9. Do not use any fuse larger that 1 amp for any components.

10. Use only Duracell AAAA batteries for replacement in the handheld remote control. Use of any
    other brand batteries may result in erratic operation. Common signs that the batteries need
    to be replaced are intermittent communication between the handheld remote control and the
    Interior Network Module and pulsing or flashing remote control LED’s after a button press.

Any questions please call: 800.323.6768             24hr. Technical Support: 800.759.7243
                                                    Enter 55880 Press # and follow directions.

More Related Content

Recently uploaded

Vip Hot Call Girls 🫤 Mahipalpur ➡️ 9711199171 ➡️ Delhi 🫦 Whatsapp Number
Vip Hot Call Girls 🫤 Mahipalpur ➡️ 9711199171 ➡️ Delhi 🫦 Whatsapp NumberVip Hot Call Girls 🫤 Mahipalpur ➡️ 9711199171 ➡️ Delhi 🫦 Whatsapp Number
Vip Hot Call Girls 🫤 Mahipalpur ➡️ 9711199171 ➡️ Delhi 🫦 Whatsapp Numberkumarajju5765
 
John Deere 200lc Excavator Operation And Tests Repair Manual.pdf
John Deere 200lc Excavator Operation And Tests Repair Manual.pdfJohn Deere 200lc Excavator Operation And Tests Repair Manual.pdf
John Deere 200lc Excavator Operation And Tests Repair Manual.pdfExcavator
 
Russian Call Girls Delhi Indirapuram {9711199171} Aarvi Gupta ✌️Independent ...
Russian  Call Girls Delhi Indirapuram {9711199171} Aarvi Gupta ✌️Independent ...Russian  Call Girls Delhi Indirapuram {9711199171} Aarvi Gupta ✌️Independent ...
Russian Call Girls Delhi Indirapuram {9711199171} Aarvi Gupta ✌️Independent ...shivangimorya083
 
UNIT-1-VEHICLE STRUCTURE AND ENGINES.ppt
UNIT-1-VEHICLE STRUCTURE AND ENGINES.pptUNIT-1-VEHICLE STRUCTURE AND ENGINES.ppt
UNIT-1-VEHICLE STRUCTURE AND ENGINES.pptDineshKumar4165
 
UNIT-III-TRANSMISSION SYSTEMS REAR AXLES
UNIT-III-TRANSMISSION SYSTEMS REAR AXLESUNIT-III-TRANSMISSION SYSTEMS REAR AXLES
UNIT-III-TRANSMISSION SYSTEMS REAR AXLESDineshKumar4165
 
Hot And Sexy 🥵 Call Girls Delhi Daryaganj {9711199171} Ira Malik High class G...
Hot And Sexy 🥵 Call Girls Delhi Daryaganj {9711199171} Ira Malik High class G...Hot And Sexy 🥵 Call Girls Delhi Daryaganj {9711199171} Ira Malik High class G...
Hot And Sexy 🥵 Call Girls Delhi Daryaganj {9711199171} Ira Malik High class G...shivangimorya083
 
Rockwell Automation 2711R PanelView 800 HMI
Rockwell Automation 2711R PanelView 800 HMIRockwell Automation 2711R PanelView 800 HMI
Rockwell Automation 2711R PanelView 800 HMIAsteam Techno
 
VIP Mumbai Call Girls Thakur village Just Call 9920874524 with A/C Room Cash ...
VIP Mumbai Call Girls Thakur village Just Call 9920874524 with A/C Room Cash ...VIP Mumbai Call Girls Thakur village Just Call 9920874524 with A/C Room Cash ...
VIP Mumbai Call Girls Thakur village Just Call 9920874524 with A/C Room Cash ...Garima Khatri
 
꧁ ୨⎯Call Girls In Ashok Vihar, New Delhi **✿❀7042364481❀✿**Escorts ServiCes C...
꧁ ୨⎯Call Girls In Ashok Vihar, New Delhi **✿❀7042364481❀✿**Escorts ServiCes C...꧁ ୨⎯Call Girls In Ashok Vihar, New Delhi **✿❀7042364481❀✿**Escorts ServiCes C...
꧁ ୨⎯Call Girls In Ashok Vihar, New Delhi **✿❀7042364481❀✿**Escorts ServiCes C...Hot Call Girls In Sector 58 (Noida)
 
Transformative journey for Automotive Components Manufacturers- D&V Business ...
Transformative journey for Automotive Components Manufacturers- D&V Business ...Transformative journey for Automotive Components Manufacturers- D&V Business ...
Transformative journey for Automotive Components Manufacturers- D&V Business ...D&V Business Consulting
 
Innovating Manufacturing with CNC Technology
Innovating Manufacturing with CNC TechnologyInnovating Manufacturing with CNC Technology
Innovating Manufacturing with CNC Technologyquickpartslimitlessm
 
Beautiful Vip Call Girls Punjabi Bagh 9711199012 Call /Whatsapps
Beautiful Vip  Call Girls Punjabi Bagh 9711199012 Call /WhatsappsBeautiful Vip  Call Girls Punjabi Bagh 9711199012 Call /Whatsapps
Beautiful Vip Call Girls Punjabi Bagh 9711199012 Call /Whatsappssapnasaifi408
 
John Deere Tractors 5515 Diagnostic Repair Manual
John Deere Tractors 5515 Diagnostic Repair ManualJohn Deere Tractors 5515 Diagnostic Repair Manual
John Deere Tractors 5515 Diagnostic Repair ManualExcavator
 
FULL ENJOY - 9953040155 Call Girls in Sector 61 | Noida
FULL ENJOY - 9953040155 Call Girls in Sector 61 | NoidaFULL ENJOY - 9953040155 Call Girls in Sector 61 | Noida
FULL ENJOY - 9953040155 Call Girls in Sector 61 | NoidaMalviyaNagarCallGirl
 
The 10th anniversary, Hyundai World Rally Team's amazing journey
The 10th anniversary, Hyundai World Rally Team's amazing journeyThe 10th anniversary, Hyundai World Rally Team's amazing journey
The 10th anniversary, Hyundai World Rally Team's amazing journeyHyundai Motor Group
 
Crash Vehicle Emergency Rescue Slideshow.ppt
Crash Vehicle Emergency Rescue Slideshow.pptCrash Vehicle Emergency Rescue Slideshow.ppt
Crash Vehicle Emergency Rescue Slideshow.pptVlademirGebDubouzet1
 
Alia +91-9537192988-Experience the Unmatchable Pleasure with Model Ahmedabad ...
Alia +91-9537192988-Experience the Unmatchable Pleasure with Model Ahmedabad ...Alia +91-9537192988-Experience the Unmatchable Pleasure with Model Ahmedabad ...
Alia +91-9537192988-Experience the Unmatchable Pleasure with Model Ahmedabad ...Niya Khan
 

Recently uploaded (20)

Vip Hot Call Girls 🫤 Mahipalpur ➡️ 9711199171 ➡️ Delhi 🫦 Whatsapp Number
Vip Hot Call Girls 🫤 Mahipalpur ➡️ 9711199171 ➡️ Delhi 🫦 Whatsapp NumberVip Hot Call Girls 🫤 Mahipalpur ➡️ 9711199171 ➡️ Delhi 🫦 Whatsapp Number
Vip Hot Call Girls 🫤 Mahipalpur ➡️ 9711199171 ➡️ Delhi 🫦 Whatsapp Number
 
John Deere 200lc Excavator Operation And Tests Repair Manual.pdf
John Deere 200lc Excavator Operation And Tests Repair Manual.pdfJohn Deere 200lc Excavator Operation And Tests Repair Manual.pdf
John Deere 200lc Excavator Operation And Tests Repair Manual.pdf
 
Russian Call Girls Delhi Indirapuram {9711199171} Aarvi Gupta ✌️Independent ...
Russian  Call Girls Delhi Indirapuram {9711199171} Aarvi Gupta ✌️Independent ...Russian  Call Girls Delhi Indirapuram {9711199171} Aarvi Gupta ✌️Independent ...
Russian Call Girls Delhi Indirapuram {9711199171} Aarvi Gupta ✌️Independent ...
 
UNIT-1-VEHICLE STRUCTURE AND ENGINES.ppt
UNIT-1-VEHICLE STRUCTURE AND ENGINES.pptUNIT-1-VEHICLE STRUCTURE AND ENGINES.ppt
UNIT-1-VEHICLE STRUCTURE AND ENGINES.ppt
 
UNIT-III-TRANSMISSION SYSTEMS REAR AXLES
UNIT-III-TRANSMISSION SYSTEMS REAR AXLESUNIT-III-TRANSMISSION SYSTEMS REAR AXLES
UNIT-III-TRANSMISSION SYSTEMS REAR AXLES
 
Hot And Sexy 🥵 Call Girls Delhi Daryaganj {9711199171} Ira Malik High class G...
Hot And Sexy 🥵 Call Girls Delhi Daryaganj {9711199171} Ira Malik High class G...Hot And Sexy 🥵 Call Girls Delhi Daryaganj {9711199171} Ira Malik High class G...
Hot And Sexy 🥵 Call Girls Delhi Daryaganj {9711199171} Ira Malik High class G...
 
Rockwell Automation 2711R PanelView 800 HMI
Rockwell Automation 2711R PanelView 800 HMIRockwell Automation 2711R PanelView 800 HMI
Rockwell Automation 2711R PanelView 800 HMI
 
VIP Mumbai Call Girls Thakur village Just Call 9920874524 with A/C Room Cash ...
VIP Mumbai Call Girls Thakur village Just Call 9920874524 with A/C Room Cash ...VIP Mumbai Call Girls Thakur village Just Call 9920874524 with A/C Room Cash ...
VIP Mumbai Call Girls Thakur village Just Call 9920874524 with A/C Room Cash ...
 
꧁ ୨⎯Call Girls In Ashok Vihar, New Delhi **✿❀7042364481❀✿**Escorts ServiCes C...
꧁ ୨⎯Call Girls In Ashok Vihar, New Delhi **✿❀7042364481❀✿**Escorts ServiCes C...꧁ ୨⎯Call Girls In Ashok Vihar, New Delhi **✿❀7042364481❀✿**Escorts ServiCes C...
꧁ ୨⎯Call Girls In Ashok Vihar, New Delhi **✿❀7042364481❀✿**Escorts ServiCes C...
 
Transformative journey for Automotive Components Manufacturers- D&V Business ...
Transformative journey for Automotive Components Manufacturers- D&V Business ...Transformative journey for Automotive Components Manufacturers- D&V Business ...
Transformative journey for Automotive Components Manufacturers- D&V Business ...
 
Innovating Manufacturing with CNC Technology
Innovating Manufacturing with CNC TechnologyInnovating Manufacturing with CNC Technology
Innovating Manufacturing with CNC Technology
 
Beautiful Vip Call Girls Punjabi Bagh 9711199012 Call /Whatsapps
Beautiful Vip  Call Girls Punjabi Bagh 9711199012 Call /WhatsappsBeautiful Vip  Call Girls Punjabi Bagh 9711199012 Call /Whatsapps
Beautiful Vip Call Girls Punjabi Bagh 9711199012 Call /Whatsapps
 
Call Girls In Kirti Nagar 📱 9999965857 🤩 Delhi 🫦 HOT AND SEXY VVIP 🍎 SERVICE
Call Girls In Kirti Nagar 📱  9999965857  🤩 Delhi 🫦 HOT AND SEXY VVIP 🍎 SERVICECall Girls In Kirti Nagar 📱  9999965857  🤩 Delhi 🫦 HOT AND SEXY VVIP 🍎 SERVICE
Call Girls In Kirti Nagar 📱 9999965857 🤩 Delhi 🫦 HOT AND SEXY VVIP 🍎 SERVICE
 
Hotel Escorts Sushant Golf City - 9548273370 Call Girls Service in Lucknow, c...
Hotel Escorts Sushant Golf City - 9548273370 Call Girls Service in Lucknow, c...Hotel Escorts Sushant Golf City - 9548273370 Call Girls Service in Lucknow, c...
Hotel Escorts Sushant Golf City - 9548273370 Call Girls Service in Lucknow, c...
 
John Deere Tractors 5515 Diagnostic Repair Manual
John Deere Tractors 5515 Diagnostic Repair ManualJohn Deere Tractors 5515 Diagnostic Repair Manual
John Deere Tractors 5515 Diagnostic Repair Manual
 
FULL ENJOY - 9953040155 Call Girls in Sector 61 | Noida
FULL ENJOY - 9953040155 Call Girls in Sector 61 | NoidaFULL ENJOY - 9953040155 Call Girls in Sector 61 | Noida
FULL ENJOY - 9953040155 Call Girls in Sector 61 | Noida
 
The 10th anniversary, Hyundai World Rally Team's amazing journey
The 10th anniversary, Hyundai World Rally Team's amazing journeyThe 10th anniversary, Hyundai World Rally Team's amazing journey
The 10th anniversary, Hyundai World Rally Team's amazing journey
 
Call Girls in Shri Niwas Puri Delhi 💯Call Us 🔝9953056974🔝
Call Girls in  Shri Niwas Puri  Delhi 💯Call Us 🔝9953056974🔝Call Girls in  Shri Niwas Puri  Delhi 💯Call Us 🔝9953056974🔝
Call Girls in Shri Niwas Puri Delhi 💯Call Us 🔝9953056974🔝
 
Crash Vehicle Emergency Rescue Slideshow.ppt
Crash Vehicle Emergency Rescue Slideshow.pptCrash Vehicle Emergency Rescue Slideshow.ppt
Crash Vehicle Emergency Rescue Slideshow.ppt
 
Alia +91-9537192988-Experience the Unmatchable Pleasure with Model Ahmedabad ...
Alia +91-9537192988-Experience the Unmatchable Pleasure with Model Ahmedabad ...Alia +91-9537192988-Experience the Unmatchable Pleasure with Model Ahmedabad ...
Alia +91-9537192988-Experience the Unmatchable Pleasure with Model Ahmedabad ...
 

Featured

AI Trends in Creative Operations 2024 by Artwork Flow.pdf
AI Trends in Creative Operations 2024 by Artwork Flow.pdfAI Trends in Creative Operations 2024 by Artwork Flow.pdf
AI Trends in Creative Operations 2024 by Artwork Flow.pdfmarketingartwork
 
PEPSICO Presentation to CAGNY Conference Feb 2024
PEPSICO Presentation to CAGNY Conference Feb 2024PEPSICO Presentation to CAGNY Conference Feb 2024
PEPSICO Presentation to CAGNY Conference Feb 2024Neil Kimberley
 
Content Methodology: A Best Practices Report (Webinar)
Content Methodology: A Best Practices Report (Webinar)Content Methodology: A Best Practices Report (Webinar)
Content Methodology: A Best Practices Report (Webinar)contently
 
How to Prepare For a Successful Job Search for 2024
How to Prepare For a Successful Job Search for 2024How to Prepare For a Successful Job Search for 2024
How to Prepare For a Successful Job Search for 2024Albert Qian
 
Social Media Marketing Trends 2024 // The Global Indie Insights
Social Media Marketing Trends 2024 // The Global Indie InsightsSocial Media Marketing Trends 2024 // The Global Indie Insights
Social Media Marketing Trends 2024 // The Global Indie InsightsKurio // The Social Media Age(ncy)
 
Trends In Paid Search: Navigating The Digital Landscape In 2024
Trends In Paid Search: Navigating The Digital Landscape In 2024Trends In Paid Search: Navigating The Digital Landscape In 2024
Trends In Paid Search: Navigating The Digital Landscape In 2024Search Engine Journal
 
5 Public speaking tips from TED - Visualized summary
5 Public speaking tips from TED - Visualized summary5 Public speaking tips from TED - Visualized summary
5 Public speaking tips from TED - Visualized summarySpeakerHub
 
ChatGPT and the Future of Work - Clark Boyd
ChatGPT and the Future of Work - Clark Boyd ChatGPT and the Future of Work - Clark Boyd
ChatGPT and the Future of Work - Clark Boyd Clark Boyd
 
Getting into the tech field. what next
Getting into the tech field. what next Getting into the tech field. what next
Getting into the tech field. what next Tessa Mero
 
Google's Just Not That Into You: Understanding Core Updates & Search Intent
Google's Just Not That Into You: Understanding Core Updates & Search IntentGoogle's Just Not That Into You: Understanding Core Updates & Search Intent
Google's Just Not That Into You: Understanding Core Updates & Search IntentLily Ray
 
Time Management & Productivity - Best Practices
Time Management & Productivity -  Best PracticesTime Management & Productivity -  Best Practices
Time Management & Productivity - Best PracticesVit Horky
 
The six step guide to practical project management
The six step guide to practical project managementThe six step guide to practical project management
The six step guide to practical project managementMindGenius
 
Beginners Guide to TikTok for Search - Rachel Pearson - We are Tilt __ Bright...
Beginners Guide to TikTok for Search - Rachel Pearson - We are Tilt __ Bright...Beginners Guide to TikTok for Search - Rachel Pearson - We are Tilt __ Bright...
Beginners Guide to TikTok for Search - Rachel Pearson - We are Tilt __ Bright...RachelPearson36
 
Unlocking the Power of ChatGPT and AI in Testing - A Real-World Look, present...
Unlocking the Power of ChatGPT and AI in Testing - A Real-World Look, present...Unlocking the Power of ChatGPT and AI in Testing - A Real-World Look, present...
Unlocking the Power of ChatGPT and AI in Testing - A Real-World Look, present...Applitools
 
12 Ways to Increase Your Influence at Work
12 Ways to Increase Your Influence at Work12 Ways to Increase Your Influence at Work
12 Ways to Increase Your Influence at WorkGetSmarter
 

Featured (20)

AI Trends in Creative Operations 2024 by Artwork Flow.pdf
AI Trends in Creative Operations 2024 by Artwork Flow.pdfAI Trends in Creative Operations 2024 by Artwork Flow.pdf
AI Trends in Creative Operations 2024 by Artwork Flow.pdf
 
Skeleton Culture Code
Skeleton Culture CodeSkeleton Culture Code
Skeleton Culture Code
 
PEPSICO Presentation to CAGNY Conference Feb 2024
PEPSICO Presentation to CAGNY Conference Feb 2024PEPSICO Presentation to CAGNY Conference Feb 2024
PEPSICO Presentation to CAGNY Conference Feb 2024
 
Content Methodology: A Best Practices Report (Webinar)
Content Methodology: A Best Practices Report (Webinar)Content Methodology: A Best Practices Report (Webinar)
Content Methodology: A Best Practices Report (Webinar)
 
How to Prepare For a Successful Job Search for 2024
How to Prepare For a Successful Job Search for 2024How to Prepare For a Successful Job Search for 2024
How to Prepare For a Successful Job Search for 2024
 
Social Media Marketing Trends 2024 // The Global Indie Insights
Social Media Marketing Trends 2024 // The Global Indie InsightsSocial Media Marketing Trends 2024 // The Global Indie Insights
Social Media Marketing Trends 2024 // The Global Indie Insights
 
Trends In Paid Search: Navigating The Digital Landscape In 2024
Trends In Paid Search: Navigating The Digital Landscape In 2024Trends In Paid Search: Navigating The Digital Landscape In 2024
Trends In Paid Search: Navigating The Digital Landscape In 2024
 
5 Public speaking tips from TED - Visualized summary
5 Public speaking tips from TED - Visualized summary5 Public speaking tips from TED - Visualized summary
5 Public speaking tips from TED - Visualized summary
 
ChatGPT and the Future of Work - Clark Boyd
ChatGPT and the Future of Work - Clark Boyd ChatGPT and the Future of Work - Clark Boyd
ChatGPT and the Future of Work - Clark Boyd
 
Getting into the tech field. what next
Getting into the tech field. what next Getting into the tech field. what next
Getting into the tech field. what next
 
Google's Just Not That Into You: Understanding Core Updates & Search Intent
Google's Just Not That Into You: Understanding Core Updates & Search IntentGoogle's Just Not That Into You: Understanding Core Updates & Search Intent
Google's Just Not That Into You: Understanding Core Updates & Search Intent
 
How to have difficult conversations
How to have difficult conversations How to have difficult conversations
How to have difficult conversations
 
Introduction to Data Science
Introduction to Data ScienceIntroduction to Data Science
Introduction to Data Science
 
Time Management & Productivity - Best Practices
Time Management & Productivity -  Best PracticesTime Management & Productivity -  Best Practices
Time Management & Productivity - Best Practices
 
The six step guide to practical project management
The six step guide to practical project managementThe six step guide to practical project management
The six step guide to practical project management
 
Beginners Guide to TikTok for Search - Rachel Pearson - We are Tilt __ Bright...
Beginners Guide to TikTok for Search - Rachel Pearson - We are Tilt __ Bright...Beginners Guide to TikTok for Search - Rachel Pearson - We are Tilt __ Bright...
Beginners Guide to TikTok for Search - Rachel Pearson - We are Tilt __ Bright...
 
Unlocking the Power of ChatGPT and AI in Testing - A Real-World Look, present...
Unlocking the Power of ChatGPT and AI in Testing - A Real-World Look, present...Unlocking the Power of ChatGPT and AI in Testing - A Real-World Look, present...
Unlocking the Power of ChatGPT and AI in Testing - A Real-World Look, present...
 
12 Ways to Increase Your Influence at Work
12 Ways to Increase Your Influence at Work12 Ways to Increase Your Influence at Work
12 Ways to Increase Your Influence at Work
 
ChatGPT webinar slides
ChatGPT webinar slidesChatGPT webinar slides
ChatGPT webinar slides
 
More than Just Lines on a Map: Best Practices for U.S Bike Routes
More than Just Lines on a Map: Best Practices for U.S Bike RoutesMore than Just Lines on a Map: Best Practices for U.S Bike Routes
More than Just Lines on a Map: Best Practices for U.S Bike Routes
 

Calibre Install Guide

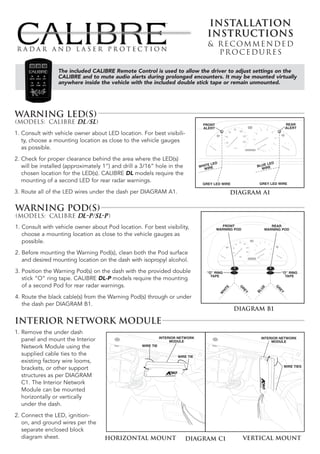
  • 1. Installation Instructions & Recommended Procedures The included CALIBRE Remote Control is used to allow the driver to adjust settings on the CALIBRE and to mute audio alerts during prolonged encounters. It may be mounted virtually anywhere inside the vehicle with the included double stick tape or remain unmounted. Warning LED(s) FRONT REAR ALERT ALERT 1. Consult with vehicle owner about LED location. For best visibili- ty, choose a mounting location as close to the vehicle gauges as possible. 2. Check for proper clearance behind the area where the LED(s) E LED LED will be installed (approximately 1”) and drill a 3/16” hole in the WHIT IRE BLUE E W WIR chosen location for the LED(s). CALIBRE DL models require the mounting of a second LED for rear radar warnings. GREY LED WIRE GREY LED WIRE 3. Route all of the LED wires under the dash per DIAGRAM A1. DIAGRAM A1 Warning Pod(s) 1. Consult with vehicle owner about Pod location. For best visibility, FRONT WARNING POD REAR WARNING POD choose a mounting location as close to the vehicle gauges as possible. 2. Before mounting the Warning Pod(s), clean both the Pod surface and desired mounting location on the dash with isopropyl alcohol. 3. Position the Warning Pod(s) on the dash with the provided double “O” RING “O” RING TAPE TAPE stick “O” ring tape. CALIBRE DL-P models require the mounting of a second Pod for rear radar warnings. G UE TE G R R HI BL EY EY W 4. Route the black cable(s) from the Warning Pod(s) through or under the dash per DIAGRAM B1. DIAGRAM B1 Interior Network Module 1. Remove the under dash INTERIOR NETWORK panel and mount the Interior MODULE INTERIOR NETWORK MODULE Network Module using the WIRE TIE supplied cable ties to the WIRE TIE existing factory wire looms, WIRE TIES brackets, or other support structures as per DIAGRAM C1. The Interior Network Module can be mounted horizontally or vertically under the dash. 2. Connect the LED, ignition- on, and ground wires per the separate enclosed block diagram sheet. HORIZONTAL MOUNT DIAGRAM C1 VERTICAL MOUNT
  • 2. Amplified Speaker 1. Route the amplified speaker cable around a panel edge and reattach the under dash panel per DIAGRAM D1. 2. For maximum audio output and concealment, DASH PANEL mount the amplified speaker to the outside of the SPEAKER under dash panel with the supplied screws per SPEAKER CABLE DIAGRAM D1. NOTE: If the vehicle is not equipped with an under dash panel (e.g., Porsche), mount the ampli- SCREWS fied speaker to existing factory wire looms, brackets, or support structures with the supplied cable ties. DIAGRAM D1 Front Radar Receiver 1. Choose a mounting location in the front of the vehicle per DIAGRAM E1. The radar receiver can be mounted horizontally or vertically provided the arrows are pointing forward, towards the road ahead. 2. Mount the front radar receiver with the supplied screws or wire ties to the vehicle’s structure per DIAGRAM E1. 3. Route the wires to the desired connection point and connect per the separate enclosed block diagram sheet. NOTE: All radar receivers can be mounted behind plastic, rubber, or fiberglass up to 1/4” thick. Do not mount radar receiver behind metal, carbon fiber or chromed plastic. RADAR RECEIVER SELF- TAPPING SCREWS RADAR RECEIVER METAL SELF- SUPPORT TAPPING SCREWS VERTICAL HORIZONTAL MOUNT MOUNT DIAGRAM E1 REAR RADAR RECEIVER 1. The rear radar receiver can be fastened to the vehicle using the supplied self-tapping screws or cable ties. See DIAGRAM F1. 2. Route the rear radar receiver cable into trunk through factory grommet. 3. If a factory grommet is not available, use the provided strain relief: a. Choose a location in the trunk compartment as close to the radar receiver as possible. METAL SUPPORT b. Drill a 1/2” hole into the chosen location for the strain relief. c. Install the strain relief and tighten the mounting nut securely. d. Route the rear radar receiver cable through the strain RECEIVER SCREWS relief, leaving a little slack in the receiver cable. e. Tighten the waterproof gasket nut to create a water- REAR RADAR RECEIVER (BEHIND BUMPER COVER) proof seal. 4. Connect wires per the separate enclosed block diagram sheet. DIAGRAM F1 44586-1 07/07
  • 3. 1. The Calibre radar receivers are interchangeable. It’s the wire color code that differentiates between front or rear radar. When you cut the cables to length, remember that the White wire is battery power for the front receiver and the Blue wire is battery power for the rear receiver. If the same color is used for both the front and the rear receivers only one receiver will be recognized. 2. Calibre radar receiver cables and EX Defuser cables should be cut to length. If the additional wire is “balled up” it can act as an “RF” choke and cause operational anomalies. 3. Calibre radar receiver cables and EX Defuser cables are color-coded the same. The connections are Brown to Brown, Yellow to Yellow, and Black to Black to Ground. 4. The ground wires on the Interior Network Module and the radar receivers should be connected to an independent ground and not connected to a factory ground wire or lug. 5. The radar receivers and the Interior Network Module should never have their power wires or ground wires connected to each other or to the same power or ground point. 6. The Interior Network Module must be connected to an isolated source of +12 Volt Ignition-on and should not be connected in parallel with any other aftermarket accessory. Use of a factory wire of less than 16ga requires an Ignition control relay. 7. The radar receivers should be connected to +12 volt battery power. A +12 volt Ignition-on source is an option if battery power is not available. 8. Do not reset the Calibre system components when doing a new installation or a re-installation of original components. A reset should only be done when a radar receiver or Interior Network Module has been replaced. Replacement of a handheld remote or the addition of an EX Defuser does not require that a reset be done. 9. Do not use any fuse larger that 1 amp for any components. 10. Use only Duracell AAAA batteries for replacement in the handheld remote control. Use of any other brand batteries may result in erratic operation. Common signs that the batteries need to be replaced are intermittent communication between the handheld remote control and the Interior Network Module and pulsing or flashing remote control LED’s after a button press. Any questions please call: 800.323.6768 24hr. Technical Support: 800.759.7243 Enter 55880 Press # and follow directions.