This document provides instructions for importing survey point data into AutoCAD Civil 3D and generating a surface and profile from the point data. It guides the user through importing an ASCII text file of survey points with northing, easting, and elevation coordinates into AutoCAD to build a surface. It then demonstrates different ways of visualizing the generated surface, including contours, triangulated irregular networks, elevation banding, and slope banding. Finally, it shows how to create a profile of the surface by using the points to generate a polyline alignment and extracting a cross-sectional profile along the alignment path.
The Pennsylvania State University Department of Civi.docxssusera34210
The Pennsylvania State University
Department of Civil Engineering
CE 321: Highway Engineering
Dr. Venky Shankar, Professor
Jung Yeol Hong, TA.
Preliminary Rural Collector Design,
Connecting SR 20 and SR3
Spring 2015
Section [#]
[Your Name Here]
Due Date: April 24, 2015
1. Introduction
Introduction and Project objectives
1. Alignments analysis
· Analysis of geographical information, topography/surface
· Criteria used in design (horizontal alignment, vertical alignment, cross section, etc.)
· Horizontal and vertical alignment characteristics, impacts displayed by the footprint (effects on forest, roads, waterways, etc.)
· Compare all alignment attributes: length, earthwork volumes, foot print area, environmental impacts, and houses displaced
· Show the 5 separate costs and total cost for each alignment and discuss cost effects
1. Earthwork
1. Safety
1. Pavement
1. Right of Way Acquisition
1. Habitat
1. Total cost for each alignment
Refer to the table
Design Analysis Summary
· Discuss the qualitative performance measures (traffic operation, safety, environment)
Which alternative is predicted safer? Why?
Is delay going to be an issue on either or both alternatives?
Do these performance measures weigh on the final decision?
1. Conclusion
As a result of the comparison, recommend the “best” alternative and describe the reasons
Note:
· Must use the Contour map and Existing Features from ANGEL in this semester (Spring 2015) –CAD drawing, and use this word file for the summary report
· Use bold print section titles
· Report must be written in third person (Do not use I)
· Include page numbers (not necessary for appendices and drawings)
· Refer to all tables or figures that are discussed in the text. There should not be a Table or Figure that is included that is not discussed and called out in the text.
· Minimum 3 pages text
· Please bind report (Cover, text, Appendix A, B, C, and 7 CAD drawings)
Appendix A
(Horizontal Curve Reports)
The horizontal curve report generation function in Civil 3D does not work in this version. Instead of generating a report like you do for the Vertical Curves, copy the information from the “grid view” under “Edit Alignment Geometry.”
· Select the alignment you want to generate a report for
· Right click and select “Edit Alignment Geometry”
· Click the “Alignment Grid View” icon as shown below
· Right click in any cell and select “Copy All”
· Paste table to a new Excel file
· You can delete the following columns
· Start Point
· End Point
· Center Point
· Pass Through Point
· Direction at Through Point1
· Direction at Through Point2
· Attainment Method
· Curve Group Index
· Curve Group Sub-Entity Index
· Pi Point
· Use the remaining table as your Horizontal Curve Report
· Do this for East and West, make sure they are labeled and include them in this appendix
Appendix B
(Vertical Curve Reports)
To generate Vertical Curve Reports:
· G ...
A great experience you've made with my colleague Ashraf, we have taken the design of a map using satellite imagery by Google Earth, the design was by ArcGIS software, in addition to other programs.
Objective To develop maps designed using different programs that allow for the manufacture of a new and modern designs
Enterprise Resource Planning System includes various modules that reduce any business's workload. Additionally, it organizes the workflows, which drives towards enhancing productivity. Here are a detailed explanation of the ERP modules. Going through the points will help you understand how the software is changing the work dynamics.
To know more details here: https://blogs.nyggs.com/nyggs/enterprise-resource-planning-erp-system-modules/
In 2015, I used to write extensions for Joomla, WordPress, phpBB3, etc and I ...Juraj Vysvader
In 2015, I used to write extensions for Joomla, WordPress, phpBB3, etc and I didn't get rich from it but it did have 63K downloads (powered possible tens of thousands of websites).
A Comprehensive Look at Generative AI in Retail App Testing.pdfkalichargn70th171
Traditional software testing methods are being challenged in retail, where customer expectations and technological advancements continually shape the landscape. Enter generative AI—a transformative subset of artificial intelligence technologies poised to revolutionize software testing.
AI Pilot Review: The World’s First Virtual Assistant Marketing SuiteGoogle
AI Pilot Review: The World’s First Virtual Assistant Marketing Suite
👉👉 Click Here To Get More Info 👇👇
https://sumonreview.com/ai-pilot-review/
AI Pilot Review: Key Features
✅Deploy AI expert bots in Any Niche With Just A Click
✅With one keyword, generate complete funnels, websites, landing pages, and more.
✅More than 85 AI features are included in the AI pilot.
✅No setup or configuration; use your voice (like Siri) to do whatever you want.
✅You Can Use AI Pilot To Create your version of AI Pilot And Charge People For It…
✅ZERO Manual Work With AI Pilot. Never write, Design, Or Code Again.
✅ZERO Limits On Features Or Usages
✅Use Our AI-powered Traffic To Get Hundreds Of Customers
✅No Complicated Setup: Get Up And Running In 2 Minutes
✅99.99% Up-Time Guaranteed
✅30 Days Money-Back Guarantee
✅ZERO Upfront Cost
See My Other Reviews Article:
(1) TubeTrivia AI Review: https://sumonreview.com/tubetrivia-ai-review
(2) SocioWave Review: https://sumonreview.com/sociowave-review
(3) AI Partner & Profit Review: https://sumonreview.com/ai-partner-profit-review
(4) AI Ebook Suite Review: https://sumonreview.com/ai-ebook-suite-review
Enhancing Project Management Efficiency_ Leveraging AI Tools like ChatGPT.pdfJay Das
With the advent of artificial intelligence or AI tools, project management processes are undergoing a transformative shift. By using tools like ChatGPT, and Bard organizations can empower their leaders and managers to plan, execute, and monitor projects more effectively.
Listen to the keynote address and hear about the latest developments from Rachana Ananthakrishnan and Ian Foster who review the updates to the Globus Platform and Service, and the relevance of Globus to the scientific community as an automation platform to accelerate scientific discovery.
How Recreation Management Software Can Streamline Your Operations.pptxwottaspaceseo
Recreation management software streamlines operations by automating key tasks such as scheduling, registration, and payment processing, reducing manual workload and errors. It provides centralized management of facilities, classes, and events, ensuring efficient resource allocation and facility usage. The software offers user-friendly online portals for easy access to bookings and program information, enhancing customer experience. Real-time reporting and data analytics deliver insights into attendance and preferences, aiding in strategic decision-making. Additionally, effective communication tools keep participants and staff informed with timely updates. Overall, recreation management software enhances efficiency, improves service delivery, and boosts customer satisfaction.
TROUBLESHOOTING 9 TYPES OF OUTOFMEMORYERRORTier1 app
Even though at surface level ‘java.lang.OutOfMemoryError’ appears as one single error; underlyingly there are 9 types of OutOfMemoryError. Each type of OutOfMemoryError has different causes, diagnosis approaches and solutions. This session equips you with the knowledge, tools, and techniques needed to troubleshoot and conquer OutOfMemoryError in all its forms, ensuring smoother, more efficient Java applications.
OpenFOAM solver for Helmholtz equation, helmholtzFoam / helmholtzBubbleFoamtakuyayamamoto1800
In this slide, we show the simulation example and the way to compile this solver.
In this solver, the Helmholtz equation can be solved by helmholtzFoam. Also, the Helmholtz equation with uniformly dispersed bubbles can be simulated by helmholtzBubbleFoam.
In software engineering, the right architecture is essential for robust, scalable platforms. Wix has undergone a pivotal shift from event sourcing to a CRUD-based model for its microservices. This talk will chart the course of this pivotal journey.
Event sourcing, which records state changes as immutable events, provided robust auditing and "time travel" debugging for Wix Stores' microservices. Despite its benefits, the complexity it introduced in state management slowed development. Wix responded by adopting a simpler, unified CRUD model. This talk will explore the challenges of event sourcing and the advantages of Wix's new "CRUD on steroids" approach, which streamlines API integration and domain event management while preserving data integrity and system resilience.
Participants will gain valuable insights into Wix's strategies for ensuring atomicity in database updates and event production, as well as caching, materialization, and performance optimization techniques within a distributed system.
Join us to discover how Wix has mastered the art of balancing simplicity and extensibility, and learn how the re-adoption of the modest CRUD has turbocharged their development velocity, resilience, and scalability in a high-growth environment.
Developing Distributed High-performance Computing Capabilities of an Open Sci...Globus
COVID-19 had an unprecedented impact on scientific collaboration. The pandemic and its broad response from the scientific community has forged new relationships among public health practitioners, mathematical modelers, and scientific computing specialists, while revealing critical gaps in exploiting advanced computing systems to support urgent decision making. Informed by our team’s work in applying high-performance computing in support of public health decision makers during the COVID-19 pandemic, we present how Globus technologies are enabling the development of an open science platform for robust epidemic analysis, with the goal of collaborative, secure, distributed, on-demand, and fast time-to-solution analyses to support public health.
Cyaniclab : Software Development Agency Portfolio.pdfCyanic lab
CyanicLab, an offshore custom software development company based in Sweden,India, Finland, is your go-to partner for startup development and innovative web design solutions. Our expert team specializes in crafting cutting-edge software tailored to meet the unique needs of startups and established enterprises alike. From conceptualization to execution, we offer comprehensive services including web and mobile app development, UI/UX design, and ongoing software maintenance. Ready to elevate your business? Contact CyanicLab today and let us propel your vision to success with our top-notch IT solutions.
Code reviews are vital for ensuring good code quality. They serve as one of our last lines of defense against bugs and subpar code reaching production.
Yet, they often turn into annoying tasks riddled with frustration, hostility, unclear feedback and lack of standards. How can we improve this crucial process?
In this session we will cover:
- The Art of Effective Code Reviews
- Streamlining the Review Process
- Elevating Reviews with Automated Tools
By the end of this presentation, you'll have the knowledge on how to organize and improve your code review proces
Software Engineering, Software Consulting, Tech Lead.
Spring Boot, Spring Cloud, Spring Core, Spring JDBC, Spring Security,
Spring Transaction, Spring MVC,
Log4j, REST/SOAP WEB-SERVICES.
Prosigns: Transforming Business with Tailored Technology SolutionsProsigns
Unlocking Business Potential: Tailored Technology Solutions by Prosigns
Discover how Prosigns, a leading technology solutions provider, partners with businesses to drive innovation and success. Our presentation showcases our comprehensive range of services, including custom software development, web and mobile app development, AI & ML solutions, blockchain integration, DevOps services, and Microsoft Dynamics 365 support.
Custom Software Development: Prosigns specializes in creating bespoke software solutions that cater to your unique business needs. Our team of experts works closely with you to understand your requirements and deliver tailor-made software that enhances efficiency and drives growth.
Web and Mobile App Development: From responsive websites to intuitive mobile applications, Prosigns develops cutting-edge solutions that engage users and deliver seamless experiences across devices.
AI & ML Solutions: Harnessing the power of Artificial Intelligence and Machine Learning, Prosigns provides smart solutions that automate processes, provide valuable insights, and drive informed decision-making.
Blockchain Integration: Prosigns offers comprehensive blockchain solutions, including development, integration, and consulting services, enabling businesses to leverage blockchain technology for enhanced security, transparency, and efficiency.
DevOps Services: Prosigns' DevOps services streamline development and operations processes, ensuring faster and more reliable software delivery through automation and continuous integration.
Microsoft Dynamics 365 Support: Prosigns provides comprehensive support and maintenance services for Microsoft Dynamics 365, ensuring your system is always up-to-date, secure, and running smoothly.
Learn how our collaborative approach and dedication to excellence help businesses achieve their goals and stay ahead in today's digital landscape. From concept to deployment, Prosigns is your trusted partner for transforming ideas into reality and unlocking the full potential of your business.
Join us on a journey of innovation and growth. Let's partner for success with Prosigns.
Prosigns: Transforming Business with Tailored Technology Solutions
Acad civil3 d_points_manual
1. CEE 317 GeoSurveying
AutoCAD Civil 3D Tutorial: Importing Survey Points
This tutorial guides you through the basic steps required to (1) import survey data into AutoCAD and
build a surface, (2) explore representations of a surface, and (3) generate a profile of your surface.
Part I: Importing Survey Data into AutoCAD
1. For this tutorial, we will use survey data of a short reach of the Provo River from Utah State
University. These survey data include a number of cross sections across the river (points taken
along the river bed). The original assignment for Utah State University was developed for
ArcGIS. Here, we will explore the data in AutoCAD instead.
Download the data at this address:
http://www.gis.usu.edu/~jwheaton/ICRRR/2010/Part_II/ProvoTopoData.zip
After it has downloaded, unzip the data in a location where you have write permission.
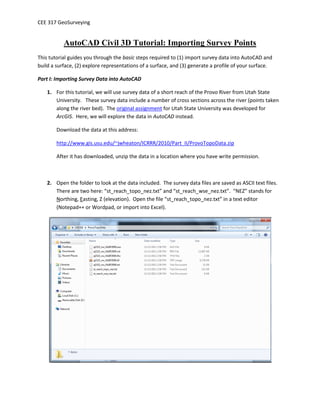
2. Open the folder to look at the data included. The survey data files are saved as ASCII text files.
There are two here: “st_reach_topo_nez.txt” and “st_reach_wse_nez.txt”. “NEZ” stands for
Northing, Easting, Z (elevation). Open the file “st_reach_topo_nez.txt” in a text editor
(Notepad++ or Wordpad, or import into Excel).
2. CEE 317 GeoSurveying
3. You will find that this file has three columns, and these correspond to (1) the Northing, (2) the
Easting, and (3) the elevation of each point (row). This file does not tell us the coordinate
system of the points or the units. In practice, you would consult with your surveying team to
obtain the coordinate system and units of these data. In this example, this information is
included in a metadata file (“q1523_nw_NAIP2009.txt”) which indicates these are in the
Universal Transverse Mercator (UTM) projected coordinate system with units of meters.
4. Close any open text files. We are now ready to import “st_reach_topo_nez.txt” into AutoCAD
Civil 3D.
5. Launch AutoCAD Civil 3D – English Metric (we know the units are in metric for this example)
from the Start Menu (as seen below). Your machine may need to install the software – let it do
so. Note: It is important that you launch AutoCAD Civil 3D and not the original AutoCAD. Civil
3D has tools that are needed for this exercise that are not found in the original AutoCAD.
3. CEE 317 GeoSurveying
6. AutoCAD Civil 3D will start. Close the welcome screen if it appears.
7. We will first create a Surface Definition. This is where the surveyed points will be stored in the
database. On the “Home” ribbon, click Surfaces > Create Surface.
4. CEE 317 GeoSurveying
8. The Create Surface dialog appears. Here you can specify the name, description, default contour
style, and render material for your surface. You will be able to change the Style and Render
material later, so don’t worry too much about them right now. Make sure your screen matches
the following graphic and click OK.
9. Now we have a surface database to store the survey points, but it is currently empty. Let’s
import the survey points now. Click the Modify Tab > Surface
10. The Surface tab now appears. Click Add Data > Point Files
5. CEE 317 GeoSurveying
11. The Add Point File dialog appears.
You should first note that there are many different format options in the “Specify point file
format” window. Many of these are intuitive: P= point number, N = northing, E = easting, Z =
elevation, D=description. You will also note that there are different ways to delimit the file, and
these include: tab delimited, comma delimited, and space delimited. From Step 3 (above), you
should have noted that the format is NEZ, and the columns are separated by a single space.
Hit the plus sign next to the selected files window and browse to “st_reach_topo_nez.txt”. The
tool should automatically detect NEZ (space delimited), but if it does not, select it in the file
format window. Make sure your screen matches the options below and click OK.
6. CEE 317 GeoSurveying
12. You may receive a warning that 1 point was outside the elevation extents – this is probably the
first row, which has a mysterious value of “5182”. Zoom extents if necessary to see your points.
AutoCAD is displaying the contours of your surface (1m minor interval, 5m major interval). You
can see a meandering river! The green boundary represents the limits of your surface
triangulation. In the next section you will explore ways of visually representing the surface.
Part II: Representing the Surface
13. Now we will examine different ways to represent the surface. Click Modify > Surface to arrive at
the Surface ribbon. Then click Surface Properties > Surface Properties
7. CEE 317 GeoSurveying
14. The “Surface style” dropdown provides several ways of visualizing your surface. We setup the
surface to display “Contours 1m and 5m”. How else can we visualize the surface? First, let’s
examine the triangulations used to create the surface. Select “Contours and Triangles” and click
Apply.
The screen now shows how the surface was created and every triangulation calculation used between
the survey points. The more dense the web, the more dense the number of survey points in an area.
Inspecting this triangulated irregular network (TIN) is especially useful if the generated surface shows
something unexpected, which may arise due to a surveying error or in areas that are not adequately
surveyed. This is an important visualization tool, because it shows the location of your surveyed points
(at the vertices of the web). You could surmise that there may be inaccuracies in the locations with less
survey points.
You can specify the shape of the boundary used to create this TIN surface. For example, you may want
to move the boundary in closer to the river where you have more survey points. This is left for you as a
future exercise.
8. CEE 317 GeoSurveying
15. Now let’s look at a raster-type representation of the surface. In the Surface Properties dialog,
select “Elevation Banding (2D)” in the “Surface style” window and click Apply. AutoCAD should
display a colorful representation of your surface, as seen below. We expect the red areas are
the lowest elevations and the blue areas are the higher elevations, but how can we know for
sure?
Note that we can also view a similar map with the slope values (“Slope Banding 2D”).
16. To answer that question, let’s return to the original representation – select “Contours 1m and
5m (Background)” and hit Apply. An easy (and intuitive) way to find the highest elevations and
lowest elevations is to simply label the contours. Click Add Labels > Contours – Multiple. Note
that there are several options for labeling your surface here.
9. CEE 317 GeoSurveying
17. Click a point in the top right area and move the mouse. You will see that a line follows your
mouse. All contours that intersect this line will be labeled.
Select a second point (as shown below) and hit enter. Zooming in, we find the following:
As expected, the slope is draining to the river from both sides (1666 m to 1665 m).
10. CEE 317 GeoSurveying
18. Now use the contour labeling tool to label the contours in the lower left extent.
Zoom in after executing this tool, and we find the following:
The contours in the lower left are around 1663 m. So this verifies that the river is flowing here
from the top right to the bottom left. (of course, you could have easily verified this with a field
trip or a discussion with your survey crew)
A final note: the contour intervals here seem too large for this dataset. You can change the
contour intervals in the Surface Properties dialogue (you will have to create a new style).
11. CEE 317 GeoSurveying
Part III: Creating a Profile from your Surface
19. Now that you have created a surface from your survey points and explored different ways of
representing the surface visually, a useful exercise is to look at profiles (or cross sections) of
your surface. This is especially important in design work where you are interested in how the
topography varies along some path, which is called an alignment in AutoCAD.
As an example, we will create a profile of the surface along the approximate route of the Provo
River. To do this, we first need an alignment, which can be created from a polyline. Zoom to
the upper right part of the surface, and then type the command “pl” to start a new polyline.
Click a point in the river to start the line, and then follow the meandering river, clicking along
the way to add new vertices (as seen below).
Do your best to follow the low points of the river. In practice, you would probably want to pick a more
refined way of tracing the river route, but we will just create the alignment manually here as an
example.
12. CEE 317 GeoSurveying
20. Once you have reached the end of the river, hit ENTER to finish the polyline. Left click on the
polyline to select it. Note: if you made a mistake, you can either edit vertices with the polyline
edit tool (type “pe”) or you can delete the polyline and start over.
21. Make sure you are viewing the “Home” ribbon. With the polyline selected, hit Alignment >
Create Alignment from Objects. Hit ENTER if necessary.
13. CEE 317 GeoSurveying
22. AutoCAD will ask you to verify the direction of the alignment. As seen below, it will show an
arrow pointing in the direction (look at the middle part of the polyline). Because we drew the
alignment in the direction of the flow, it should be oriented correctly. Hit ENTER to accept the
direction or reverse the direction if necessary.
It is important to know the direction of the alignment, as it will help you make sense of the profile.
Alignments will have stations, such that the alignment begins at a reference point (usually 0+000 m),
and the stations will be numbered based on the distance along the alignment path from that
reference point. So if we specify 0+000 as the starting point of the alignment, a station of 0+500
signifies a point that is 500 m away from the starting point along the alignment. Note that this is not
necessarily the distance from the starting point as the crow flies; alignments that meander (like our
example) or alignments that have curves/bends will have stations that do not correspond to the
straight line distance from the starting point of the alignment.
After you have created your alignment, you can label the stations in your plan view to help you
remember the orientation. This is left for you as an exercise on your own.
14. CEE 317 GeoSurveying
23. After you confirm the direction, a dialog entitled “Create Alignment from Objects” will be
displayed. Here you can name the alignment, select the type of alignment, provide a
description, specify the starting station (we use 0+000.00m here) select the drawing layer and
specify other options. Make sure your screen matches the following graphic and hit OK.
24. The alignment is now created. You can confirm this by looking at the “Prospector” tab in your
Toolspace. Expand Alignments > Miscellaneous Alignments and find your new alignment.
15. CEE 317 GeoSurveying
25. You now have created a surface and your alignment for the river route. At this stage, the two
are disjoint. Let’s sample the surface along the river alignment we just created. To do this,
select the alignment in your plan view and click “Surface Profile”. Here you can select which
alignment and which surface you want to use in this operation. In a real project, you would
likely have many alignments (e.g., road centerlines, pipe centerlines, channel/river centerlines,
etc) and many surface (e.g., existing grade, proposed grade). In this example, there is only one
alignment and one surface.
Highlight “Surface1” and hit “Add>>”. Then hit OK to sample the surface along your river
alignment.
16. CEE 317 GeoSurveying
26. You have sampled the surface along your alignment and are now ready to generate a surface
profile. Select your alignment in the plan view and click “Profile View”.
27. A “Create Profile View – General” dialogue will be displayed. You will now go through a series of
tabs to specify the properties and style of your profile. Make sure you match the following
graphic and click “Next >”.
17. CEE 317 GeoSurveying
28. Once you reach the “Profile View Height” page, ensure that there are values in your minimum
and maximum height boxes. If not, then you may not have successfully sampled the surface
along your alignment (Step 25) or you did not select the correct alignment (Step 27).
For this exercise, we will not worry about the style of the profile, so we will just continue through with the
default values. Keep clicking “Next>” until you reach the “Profile Hatch Options” screen, and then hit
“Create Profile View”.
18. CEE 317 GeoSurveying
29. AutoCAD will now prompt you to select a profile view origin. Zoom out and pan away from your
surveyed points, where you will likely not have any points/features drawn in the future. Click at
your desired location to place the profile.
30. The profile will be drawn automatically for you, as shown below (red line is your surface).
Remember that station 0+000 corresponds to the top right corner of the survey, where we
started the alignment, and station 0+500 is in the lower left corner of the survey. The profile
shows the river bed gradually sloping from 0+000 to station 0+500, which meets our
expectations. There are some jagged areas, which may have resulted from a variety of reasons:
(1) we eyeballed the alignment, (2) there may be low points or rocks in the river survey, (3)
there are locations without many survey points where we are viewing the interpolation. The
profile tool is a useful way of looking at slices of your surface, which should inform your designs.
Note that you can also use this tool to generate cross sections (e.g., profiles that are perpendicular to the
direction of flow). It is left as an exercise for you to create a cross section of the river.