Create Report Wizard Report Group Vendor
•
1 recomendación•342 vistas

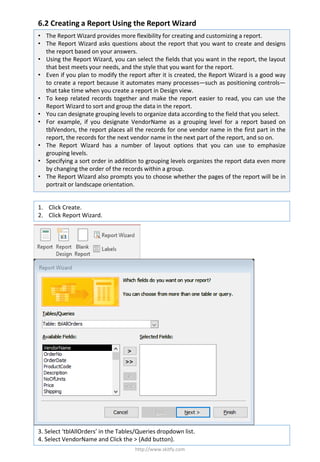
6.2 Creating a Report Using the Report Wizard

Recomendados
Más contenido relacionado
La actualidad más candente
La actualidad más candente (20)
Similar a Create Report Wizard Report Group Vendor
Similar a Create Report Wizard Report Group Vendor (20)
Más de Pyi Soe
Más de Pyi Soe (20)
Último
Último (20)
Create Report Wizard Report Group Vendor
- 1. 6.2 Creating a Report Using the Report Wizard http://www.skitfy.com • The Report Wizard provides more flexibility for creating and customizing a report. • The Report Wizard asks questions about the report that you want to create and designs the report based on your answers. • Using the Report Wizard, you can select the fields that you want in the report, the layout that best meets your needs, and the style that you want for the report. • Even if you plan to modify the report after it is created, the Report Wizard is a good way to create a report because it automates many processes—such as positioning controls— that take time when you create a report in Design view. • To keep related records together and make the report easier to read, you can use the Report Wizard to sort and group the data in the report. • You can designate grouping levels to organize data according to the field that you select. • For example, if you designate VendorName as a grouping level for a report based on tblVendors, the report places all the records for one vendor name in the first part in the report, the records for the next vendor name in the next part of the report, and so on. • The Report Wizard has a number of layout options that you can use to emphasize grouping levels. • Specifying a sort order in addition to grouping levels organizes the report data even more by changing the order of the records within a group. • The Report Wizard also prompts you to choose whether the pages of the report will be in portrait or landscape orientation. 1. Click Create. 2. Click Report Wizard. 3. Select ‘tblAllOrders’ in the Tables/Queries dropdown list. 4. Select VendorName and Click the > (Add button).
- 2. http://www.skitfy.com 5. Repeat step 4 for the rest of the fields in tblAllOrders except EmployeeID and VendorID. 6. Click Next. The next Report Wizard dialog box appears, with VendorName already selected in the field list on the left side of the dialog box. 7. Click the > (Add button).
- 3. http://www.skitfy.com VendorName is selected as the grouping level. 9. In the first box, click the down arrow, click OrderDate, click the Sort Ascending button, and then click Next. 8. Click Next. The next Report Wizard dialog box appears.
- 4. http://www.skitfy.com 11. Type rptAllOrders, verify that the Preview the report option is selected. 12. Click Finish. 10. Click the Stepped layout option, click the Landscape option, verify that the ‘Adjust the field width so all fields fit on a page’ check box is selected, and then click Next