How to setup_shared_task_outlook2010
•
1 like•163 views

1. To setup a shared task folder in Outlook, create a new task folder, set the permissions to share it with other users, and grant those users editor rights. 2. To view a shared task folder, the user needs to add the email address of the folder owner in their Outlook account settings to access the shared tasks. 3. Once configured, both users can collaborate on tasks by viewing and editing the shared task folder from their own Outlook accounts.

Recommended
More Related Content
What's hot
What's hot (20)
Similar to How to setup_shared_task_outlook2010
Similar to How to setup_shared_task_outlook2010 (20)
Recently uploaded
Recently uploaded (16)
How to setup_shared_task_outlook2010
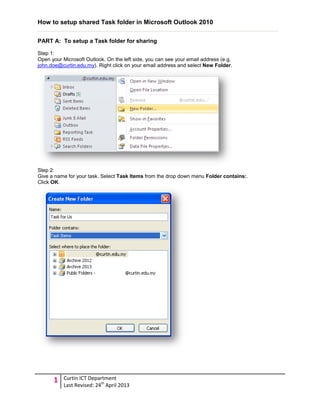
- 1. How to setup shared Task folder in Microsoft Outlook 2010 1 Curtin ICT Department Last Revised: 24th April 2013 PART A: To setup a Task folder for sharing Step 1: Open your Microsoft Outlook. On the left side, you can see your email address (e.g. john.doe@curtin.edu.my). Right click on your email address and select New Folder. Step 2: Give a name for your task. Select Task Items from the drop down menu Folder contains:. Click OK.
- 2. How to setup shared Task folder in Microsoft Outlook 2010 2 Curtin ICT Department Last Revised: 24th April 2013 Step 3: You can view the created task under your email menu. If you still unable to view the created task, don’t worry because you can click on the Folder icon on the left-below there (highlighted with red colour box).
- 3. How to setup shared Task folder in Microsoft Outlook 2010 3 Curtin ICT Department Last Revised: 24th April 2013 Step 5: Go to your email address again on left side. Right click on your email address and select Folder Permissions. Step 6: Click Add button.
- 4. How to setup shared Task folder in Microsoft Outlook 2010 4 Curtin ICT Department Last Revised: 24th April 2013 Step 7: Enter the name of the person that you want to share your tasks. Click OK once you have selected the name. Step 8: Select the name that you have added earlier. Tick the checkbox Folder visible.
- 5. How to setup shared Task folder in Microsoft Outlook 2010 5 Curtin ICT Department Last Revised: 24th April 2013 Step 9: Scroll down and select the task you created earlier. Right click on the task and select Share > Folder Permissions. Step 10: You can see your name as Owner of the task. Click Add button and enter name of the person that you want to share your task. Click OK once the name has been selected.
- 6. How to setup shared Task folder in Microsoft Outlook 2010 6 Curtin ICT Department Last Revised: 24th April 2013 Step 11: Select the name added earlier. On the Permission Level: drop down menu, select any of the role you think suitable, but we suggest you to select Editor or Author. Click OK. NOTE: If you want the person to be able to change items, select Editor. Step 12: You have completed the steps to setup a shared tasks. Please proceed to Part B to do configuration so that you can view the tasks that being shared earlier. Note: Part B must be done using the account that added in Permissions list (in this case, John Doe).
- 7. How to setup shared Task folder in Microsoft Outlook 2010 7 Curtin ICT Department Last Revised: 24th April 2013 PART B: To open a shared Task folder Step 13: From your Microsoft Outlook, go to File > Info. Click on Account Settings. Alternatively, you can go to Start > Control Panel and select icon Mail. Step 14: Click on Change button. Step 15:
- 8. How to setup shared Task folder in Microsoft Outlook 2010 8 Curtin ICT Department Last Revised: 24th April 2013 Click on More Settings button. Step 16: Select Advanced tab and click Add button. Enter the email address of person that created the shared tasks earlier. Click OK twice to close the windows. Step 17:
- 9. How to setup shared Task folder in Microsoft Outlook 2010 9 Curtin ICT Department Last Revised: 24th April 2013 Click Next to complete the process. Click Finish to exit. You may close and open again the Microsoft Outlook. Step 18: You can view the shared tasks by click on the Tasks tab (lower-left side).