Step by step--create_a_class
•
0 likes•92 views

A video to go with this Step by Step sheet can be found at : http://www.einstruction.com/cps-video-tutorials I am the authorized K-12 representative in South Carolina for eInstruction by Turning Technologies Bill McIntosh SchoolVision Inc.. Authorized South Carolina K-12 Consultant for eInstruction / Turning Technologies Phone :843-442-8888 Email :WKMcIntosh@Comcast.net Twitter : @OtisTMcIntosh SchoolVision Website on Facebook: https://www.facebook.com/WKMIII Website : www.einstruction.com For technical assistance on all eInstruction® or Turning Technologies products please call 866-746-3015

Recommended
More Related Content
More from William McIntosh
More from William McIntosh (20)
Recently uploaded
Recently uploaded (20)
Step by step--create_a_class
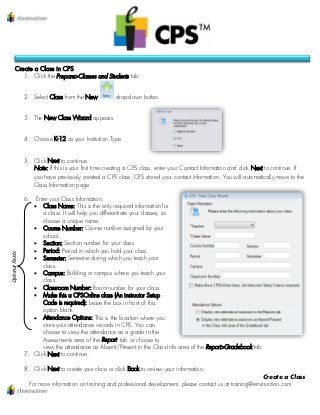
- 1. Create a Class For more information on training and professional development, please contact us at training@einstruction.com Create a Class in CPS 1. Click the Prepare>Classes and Students tab. 2. Select Class from the New drop-down button. 3. The New Class Wizard appears. 4. Choose K-12 as your Institution Type. 5. Click Next to continue. Note: If this is your first time creating a CPS class, enter your Contact Information and click Next to continue. If you have previously created a CPS class, CPS stored your contact information. You will automatically move to the Class Information page. 6. Enter your Class Information: Class Name: This is the only required information for a class. It will help you differentiate your classes, so choose a unique name. Course Number: Course number assigned by your school. Section: Section number for your class. Period: Period in which you hold your class. Semester: Semester during which you teach your class. Campus: Building or campus where you teach your class. Classroom Number: Room number for your class. Make this a CPSOnline class (An instructor Setup Code is required): Leave the box in front of this option blank. Attendance Options: This is the location where you store your attendance records in CPS. You can choose to view the attendance as a grade in the Assessments area of the Report tab or choose to view the attendance as Absent/Present in the Class Info area of the Report>Gradebook tab. 7. Click Next to continue. 8. Click Next to create your class or click Back to review your information. OptionalFields
- 2. Create a Class For more information on training and professional development, please contact us at training@einstruction.com 9. Click Done to close the New Class Wizard and return to the Prepare>Classes and Students tab, or create another class by checking the box in front of the I want to make another class option. Add Students to a Class Once you have created a class in the database, you can add students to that class. 1. Click the Prepare>Classes and Students tab. 2. Click the New drop-down button and select Student. 3. CPS displays the default student information. CPS automatically saves the default student data row. Quick Tip: Quickly add personalized student information to a student data row by typing in the student‘s first name, click the Tab key on your keyboard, type in the student‘s last name, click Enter on your keyboard. Clicking Enter saves the student‘s information and automatically moves you to the next student data row. CPS automatically assigns the next student a pad ID number in numeric order. You may change the student‘s pad ID number by clicking on the Pad ID data field and entering in a new pad ID. Data fields include the following fields: First name (required) Last name (required) Pad ID (required) Student ID (required for REAP) Gender (required for REAP) Ethnicity (required for REAP) Economically disadvantaged (not required) Note: If you are using REAP, each student must have a unique student ID. If you know your students‘ district IDs, please use them. The IDs may be alpha-numeric, but must have at least 5 total characters and/or numbers. 4. Click Save when you have added all information for each student. CPS will automatically display the student information on the student side of the window. Note: You can use any class you create in this database in conjunction with any session delivery. Click the column headers, First Name, Last Name, or Pad ID, on the student side to sort the view of the students in a class.