Independent Call Girls In Jaipur { 8445551418 } ✔ ANIKA MEHTA ✔ Get High Prof...
Performing chest physiotherapy
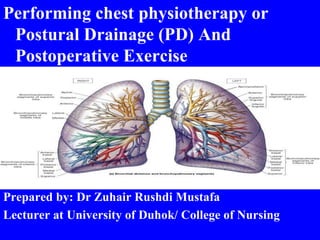
1. Performing chest physiotherapy or
Postural Drainage (PD) And
Postoperative Exercise
Prepared by: Dr Zuhair Rushdi Mustafa
Lecturer at University of Duhok/ College of Nursing
2. Performing Postural Drainage (PD)
Definitions
• Postural drainage is a technique in which
different positions (18 positions) are used
to facilitate the drainage of secretions
from the bronchial airways.
• Gravity helps to move the secretions to
the trachea to be coughed up easily.
3. Goals
The goal of postural drainage is:
1. To help drain mucus from each of lung lobes into
the larger airways of the lungs so it can be coughed
up more readily.
2. To prevent accumulation of secretions in patients at
risk for pulmonary complications such as chronic
bronchitis, prolonged bed rest, and patient's
ventilator dependent.
4. 3. Remove accumulated secretions from lungs in
patients with pulmonary complications such as
COPD, very weak/elderly, unconscious or weakened
Patients.
4. To help people with sputum production greater than
25 to 30 mL per day.
5. Relative Contraindications to PD
1. Severe hemoptysis
2. Severe pulmonary edema
3. Congestive Heart Failure (CHF)
4. Large pleural effusion
5. Aortic Aneurysm
6. Cardiac arrhythmia
7. Severe hypertension or hypotension
8. Recent Myocardial Infarction (MI)
9. Unstable angina
10. Patient with recent neurosurgery (head-down position may
cause increase intracranial pressure ICP).
6. EQUIPMENT/SUPPLIES
1. Hospital bed or tilt board to place patient in position
(pillows can also be used to help position patients)
2. Tissues
3. Container for sputum
4. Emesis basin
5. Clean gloves if indicated
7. IMPLEMENTATION
1. Wash hands. Done clean gloves if indicated.
2. Gather equipment.
3. Identify the client
4. Close curtain around the bed. Provide patient privacy.
5. Explain procedure to patient and family.
6. Loosen any tight clothing and auscultate breath sounds.
7. Ensure that several hours have passed since the child has
eaten
8. The client’s exact position are based on location of mucus
accumulation.
16. Percussion
percussion is an airway clearance technique that
involves clapping a hand to beat firmly on the
chest and/or back to help loosen thick secretions.
Doing this makes mucus easier to expel, or cough
up.
17. Vibration
• Vibration is an airway clearance technique that help
clear mucus from the airways.
• Vibration helps to gently shake mucus and
secretions into the large airways, making them
easier to cough up.
18. 9. Position patient to drain posterior upper lobes: apply
the client on Trendelenburg’s position on abdomen
and adopts a head-downward.
10. Perform percussion
(chest wall or back) for 3-5
minutes per lung segment.
19. 11 Then perform vibration. Ask the client to take deep
breath through the nose and exhale through the
mouth. During exhalation, vibrating the area for 10
to 15 second. Perform vibration for 3-5 minutes.
12. Finish vibration with huffing or coughing.
20. 13. Continue until identified target areas have been
drained.
14. Treatments generally last about 15 to 20 minutes.
15. Auscultate breath sounds for airway clearance, and
assist patient with mouth care.
16. Return the client to comfortable position.
17. Perform hand Hygiene.
21. Teaching Postoperative Leg Exercises
Purpose:
During surgery, venous blood return from the legs
slows.
To prevent postoperative complications, for
example: Thrombophlebitis and resulting emboli
which are potential complications from this
circulatory stasis in the legs.
Leg exercises increase venous return through flexion
and contraction of the leg muscles
22. IMPLEMENTATION
1. Check the patient’s chart for the type of surgery
and review the medical orders.
2. Perform hand hygiene and put on clean gloves if
indicated.
3. Identify the patient.
4. Close curtains around bed and close the door to the
room.
5. Explain procedure and rationale for performing leg
exercises.
23. 6. Assist the patient to sit up (semi-Fowler’s position).
7. Instruct patient to bend knee, then raise leg in air,
and hold in this position
for 2–3 seconds
24. 8. Have patient extend leg
and lower it to bed.
9. Repeat procedure with
other leg
10. Complete sequence 5 times each hour after surgery
while awake.
Raising patient’s right foot and keeping
it elevated for a few seconds.
Lowering the entire leg to the bed.
2
3
25. 11. Instruct patient to extend toes (plantar flexion)
toward bottom of bed, then flex toes (dorsiflexion)
toward head of bed.
12. Repeat sequence 5 times
each hour after surgery
while awake. Pointing toes of both feet toward the foot of the bed,
with both legs extended.
Pulling toes toward chin, as if a string were
attached to them.
26. 14. Instruct patient to make circles with the ankle
moving first to the left and then to the right. Repeat
sequence 5 times both ankle each hour after surgery
while awake.
15. Remove gloves,
if used. Perform
hand hygiene.
Having patient make circles with both
ankles, first one way and then the other.
27. Deep Breathing Exercises
Purpose:
To prevent atlectasis and pneumonia after surgery.
IMPLEMENTATION
1. Check the patient’s chart for the type of surgery and review
the medical orders.
2. Perform hand hygiene and put on clean gloves, if
indicated.
3. Identify the patient.
4. Close curtains around bed and close the door to the room.
5. Explain procedure and rationale for performing deep
breathing exercises.
28. 6. Assist the patient to sit up (semi- or high-Fowler’s position)
and instruct the patient to place the palms of both hands
along the lower anterior rib cage.
Assisting patient to semi-Fowler’s
position.
high-Fowler’s
29. 7. Instruct the patient to exhale gently and completely.
8. Instruct the patient to breathe in through the nose as deeply
as possible and hold breath for 3 seconds.
9. Instruct the patient to exhale through the mouth, squeeze the
lips like when whistling.
10. Have the patient practice the breathing exercise three
times.
11. Instruct the patient that this exercise should be performed
10 times every 1 to 2 hours for the first 24 hours after surgery.
30. coughing and splinting (providing support to
the incision) exercise
EQUIPMENT
1. pillow
2. Clean gloves as indicated.
IMPLEMENTATION
1. Check the patient’s chart for the type of surgery
and review the medical orders.
2. Perform hand hygiene and put on clean gloves, if
indicated.
31. 3. Identify the patient..
4. Gather the necessary supplies and bring to the
bedside
5. Close curtains around bed and close the door to the
room.
6. Explain procedure and rationale for performing
coughing and splinting.
32. 7. Assist the patient to sit up (semi-Fowler’s position)
and apply a pillow against the part of the body
where the incision will be (e.g., abdomen or chest)
Having patient splint chest or
abdominal incision by holding a
folded bath blanket or pillow against
the incision.
33. 8. Instruct the patient to inhale and exhale through the
nose three times.
9. Ask the patient to take a deep breath from the nose
and hold it for 3 seconds and then cough out three
short breaths.
Telling patient to take a deep
breath and hold for 3 seconds.
Encouraging patient to
cough out three short
coughs
after holding breath
34. 10. Ask the patient to take a breath through the mouth
and strongly cough two times.
11. Instruct the patient that these should be performed
every 2 hours when awake after surgery.
12. Remove gloves, if used and perform hand hygiene
Encouraging patient to take another
deep breath and
cough strongly two times.