Installing lemp with ssl and varnish on Debian 9
•Download as DOCX, PDF•
0 likes•564 views

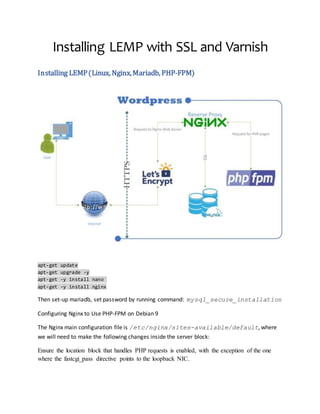
Installing LEMP (Linux, Nginx, Mariadb, php or php-fpm) as reverse proxy & wordpress with Varnish and SSL on Debian 9

Recommended
More Related Content
What's hot
What's hot (18)
Similar to Installing lemp with ssl and varnish on Debian 9
Similar to Installing lemp with ssl and varnish on Debian 9 (20)
More from عطاءالمنعم اثیل شیخ
More from عطاءالمنعم اثیل شیخ (19)
Recently uploaded
Recently uploaded (20)
Installing lemp with ssl and varnish on Debian 9
- 1. Installing LEMP with SSL and Varnish Installing LEMP(Linux, Nginx,Mariadb, PHP-FPM) apt-get update apt-get upgrade -y apt-get -y install nano apt-get -y install nginx Then set-up mariadb, set password by running command: mysql_secure_installation Configuring Nginx to Use PHP-FPM on Debian 9 The Nginx main configuration file is /etc/nginx/sites-available/default, where we will need to make the following changes inside the server block: Ensure the location block that handles PHP requests is enabled, with the exception of the one where the fastcgi_pass directive points to the loopback NIC.
- 2. Add index.php after the index directive to indicate that if found, it should be served by default before index.html or other files. Add the server_name directive pointing to the IP address or hostname of your server. This will be cloudtest2.cf in our case. Additionally, make sure the root directive points to the location where your .php files will be stored (/var/www/html by default). When you’re done, you can use the following command to test the configuration file for errors. Nginx -t At this point, your /etc/nginx/sites-available/default should look as follows: server { listen 80; server_name cloudtest2.cf www.cloudtest2.cf; root /var/www/cloudtest/; index info.php index.html index.htm index.php; location / { try_files $uri $uri/ /index.php$is_args$args; } location ~ .php$ { fastcgi_split_path_info ^(.+.php)(/.+)$; fastcgi_pass unix:/var/run/php/php7.0-fpm-cloudtest2.cf.sock; fastcgi_index index.php; include fastcgi.conf; } }
- 3. Installing PHP We can make PHP7 work in nginx through PHP-FPM (PHP-FPM (FastCGI Process Manager) is an alternative PHP FastCGI implementation with some additional features useful for sites of any size, especially busier sites) which we install as follows: apt-get -y install php-mysqli php7.0-fpm PHP-FPM is a daemon process (with the systemd unit file php7.0-fpm.service) that runs a FastCGI server on the socket /var/run/php/ php7.0-fpm-cloudtest2.cf.sock You can change “cloudtest2.cf” to your desired website or domain’s name. Configuring nginx The nginx configuration is in /etc/nginx/nginx.conf which we open now: nano /etc/nginx/nginx.conf The configuration is easy to understand (you can learn more about it here: http://wiki.nginx.org/NginxFullExample and here: http://wiki.nginx.org/NginxFullExample2) First set the keepalive_timeout to a reasonable value like 2 seconds: [...] keepalive_timeout 2; [...] The virtual hosts are defined in server {} containers. The default vhost is defined in the file /etc/nginx/sites-available/default - let's modify it as follows: nano /etc/nginx/sites-available/default and copy this configurations, and make changes as per your need: server { listen 80; listen 443 ssl; server_name cloudtest2.cf www.cloudtest2.cf; root /var/www/cloudtest;
- 4. index info.php index.html index.htm index.php; access_log /var/log/nginx/cloudtest2.cf-access.log; error_log /var/log/nginx/cloudtest2.cf-error.log error; location / { try_files $uri $uri/ /index.php$is_args$args; } location ~ .php$ { fastcgi_split_path_info ^(.+.php)(/.+)$; fastcgi_pass unix:/var/run/php/php7.0-fpm-cloudtest2.cf.sock; fastcgi_index index.php; include fastcgi.conf; } } server_name _; makes this a default catchall vhost (of course, you can as well specify a hostname here like www.example.com). I've added index.php to the index line. root /var/www/html; means that the document root is the directory /var/www/html. The important part for PHP is the location ~ .php$ {} stanza. Uncomment it like shown above to enable it. Now save the file and reload Nginx: systemctl reload nginx.service Next open /etc/php/7.0/fpm/php.ini... nano /etc/php/7.0/fpm/php.ini
- 5. ... and set cgi.fix_pathinfo=0: [...] ; http://php.net/cgi.fix-pathinfo cgi.fix_pathinfo=0 [...] Reload PHP-FPM: systemctl reload php7.0-fpm Now create the following PHP file in the document root /var/www/html/: nano /var/www/html/info.php <?php phpinfo(); ?> Now we call that file in a browser (e.g. http://(yourIP)/info.php):
- 6. As you see, PHP7 is working, and it's working through FPM/FastCGI, as shown in the Server API line. If you scroll further down, you will see all modules that are already enabled in PHP5. You can search for available PHP modules like this: apt-cache search php7.0 Pick the ones you need and install them like this: apt-get -y install php7.0-mysql php7.0-curl php7.0-sqlite3 By default PHP-FPM is listening on the socket /var/run/php/php7.0-fpm.sock. To define this, open /etc/php/7.0/fpm/pool.d/www.conf... nano /etc/php/7.0/fpm/pool.d/www.conf ... and make the listen line look as follows: (path to your socket) [...]
- 7. listen = /var/run/php/php5-fpm.sock ;listen = 127.0.0.1:9000 [...] As you can see in the following image, this file is now being served by Nginx: PHP-FPM runs on sockets, if you want it to use tcp connection, so comment out ‘sock’ line and uncomment “127.0.0.1:9000’ This will make PHP-FPM listen on port 9000 on the IP 127.0.0.1 (localhost). Make sure you use a port that is not in use on your system. If you make these changes to listen on a port except socket, then you have to make changes in nginx conf: Next go through your Nginx configuration and all your vhosts and change the line fastcgi_pass unix:/var/run/php/php-fpm.sock; to fastcgi_pass 127.0.0.1:9000;, e.g. like this: nano /etc/nginx/sites-available/default [...] location ~ .php$ { include snippets/fastcgi-php.conf; # # With php7.0-cgi alone: # fastcgi_pass 127.0.0.1:9000; # # With php7.0-fpm: # fastcgi_pass unix:/var/run/php5-fpm.sock; fastcgi_pass 127.0.0.1:9000; } [...] Finally, reload Nginx: systemctl reload nginx.service
- 8. If you want to install Apache instead of php-fpm with Nginx, use this section: Configure Nginx Create a config file with the following command: nano /etc/nginx/conf.d/default.conf Paste the following configuration in your file then save and exit: server { listen 80; root /var/www/cloudtest/; index index.php index.html index.htm; server_name _; location / { try_files $uri $uri/ /index.php; } location ~ .php$ { proxy_set_header X-Real-IP $remote_addr; proxy_set_header X-Forwarded-For $remote_addr; proxy_set_header Host $host; proxy_pass http://127.0.0.1:8080; } location ~ /.ht {
- 9. deny all; } } Installand ConfigureApache If you have Apache already installed you can skip this section. install Apache web server with the command below: apt-get install apache2 Start and enable the httpd service: systemctl enable apache2 systemctl start apache2 Configure Apache We need to configure the Apache to take the backend part of the job, for that cause we need to configure the Apache to listen on port 8081: nano /etc/apache2/ports.conf Find the line that starts with “listen” and set port to 8081: Listen 8081 Apache on Debian 9 has one server block enabled by default that is configured to serve documents from the /var/www/html directory. While this works well for a single site, it can become unwieldy if you are hosting multiple sites. Instead of modifying /var/www/html, let's create a directory structure within /var/www/ for our example.com site, leaving /var/www/html in place as the default directory to be served if a client request doesn't match any other sites. In our case, we used /var/www/cloudtest. Change “DocumentRoot” in /etc/apache2/sites-available/ edit your site or default file and modify it like below: <VirtualHost localhost:8081> ServerName cloudtest2.cf ServerAlias www.cloudtest2.cf ServerAdmin webmaster@localhost
- 10. DocumentRoot /var/www/cloudtest/ DirectoryIndex index.html index.php ErrorLog ${APACHE_LOG_DIR}/cloudtest2.cf.error.log CustomLog ${APACHE_LOG_DIR}/access.log combined </VirtualHost> The “DocumentRoot” should be the same on both Nginx and Apache, If you have VirtualHost(s) configured, it should be configured on both of them. Save and Exit. InstallPHP Install php as described in the beginning. Testing your PHP In this section we are going to test if our PHP is functioning properly and more importantly if it’s processed by the Apache Handler: create a PHP file in your document root using the following command: nano /var/www/cloudtest/info.php Paste the following code in it then save and exit: <?php phpinfo(); ?> Now you can open your browser and enter your Domain or your Public IP address, you should see the following page: http://(your server’s IP)/info.php
- 11. Make a Dummy Site I want to serve files from a directory within root directory. This directory will be called cloudtest.
- 12. cd /var/www/cloudtest/ In this directory we will make a dummy index.html page. nano /var/www/cloudtest/index.html Inside just put anything. We don’t need actual html, just something kinda unique. Welcome to test.jasonrigden.com. This is the dummy index page. Now we need to change the www directory permissions as mentioned in the beginning (wordpress section) Nginx Configuration Directory Let’s enter the directory containing the Nginx configuration files. cd /etc/nginx ls this directory to take a look around. In this tutorial we only care about a couple files and directories. The file nginx.conf is the central configuration file for our Nginx instance. The sites- available and sites-enableddirectories contain the site specific configuration files. nginx.conf It is a good practice to make backups of configuration files before editing them. Make a backup of of nginx.conf. sudo cp nginx.conf OLD.nginx.conf Now open up the primary Nginx configuration file and take look around. sudo nano nginx.conf First of all, lines starting with a # are comments and are ignored by Nginx. Directives need to end with a semicolon ;. Configuration is organized into blocks such as http, server, location. Nginx configuration files can also include other files. If l you look near the bottom of the http block you should see a line, include /etc/nginx/sites-enabled/*;. The configuration files in the sites-enabled will be included as part of the Nginx configuration. The sites-enabled will be where our website specific settings files will be. The nginx.conf will be where the server wide settings will be. sites-available Enter the sites-available directory.
- 13. cd sites-available Generally speaking, the sites-available directory contains configuration files for individual websites. Let’s take a look at the default configuration file. sudo nano default In this file you should see more blocks. Look for the server and locationblocks. Exit nano and then copy this default file. Let’s make a new configuration file for a new website. I would name the new file for the domain you will be using. In my case that is jasonrigden.com. sudo nano test.jasonrigden.com This will be the site specific configuration file for the website at test.jasonrigden.com. Edit the file and change the values as appropriate. server { listen 80; server_name test.jasonrigden.com; root /var/www/cloudtest/; index index.html; } Nginx needs to know a few things before it can actually start serving up web pages. Notice that our settings will live in a server block. We tell Nginx to listen for connections on port 80. That this server block is for the domain test.jasonrigden.com. That the files to server are located at /var/www/cloudtest. Here you have to include a block of location in which you have to define backend where upstream is defined. First create a backend file in ‘/etc/nginx/conf.d’ with the any name, in our case it is ‘ngx_backends’ and copy these lines into this file: upstream ngx_backends { server localhost:8081; } save and exit Then Copy and paste these lines into your site’s config file (/etc/nginx/sites-available/(your site name): location / { try_files $uri = @backend; }
- 14. location @backend { error_log off; client_max_body_size 20m; client_body_buffer_size 128k; proxy_connect_timeout 900; proxy_send_timeout 900; proxy_read_timeout 900; proxy_buffer_size 128k; proxy_buffers 4 256k; proxy_busy_buffers_size 256k; proxy_redirect off; proxy_buffering off; proxy_set_header X-Real-IP $remote_addr; proxy_set_header X-Forwarded-For $remote_addr; proxy_set_header Host $host; proxy_pass http://ngx_backends; (this is the file we have created before, where you define upsteream, ‘ngx_backends’ into: /etc/nginx/conf.d) proxy_set_header X-Forwarded-Proto $scheme; proxy_set_header X-Forwarded-Host $http_host; } Remember earlier when we talked about included configuration files? Configuration files in the sites-enabled directory will be included in our Nginx instance. Create a symbolic link for the configuration files we want to enable. sudo ln -s /etc/nginx/sites-available/test.jasonrigden.com /etc/nginx/sites-enabled/ Then restart the Nginx server. sudo systemctl restart nginx Check to see if the sites is up.
- 15. curl test.jasonrigden.com Which should return the contents of the index.html that we made earlier. Welcome to test.jasonrigden.com. This is the dummy index page. It works At this point we have a working website. All you need now is to have your static site generator output to /var/www/cloudtest/. Anything in that folder will be served by the Nginx. The next few sections will cover various optional features and optimizations that you can choose.
- 16. InstallMariaDBServer: apt install mariadb-server mariadb-client systemctl start mariadb systemctl enable mariadb Now set the mysql root password: mysql_secure_installation Check MariaDB Server Version: mariadb –version INSTALLWORDPRESS: Download the link of Wordpress. wget (https://wordpress.org/latest.tar.gz) Now extract the file tar xvzf file.tar.gz Now create a Database and User on mariaDB Database. Mariadb> create database wordpress; Mariadb> create user ‘munim’@ ‘localhost’ identified by ‘password’;
- 17. Give all privileges to the user. Mariadb> GRANT ALL PRIVILEGES ON ‘wordpress’ TO ‘munim’@’localhost’; Now refresh Mariadb. Mariadb> flush privileges; SET Wordpress Configuration File: Now you create a configuration file wp-config.php and then copy file wp-config-sample.php to wp-config.php: cp /wordpress/wp-config-sample.php /wordpress/wp-config.php After that, open a wp-config.php file in the nano text editor: nano /wordpress/wp-config.php And enter all the information here about wordpress database: define('DB_NAME', 'wordpress'); MySql Database username: define('DB_USER', 'user'); Mysql Database password: define('DB_PASSWORD', 'password'); MySql HostName define('DB_HOST', 'localhost');
- 18. after you make changes save them and close nano editor command. Now transfer or copy the wordpress file to /var/www/cloudtest/ cp –r /wordpress/* /var/www/ systemctl restart apache2 Give these Permissions to wordpress directory: chown -R www-data:www-data /var/www/ find /var/www/ -type d -exec chmod g+s {} ; chmod g+w /var/www/cloudtest/wp-content chmod -R g+w /var/www/cloudtest/wp-content/themes chmod -R g+w /var/www/cloudtest/wp-content/plugins chown -R www-data /var/www/cloudtest find . -type d -exec chmod 755 {} ; find . -type f -exec chmod 644 {} ; Make A SSL Certificate FOR MYSQL: mkdir ~/certs cd /certs Generate a CA key and create the certificate and private key. openssl genrsa 4096 > ca-key.pem openssl req -new -x509 -nodes -days 36500 -key ca-key.pem -out cacert.pem Create a server certificate and write the RSA key. The Common Name should be your web server’s FQDN or IP address:
- 19. openssl req -newkey rsa:4096 -days 36500 -nodes -keyout server-key.pem -out server- req.pem openssl rsa -in server-key.pem -out server-key.pem Sign the certificate: openssl x509 -req -in server-req.pem -days 36500 -CA cacert.pem -CAkey ca-key.pem - set_serial 01 -out server-cert.pem Move the keys and certificate to a permanent location: mkdir /etc/mysql/ssl mv *.* /etc/mysql/ssl && cd /etc/mysql/ssl Generate a client key. Respond to the prompts as appropriate and set the Common Name to your web server’s FQDN or IP address: openssl req -newkey rsa:2048 -days 36500 -nodes -keyout client-key.pem -out client- req.pem Write the RSA key: openssl rsa -in client-key.pem -out client-key.pem Sign the client certificate: openssl x509 -req -in client-req.pem -days 36500 -CA cacert.pem -CAkey ca-key.pem - set_serial 01 -out client-cert.pem Verify the certificates: openssl verify -CAfile cacert.pem server-cert.pem client-cert.pem Configure the MariaDB server to use the certificates. Path: /etc/mysql/mariadb.conf.d/50-server.cnf Find the following lines and Uncomment these lines.
- 20. ssl-ca=/etc/mysql/ssl/ca-cert.pem ssl-cert=/etc/mysql/ssl/server-cert.pem ssl-key=/etc/mysql/ssl/server-key.pem Give permissions to user ‘munim’ in database: mysql -u root -p GRANT ALL PRIVILEGES ON wordpress.* TO 'munim'@'173.82.185.124' REQUIRE SSL; FLUSH PRIVILEGES; exit Restart MAriaDB: systemctl restart mysql Create the directory and move the certificates and key to /etc/mysql/ssl: mkdir /etc/mysql/ssl && mv ~/certs/*.* /etc/mysql/ssl Configure the web server’s MariaDB client to use SSL. Find the [mysql] section and add locations for the certificates and key: PATH: /etc/mysql/mariadb.conf.d/50-mysql-clients.cnf [mysql] ssl-ca=/etc/mysql/ssl/ca-cert.pem ssl-cert=/etc/mysql/ssl/client-cert.pem ssl-key=/etc/mysql/ssl/client-key.pem Log in to the remote database to test the login over SSL: Mysql –u root –p Now check the status Then edit a wp-config.php file and add these lines to connect wordpress with mysql server through SSL:
- 21. define('MYSQL_CLIENT_FLAGS', MYSQLI_CLIENT_SSL); define('MYSQL_SSL_CA', '/etc/mysql/client-ssl/ca-cert.pem'); define('FORCE_SSL_ADMIN', true); we can use these lines to view errors on website: define( 'WP_DEBUG', false ); define( 'WP_DEBUG_LOG', true );
- 22. SecureYour WebsiteusingLet’sEncrypt Step 1 — Installing Certbot The first step to using Let's Encrypt to obtain an SSL certificate is to install the Certbot software on your server. Certbot is in very active development, so the Certbot packages provided by Debian with current stable releases tend to be outdated. However, we can obtain a more up-to-date package by enabling the Debian 9 backports repository in /etc/apt/sources.list, where the apt package manager looks for package sources. The backports repository includes recompiled packages that can be run without new libraries on stable Debian distributions. To add the backports repository, first open /etc/apt/sources.list: sudo nano /etc/apt/sources.list At the bottom of the file, add the following mirrors from the Debian project: /etc/apt/sources.list ... deb http://deb.debian.org/debian stretch-backports main contrib non-free deb-src http://deb.debian.org/debian stretch-backports main contrib non-free This includes the main packages, which are Debian Free Software Guidelines (DFSG)- compliant, as well as the non-free and contrib components, which are either not DFSG-compliant themselves or include dependencies in this category. Save and close the file when you are finished. Update the package list to pick up the new repository's package information: sudo apt update And finally, install Certbot's Nginx package with apt: sudo apt install python-certbot-nginx -t stretch-backports Certbot is now ready to use, but in order for it to configure SSL for Nginx, we need to verify some of Nginx's configuration.
- 23. Step 2 — Confirming Nginx's Configuration Certbot needs to be able to find the correct server block in your Nginx configuration for it to be able to automatically configure SSL. Specifically, it does this by looking for a server_namedirective that matches your requested domain. If you followed the server block setup step in the Nginx installation tutorial, you should have a server block for your domain at /etc/nginx/sites-available/example.com with the server_namedirective already set appropriately. To check, open the server block file for your domain using nano or your favorite text editor: sudo nano /etc/nginx/sites-available/example.com Find the existing server_name line. It should look like this: /etc/nginx/sites-available/example.com ... server_name example.com www.example.com; ... If it does, exit your editor and move on to the next step. If it doesn't, update it to match. Then save the file, quit your editor, and verify the syntax of your configuration edits: sudo nginx -t If you get an error, reopen the server block file and check for any typos or missing characters. Once your configuration file syntax is correct, reload Nginx to load the new configuration: sudo systemctl reload nginx Certbot can now find the correct server block and update it Step 3 — Obtaining an SSL Certificate Certbot provides a variety of ways to obtain SSL certificates through plugins. The Nginx plugin will take care of reconfiguring Nginx and reloading the config whenever necessary. To use this plugin, type the following:
- 24. sudo certbot --nginx -d example.com -d www.example.com This runs certbot with the --nginx plugin, using -d to specify the names we'd like the certificate to be valid for. If this is your first time running certbot, you will be prompted to enter an email address and agree to the terms of service. After doing so, certbot will communicate with the Let's Encrypt server, then run a challenge to verify that you control the domain you're requesting a certificate for. If that's successful, certbot will ask how you'd like to configure your HTTPS settings. Note: If you want to redirect your website through .htaccess then you have to select option 1 otherwise you can select option 2. Output Please choose whether or not to redirect HTTP traffic to HTTPS, removing HTTP access. ------------------------------------------------------------------------------- 1: No redirect - Make no further changes to the webserver configuration. 2: Redirect - Make all requests redirect to secure HTTPS access. Choose this for new sites, or if you're confident your site works on HTTPS. You can undo this change by editing your web server's configuration. ------------------------------------------------------------------------------- Select the appropriate number [1-2] then [enter] (press 'c' to cancel): Select your choice then hit ENTER. The configuration will be updated, and Nginx will reload to pick up the new settings. certbot will wrap up with a message telling you the process was successful and where your certificates are stored: Output IMPORTANT NOTES: - Congratulations! Your certificate and chain have been saved at: /etc/letsencrypt/live/example.com/fullchain.pem Your key file has been saved at: /etc/letsencrypt/live/example.com/privkey.pem Your cert will expire on 2018-07-23. To obtain a new or tweaked
- 25. version of this certificate in the future, simply run certbot again with the "certonly" option. To non-interactively renew *all* of your certificates, run "certbot renew" - Your account credentials have been saved in your Certbot configuration directory at /etc/letsencrypt. You should make a secure backup of this folder now. This configuration directory will also contain certificates and private keys obtained by Certbot so making regular backups of this folder is ideal. - If you like Certbot, please consider supporting our work by: Donating to ISRG / Let's Encrypt: https://letsencrypt.org/donate Donating to EFF: https://eff.org/donate -le Your certificates are downloaded, installed, and loaded. Try reloading your website using https:// and notice your browser's security indicator. It should indicate that the site is properly secured, usually with a green lock icon. If you test your server using the SSL Labs Server Test, it will get an A grade. Let's finish by testing the renewal process. After confirming ssl, We used this line for redirecting traffic from http to https: if ($scheme = http) { return 301 https://$server_name$request_uri; } Insert above lines in server block of your sites config file at: /etc/nginx/sites-available/(your site)
- 26. Use Varnish& NGINX to ServeWordPressoverSSL& HTTP on Debian8
- 27. Varnish is a powerful and flexible caching HTTP reverse proxy. It can be installed in front of any web server to cache its contents, which will improve speed and reduce server load. When a client requests a webpage, Varnish first tries to send it from the cache. If the page is not cached, Varnish forwards the request to the backend server, fetches the response, stores it in the cache, and delivers it to the client. When a cached resource is requested through Varnish, the request doesn’t reach the web server or involve PHP or MySQL execution. Instead, Varnish reads it from memory, delivering the cached page in a matter of microseconds. One Varnish drawback is that it doesn’t support SSL-encrypted traffic. You can circumvent this issue by using NGINX for both SSL decryption and as a backend web server. Using NGINX for both tasks reduces the complexity of the setup, leading to fewer potential points of failure, lower resource consumption, and fewer components to maintain. Both Varnish and NGINX are versatile tools with a variety of uses. This guide uses Varnish 4.0, which comes included in Debian 8 repositories, and presents a basic setup that you can refine to meet your specific needs. How Varnish and NGINX Work Together (link) In this guide, we will configure NGINX and Varnish for two WordPress sites: www.example-over-http.com will be an unencrypted, HTTP-only site. www.example-over-https.com will be a separate, HTTPS-encrypted site. For HTTP traffic, Varnish will listen on port 80. If content is found in the cache, Varnish will serve it. If not, it will pass the request to NGINX on port 8080. In the second case, NGINX will send the requested content back to Varnish on the same port, then Varnish will store the fetched content in the cache and deliver it to the client on port 80. For HTTPS traffic, NGINX will listen on port 443 and send decrypted traffic to Varnish on port 80. If content is found in the cache, Varnish will send the unencrypted content from the cache back to NGINX, which will encrypt it and send it to the client. If content is not found in the cache, Varnish will request it from NGINX on port 8080, store it in the cache, and then send it unencrypted to frontend NGINX, which will encrypt it and send it to the client’s browser. Our setup is illustrated below. Please note that frontend NGINX and backend NGINX are one and the same server: Before You Begin (link)
- 28. This tutorial assumes that you have SSH access to your Linode running Debian 8 (Jessie). Before you get started: Complete the steps in our Getting Started and Securing your Server guides. You’ll need a standard user account with sudo privileges for many commands in this guide. Follow the steps outlined in our LEMP on Debian 8 guide. Skip the NGINX configuration section, since we’ll address it later in this guide. After configuring NGINX according to this guide, follow the steps in our WordPress guide to install and configure WordPress. We’ll include a step in the instructions to let you know when it’s time to do this. Installand ConfigureVarnish (link to guide) For all steps in this section, replace 203.0.113.100 with your Linodes public IPv4 address, and 2001:DB8::1234 with its IPv6 address. Update your package repositories and install Varnish: sudo apt-get update sudo apt-get install varnish Open /etc/default/varnish with sudo rights. To make sure Varnish starts at boot, under Should we start varnishd at boot? set the START to yes: /etc/default/varnish 1 START=yes In the Alternative 2 section, make the following changes to DAEMON_OPTS: /etc/default/varnish 1 2 3 4 5 DAEMON_OPTS="-a :80 -T localhost:6082 -f /etc/varnish/custom.vcl -S /etc/varnish/secret -s malloc,1G" This will set Varnish to listen on port 80 and will instruct it to use the custom.vcl configuration file. The custom configuration file is used so that future updates to Varnish do not overwrite changes to default.vcl.
- 29. The -s malloc,1G line sets the maximum amount of RAM that will be used by Varnish to store content. This value can be adjusted to suit your needs, taking into account the server’s total RAM along with the size and expected traffic of your website. For example, on a system with 4 GB of RAM, you can allocate 2 or 3 GB to Varnish. When you’ve made these changes, save and exit the file. Create a Custom Varnish Configuration File (link) To start customizing your Varnish configuration, create a new file called custom.vcl: sudo touch /etc/varnish/custom.vcl Varnish configuration uses a domain-specific language called Varnish Configuration Language (VCL). First, specify the VCL version used: /etc/varnish/custom.vcl 1 vcl 4.0; Specify that the backend (NGINX) is listening on port 8080, by adding the backend default directive: /etc/varnish/custom.vcl 1 2 3 4 backend default { .host = "localhost"; .port = "8080"; } Allow cache-purging requests only from localhost using the acl directive: /etc/varnish/custom.vcl 1 2 3 4 5 acl purger { "localhost"; "203.0.113.100"; "2001:DB8::1234"; } Remember to substitute your Linode’s actual IP addresses for the example addresses. Create the sub vcl_recv routine, which is used when a request is sent by a HTTP client.
- 30. /etc/varnish/custom.vcl 1 2 3 4 sub vcl_recv { } The settings in the following steps should be placed inside the sub vcl_recv brackets: Redirect HTTP requests to HTTPS for our SSL website: /etc/varnish/custom.vcl 1 2 3 4 if (client.ip != "127.0.0.1" && req.http.host ~ "example-over-https.com") { set req.http.x-redir = "https://www.example-over-https.com" + req.url; return(synth(850, "")); } Remember to replace the example domain with your own. Allow cache-purging requests only from the IP addresses in the above acl purger section (Step 4). If a purge request comes from a different IP address, an error message will be produced: /etc/varnish/custom.vcl 1 2 3 4 5 6 if (req.method == "PURGE") { if (!client.ip ~ purger) { return(synth(405, "This IP is not allowed to send PURGE requests.")); } return (purge); } Change the X-Forwarded-For header: /etc/varnish/custom.vcl
- 31. 1 2 3 4 5 if (req.restarts == 0) { if (req.http.X-Forwarded-For) { set req.http.X-Forwarded-For = client.ip; } } Exclude POST requests or those with basic authentication from caching: /etc/varnish/custom.vcl 1 2 3 if (req.http.Authorization || req.method == "POST") { return (pass); } Exclude RSS feeds from caching: /etc/varnish/custom.vcl 1 2 3 if (req.url ~ "/feed") { return (pass); } Tell Varnish not to cache the WordPress admin and login pages: /etc/varnish/custom.vcl 1 2 3 if (req.url ~ "wp-admin|wp-login") { return (pass); } WordPress sets many cookies that are safe to ignore. To remove them, add the following lines: /etc/varnish/custom.vcl 1 2 3 4 set req.http.cookie = regsuball(req.http.cookie, "wp-settings-d+=[^;]+(; )?", ""); set req.http.cookie = regsuball(req.http.cookie, "wp-settings-time-d+=[^;]+(; )?", ""); if (req.http.cookie == "") { unset req.http.cookie;
- 32. 5 } Note This is the final setting to be placed inside the sub vcl_recv routine. All directives in the following steps (from Step 6 onward) should be placed after the closing last bracket. Redirect HTTP to HTTPS using the sub vcl_synth directive with the following settings: /etc/varnish/custom.vcl 1 2 3 4 5 6 7 sub vcl_synth { if (resp.status == 850) { set resp.http.Location = req.http.x-redir; set resp.status = 302; return (deliver); } } Cache-purging for a particular page must occur each time we make edits to that page. To implement this, we use the sub vcl_purge directive: /etc/varnish/custom.vcl 1 2 3 4 5 sub vcl_purge { set req.method = "GET"; set req.http.X-Purger = "Purged"; return (restart); } The sub vcl_backend_response directive is used to handle communication with the backend server, NGINX. We use it to set the amount of time the content remains in the cache. We can also set a grace period, which determines how Varnish will serve content from the cache even if the backend server is down. Time can be set in seconds (s), minutes (m), hours (h) or days (d). Here, we’ve set the caching time to 24 hours, and the grace period to 1 hour, but you can adjust these settings based on your needs:
- 33. /etc/varnish/custom.vcl 1 2 3 sub vcl_backend_response { set beresp.ttl = 24h; set beresp.grace = 1h; Before closing the vcl_backend_response block with a bracket, allow cookies to be set only if you are on admin pages or WooCommerce-specific pages: /etc/varnish/custom.vcl 1 2 3 4 if (bereq.url !~ "wp-admin|wp-login|product|cart|checkout|my-account|/?remove_item=") { unset beresp.http.set-cookie; } } Remember to include in the above series any page that requires cookies to work, for example phpmyadmin|webmail|postfixadmin, etc. If you change the WordPress login page from wp-login.php to something else, also add that new name to this series. Note The “WooCommerce Recently Viewed” widget, which displays a group of recently viewed products, uses a cookie to store recent user-specific actions and this cookie prevents Varnish from caching product pages when they are browsed by visitors. If you want to cache product pages when they are only browsed, before products are added to the cart, you must disable this widget. Special attention is required when enabling widgets that use cookies to store recent user-specific activities, if you want Varnish to cache as many pages as possible. Change the headers for purge requests by adding the sub vcl_deliver directive: /etc/varnish/custom.vcl 1 2 3 4 5 sub vcl_deliver { if (req.http.X-Purger) { set resp.http.X-Purger = req.http.X-Purger; } }
- 34. This concludes the custom.vcl configuration. You can now save and exit the file. The final custom.vcl file will look like this. Note You can download the complete sample configuration file using the link above and wget. If you do, remember to replace the variables as described above. Edit the Varnish Startup Configuration (link) For Varnish to work properly, we also need to edit the /lib/systemd/system/varnish.service file to use our custom configuration file. Specifically, we’ll tell it to use the custom configuration file and modify the port number and allocated memory values to match the changes we made in our /etc/default/varnish file. Open /lib/systemd/system/varnish.service and find the two lines beginning with ExecStart. Modify them to look like this: /lib/systemd/system/varnish.service After saving and exiting the file, reload the systemd process: sudo systemctl daemon-reload Configure NGINX (link) Open /etc/nginx/nginx.conf and comment out the ssl_protocols and ssl_prefer_server_ciphers directives. We’ll include these SSL settings in the server block within the /etc/nginx/sites-enabled/default file: /etc/nginx/nginx.conf 1 2 # ssl_protocols TLSv1 TLSv1.1 TLSv1.2; # Dropping SSLv3, ref: POODLE # ssl_prefer_server_ciphers on; Since the access logs and error logs will be defined for each individual website in the server block, comment out the access_log and error_log directives: /etc/nginx/nginx.conf 1 2 # access_log /var/log/nginx/access.log; # error_log /var/log/nginx/error.log; 1 2 ExecStartPre=/usr/sbin/varnishd -C -f /etc/varnish/custom.vcl ExecStart=/usr/sbin/varnishd -a :80 -T localhost:6082 -f /etc/varnish/custom.vcl -S /etc/varnish/secret -s malloc,1G
- 35. Save and exit the file. Next, we’ll configure the HTTP-only website, www.example-over-http.com. Begin by making a backup of the default server block (virtual host) file: sudo mv /etc/nginx/sites-available/default /etc/nginx/sites-available/default-backup Open a new /etc/nginx/sites-available/default file and add the following blocks: /etc/nginx/sites-available/default 1 2 3 4 5 6 7 8 9 10 11 12 13 14 15 16 17 18 19 20 21 server { listen 8080; listen [::]:8080; server_name example-over-http.com; return 301 http://www.example-over-http.com$request_uri; } server { listen 8080; listen [::]:8080; server_name www.example-over-http.com; root /var/www/html/example-over-http.com/public_html; port_in_redirect off; index index.php; location / { try_files $uri $uri/ /index.php?$args; } location ~ .php$ { try_files $uri =404; fastcgi_split_path_info ^(.+.php)(/.+)$;
- 36. 22 23 24 25 26 27 28 29 30 include fastcgi_params; fastcgi_index index.php; fastcgi_param SCRIPT_FILENAME $document_root$fastcgi_script_name; fastcgi_pass unix:/var/run/php5-fpm.sock; } error_log /var/www/html/example-over-http.com/logs/error.log notice; } A few things to note here: The first server block is used to redirect all requests for example-over- http.com to www.example-over-http.com. This assumes you want to use the www subdomain and have added a DNS A record for it. listen [::]:8080; is needed if you want your site to be also accesible over IPv6. port_in_redirect off; prevents NGINX from appending the port number to the requested URL. fastcgi directives are used to proxy requests for PHP code execution to PHP-FPM, via the FastCGI protocol. To configure NGINX for the SSL-encrypted website (in our example we called it www.example- over-https.com), you need two more server blocks. Append the following server blocks to your /etc/nginx/sites-available/default file: /etc/nginx/sites-available/default
- 37. 1 2 3 4 5 6 7 8 9 10 11 12 13 14 15 16 17 18 19 20 21 22 23 24 25 26 27 server { listen 443 ssl; listen [::]:443 ssl; server_name www.example-over-https.com; port_in_redirect off; ssl on; ssl_certificate /etc/nginx/ssl/ssl-bundle.crt; ssl_certificate_key /etc/nginx/ssl/example-over-https.com.key; ssl_protocols TLSv1 TLSv1.1 TLSv1.2; ssl_ciphers ECDH+AESGCM:DH+AESGCM:ECDH+AES256:DH+AES256:ECDH+AES128:DH+AES:ECDH+3DES:DH+3DES:RSA+AESGC ssl_prefer_server_ciphers on; ssl_session_cache shared:SSL:20m; ssl_session_timeout 60m; add_header Strict-Transport-Security "max-age=31536000"; add_header X-Content-Type-Options nosniff; location / { proxy_pass http://127.0.0.1:80; proxy_set_header Host $http_host; proxy_set_header X-Forwarded-Host $http_host; proxy_set_header X-Real-IP $remote_addr; proxy_set_header X-Forwarded-For $proxy_add_x_forwarded_for; proxy_set_header X-Forwarded-Proto https; proxy_set_header HTTPS "on";
- 38. 28 29 30 31 32 33 34 35 36 37 38 39 40 41 42 43 44 45 46 47 48 49 50 51 52 53 54 access_log /var/www/html/example-over-https.com/logs/access.log; error_log /var/www/html/example-over-https.com/logs/error.log notice; } } server { listen 8080; listen [::]:8080; server_name www.example-over-https.com; root /var/www/html/example-over-https.com/public_html; index index.php; port_in_redirect off; location / { try_files $uri $uri/ /index.php?$args; } location ~ .php$ { try_files $uri =404; fastcgi_split_path_info ^(.+.php)(/.+)$; include fastcgi_params; fastcgi_index index.php; fastcgi_param SCRIPT_FILENAME $document_root$fastcgi_script_name; fastcgi_param HTTPS on; fastcgi_pass unix:/var/run/php5-fpm.sock; }
- 39. 55} For an SSL-encrypted website, you need one server block to receive traffic on port 443 and pass decrypted traffic to Varnish on port 80, and another server block to serve unencrypted traffic to Varnish on port 8080, when Varnish asks for it. Caution The ssl_certificate directive must specify the location and name of the SSL certificate file. Take a look at our guide to using SSL on NGINX for more information, and update the ssl_certificate and ssl_certificate_key values as needed. Alternately, if you don’t have a commercially-signed SSL certificate (issued by a CA), you can issue a self-signed SSL certificate using openssl, but this should be done only for testing purposes. Self-signed sites will return a “This Connection is Untrusted” message when opened in a browser. Now, let’s review the key points of the previous two server blocks: ssl_session_cache shared:SSL:20m; creates a 20MB cache shared between all worker processes. This cache is used to store SSL session parameters to avoid SSL handshakes for parallel and subsequent connections. 1MB can store about 4000 sessions, so adjust this cache size according to the expected traffic for your website. ssl_session_timeout 60m; specifies the SSL session cache timeout. Here it’s set to 60 minutes, but it can be decreased or increased, depending on traffic and resources. ssl_prefer_server_ciphers on; means that when an SSL connection is established, the server ciphers are preferred over client ciphers. add_header Strict-Transport-Security "max-age=31536000"; tells web browsers they should only interact with this server using a secure HTTPS connection. The max-age specifies in seconds what period of time the site is willing to accept HTTPS-only connections. add_header X-Content-Type-Options nosniff; this header tells the browser not to override the response content’s MIME type. So, if the server says the content is text, the browser will render it as text. proxy_pass http://127.0.0.1:80; this directive proxies all the decrypted traffic to Varnish, which listens on port 80.
- 40. proxy_set_header directives add specific headers to requests, so SSL traffic can be recognized. access_log and error_log indicate the location and name of the respective types of logs. Adjust these locations and names according to your setup, and make sure the www-data user has permissions to modify each log. fastcgi directives present in the last server block are necessary to proxy requests for PHP code execution to PHP-FPM, via the FastCGI protocol. Optional: To prevent access to your website via direct input of your IP address into a browser, you can put a catch-all default server block right at the top of the file: /etc/nginx/sites-available/default 1 2 3 4 5 6 7 server { listen 8080 default_server; listen [::]:8080; server_name _; root /var/www/html; index index.html; } The /var/www/html/index.html file can contain a simple message like “Page not found!” Restart NGINX, then start Varnish: sudo systemctl restart nginx sudo systemctl start varnish Note: After all these settings, if varnish still give error or not running, edit this file: nano /etc/systemd/system/varnish.service.d/customexec.conf and check ports config and set according to your need.