Billy Sweet Chimney Show - work showcase
•Descargar como PPT, PDF•
0 recomendaciones•1,094 vistas

Showcase of Billy Sweet Chimney Sweep's Chimney work in and around Boston and the North Shore of Massachusetts

Recomendados
Recomendados
Más contenido relacionado
Similar a Billy Sweet Chimney Show - work showcase
Similar a Billy Sweet Chimney Show - work showcase (20)
Último
Último (20)
Billy Sweet Chimney Show - work showcase
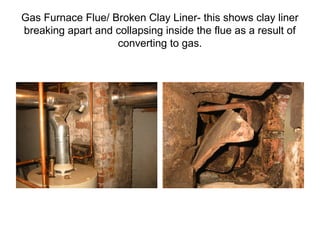
- 1. Gas Furnace Flue/ Broken Clay Liner- this shows clay liner breaking apart and collapsing inside the flue as a result of converting to gas.
- 2. Oil Boiler Liner Install in Beacon Hill- a new boiler had been installed. The vent pipe and flue were completely clogged. This shows the boiler. The vent pipe access is an extremely tight and small area to work in. On the right, we removed the pipe to clean out what we could
- 3. This is the top of the chimney- the flue on the left is where we installed the new liner.
- 4. We are installing the liner from the roof.
- 5. We had to create 2 breaches in the kitchen wall which angled across 6 feet on the 1st floor.
- 6. These are closeup shots of the breaches.
- 7. We created a new access for the vent pipe, installed a tee and a wye pipe.
- 8. We sealed the breaches back up in the kitchen here
- 9. We built a masonry wall to seal off the tee at the bottom.
- 10. This shows the wye pipe we installed so that we can access to sweep and inspect the flue annually.
- 11. This shows the flue liner cap installed on the left side of the chimney, properly sealed with a secure top plate and collar.
- 12. Gas Vent Pipe and Liner Installation- at left is an extremely bad installation of a vent pipe into the chimney; on the right shows the removal of masonry to properly install the liner the tee and new vent pipe
- 13. Gas Vent Pipe and Liner Installation- this shows the mortar and brick we used to seal off the chimney.
- 14. Gas Vent Pipe and Liner Installation- this shows the proper termination of the liner with a top plate, a collar and a stainless steel chimney cap.
- 15. Oil Vent Pipe & Liner Installation- this shows the bad condition the vent pipe was in.
- 16. Oil Vent Pipe & Liner Installation- this shows the new vent pipe and liner being installed
- 17. Oil Vent Pipe & Liner Installation- this shows the completion of the work
- 18. Gas Liner Installation- you can see the breach we had to make to get liner around the bend in the flue.
- 19. Gas Liner Installation- this is a closeup view of the breach we had to make to get the liner around the bend in the flue. The photo on the right shows the top plate and collar having just been installed.
- 20. Hole in Aluminum Liner made by Squirrel- this also shows the top plate was not covering the entire top of the chimney and was not secured to the top either.
- 21. Hole in Aluminum Liner made by the squirrel- we literally scared the squirrel out of the chimney.
- 22. Hole in Aluminum Liner- this is using the chimney camera- you can see the squirrel’s nest. This is why we don’t use aluminum!
- 23. The photo on the left shows an exposed furnace flue liner in the smoke chamber of the fireplace. The photo on the right shows that we sealed off the liner with brick and mortar.
- 24. This shows a flue that is unlined. This also shows a vent pipe that has been installed too far into the flue
- 25. This shows an aluminum liner blocked by a squirrel’s nest.
- 26. We had to remove the liner because of these holes- this is why we don’t do aluminum liners!
- 27. Using our chimney camera, this shows a cracked clay liner on the 3rd floor and a breach with a pie plate on the 2nd floor of the house. This is the reason we are using the chimney camera. It sees things in a flue we would never see with our own eyes!
- 28. Installing thermocrete for a furnace chimney- the left photo shows the hose at the top of the chimney. The right photo shows the finished spray application of thermocrete
- 29. This shows the application of thermocrete- at left is the first layer; at right is the final coat
- 30. Installation of a Hip & Ridge Stainless steel chimney cap- these are designed to withstand weather and waterproof the top of the chimney much better than an ordinary chimney cap
- 31. A customer was removing an oil burner and asked us to examine the chimney. We discovered an unlined flue.
- 32. We installed a flexible 7” stainless steel liner in the flue (left); we then began the work of connecting the vent pipe to the tee on the bottom. You can also see the new gas furnace system installed.
- 33. Here’s a closer view of the tee on the bottom (left) and the installation of the top plate, collar and liner cap on top of the chimney (right).
- 34. The photo on the left shows the installation of the tee with the vent pipe; the right shows the completion with the completion of the masonry.