SlideShare una empresa de Scribd logo
1 de 6
Descargar para leer sin conexión


                                Windows Live Movie Maker 

         What is Windows Live Movie Maker? 
          

         Windows Live Movie Maker is available on all computers that have Windows 7. Teachers 
         and students use Windows Live Movie Maker to turn videos and photos into great‐looking 
         movies. 

         Here are some of the things you can do in Movie Maker: 

                   •   Add videos and photos. Start your project by adding photos and videos to 
                       Movie Maker. Add videos and photos right in Movie Maker or through 
                       Windows Live Photo Gallery.  
                   •   Personalize your movie. Add transitions, pan and zoom effects, visual effects, 
                       titles, credits, captions, and other special touches to make your movie your 
                       own.  
                   •   Add music. Add music to your movies to use as a soundtrack.  
                   •   Make a movie quickly using AutoMovie themes. After you add videos and 
                       photos, pick an AutoMovie theme to make a movie in just a few clicks. 
                       AutoMovie themes automatically add a title, credits, transitions, and effects 
                       for you.  
                   •   Preview at any time. View your whole project at any time when editing to see 
                       what your final movie will look like. Or just preview a single item in your 
                       project, such as a video, photo, or text item.  
        
       Before you assemble your presentation in Windows Live Movie Maker, you should develop 
       an outline of what you want to present and then you should have the following saved in 
       files you can browse to: 
               Graphics‐ photos, pictures or clip art (e.g., jpg or gif files) 
               Sound Files (e.g.,  wav or mp3 files) 
               Video files (e.g.,  avi or mpg files) 
        
       Starting: 
       Open Windows Live Movie Maker program.  You will find it under Applications.   
          
       On the left side of the screen, you will see a video preview monitor.  On the right side of the 
       screen, you will see the storyboard area that you will add graphic, sound, and video files to.  


Preview monitor                                                                            Storyboard


                                                          1                                   Speri Silverman & Dawn Madsen 2011 


Name your project by saving it.  Click File                     , then Save project.  Type in a File name, 
choose the location to save your project to, then click Save.  Continue to periodically save your 
project by clicking the Save project icon             at the top left of your screen.  


Live Movie Home Tab: 

    1.    In the Add group, click Add videos and photos.  


          In the Add videos and photos dialog box, open the folder that contains the photos or 
          videos that you want to add, select the video files and photos, and then click Open.  

         Tip:  To select multiple photos and videos, press and hold the Ctrl key, and then click 
         each photo and video you want. 

     2. In the Add group, click Add music.  

             In the Add music dialog box, open the folder that contains the audio files that you 
             want to add, select the audio files, and then click Open.  
             

     3. In the Add group,  add text to your project.  

           To add a caption to a photo or segment of video, click on the graphic or point in your 
          video where you want the caption to appear. Then click on Add caption and type in 
          your desired text.   

          If you want to add a title or other text that stands alone as a new slide (not on top of a 
          photo or video), click in the storyboard where you want the text slide to appear, then 
          click Add title and type in your desired text.   

          When you choose Add credits, if you have not selected a photo or video for the credits 
          to run on top of, then the credits will automatically be inserted at the end of your 
          presentation.  You can add a Credits, Director, Starring, and Location with this icon. 

                                                                                  Add Title 

                                                                                    Add Caption 

                                                                                    Add Credits 


                                                                                    2                                   Speri Silverman & Dawn Madsen 2011 


Format Tab (Text Tools):                             
 
Click on the text you want to edit and use this tab to change the text size and font and the 
effect of how your text appears on your pictures.   


Edit Tab (Video Tools):  

1.    Click on the video you want to edit in the storyboard. 

       In the Audio group, click Video volume to change the volume of the audio in your video. 

       In the Audio group, click Fade in: and Fade out: to select the speed for having your video   
       fade in and out.  

    In the Adjust group, click Speed to speed up or slow down the rate of your video. 

2.   Click on a slide that does not have a photo, such as a title or credit slide. 

    In the Adjust group, click Background color and select a background color for that slide.   

3.   Click on the background of your storyboard.  

    In the Adjust group, click Duration and choose a time that you would like length of your 
    entire project to be.  


4.    Click on a video that you would like to split in your storyboard. 

        Click the play button in the preview monitor to play your video. 

        Click the pause button at a time when you would like the video to be split.   

        Tip:   When the video is paused, you can use the forward and back buttons on the video  
        player to scan through your video in incremental steps.  


                                                        3                                   Speri Silverman & Dawn Madsen 2011 


                                                                           In the Editing group, click Split to split your video at     
                                                                           the spot where it has been paused.  There will now be  
                                                                           two segments of this video in the storyboard. 

                                                                           Tip:  It is especially useful to split a video when you 
                                                                           want to move or delete a portion of the video.   

                                                                           Bonus Tip: To delete any item from your storyboard,  
                                                                           simply click on that item, then click Delete on your   
                                                                           keyboard.  

5.  Click on a video that you would like to trim in your storyboard.  

      Drag the slider under the preview monitor to the point that you want the video to start (or   
      play the video and pause it at that point).  In the Editing group, click Set start point.  

      Drag the slider under the preview monitor to the point that you want the video to end (or   
      play the video and pause it at that point).  In the Editing group, click Set end point.  

      In the Editing group, click the Trim tool.   The slider under the preview monitor will now        
      show the portion of remaining video as a thin blue line and the sections you trimmed off are    
      shaded gray.   You can move the rectangles on either side of the remaining video to change   
      where the trim starts and ends.   When you are finished trimming, click Save trim. 


Options Tab (Music Tools): 

Click on the audio file that you would like to edit. Audio files appear in green above the photo 
and video slides on your storyboard.   

In the Audio group, change Music volume and the speed with which music will  Fade in and 
Fade out.   

 In the Editing group, Split your audio file and Set start point and Set end point using the slider 
under the preview monitor (the same way you did when editing video clips).  


                                                                        4                                   Speri Silverman & Dawn Madsen 2011 


Animation Tab:                                        
Use it to add transitions between pictures. 


Visual Effects Tab: 

Use it to add visual effects to your pictures. 


                           Black and White Filters
 

Project Tab: 

Allows you to change your movie to widescreen or standard view. 


Set the music and video to play at the same volume and automatically adjust the duration of 
photos so the movie and music end at the same time. 


                                                         5                                   Speri Silverman & Dawn Madsen 2011 


View Tab:                                        
Allows you to preview your movie before publishing it in full screen view. 


Saving your movie: 
In the home tab, select Save movie (on the far right).  Select For computer.  Your project should 
already have a File Name and be ready to save to a desired place on your computer from when 
it was saved at the beginning of the training.   Click Save.   The movie will take a few moments 
to save, and will then give you the option of playing the movie immediately or going to the file 
where it has been stored.   

Note:   When selecting Save movie, other options such as, Burn a DVD, For high definition 
display, and For email are also available.  


                                                    6                                   Speri Silverman & Dawn Madsen 2011 
 

Más contenido relacionado

La actualidad más candente

7464 Movie Maker Presentation Show Mtl
7464 Movie Maker Presentation Show Mtl7464 Movie Maker Presentation Show Mtl
7464 Movie Maker Presentation Show Mtlmlofton62
 
Button Movie Maker Training Aid
Button Movie Maker Training AidButton Movie Maker Training Aid
Button Movie Maker Training Aidabutton1
 
People on the move and Premier guide
People on the move and Premier guidePeople on the move and Premier guide
People on the move and Premier guideSouth Sefton College
 
Windows Movie Maker
Windows Movie Maker Windows Movie Maker
Windows Movie Maker mrgruich
 
By george parkin
By george parkinBy george parkin
By george parkinParkin6
 
How to use windows movie maker
How to use windows movie makerHow to use windows movie maker
How to use windows movie makerconsuelo5011
 
2010.11.2 supt conf day
2010.11.2 supt conf day2010.11.2 supt conf day
2010.11.2 supt conf daycelsesser
 
User Manuel for Wondershare Video Editor Windows V. 4.8+
User Manuel for Wondershare Video Editor Windows V. 4.8+User Manuel for Wondershare Video Editor Windows V. 4.8+
User Manuel for Wondershare Video Editor Windows V. 4.8+Liza Brown
 
Digital Storytelling - Windows and Apple
Digital Storytelling - Windows and AppleDigital Storytelling - Windows and Apple
Digital Storytelling - Windows and AppleJennifer Dorman
 
Windows movie maker
Windows movie makerWindows movie maker
Windows movie makerhlkline
 
Intro to premier pro
Intro to premier proIntro to premier pro
Intro to premier proLouise Sands
 
How to-use-movie-maker
How to-use-movie-makerHow to-use-movie-maker
How to-use-movie-makeraurelia garcia
 
iMovie Tutorial
iMovie TutorialiMovie Tutorial
iMovie TutorialNYCDOE
 
I movie guide
I movie guideI movie guide
I movie guideLibmark
 

La actualidad más candente (19)

Imovie 09 Manual
Imovie 09 ManualImovie 09 Manual
Imovie 09 Manual
 
7464 Movie Maker Presentation Show Mtl
7464 Movie Maker Presentation Show Mtl7464 Movie Maker Presentation Show Mtl
7464 Movie Maker Presentation Show Mtl
 
Button Movie Maker Training Aid
Button Movie Maker Training AidButton Movie Maker Training Aid
Button Movie Maker Training Aid
 
People on the move and Premier guide
People on the move and Premier guidePeople on the move and Premier guide
People on the move and Premier guide
 
Photo DVD
Photo DVDPhoto DVD
Photo DVD
 
Windows Movie Maker
Windows Movie Maker Windows Movie Maker
Windows Movie Maker
 
By george parkin
By george parkinBy george parkin
By george parkin
 
How to use windows movie maker
How to use windows movie makerHow to use windows movie maker
How to use windows movie maker
 
2010.11.2 supt conf day
2010.11.2 supt conf day2010.11.2 supt conf day
2010.11.2 supt conf day
 
User Manuel for Wondershare Video Editor Windows V. 4.8+
User Manuel for Wondershare Video Editor Windows V. 4.8+User Manuel for Wondershare Video Editor Windows V. 4.8+
User Manuel for Wondershare Video Editor Windows V. 4.8+
 
Digital Storytelling - Windows and Apple
Digital Storytelling - Windows and AppleDigital Storytelling - Windows and Apple
Digital Storytelling - Windows and Apple
 
Windows movie maker
Windows movie makerWindows movie maker
Windows movie maker
 
Intro to premier pro
Intro to premier proIntro to premier pro
Intro to premier pro
 
How to-use-movie-maker
How to-use-movie-makerHow to-use-movie-maker
How to-use-movie-maker
 
Movie Maker Help Sheet
Movie Maker Help SheetMovie Maker Help Sheet
Movie Maker Help Sheet
 
iMovie Tutorial
iMovie TutorialiMovie Tutorial
iMovie Tutorial
 
I movie guide
I movie guideI movie guide
I movie guide
 
Filmora tutorial
Filmora tutorialFilmora tutorial
Filmora tutorial
 
Studio gsg
Studio gsgStudio gsg
Studio gsg
 

Destacado

Rahmati Checklist and Rubric
Rahmati Checklist and RubricRahmati Checklist and Rubric
Rahmati Checklist and Rubricchsmediacenter
 
Proyecto: la vida de los inmigrantes
Proyecto: la vida de los inmigrantesProyecto: la vida de los inmigrantes
Proyecto: la vida de los inmigranteschsmediacenter
 
About the Creative Commons
About the Creative CommonsAbout the Creative Commons
About the Creative Commonschsmediacenter
 
Media Center Newsletter, Q3, FY13
Media Center Newsletter, Q3, FY13Media Center Newsletter, Q3, FY13
Media Center Newsletter, Q3, FY13chsmediacenter
 
To Kill a Mockingbird 2014
To Kill a Mockingbird 2014To Kill a Mockingbird 2014
To Kill a Mockingbird 2014chsmediacenter
 

Destacado (9)

Rahmati Checklist and Rubric
Rahmati Checklist and RubricRahmati Checklist and Rubric
Rahmati Checklist and Rubric
 
Proyecto: la vida de los inmigrantes
Proyecto: la vida de los inmigrantesProyecto: la vida de los inmigrantes
Proyecto: la vida de los inmigrantes
 
About the Creative Commons
About the Creative CommonsAbout the Creative Commons
About the Creative Commons
 
Chs fy13 q1
Chs fy13 q1Chs fy13 q1
Chs fy13 q1
 
Chs fy14 q1
Chs fy14 q1Chs fy14 q1
Chs fy14 q1
 
Chs fy13 q2
Chs fy13 q2Chs fy13 q2
Chs fy13 q2
 
Media Center Newsletter, Q3, FY13
Media Center Newsletter, Q3, FY13Media Center Newsletter, Q3, FY13
Media Center Newsletter, Q3, FY13
 
Wannen Assignment
Wannen AssignmentWannen Assignment
Wannen Assignment
 
To Kill a Mockingbird 2014
To Kill a Mockingbird 2014To Kill a Mockingbird 2014
To Kill a Mockingbird 2014
 

Similar a Create Movie with Movie Maker

GGC 1000 movie maker
GGC 1000 movie makerGGC 1000 movie maker
GGC 1000 movie makerabutton1
 
Abc open windows_livemoviemaker
Abc open windows_livemoviemakerAbc open windows_livemoviemaker
Abc open windows_livemoviemakergreenfrog88
 
Wlmm stepby step
Wlmm stepby stepWlmm stepby step
Wlmm stepby stepthinkict
 
How To Use Movie Maker
How To Use Movie MakerHow To Use Movie Maker
How To Use Movie MakerMike Hasley
 
Powerpoint: Video and Audio
Powerpoint: Video and AudioPowerpoint: Video and Audio
Powerpoint: Video and Audiosamharlow
 
WLMM Interface
WLMM InterfaceWLMM Interface
WLMM InterfaceAlshuaili
 
Windows movie maker tutorial
Windows movie maker tutorialWindows movie maker tutorial
Windows movie maker tutorialiclict
 
use-video-editor-windows-11.docx
use-video-editor-windows-11.docxuse-video-editor-windows-11.docx
use-video-editor-windows-11.docxssuser1eca7d
 
Digital Storytelling With Movie Maker
Digital Storytelling With Movie MakerDigital Storytelling With Movie Maker
Digital Storytelling With Movie MakerLinda Rush
 
User manuel-for-wondershare-video-editor-windows-v-4-8
User manuel-for-wondershare-video-editor-windows-v-4-8User manuel-for-wondershare-video-editor-windows-v-4-8
User manuel-for-wondershare-video-editor-windows-v-4-8Fajar Baskoro
 
Let’s make a movie!
Let’s make a movie!Let’s make a movie!
Let’s make a movie!bnipper
 
FILMORA Video editing Filmora presintation for video and audio editing
FILMORA Video editing Filmora presintation for video and audio editingFILMORA Video editing Filmora presintation for video and audio editing
FILMORA Video editing Filmora presintation for video and audio editingMichael Montarde
 
Using Windows Movie Maker Bj
Using Windows Movie Maker BjUsing Windows Movie Maker Bj
Using Windows Movie Maker Bju083133
 

Similar a Create Movie with Movie Maker (20)

GGC 1000 movie maker
GGC 1000 movie makerGGC 1000 movie maker
GGC 1000 movie maker
 
Abc open windows_livemoviemaker
Abc open windows_livemoviemakerAbc open windows_livemoviemaker
Abc open windows_livemoviemaker
 
Wlmm stepby step
Wlmm stepby stepWlmm stepby step
Wlmm stepby step
 
How To Use Movie Maker
How To Use Movie MakerHow To Use Movie Maker
How To Use Movie Maker
 
Powerpoint: Video and Audio
Powerpoint: Video and AudioPowerpoint: Video and Audio
Powerpoint: Video and Audio
 
WLMM Interface
WLMM InterfaceWLMM Interface
WLMM Interface
 
Windows movie maker tutorial
Windows movie maker tutorialWindows movie maker tutorial
Windows movie maker tutorial
 
use-video-editor-windows-11.docx
use-video-editor-windows-11.docxuse-video-editor-windows-11.docx
use-video-editor-windows-11.docx
 
Nov 2011 Technology Fair
Nov 2011 Technology FairNov 2011 Technology Fair
Nov 2011 Technology Fair
 
IMovie2015
IMovie2015IMovie2015
IMovie2015
 
Moviemaker report
Moviemaker reportMoviemaker report
Moviemaker report
 
Digital Storytelling With Movie Maker
Digital Storytelling With Movie MakerDigital Storytelling With Movie Maker
Digital Storytelling With Movie Maker
 
Digital Storytelling Feb 2010
Digital Storytelling Feb 2010Digital Storytelling Feb 2010
Digital Storytelling Feb 2010
 
User manuel-for-wondershare-video-editor-windows-v-4-8
User manuel-for-wondershare-video-editor-windows-v-4-8User manuel-for-wondershare-video-editor-windows-v-4-8
User manuel-for-wondershare-video-editor-windows-v-4-8
 
Lab1
Lab1Lab1
Lab1
 
Let’s make a movie!
Let’s make a movie!Let’s make a movie!
Let’s make a movie!
 
Customizing a video in iMovie
Customizing a video in iMovieCustomizing a video in iMovie
Customizing a video in iMovie
 
Notes
NotesNotes
Notes
 
FILMORA Video editing Filmora presintation for video and audio editing
FILMORA Video editing Filmora presintation for video and audio editingFILMORA Video editing Filmora presintation for video and audio editing
FILMORA Video editing Filmora presintation for video and audio editing
 
Using Windows Movie Maker Bj
Using Windows Movie Maker BjUsing Windows Movie Maker Bj
Using Windows Movie Maker Bj
 

Más de chsmediacenter

Media Center Newsletter, Q1, FY13
Media Center Newsletter, Q1, FY13Media Center Newsletter, Q1, FY13
Media Center Newsletter, Q1, FY13chsmediacenter
 
Burke Final Humanities Paper
Burke Final Humanities PaperBurke Final Humanities Paper
Burke Final Humanities Paperchsmediacenter
 
Wannen Project Outline and Checklist
Wannen Project Outline and ChecklistWannen Project Outline and Checklist
Wannen Project Outline and Checklistchsmediacenter
 
Johnson_TKAM_Assignment
Johnson_TKAM_AssignmentJohnson_TKAM_Assignment
Johnson_TKAM_Assignmentchsmediacenter
 
Johnson_B&W_Assignment
Johnson_B&W_AssignmentJohnson_B&W_Assignment
Johnson_B&W_Assignmentchsmediacenter
 
Rahmati 2011 tkam_persecutions
Rahmati  2011 tkam_persecutionsRahmati  2011 tkam_persecutions
Rahmati 2011 tkam_persecutionschsmediacenter
 
Photo Story Directions
Photo Story DirectionsPhoto Story Directions
Photo Story Directionschsmediacenter
 
Clarksburg HS Media Center - 2010-2011 Quater 2 Newsletter
Clarksburg HS Media Center - 2010-2011 Quater 2 NewsletterClarksburg HS Media Center - 2010-2011 Quater 2 Newsletter
Clarksburg HS Media Center - 2010-2011 Quater 2 Newsletterchsmediacenter
 

Más de chsmediacenter (17)

Douglass assignment
Douglass assignmentDouglass assignment
Douglass assignment
 
Media Center Newsletter, Q1, FY13
Media Center Newsletter, Q1, FY13Media Center Newsletter, Q1, FY13
Media Center Newsletter, Q1, FY13
 
TKAM - Meyer
TKAM - MeyerTKAM - Meyer
TKAM - Meyer
 
Wannen Rubric
Wannen RubricWannen Rubric
Wannen Rubric
 
Wannen TKAM Project
Wannen TKAM ProjectWannen TKAM Project
Wannen TKAM Project
 
Burke Final Humanities Paper
Burke Final Humanities PaperBurke Final Humanities Paper
Burke Final Humanities Paper
 
Wannen Rubric
Wannen RubricWannen Rubric
Wannen Rubric
 
Wannen Project Outline and Checklist
Wannen Project Outline and ChecklistWannen Project Outline and Checklist
Wannen Project Outline and Checklist
 
Johnson_TKAM_Assignment
Johnson_TKAM_AssignmentJohnson_TKAM_Assignment
Johnson_TKAM_Assignment
 
Johnson_B&W_Assignment
Johnson_B&W_AssignmentJohnson_B&W_Assignment
Johnson_B&W_Assignment
 
Rahmati 2011 tkam_persecutions
Rahmati  2011 tkam_persecutionsRahmati  2011 tkam_persecutions
Rahmati 2011 tkam_persecutions
 
Rahmati 2011 tkam_pd4
Rahmati 2011 tkam_pd4Rahmati 2011 tkam_pd4
Rahmati 2011 tkam_pd4
 
Student Example 1
Student Example 1Student Example 1
Student Example 1
 
Student Example 2
Student Example 2Student Example 2
Student Example 2
 
Glogster Directions
Glogster DirectionsGlogster Directions
Glogster Directions
 
Photo Story Directions
Photo Story DirectionsPhoto Story Directions
Photo Story Directions
 
Clarksburg HS Media Center - 2010-2011 Quater 2 Newsletter
Clarksburg HS Media Center - 2010-2011 Quater 2 NewsletterClarksburg HS Media Center - 2010-2011 Quater 2 Newsletter
Clarksburg HS Media Center - 2010-2011 Quater 2 Newsletter
 

Create Movie with Movie Maker

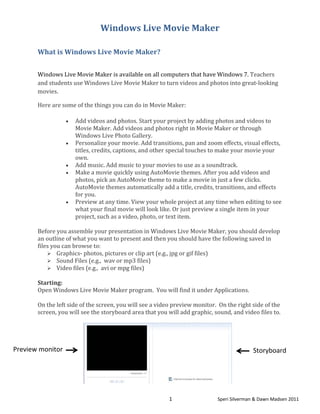
  • 1.     Windows Live Movie Maker  What is Windows Live Movie Maker?    Windows Live Movie Maker is available on all computers that have Windows 7. Teachers  and students use Windows Live Movie Maker to turn videos and photos into great‐looking  movies.  Here are some of the things you can do in Movie Maker:  • Add videos and photos. Start your project by adding photos and videos to  Movie Maker. Add videos and photos right in Movie Maker or through  Windows Live Photo Gallery.   • Personalize your movie. Add transitions, pan and zoom effects, visual effects,  titles, credits, captions, and other special touches to make your movie your  own.   • Add music. Add music to your movies to use as a soundtrack.   • Make a movie quickly using AutoMovie themes. After you add videos and  photos, pick an AutoMovie theme to make a movie in just a few clicks.  AutoMovie themes automatically add a title, credits, transitions, and effects  for you.   • Preview at any time. View your whole project at any time when editing to see  what your final movie will look like. Or just preview a single item in your  project, such as a video, photo, or text item.     Before you assemble your presentation in Windows Live Movie Maker, you should develop  an outline of what you want to present and then you should have the following saved in  files you can browse to:  Graphics‐ photos, pictures or clip art (e.g., jpg or gif files)  Sound Files (e.g.,  wav or mp3 files)  Video files (e.g.,  avi or mpg files)    Starting:  Open Windows Live Movie Maker program.  You will find it under Applications.        On the left side of the screen, you will see a video preview monitor.  On the right side of the  screen, you will see the storyboard area that you will add graphic, sound, and video files to.             Preview monitor  Storyboard       1                                   Speri Silverman & Dawn Madsen 2011   
  • 2.     Name your project by saving it.  Click File                     , then Save project.  Type in a File name,  choose the location to save your project to, then click Save.  Continue to periodically save your  project by clicking the Save project icon             at the top left of your screen.     Live Movie Home Tab:  1. In the Add group, click Add videos and photos.         In the Add videos and photos dialog box, open the folder that contains the photos or  videos that you want to add, select the video files and photos, and then click Open.   Tip:  To select multiple photos and videos, press and hold the Ctrl key, and then click  each photo and video you want.  2. In the Add group, click Add music.            In the Add music dialog box, open the folder that contains the audio files that you           want to add, select the audio files, and then click Open.     3. In the Add group,  add text to your project.    To add a caption to a photo or segment of video, click on the graphic or point in your  video where you want the caption to appear. Then click on Add caption and type in  your desired text.    If you want to add a title or other text that stands alone as a new slide (not on top of a  photo or video), click in the storyboard where you want the text slide to appear, then  click Add title and type in your desired text.    When you choose Add credits, if you have not selected a photo or video for the credits  to run on top of, then the credits will automatically be inserted at the end of your  presentation.  You can add a Credits, Director, Starring, and Location with this icon.                                                                    Add Title                                                                             Add Caption                                                                             Add Credits  2                                   Speri Silverman & Dawn Madsen 2011   
  • 3.     Format Tab (Text Tools):      Click on the text you want to edit and use this tab to change the text size and font and the  effect of how your text appears on your pictures.            Edit Tab (Video Tools):   1.    Click on the video you want to edit in the storyboard.         In the Audio group, click Video volume to change the volume of the audio in your video.         In the Audio group, click Fade in: and Fade out: to select the speed for having your video           fade in and out.     In the Adjust group, click Speed to speed up or slow down the rate of your video.  2.   Click on a slide that does not have a photo, such as a title or credit slide.    In the Adjust group, click Background color and select a background color for that slide.    3.   Click on the background of your storyboard.     In the Adjust group, click Duration and choose a time that you would like length of your    entire project to be.     4.    Click on a video that you would like to split in your storyboard.          Click the play button in the preview monitor to play your video.          Click the pause button at a time when you would like the video to be split.            Tip:   When the video is paused, you can use the forward and back buttons on the video           player to scan through your video in incremental steps.   3                                   Speri Silverman & Dawn Madsen 2011   
  • 4.                                                                                In the Editing group, click Split to split your video at                                                                                 the spot where it has been paused.  There will now be                                                                              two segments of this video in the storyboard.                                                                             Tip:  It is especially useful to split a video when you                                                                             want to move or delete a portion of the video.                                                                               Bonus Tip: To delete any item from your storyboard,                                                                              simply click on that item, then click Delete on your                                                                               keyboard.   5.  Click on a video that you would like to trim in your storyboard.         Drag the slider under the preview monitor to the point that you want the video to start (or          play the video and pause it at that point).  In the Editing group, click Set start point.         Drag the slider under the preview monitor to the point that you want the video to end (or          play the video and pause it at that point).  In the Editing group, click Set end point.         In the Editing group, click the Trim tool.   The slider under the preview monitor will now               show the portion of remaining video as a thin blue line and the sections you trimmed off are           shaded gray.   You can move the rectangles on either side of the remaining video to change          where the trim starts and ends.   When you are finished trimming, click Save trim.              Options Tab (Music Tools):  Click on the audio file that you would like to edit. Audio files appear in green above the photo  and video slides on your storyboard.    In the Audio group, change Music volume and the speed with which music will  Fade in and  Fade out.     In the Editing group, Split your audio file and Set start point and Set end point using the slider  under the preview monitor (the same way you did when editing video clips).     4                                   Speri Silverman & Dawn Madsen 2011   
  • 5.   Animation Tab:    Use it to add transitions between pictures.      Visual Effects Tab:  Use it to add visual effects to your pictures.          Black and White Filters   Project Tab:  Allows you to change your movie to widescreen or standard view.        Set the music and video to play at the same volume and automatically adjust the duration of  photos so the movie and music end at the same time.    5                                   Speri Silverman & Dawn Madsen 2011   
  • 6.   View Tab:    Allows you to preview your movie before publishing it in full screen view.      Saving your movie:  In the home tab, select Save movie (on the far right).  Select For computer.  Your project should  already have a File Name and be ready to save to a desired place on your computer from when  it was saved at the beginning of the training.   Click Save.   The movie will take a few moments  to save, and will then give you the option of playing the movie immediately or going to the file  where it has been stored.    Note:   When selecting Save movie, other options such as, Burn a DVD, For high definition  display, and For email are also available.     6                                   Speri Silverman & Dawn Madsen 2011