Review CalendarSnack RSVP Tracking with ConvertKit
•
1 recomendación•1,165 vistas

This document reviews CalendarSnack, a product that allows users to create calendar invites from various platforms like ConvertKit and embed them on websites. It provides step-by-step instructions on setting up CalendarSnack integrations with ConvertKit for email marketing campaigns and includes screenshots of the CalendarSnack dashboard and reporting features.

Recomendados
Más contenido relacionado
La actualidad más candente
La actualidad más candente (20)
Similar a Review CalendarSnack RSVP Tracking with ConvertKit
Similar a Review CalendarSnack RSVP Tracking with ConvertKit (20)
Más de 31events.com
Más de 31events.com (20)
Último
Último (20)
Review CalendarSnack RSVP Tracking with ConvertKit
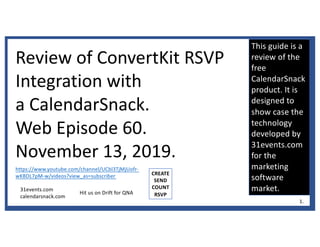
- 1. This guide is a review of the free CalendarSnack product. It is designed to show case the technology developed by 31events.com for the marketing software market. Review of ConvertKit RSVP Integration with a CalendarSnack. Web Episode 60. November 13, 2019. https://www.youtube.com/channel/UCbl3TjMjUofr- wKBDL7pM-w/videos?view_as=subscriber 31events.com calendarsnack.com CREATE SEND COUNT RSVP 1. Hit us on Drift for QNA
- 2. Step 1. Send us an calendar invitation out of your calendar to create@calendarsnack.com. You will receive calendarsnack with instructions like the one below to your email. 2.
- 3. This is the default Event Summary page when you click the Hyperlink in the CalendarSnack confirmation email that is sent to the Event Creator. 3.
- 4. Under the Summary Button and Send Test Tab. You can self test the actual invite. This will send you a calendar invite to the address of the event organizer. In this case, Bob@techvader.com will receive a test invite. You can see what the Calendar event looks like, if you don’t like it, you can edit, or create a new one. 4.
- 5. Under Summary Button and Review and Edit Tab there are 3 Red high lighted areas that can be edited here. The other OPTION is to generate a new calendarsnack. Its common to mess something up when creating the calendar invite. We encourage you to fill all the information in your calendar client since that will be the RSVP information your customer gets in the calendar invite. 5.
- 6. Under Email Marketing Button and Build Your Own Tab. You can for use the copy code for inside a ConvertKit Template CTA Graphic. This email merge code came from the Convert Kit website. (Anyone email marketing platform that supports merge codes.) 6.
- 7. Under Email Marketing Button and Build Your Own Tab. You can for use the copy code for inside a ConvertKit Template CTA Graphic. This email merge code came from the Convert Kit website. You can leave the Merge Codes blank for First name and Last name. 6. ConvertKit Help Page
- 8. 7. Double click on image – it is located under Image settings called “Link”. You can also hyperlink a word for the RSVP in the ConvertKit for ”click here” to get RSVP. CalendarSnack Code inserted into the Call to Action Graphic in a Convertkit template. 7.
- 9. CalendarSnack Code inserted into the Call to Action Graphic in a Convertkit template. Double click on image – it is located under Image settings called “Link”. You can also just hyperlink a word for RSVP in the template for ”click here” to get the RSVP. 8.
- 10. 2.After clicking the Call to Action graphic, a redirect to the default landing page occurs. You can insert your own landing page if you want. In the background we send a calendar invite. 3. In the background we send a calendar invite and track in reporting engine. 1.This is the ConvertKit campaign that was sent with the Calendar Invite embedded into the ConvertKit Campaign to my email box. 9..
- 11. Under the Invite Forms Button and Webforms Tab. There are 4 invite forms you can use to embed into your website. Each contain copy code for the single event. You of course can build your own modals and insert our embed code. We track the calendar invite RSVP’s for any of these in the reporting engine module. 10.
- 12. Web Forms In the Webforms tab, you will find four (4), prebuilt webforms for website embedding as you scroll down. They are simple to use, and we send out the calendar invites whenever someone uses the modal web form, and that is tracked as well for the single event. 2. 3. 4. 11. 1.
- 13. Under the Invite Forms for Website Button and Landing Pages tab. Copy Code for URL. To send to someone a quick signup page in email, SMS, a tweet, or Slack. The Click to preview button at the bottom will generate the actual landing page. 12.
- 14. Under the Email Invitations Button and Send a Single Invite Tab. You can use this webform to send single calendar invitations that will be tracked in the reporting engine. 13..
- 15. Under the Event Report Button and Summary detail tab there are 3 Cards. We show the details of Event Summary, Invitation Sent, and Invitation Responses. 14.
- 16. Under Event Report Button and Summary Tab we track invitations sent from MailChimp, Klaviyo, Email (custom built category) , Webform, Landing Page, Direct – Single, Direct Bulk and Shared sources. *ConvertKit for this example. 15.
- 17. Under the Report Tab and Summary Report Detail. We show the detail status of the RSVP Calendar Invite. We track Yes, No, Maybe and No Responses. 16.
- 18. Under the Report Button and Invitee detail Tab. We show the email details of who replied to the Calendar Invite and what is the RSVP status. Each calendar invite is tracked by reply source type. 17.
- 19. Under the Report Button and Download Report Tab. You can receive the detailed report by clicking the “Get your Report” button. This will be sent to the organizer’s email. 18..
- 20. Attendee Report Email and .CSV Attachment 19. TEST Email Accounts