
Recomendados
Más contenido relacionado
Similar a Dt process journal 3
Similar a Dt process journal 3 (20)
Más de hyojik
Dt process journal 3
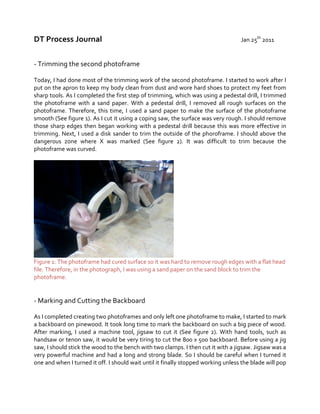
- 1. DT Process Journal Jan 25th 2011 -‐ Trimming the second photoframe Today, I had done most of the trimming work of the second photoframe. I started to work after I put on the apron to keep my body clean from dust and wore hard shoes to protect my feet from sharp tools. As I completed the first step of trimming, which was using a pedestal drill, I trimmed the photoframe with a sand paper. With a pedestal drill, I removed all rough surfaces on the photoframe. Therefore, this time, I used a sand paper to make the surface of the photoframe smooth (See figure 1). As I cut it using a coping saw, the surface was very rough. I should remove those sharp edges then began working with a pedestal drill because this was more effective in trimming. Next, I used a disk sander to trim the outside of the phoroframe. I should above the dangerous zone where X was marked (See figure 2). It was difficult to trim because the photoframe was curved. Figure 1: The photoframe had cured surface so it was hard to remove rough edges with a flat head file. Therefore, in the photograph, I was using a sand paper on the sand block to trim the photoframe. -‐ Marking and Cutting the Backboard As I completed creating two photoframes and only left one photoframe to make, I started to mark a backboard on pinewood. It took long time to mark the backboard on such a big piece of wood. After marking, I used a machine tool, jigsaw to cut it (See figure 2). With hand tools, such as handsaw or tenon saw, it would be very tiring to cut the 800 x 500 backboard. Before using a jig saw, I should stick the wood to the bench with two clamps. I then cut it with a jigsaw. Jigsaw was a very powerful machine and had a long and strong blade. So I should be careful when I turned it one and when I turned it off. I should wait until it finally stopped working unless the blade will pop
- 2. out. I pushed the jigsaw hard while cutting so it would be easier to follow the pencil line and cut neater. Figure 2: The backboard was too big to cut with hand tool, such as handsaw or tenon saw. Therefore, in the image, I was using a jigsaw to cut the backboard. -‐ AOI / Learner Profile Today’s process was related to Approaches to Learning. I learned some safety rules dealth with jigsaw: First, I needed to push it down while it was working. Second, I should wait until the blade finally stopped moving when I turn off the machine. With the regards of Learner Profile, I was a communicator during the workshop. Although I used a jigsaw before in grade 9, I forgot how to work with it. Even I was scared to use it because I could felt the vibration jigsaw made while it working. I was able to manage this difficulty by asking for teacher’s help. Teacher showed me a demonstration of using a jigsaw and also he informed me some safety rules that I should obey when working with a jigsaw -‐ Emotion / Changes to Plan Today’s process was satisfying for me. As I predicted in the flow chart, this trimming process took long time. However, it took much shorter to make the edge of photoframe smooth. I could move to next process quicker. In addition, I was a bit scared to use gig saw because of its great vibration. Therefore, today’s work was successful.