Soho setup, how to configure the cisco 871 w wireless router
•Download as DOCX, PDF•
2 likes•7,285 views

how to configure the cisco 871 w wireless router

Recommended
Recommended
More Related Content
More from IT Tech
More from IT Tech (20)
Recently uploaded
Recently uploaded (20)
Soho setup, how to configure the cisco 871 w wireless router
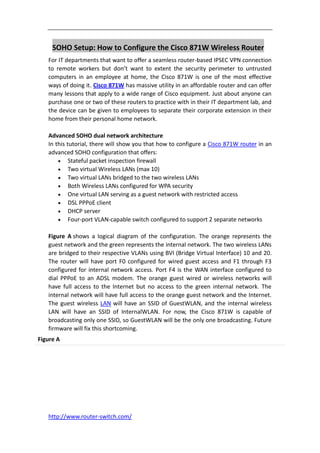
- 1. SOHO Setup: How to Configure the Cisco 871W Wireless Router For IT departments that want to offer a seamless router-based IPSEC VPN connection to remote workers but don’t want to extent the security perimeter to untrusted computers in an employee at home, the Cisco 871W is one of the most effective ways of doing it. Cisco 871W has massive utility in an affordable router and can offer many lessons that apply to a wide range of Cisco equipment. Just about anyone can purchase one or two of these routers to practice with in their IT department lab, and the device can be given to employees to separate their corporate extension in their home from their personal home network. Advanced SOHO dual network architecture In this tutorial, there will show you that how to configure a Cisco 871W router in an advanced SOHO configuration that offers: Stateful packet inspection firewall Two virtual Wireless LANs (max 10) Two virtual LANs bridged to the two wireless LANs Both Wireless LANs configured for WPA security One virtual LAN serving as a guest network with restricted access DSL PPPoE client DHCP server Four-port VLAN-capable switch configured to support 2 separate networks Figure A shows a logical diagram of the configuration. The orange represents the guest network and the green represents the internal network. The two wireless LANs are bridged to their respective VLANs using BVI (Bridge Virtual Interface) 10 and 20. The router will have port F0 configured for wired guest access and F1 through F3 configured for internal network access. Port F4 is the WAN interface configured to dial PPPoE to an ADSL modem. The orange guest wired or wireless networks will have full access to the Internet but no access to the green internal network. The internal network will have full access to the orange guest network and the Internet. The guest wireless LAN will have an SSID of GuestWLAN, and the internal wireless LAN will have an SSID of InternalWLAN. For now, the Cisco 871W is capable of broadcasting only one SSID, so GuestWLAN will be the only one broadcasting. Future firmware will fix this shortcoming. Figure A http://www.router-switch.com/
- 2. Initial hardware setup After you've removed the 871W from the box and plugged in the power adapter, plug the supplied console cable into a valid serial port on your computer. If you have a laptop that doesn't have a serial port, you will need a USB-to-serial adapter. For ideal testing purposes, you'll need a wireless LAN-capable laptop and a desktop computer. Plug the desktop computer into F1 or FastEthernet port 1. (This is the second port from left inFigure B, since F0 is the first.) Most desktop computers have at least a COM1 port, so you can use that as the console configuration computer. Plug the RJ45 end of the console port into the right-most RJ45 port labeled "console." If all you have is the laptop, you can use that to test the wired and wireless functionality. Figure B http://www.router-switch.com/
- 3. Wiping the default configuration and creating VLANs The first thing I do with all the newer Cisco routers is wipe the default configuration on them. Old school routers didn't have any username and passwords assigned to them, but these new devices are different. You must first log in with username "cisco" and password "cisco." The "c" in "cisco" may need to be capitalized on certain access points and routers, but most of the newer Cisco devices are like this. After you've logged in, you'll need to type the following commands: enable write erase reload (confirm reboot) Once the router is rebooted, you'll see a "router>" prompt and there will be no passwords required. Now you're starting with a clean slate. Note that for our particular lab exercise, you'll need to create two VLANs before you go into global configuration mode. You'll do that with the following commands: enable vlan data vlan 10 name Internal-LAN vlan 20 name Guest-LAN exit Once the VLANs are created, you'll be able to enter global configuration mode by typing the old "config t" command. Introducing our new CLI configuration template I've always thought that the Cisco configuration guides were too difficult to use, with their inline comments and hints, so I've created my own configuration template system in Microsoft Excel. Thanks to our development blogger, Justin James, who http://www.router-switch.com/
- 4. wrote a quick replacement button that automatically generates a ready-to-use configuration output, we have a truly useful new tool for documenting and creating CLI configuration files. For this tutorial, I've created this Cisco 871W SOHO template, embedded with Justin's new rapid replace functionality. How to use the CLI template for Cisco 871W Once you've downloaded the template for this tutorial, it's easy to generate your own Cisco 871W configuration. All you need to do is fill out the yellow section shown in Figure C on the Variables sheet. Figure C Figure D shows the Reference sheet in the configuration template with substitute variable names in red fonts and enclosed in [brackets]. The Replace button will copy the contents of the Reference sheet to a new sheet called 871W (user-configurable in cell G5) with an auto-incrementing number behind it for each new configuration you create. Figure D http://www.router-switch.com/
- 5. Inserting the configuration into the 871W Once the output is created, you can copy the Command column with your customized settings (starting below the "Command" label) and paste it into your console. Note that all the Excel formatting will be excluded from the paste command, which is exactly what we want. Some commands take longer than others to insert because the router has to think, so I would recommend that you do a small section at a time. The console is also known to drop certain statements if you paste too fast, so make sure the router takes every command. You'll have to verify with the "show run" command. When you're satisfied, be sure to issue the "write mem" command to commit all the changes permanently so that the settings will remain the next time you reboot the router. Notice that on the Reference sheet, I labeled all the commands with their purpose. This is for reference, learning, and documentation purposes. It would be wise to look through the entire Reference sheet so you'll understand what most of the lines are doing. The final Excel file is perfect for initial setup and permanent documentation. Anyone with any knowledge of Cisco devices should readily understand what's going on with this Excel template. The spreadsheet format help make Cisco CLI more readable and understandable. http://www.router-switch.com/
- 6. You can also change the Reference sheet if you want to modify the template to suit your own purposes. For example, you may not want to force your guests to use WPA-PSK security instead of WEP. and you may even want to leave it wide open and offer a free hotspot. In future articles, we'll go over QoS options to restrict the amount of bandwidth the guest network can consume and to prioritize latency-sensitive applications, like VoIP and online gaming. We'll accompany those articles with an updated CLI template for you to download. Test your multi-VLAN multi-WLAN router Your desktop PC connected to port F1 should be on the internal LAN. You should be able to acquire an address in the internal network. If you left my IP scheme default, that should be an IP address of 192.168.1.100. You should be able to ping 192.168.1.1 and 192.168.2.1, which are the IP addresses of the BVI 10 and 20 interfaces. Once the configuration is complete, you'll need to log in with the username and password you configured. If pinging doesn't work, check the IP address configuration on your BVI interfaces.You can't use telnet or SSH if you can't even ping the router, so you'll need to use the console to troubleshoot. You can troubleshoot IP configuration with the "show ipint brief" command, which will display a listing of all the interfaces in your Cisco 871W router, as shown in Figure E. Figure E http://www.router-switch.com/
- 7. You should also be able to ping something like techrepublic.com.com if you've entered a valid DNS server. If you can't ping any Web site that you know should work, try pinging your DNS server and see whether it's available. If that doesn't work, you'll need to troubleshoot and verify that your configuration is correct. A good thing to check is whether your Dialer1 interface has been assigned an IP address from your DSL provider yet. If this were a cable modem, it would simply be the FastEthernet4 interface configured in DHCP mode. If you're able to ping everything mentioned above, test your wireless laptop by connecting to both wireless LANs. From the guest network, try to ping 192.168.1.1 and make sure it fails, to prove the Guest-ACL is working. The Guest-ACL can be modified to have exceptions if, for example, you want your guests to be able to print. The guest network should be able to get to everything on the Internet. If you still have problems, post your question in the article discussion and send me a private TechRepublic message. Notes: Cisco 871W Wireless Router Does It All Summary: For IT departments that want to offer a seamless router-based IPSEC VPN connection to remote workers but don’t want to extent the security perimeter to http://www.router-switch.com/
- 8. untrusted computers in an employee at home, the Cisco 871W is one of the most effective ways of doing it. I’ve been testing and reviewing a Cisco 871W Wireless Router for the last few weeks and I’m using it as my primary router at home (yes this is the one I hooked up to my generator during the power outage). The main purpose of this exercise is to create a series of tutorials on the Cisco 871W Wireless Router because it does so many things. While the configuration is not exactly like the bigger Cisco devices it shares features with and it’s limited in many ways, it does give one a huge leap in Cisco knowledge on a broad range of devices which is very useful for an IT career. Here are some of the key topics we’ll be covering in this series to give you a head start: Cisco command line interface familiarity Cisco IOS Router Cisco IOS Layer 2 and 3 Firewall 4-port IOS switch with VLAN (Virtual Local Area Network) configuration and 802.1q tagging capability on up to 4 VLANs Wireless access point with multiple Virtual SSID and VLAN assignment capability on 10 wireless VLANs and 10 virtual SSIDs IPSEC tunnels Remote access IPSEC VPN server Remote access SSLVPN server with full IP tunneling support Firewall policy between the VLANs and physical interfaces Enhanced QoS policies IP phone VLAN support Enhanced routing functionality such as policy based routing Enhanced routing protocols like OSPF, EIGRP, and BGP Original reading/guide from http://www.techrepublic.com/article/configuring-the-cisco-871w-wireless-router-so ho-setup/6102399 More Tips: Cisco 871 Interfaces and Basic Configuration http://www.router-switch.com/