
![Real-Time Digital Signal Processing Based on the TMS320C6000
Interrupt Mapping
CPU Program
Inter rupt Sources (Acronym) Interrupt Address Memory
Host processor to DSP interrupt (DSPINT) INT4 080h
Timer 0 interrupt (TINT0) INT5 0A0h
Timer 1 interrupt (TINT1) INT6 0C0h
EMIF SDRAM timer interrupt (SD_INT) INT7 0E0h
100h
Interrupt Multiplexers
External interr upt pin 4 (EXT_INT4) INT8
External interr upt pin 5 (EXT_INT5) INT9 120h
External interr upt pin 6 (EXT_INT6) INT10 140h
External interr upt pin 7 (EXT_INT7) INT11 160h
DMA channel 0 interrupt (DMA_INT0) INT12 180h
DMA channel 1 interrupt (DMA_INT1) INT13 1A0h
DMA channel 2 interrupt (DMA_INT2) INT14 1C0h ISTB+1E0h
DMA channel 3 interrupt (DMA_INT3) INT15 1E0h B ISR
NOP 5
McBSP 0 transmit interrupt (XINT0)
NOP
One
McBSP 0 receive interrupt (RINT0) NOP
NOP
Fetch
McBSP 1 transmit interrupt (XINT1) NOP Packet
McBSP 1 receive interrupt (RINT1) NOP
NOP
Interrupt ISR
Process Process B IRP
NOP 5
Save registers/control registers
interrupt service function
Restore registers/control registers
Figure 5-1: Interrupt mapping and operation.
Interrupts can be enabled or disabled by setting or clearing appropriate bits in in-
terrupt enable register (IER). There is a master switch, the global interrupt enable
(GIE) bit as part of CSR, which can be used to turn all interrupts on or off. For
example, the assembly code shown in Figure 5-2 indicates how to enable INT4 and
the GIE bit. Here the instruction MVC (move to and from a control register) is used
to transfer a control register to a CPU register for bit manipulation. Another regis-
ter called interrupt flag register (IFR) allows one to check if or what interrupt has
occurred. (Refer to the TI TMS320C6x CPU manual [1] for more details on the
interrupt registers.)
88
@Spy](data:image/gif;base64,R0lGODlhAQABAIAAAAAAAP///yH5BAEAAAAALAAAAAABAAEAAAIBRAA7)
Recomendados
Más contenido relacionado
La actualidad más candente
La actualidad más candente (19)
Similar a Dsp interrupciones
Similar a Dsp interrupciones (20)
Dsp interrupciones
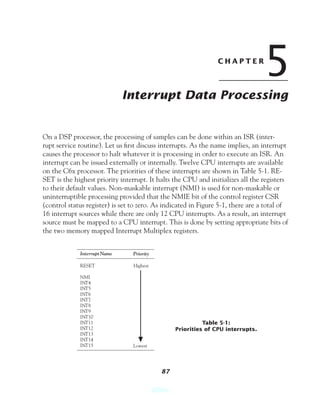
- 1. CHAPTER 5 Interrupt Data Processing On a DSP processor, the processing of samples can be done within an ISR (inter- rupt service routine). Let us first discuss interrupts. As the name implies, an interrupt causes the processor to halt whatever it is processing in order to execute an ISR. An interrupt can be issued externally or internally. Twelve CPU interrupts are available on the C6x processor. The priorities of these interrupts are shown in Table 5-1. RE- SET is the highest priority interrupt. It halts the CPU and initializes all the registers to their default values. Non-maskable interrupt (NMI) is used for non-maskable or uninterruptible processing provided that the NMIE bit of the control register CSR (control status register) is set to zero. As indicated in Figure 5-1, there are a total of 16 interrupt sources while there are only 12 CPU interrupts. As a result, an interrupt source must be mapped to a CPU interrupt. This is done by setting appropriate bits of the two memory mapped Interrupt Multiplex registers. Interrupt Name Priority RESET Highest NMI INT4 INT5 INT6 INT7 INT8 INT9 INT10 INT11 Table 5-1: INT12 Priorities of CPU interrupts. INT13 INT14 INT15 Lowest 87 @Spy
- 2. Real-Time Digital Signal Processing Based on the TMS320C6000 Interrupt Mapping CPU Program Inter rupt Sources (Acronym) Interrupt Address Memory Host processor to DSP interrupt (DSPINT) INT4 080h Timer 0 interrupt (TINT0) INT5 0A0h Timer 1 interrupt (TINT1) INT6 0C0h EMIF SDRAM timer interrupt (SD_INT) INT7 0E0h 100h Interrupt Multiplexers External interr upt pin 4 (EXT_INT4) INT8 External interr upt pin 5 (EXT_INT5) INT9 120h External interr upt pin 6 (EXT_INT6) INT10 140h External interr upt pin 7 (EXT_INT7) INT11 160h DMA channel 0 interrupt (DMA_INT0) INT12 180h DMA channel 1 interrupt (DMA_INT1) INT13 1A0h DMA channel 2 interrupt (DMA_INT2) INT14 1C0h ISTB+1E0h DMA channel 3 interrupt (DMA_INT3) INT15 1E0h B ISR NOP 5 McBSP 0 transmit interrupt (XINT0) NOP One McBSP 0 receive interrupt (RINT0) NOP NOP Fetch McBSP 1 transmit interrupt (XINT1) NOP Packet McBSP 1 receive interrupt (RINT1) NOP NOP Interrupt ISR Process Process B IRP NOP 5 Save registers/control registers interrupt service function Restore registers/control registers Figure 5-1: Interrupt mapping and operation. Interrupts can be enabled or disabled by setting or clearing appropriate bits in in- terrupt enable register (IER). There is a master switch, the global interrupt enable (GIE) bit as part of CSR, which can be used to turn all interrupts on or off. For example, the assembly code shown in Figure 5-2 indicates how to enable INT4 and the GIE bit. Here the instruction MVC (move to and from a control register) is used to transfer a control register to a CPU register for bit manipulation. Another regis- ter called interrupt flag register (IFR) allows one to check if or what interrupt has occurred. (Refer to the TI TMS320C6x CPU manual [1] for more details on the interrupt registers.) 88 @Spy
- 3. Chapter 5: Interrupt Data Processing MVK .S2 0010h, B3 ; bit4="1" MVC .S2 IER, B4 ; get IER OR .L2 B3, B4, B4 ; set bit4 MVC .S2 B4, IER ; write IER MVC .S2 CSR, B5 ; get CSRGIE OR .L2 1, B5, B5 ; bit0="1" MVC .S2 B5, CSR ; set GIE Figure 5-2: Setup code to turn on INT4 and GIE. The location where the processor will go to after an interrupt occurs is specified by a predefined offset for that interrupt added to the interrupt service table base (ISTB) bits as part of the interrupt service table pointer (ISTP) register. As an example, for the CPU INT15, the processor goes to the location ISTB + 1E0h. At this location, there is normally a branch instruction that would take the processor to a receive ISR somewhere in memory, as shown in Figure 5-1. In general, an ISR includes three parts. The first and last part incorporate saving and restoring registers, respectively. The actual interrupt routine makes up the second part. If needed, saving and restoring are done to bring the status of the processor back to the time when the interrupt was issued. 89 @Spy
- 4. Real-Time Digital Signal Processing Based on the TMS320C6000 Bibliography [1] Texas Instruments, TMS320C6000 CPU and Instruction Set Reference Guide, Literature ID# SPRU 189F, 2000. 90 @Spy
- 5. Lab 2: Audio Signal Sampling The purpose of this lab is to use a C6x DSK or EVM to sample an analog audio signal in real-time. A common approach to processing live signals, which is the use of an interrupt service routine, is utilized here. The AD535 codec on the C6711 DSK board provides a fixed sampling rate of 8 kHz. As done here, the audio daughter card PCM3003, shown in Figure 5-3, can be added to the C6711 DSK board in order to alter the sampling rate. PCM3003 has two stereo 3.5 mm audio jacks for a line-in and a line-out signal, plus two on-board microphones. The sampling rate can be varied from 4 kHz to 48 kHz via its timer. On the C6701 EVM board, there exists a 16-bit stereo audio codec CS4231A which can handle sampling rates from 5.5 kHz to 48 kHz. There are three 3.5 mm audio jack inputs on the back of the EVM board for a microphone-in, a line-in and a line-out signal. Each audio jack has its own amplifying and filtering capabilities. The block diagrams of the DSK and EVM stereo interface are shown in Figure 5-3. The codecs on both boards are connected to the C6x DSP through the multichannel buffered serial port (McBSP). The configuration and control of the peripherals are done via application program- ming interface (API) functions of the chip support library (CSL) library for C6711 DSK, the board support library (BSL) for C6713 and C6416 DSK, and DSP sup- port software for EVM. In this lab, CSL without DSP/BIOS is used to perform audio signal sampling. In Chapters 9 and 10, CSL is used with DSP/BIOS for real-time analysis and scheduling. Considering that the peripherals and thus the libraries for the DSK and the EVM boards are different, the hardware and software configurations for these boards are presented in separate sections. 91 @Spy
- 6. Real-Time Digital Signal Processing Based on the TMS320C6000 (a) TL V2772 PCM3003 Line In aud io op amp stereo C 6711 audio DSP codec TL V277 2 Line Out aud io op amp McBSP1 (16/20 bit, 4-48 k Hz) 3.5-mm stereo audio jacks 12.2880 TOUT MHz Master clock (b) Expansion peripheral 7 interface connector Mic preamp McBSP0 'C6201 biasing, & filtering serial 'CBT3257 DSP data/ voltage TI TLC2272A CS4231A 7 McBSP MIC IN audio op amp clocks Xlat/ stereo MUX Passive filter/ audio 7 LINE IN AC coupling codec Passive filter/ (16-bit, 5.5-48 kHz) LINE OUT AC coupling PDWN 'LVTH162245 3.5-mm stereo audio jacks 16.9344 24.576 McBSP0 MHz MHz MUX control (from CPLD) Sample rate 8 crystals Parallel control interface (c) Figure 5-3: (a) PCM3003 audio daughter card†,(b) DSK stereo audio daughter card interface, (c) EVM stereo audio interface†. 92 @Spy
- 7. Lab 2: Audio Signal Sampling L2.1 Initialization of Codec and Peripherals of C6711 In writing a program that uses the codec to sample an incoming analog signal, several initializations have to be performed. Among these are the initialization of the CSL library, McBSP, and timer. To achieve these initializations or adjustments, the API functions are used. Once the required initializations are made, an interrupt needs to be assigned to the receive register of the serial port to halt the processor and jump to a defined interrupt service routine. The final program will output the same input sample back to the codec. The following program includes an order of API functions that achieves all of the foregoing mentioned initializations (Figure 5-4 shows the flowchart of the steps involved): #define CHIP_6711 // Chip Symbol #include <stdio.h> #include <c6x.h> #include <csl.h> #include <csl_mcbsp.h> #include <csl_irq.h> MCBSP_Handle hMcbsp; void hookint(void); void interrupt serialPortRcvISR(void); int main() { MCBSP_Config MyConfig = { 0x00010001, // (SPCR) Enable serial port tx & rx 0x000000A0, // (RCR) 1-phase 32 bits receive 0x000000A0, // (XCR) 1-phase 32 bits transmit 0x00000000, // (SRGR) 0x00000000, // (MCR) 0x00000000, // (RCER) 0x00000000, // (XCER) 0x00000000 // (PCR) }; TIMER_Config timerCfg = { 0x000003C1, // (CTL) Internal clock src & TOUT is timer output 0x00000000, // (PRD) Fs = 73,242 Hz 0x00000000 // (CNT) }; TIMER_Handle hTimer; CSL_init(); // Initialize the library hMcbsp = MCBSP_open(MCBSP_DEV1,MCBSP_OPEN_RESET); if (hMcbsp == INV) { printf("Error opening MCBSP 1n"); return(-1); } 93 @Spy
- 8. Real-Time Digital Signal Processing Based on the TMS320C6000 MCBSP_config(hMcbsp,&MyConfig); hTimer = TIMER_open(TIMER_DEV0, TIMER_OPEN_RESET); if (hTimer == INV) { printf("Error opening TIMERn"); return(-1); } TIMER_config(hTimer, &timerCfg); hookint(); while(1) { } } void hookint() { IRQ_globalDisable(); // Globally disables interrupts IRQ_nmiEnable(); // Enables the NMI interrupt IRQ_map(IRQ_EVT_RINT1,15); // Maps an event to intr 15 IRQ_enable(IRQ_EVT_RINT1); // Enables the event IRQ_globalEnable(); // Globally enables intrs } interrupt void serialPortRcvISR() { int temp; temp = MCBSP_read(hMcbsp); MCBSP_write(hMcbsp,temp); } Let us explain this program in a step-by-step fashion. Here, CSL is used without DSP/BIOS. This requires defining the chip identification symbol either in the source code or build option. The first line in the code specifies the chip identification symbol CHIP_6711 for the C6711 DSK. One can also define this symbol by stating CHIP_6711 in the field Compiler tab → Preprocessor category → Define Symbols in the menu Project → Build Options. The first step consists of initializing the CSL library. This is done by using the func- tion csl_init(), which must be called at the beginning of the program before calling any other CSL API functions. Next step involves opening a handle to the McBSP in order to send and receive data. The McBSP API functions are used for this purpose. The API function MCBSP_ open() opens the McBSP, and returns the device handle hMcbsp for controlling the McBSP. The first argument of this function represents the port to be opened. Since the audio daughter card is connected to port 1, the port number is specified as 94 @Spy
- 9. Lab 2: Audio Signal Sampling MCBSP_DEV1. The second argument, MCBSP_OPEN_RESET, specifies the initial- ization of the port register based on the power-on defaults. It also disables and clears any associated interrupts. If this opening fails, the symbolic constant INV is returned (for more details, refer to the TMS320C6000 Chip Support Library API Reference Guide [1]). Next, it is required to adjust the parameters of the McBSP. In the serial port control register (SPCR), the RRST and XRST fields are set to 1, so that the serial port re- ceiving and transmitting capabilities are enabled. The RINTM field is configured in order to generate receive interrupts (RINT1), i.e. data gets in the data receive regis- ter (DRR) as a result of the codec sampling. The frame and word lengths are set to 0 and 32 bit in the receive control register (RCR) and transmit control register (XCR), respectively. The sample rate generator register (SRGR) controls frame period, frame length, and sample rate clock divider. The multichannel control register (MCR), re- ceive channel enable register (RCER), and transmit channel enable register (XCER) are used to configure subframe data receive and transmit modes. And the pin control register (PCR) is used for general-purpose I/O configuration. 95 @Spy
- 10. Real-Time Digital Signal Processing Based on the TMS320C6000 Main () hookint() Interrupt Service routine Read samples from Start Disable interrupt globally the DRR (Data Receive Register) Initialize CSL Enable non-maskable interrupt Put your DSP codes here. Open a handle to McBSP for Map the DRR interrupt data transfer to CP interrupt 15 U Write data to the DXR (Data Transmit Register) No Succeeded? End Enable the interrupts Yes Adjust the behavior of McBSP Open a handle to TIMER for codec configuration No Succeeded? End Yes Adjust the behavior of TIMER Enable codec to generate interrupts as data is received in the data receive register (DRR) hookint() Keep the program running; wait for interrupt Figure 5-4: Flowchart of sampling program on C6711 DSK with audio daughter card. 96 @Spy
- 11. Lab 2: Audio Signal Sampling The following lines of code perform the above configurations: /**************************************************/ /* configure McBSP */ /**************************************************/ MCBSP_Config MyConfig = { 0x00010001, // (SPCR) Enable serial port tx & rx 0x000000A0, // (RCR) 1-phase 32 bits receive 0x000000A0, // (XCR) 1-phase 32 bits transmit 0x00000000, // (SRGR) 0x00000000, // (MCR) 0x00000000, // (RCER) 0x00000000, // (XCER) 0x00000000 // (PCR) }; hMcbsp = MCBSP_open(MCBSP_DEV1,MCBSP_OPEN_RESET); if (hMcbsp == INV) { printf("Error opening MCBSP 1n"); return(-1); } MCBSP_config(hMcbsp,&MyConfig); Next, we need to adjust the codec parameters. Considering that the sampling rate of the audio daughter card is set to 48 kHz by default, its jumper setting needs to be changed in order to change the sampling rate by software. There are twelve jumpers on the daughter card for configuring data format, bit rate, data rate, enable/disable on-board microphone inputs, and master clock source. JP5 jumper connects pins 3 and 4 by default generating the master clock (MCLK) from the 12.288 MHz ADC clock. This jumper needs to be moved to connect pins 1 and 2 so that MCLK can be provided by the DSK timer. The timer needs to be configured to set the sampling rate. The steps involved to open and configure the timer is similar to the McBSP. First, the timer is opened with the TIMER_open() API to get a handle, similar to the procedure to get a handle to McBSP. The first argument is used to select the timer device. Here, TIMER_DEV0 is used to specify timer 0. The second argument, TIMER_OPEN_RESET, initilaizes the timer device register with the power-on defaults, and any associated interrupts is disabled or cleared. If this opening fails, INV is returned. The timer parameters need to be specified. In the timer control register (CTL), the CLKSRC field selects clock source, and the CP field selects pulse/clock mode. The HLD and GO fields are set to 1 in order to enable and start counting. If the FUNC 97 @Spy
- 12. Real-Time Digital Signal Processing Based on the TMS320C6000 field is set to 1, the timer output pin TOUT is configured as timer output, otherwise it serves as a general-purpose output. For this lab, the FUNC field is set to 1. The value in the timer period register (PRD) indicates the number of clock cycles to count before sending out the output clock signal. The PRD values and corresponding sampling rates are listed in Table 5-2. The listed values correspond to default posi- tions of the jumpers except for JP5. The timer counter register (CNT) is incremented when it is enabled to count. The following lines of code are used to initialize the codec as just described. Table 5-2: Examples of sampling rates using PCM3003 stereo audio codec. PRD value fs (Hz) 0 73242.19 1 36621.09 2 18310.55 3 12207.03 4 9155.27 5 7324.22 6 6103.52 7 5231.58 8 4577.64 9 4069.01 TIMER_Config timerCfg = { 0x000003C1, // (CTL) Internal clock src & TOUT is timer output 0x00000000, // (PRD) Fs = 73242 Hz 0x00000000 // (CNT) }; TIMER_Handle hTimer; hTimer = TIMER_open(TIMER_DEV0, TIMER_OPEN_RESET); if (hTimer == INV) { printf("Error opening TIMERn"); return(-1); } TIMER_config(hTimer, &timerCfg); The initializations of the CSL, McBSP and timer are now complete. Next, let us turn our attention to setting up an interrupt to branch to a simple ISR in order to process an incoming signal. 98
- 13. Lab 2: Audio Signal Sampling L2.2 Interrupt Service Routine The idea of using interrupts is commonly used for real-time data processing. This approach is widely used, since it eliminates the need for complicated synchroniza- tion schemes. In our case, the interrupt occurs when a new data sample arrives in the DRR of the serial port. The generated interrupt will branch to an ISR, which is then used to process the sample and send it back out. To do this, the interrupt capabilities of the DSK must be enabled and adjusted so that an unused interrupt is assigned to the DRR event of the serial port. The first task at hand is to initialize the interrupt service table pointer (ISTP) reg- ister with the base address of the interrupt service table (IST). Upon resetting the board, address 0 is assigned as the base address of the vector table. In this lab, we use this default value for ISTP, noting that the address can be relocated by changing the ISTB field value in the ISTP register. Next, we need to select an interrupt source and map it to a CPU interrupt, in our case the McBSP1 receive interrupt (RINT1). Here, the CPU interrupt 15 is used and mapped to the RINT1 interrupt by using the function IRQ_map(). To connect the ISR to this interrupt, the IST needs to be modified. Let us define the ISR to be se- rialPortRcvISR(). The following assembly code defines the IST which hooks the CPU interrupt 15 to the ISR serialPortRcvISR(). ; vectors.asm .ref _c_int00 .ref _serialPortRcvISR ; refer the addr of ISR defined in C code .sect "vectors" RESET_RST: MVKL .S2 _c_int00, B0 MVKH .S2 _c_int00, B0 B .S2 B0 NOP NOP NOP NOP NOP NMI_RST: .loop 8 NOP .endloop RESV1: .loop 8 NOP .endloop RESV2: .loop 8 NOP .endloop INT4: .loop 8 99
- 14. Real-Time Digital Signal Processing Based on the TMS320C6000 NOP .endloop INT5: .loop 8 NOP .endloop INT6: .loop 8 NOP .endloop INT7: .loop 8 NOP .endloop INT8: .loop 8 NOP .endloop INT9: .loop 8 NOP .endloop INT10: .loop 8 NOP .endloop INT11: .loop 8 NOP .endloop INT12: .loop 8 NOP .endloop INT13: .loop 8 NOP .endloop INT14: .loop 8 NOP .endloop INT15: MVKL .S2 _serialPortRcvISR, B0 MVKH .S2 _serialPortRcvISR, B0 B .S2 B0 ;branch to ISR NOP NOP NOP NOP NOP Figure 5-5: Assembly code defining interrupt service table. The last item to take care of is to enable interrupts by using the IRQ_enable and IRQ_globalEnable APIs. The following lines of code maps the CPU interrupt 15 to the RINT1 interrupt. void hookint() { IRQ_globalDisable(); // Globally disables interrupts IRQ_nmiEnable(); // Enables the NMI interrupt IRQ_map(IRQ_EVT_RINT1,15); // Maps an event to intr 15 IRQ_enable(IRQ_EVT_RINT1); // Enables the event IRQ_globalEnable(); // Globally enables interrupts } 100
- 15. Lab 2: Audio Signal Sampling A simple ISR can now be written to receive samples from the McBSP and send them back out, unprocessed for the time being. To write such an ISR, we need to state an interrupt declaration with no arguments. The MCBSP_read and MCBSP_write APIs are used to read samples from the DRR and write them to the DXR (data trans- mit register) of the McBSP. The device handler acquired during the configuration of the McBSP should be specified as an argument in both MCBSP_read and MCBSP_ write. The ISR is presented below. interrupt void serialPortRcvISR() { int temp; temp = MCBSP_read(hMcbsp); MCBSP_write(hMcbsp,temp); } Considering that the CPU is not actually doing anything as it waits for a new data sample, an infinite loop is set up inside the main program to keep it running. As an interrupt occurs, the program branches to the ISR, performs it and then returns to its wait state. This is accomplished via a while(1){} statement. Now the complete program for sampling an analog signal is ready for use. Basically, this program services interrupts to read in samples of an analog signal, such as the output from a CD player connected to the line-in of the DSK. To build this program in CCS, the project should include two libraries: rts6700.lib and csl6711.lib. The library rts6700.lib is the runtime-support library containing the run-time support functions such as math functions. The chip support library csl6711. lib is a collection of the API modules for programming the registers and peripherals. This library allows the programmer to control interrupt functionality, CPU opera- tional modes, and internal peripherals including McBSPs and timers. In addition to these library files, a linker command file needs to be added into the project. The following command file is used in this lab: MEMORY { vecs: o = 00000000h l = 00000200h IRAM: o = 00000200h l = 0000FE00h CE0: o = 80000000h l = 01000000h } 101
- 16. Real-Time Digital Signal Processing Based on the TMS320C6000 SECTIONS { "vectors" > vecs .cinit > IRAM .text > IRAM .stack > IRAM .bss > IRAM .const > IRAM .data > IRAM .far > IRAM .switch > IRAM .sysmem > IRAM .tables > IRAM .cio > IRAM } Figure 5-6 shows the Project View panel after the necessary files are added into the project. To build an executable file from these files, the button Rebuild All needs to be clicked. The executable file can then get loaded by choosing the menu item File → Load Program. By running the executable and connecting the output of a CD player to the line-in and a pair of powered speakers to the line-out, CD quality sound should be heard. Figure 5-7 shows the block diagram of this setup. Figure 5-6: Project view for Lab 2. 102
- 17. Lab 2: Audio Signal Sampling PC Line out CD Player Line out Line in Line out Powered Sound Card OR Codec Speaker DSK or EVM Figure 5-7: Block diagram of Lab 2 setup. The effect of the sampling rate on the sound quality can be studied by modifying the value in the PRD register as part of the main program codec.c as indicated below: int main() { . . . TIMER_Config timerCfg = { 0x000003C1, // (CTL) Internal clock src & TOUT is a timer output 0x00000009, // (PRD) Fs = 4069 Hz 0x00000000 // (CNT) }; } This will change the sampling rate to 4 kHz. By rebuilding, reloading, and running the executable code, degradation in the sound quality can be heard due to the devia- tion from the Nyquist rate. It is possible to manipulate or process the audio signal. For example, the sound vol- ume can be controlled by multiplying a volume gain factor with the sound samples. The code for doing so is as follows: int volumeGain; int main() { ... volumeGain = 1; /* Initialize */ ... } interrupt void serialPortRcvISR() { int temp; temp = MCBSP_read(hMcbsp); temp = temp * volumeGain; MCBSP_write(hMcbsp, temp); } 103
- 18. Real-Time Digital Signal Processing Based on the TMS320C6000 The variable volumeGain is declared as a global variable in order to be accessed at run-time. To change the volume at run-time, the option Edit → Variable should be chosen, which brings up an Edit Variable dialog box. As shown in Figure 5-8, by en- tering volumeGain in the Variable field and a desired gain value in the Value field of this dialog box, the sound volume can be altered. Figure 5-8: Editing value of a variable. L2.3 C6711 DSK without Audio Daughter Card If the codec AD535 on the DSK board is used instead of the daughter card, the McBSP, codec, interrupt configurations need to be modified, considering that the co- dec sampling rate is fixed at 8 kHz. The timer configuration is no longer needed. The McBSP configuration stays the same as before with one difference in the register value corresponding to the codec data format. The codec configuration is done based on the secondary communication mode of AD535 via McBSP0. That is, the LSB of the data must be first set to 1 to get the codec ready for configuration. Then, during the primary communication mode, the LSB needs to remain 0 for general purpose I/O. This is done by performing a masking operation with 0xFFFE. The AD535 codec is configured to select TAPI & microphone preamps for ADC input, set voice ADC input & DAC output PGA gain as 0 dB, and set 60-ohm speaker L/R buffer gain as 0 dB. The interrupt configuration is the same as before except for the inter- rupt source being IRQ_EVT_RINT0, since the codec AD535 is accessed via the McBSP channel 0. The source code of the foregoing configurations is shown below. #define CHIP_6711 #include <stdio.h> #include <c6x.h> #include <csl.h> #include <csl_mcbsp.h> #include <csl_irq.h> 104
- 19. Lab 2: Audio Signal Sampling /********************************************************* * Declarations *********************************************************/ MCBSP_Handle hMcbsp; int volumeGain; interrupt void serialPortRcvISR(void); void AD535_Init(int data); void main() { MCBSP_Config MyConfig = { 0x00012001, // (SPCR) Serial port tx & rx are enabled. 0x00010040, // (RCR) one 16 bit data/frame 0x00010040, // (XCR) one 16 bit data/frame 0x00000000, // (SRGR) 0x00000000, // (MCR) 0x00000000, // (RCER) 0x00000000, // (XCER) 0x00000000 // (PCR) }; CSL_init(); // Initialize the library hMcbsp = MCBSP_open(MCBSP_DEV0, MCBSP_OPEN_RESET); MCBSP_config(hMcbsp,&MyConfig); AD535_Init(0x0306); // Reg 3, Voice channel software reset not asserted // TAPI & Microphone preamps selected for ADC input AD535_Init(0x0400); // Reg 4, Voice ADC input PGA gain = 0 dB AD535_Init(0x0502); // Reg 5, Voice DAC output PGA gain = 0 dB // 60-Ohm Spkr_L/R buffer gain = 0 dB volumeGain = 1; IRQ_globalDisable(); // Globally disables interrupts IRQ_nmiEnable(); // Enables the NMI interrupt IRQ_map(IRQ_EVT_RINT0,15); // Maps an event to a physical interrupt IRQ_enable(IRQ_EVT_RINT0); // Enables the event IRQ_globalEnable(); // Globally enables interrupts while(1) { } } void AD535_Init(int data) { while(!MCBSP_xrdy(hMcbsp)); // Secondary serial communication request MCBSP_write(hMcbsp, 1); while(!MCBSP_rrdy(hMcbsp)); // Read MCBSP_read(hMcbsp); 105
- 20. Real-Time Digital Signal Processing Based on the TMS320C6000 while(!MCBSP_xrdy(hMcbsp)); // Write to Control Register of AD535 MCBSP_write(hMcbsp, data); while(!MCBSP_rrdy(hMcbsp)); // Read MCBSP_read(hMcbsp); } interrupt void serialPortRcvISR() { int temp; temp = MCBSP_read(hMcbsp); temp = ( temp * volumeGain ) & 0xFFFE; MCBSP_write(hMcbsp,temp); } L2.4 C6416/C6713 DSK The codec AIC23 on the C6416/C6713 DSK is different than the codec AD535 on the C6711 DSK. The configuration of this codec is achieved by using the C6416/ C6713 Board Support Library (BSL) as part of CCS. Two serial channels, McBSP1 and McBSP2 (McBSP0 and McBSP1 for C6713), are used for the configuration. The McBSP1 (McBSP0 for C6713) is used to control the codec internal configuration registers. The McBSP2 (McBSP1 for C6713) is used for audio data communication. Consequently, the interrupt source should be stated as IRQ_EVT_RINT2 (IRQ_ EVT_RINT1 for C6713). The sampling rates supported by the AIC23 codec are listed in Table 5-3. The sampling rate is configured using the DSK6416_AIC23_setFreq() (DSK6713_ AIC23_setFreq() for C6713) API. Using the default configuration of AIC23, the sampled data is stored in a frame consisting of 16-bit left channel data followed by 16-bit right channel data. In order to have code consistency across different DSP platforms, the default configuration of McBSP defined in the DSK6416_AIC23 library needs to be customized. This is achieved by modifying the transmit/receive in- terrupt mode (TINTM/RINTM) field of SPCR so that the transmit/receive interrupt (XINT/RINT) is generated by a new frame synchronization. Also, the transmit/re- ceive word length should be set to 32 bits to process data from left and right together. A more detailed description of the codec internal registers is provided in [3]. 106
- 21. Lab 2: Audio Signal Sampling Table 5-3: Sampling rates allowed by AIC23 stereo audio codec. Sampling rate (kHz) 8.000 44.000 16.000 48.000 24.000 96.000 32.000 To build the project, the Board Support Library, dsk6416bsl.lib (dsk6713bsl.lib for C6713), needs to be added to the project. The source code of the foregoing configu- rations for C6416 is shown below. #define CHIP_6416 #include <stdio.h> #include <c6x.h> #include <csl.h> #include <csl_mcbsp.h> #include <csl_irq.h> #include "dsk6416.h" #include "dsk6416_aic23.h" DSK6416_AIC23_CodecHandle hCodec; DSK6416_AIC23_Config config = DSK6416_AIC23_DEFAULTCONFIG; // Codec configuration with default settings interrupt void serialPortRcvISR(void); void hook_int(); int volumeGain; void main() { DSK6416_init(); // Initialize the board support library hCodec = DSK6416_AIC23_openCodec(0, &config); MCBSP_FSETS(SPCR2, RINTM, FRM); MCBSP_FSETS(SPCR2, XINTM, FRM); MCBSP_FSETS(RCR2, RWDLEN1, 32BIT); MCBSP_FSETS(XCR2, XWDLEN1, 32BIT); DSK6416_AIC23_setFreq(hCodec, DSK6416_AIC23_FREQ_48KHZ); volumeGain = 1; hook_int(); while(1) { 107
- 22. Real-Time Digital Signal Processing Based on the TMS320C6000 } } void hook_int() { IRQ_globalDisable(); // Globally disables interrupts IRQ_nmiEnable(); // Enables the NMI interrupt IRQ_map(IRQ_EVT_RINT2,15); // Maps an event to a physical interrupt IRQ_enable(IRQ_EVT_RINT2); // Enables the event IRQ_globalEnable(); // Globally enables interrupts } interrupt void serialPortRcvISR() { Uint32 temp; temp = MCBSP_read(DSK6416_AIC23_DATAHANDLE); temp = temp * volumeGain; MCBSP_write(DSK6416_AIC23_DATAHANDLE, temp); } L2.5 C67x EVM All the configurations stated for the DSK can be done in a similar way for the C67x EVM through the DSP support software provided by Texas Instruments. The DSP support software contains C functions for accessing and setting up the EVM board, McBSP, and codec. The codec library is supplied in the archived object library file drv6x.lib (drv6xe.lib is the big-endian version of this library). The corresponding source file is drv6x.src. The codec library contains API functions that can be used to configure and control the operation of the codec. The functional descriptions of these functions can be found in the EVM Reference Guide [2] under TMS320C6x EVM DSP Support Software. These functions are utilized here to write a sampling program for the C67x EVM. Since the main structure of the code for EVM is exactly the same as that for DSK, this section includes only the parts that differ with DSK. The EVM version of the program is shown below. #include <stdlib.h> #include <stdio.h> #include <string.h> #include <common.h> #include <mcbspdrv.h> #include <intr.h> #include <board.h> #include <codec.h> #include <mcbsp.h> 108
- 23. Lab 2: Audio Signal Sampling #include <mathf.h> void hookint(void); interrupt void serialPortRcvISR(void); int main() { Mcbsp_dev dev; Mcbsp_config mcbspConfig; int sampleRate, status; /******************************************************/ /* Initialize EVM */ /******************************************************/ status = evm_init(); if(status == ERROR) return (ERROR); /******************************************************/ /* Open MCBSP for subsequent Examples */ /******************************************************/ mcbsp_drv_init(); dev= mcbsp_open(0); if (dev == NULL) { printf("Error opening MCBSP 0n"); return(ERROR); } /******************************************************/ /* configure McBSP */ /******************************************************/ memset(&mcbspConfig,0,sizeof(mcbspConfig)); mcbspConfig.loopback = FALSE; mcbspConfig.tx.update = TRUE; mcbspConfig.tx.clock_mode = CLK_MODE_EXT; mcbspConfig.tx.frame_length1 = 0; mcbspConfig.tx.word_length1 = WORD_LENGTH_32; mcbspConfig.rx.update = TRUE; mcbspConfig.rx.clock_mode = CLK_MODE_EXT; mcbspConfig.rx.frame_length1 = 0; mcbspConfig.rx.word_length1 = WORD_LENGTH_32; mcbsp_config(dev,&mcbspConfig); MCBSP_ENABLE(0, MCBSP_BOTH); /******************************************************/ /* configure CODEC */ /******************************************************/ codec_init(); /* A/D 0.0 dB gain, turn off 20dB mic gain, sel (L/R)LINE input */ codec_adc_control(LEFT,0.0,FALSE,LINE_SEL); codec_adc_control(RIGHT,0.0,FALSE,LINE_SEL); /* mute (L/R)LINE input to mixer */ codec_line_in_control(LEFT,MIN_AUX_LINE_GAIN,TRUE); codec_line_in_control(RIGHT,MIN_AUX_LINE_GAIN,TRUE); 109
- 24. Real-Time Digital Signal Processing Based on the TMS320C6000 /* D/A 0.0 dB atten, do not mute DAC outputs */ codec_dac_control(LEFT, 0.0, FALSE); codec_dac_control(RIGHT, 0.0, FALSE); sampleRate = 44100; codec_change_sample_rate(sampleRate, TRUE); codec_interrupt_enable(); hookint(); /******************************************************/ /* Main Loop, wait for Interrupt */ /******************************************************/ while (1) { } } void hookint() { intr_init(); intr_map(CPU_INT15, ISN_RINT0); intr_hook(serialPortRcvISR, CPU_INT15); INTR_ENABLE(15); INTR_GLOBAL_ENABLE(); return; } interrupt void serialPortRcvISR(void) { int temp; temp = MCBSP_READ(0); MCBSP_WRITE(0, temp); } Similar to DSK, the first part of the program involves initialization. Since we are using the DSP support software instead of CSL, the EVM initialization is done by stating the function evm_init() before calling any other support functions. This function configures the EVM base address variables, and initializes the external mem- ory interface (EMIF). The return value of this function indicates success or failure of the EVM initialization. Once EVM has been successfully initialized, next step is to open a handle to the McBSP in order to send and receive data. The McBSP API functions are used for this purpose. The API function mcbsp_drv_init() initializes the McBSP driver and allocates memory for the device handles. The return value of this func- tion also indicates success or failure. After the initialization of the McBSP driver, the data structure elements that control the behavior of the McBSP are set to their 110
- 25. Lab 2: Audio Signal Sampling default values (for more details, refer to the EVM Reference Guide [2]). Then, the McBSP needs to be actually opened to get a handle to it. The API function mcbsp_ open() is used to return the handle dev for controlling the McBSP. Next step is to adjust the parameters of the McBSP. The data structure of the McBSP gets initialized to its default values as a result of using the initialization functions, so all that is required is the adjustment of several parameters to suit our needs. The loopback property of the McBSP is turned off or set to FALSE in order to disable the serial port test mode, in which the receive pins get connected internally to the trans- mit pins. The update property is set to TRUE for setting properties. The source signal for clocking the serial port transfers is made external by setting the clock mode to CLK_MODE_EXT. The frame and word lengths are set to 0 and WORD_LENGTH_32, respectively. The adjustments to the McBSP are made by allocating memory to the structure mcbsp_Config using the function memset(). The address of this struc- ture is passed as an argument to the function mcbsp_config(), which performs the required adjustments. Finally, the McBSP needs to be activated. This is done by using the macro MCBSP_ ENABLE(), which is defined in the header file mcbsp.h. A macro is a collection of instructions that gets substituted for the macro in the program by the assembler. In this lab, the macro MCBSP_ENABLE(0) places the selected port 0 in the general purpose I/O mode. The following lines of code are used to do these adjustments: memset(&mcbspConfig,0,sizeof(mcbspConfig)); mcbspConfig.loopback = FALSE; mcbspConfig.tx.update = TRUE; mcbspConfig.tx.clock_mode = CLK_MODE_EXT; mcbspConfig.tx.frame_length1 = 0; mcbspConfig.tx.word_length1 = WORD_LENGTH_32; mcbspConfig.rx.update = TRUE; mcbspConfig.rx.clock_mode = CLK_MODE_EXT; mcbspConfig.rx.frame_length1 = 0; mcbspConfig.rx.word_length1 = WORD_LENGTH_32; mcbsp_config(dev,&mcbspConfig); MCBSP_ENABLE(0, MCBSP_BOTH); Next, we need to adjust the parameters of the codec. The codec is initialized by using the codec API function codec_init(). This function sets the codec to its default parameters. The main item to adjust here is sampling rate. This is done by using the API function codec_change_sample_rate(). This function sets the sampling rate of the codec to the closest allowed sampling rate of the passed argument. The return value from this function will be the actual sampling rate. Table 5-4 lists the sampling rates supported by the codec. The other required adjustments are the selec- 111
- 26. Real-Time Digital Signal Processing Based on the TMS320C6000 tion of line-in or mic-in and the adjustment of their gain settings. To have stereo input, both channels should be selected and their gains adjusted to 0dB settings. The API functions that accomplish these tasks are codec_adc_control(), codec_ line_in_control(), and codec_dac_control(). It is also required for the codec to generate interrupts as data is received in the DRR. Hence, the interrupt processing capability of the codec must be enabled. This is accomplished by using the API function codec_interrupt_enable(). The following lines of code are used for the purpose of initializing the codec as just described: Table 5-4: Sampling rates allowed by CS4231A stereo audio codec. Sampling rate (kHz) 5.5125 22.0500 6.6150 27.4286 8.0000 32.0000 9.6000 33.0750 11.0250 37.8000 16.0000 44.1000 18.9000 48.0000 codec_init(); // ADC 0.0 dB gain, turn off 20dB mic gain, sel (L/R)LINE input codec_adc_control(LEFT,0.0,FALSE,LINE_SEL); codec_adc_control(RIGHT,0.0,FALSE,LINE_SEL); // (L/R) LINE input to mixer codec_line_in_control(LEFT,MIN_AUX_LINE_GAIN,FALSE); codec_line_in_control(RIGHT,MIN_AUX_LINE_GAIN,FALSE); // DAC 0.0 dB atten, do not mute DAC outputs codec_dac_control(LEFT, 0.0, FALSE); codec_dac_control(RIGHT, 0.0, FALSE); sampleRate = 44100; actualrate = codec_change_sample_rate(sampleRate, TRUE); codec_interrupt_enable(); Now, in order to set up an interrupt, the first task involves the initialization of the interrupt service table pointer (ISTP) register with the address of the global vec_ table, which is resolved at the link time. This is done by placing the base address of the vector table in the ISTP register. The function intr_init() is used for this 112
- 27. Lab 2: Audio Signal Sampling purpose. Next, we need to select an interrupt number and map it to a CPU interrupt, in our case the RINT0 interrupt. Here, the CPU interrupt 15 is used and mapped to the RINT0 interrupt by using the function intr_map(). To connect an ISR to this interrupt, the function intr_hook() is called, to which the name of the function that we wish to use is passed. The last task is to enable the interrupts via the macros INTR_ENABLE and INTR_GLOBAL_ENABLE. The following lines of code map the CPU interrupt 15 to the RINT0 interrupt and then hook it to an ISR named seri- alPortRcvISR: intr_init(); intr_map(CPU_INT15, ISN_RINT0); intr_hook(serialPortRcvISR, CPU_INT15); INTR_ENABLE(15); INTR_GLOBAL_ENABLE(); To build this program in CCS, the project should include three libraries: rts6701.lib, drv6x.lib and dev6x.lib. The library rts6701.lib is the runtime-support library contain- ing the runtime-support functions such as math functions. The library dev6x.lib is a collection of macros and functions for programming the C6x registers and periph- erals. This library allows the programmer to control interrupt functionality, CPU operational modes, and internal peripherals including McBSPs. The linker command file for EVM is shown below. MEMORY { INT_PROG_MEM (RX) : origin = 0x00000000 length = 0x00010000 SBSRAM_PROG_MEM (RX) : origin = 0x00400000 length = 0x00014000 SBSRAM_DATA_MEM (RW) : origin = 0x00414000 length = 0x0002C000 SDRAM0_DATA_MEM (RW) : origin = 0x02000000 length = 0x00400000 SDRAM1_DATA_MEM (RW) : origin = 0x03000000 length = 0x00400000 INT_DATA_MEM (RW) : origin = 0x80000000 length = 0x00010000 } SECTIONS { .vec: load = 0x00000000 .text: load = SBSRAM_PROG_MEM .const: load = INT_DATA_MEM .bss: load = INT_DATA_MEM .data: load = INT_DATA_MEM .cinit load = INT_DATA_MEM .pinit load = INT_DATA_MEM .stack load = INT_DATA_MEM .far load = INT_DATA_MEM .sysmem load = SDRAM0_DATA_MEM .cio load = INT_DATA_MEM sbsbuf load = SBSRAM_DATA_MEM { _SbsramDataAddr = .; _SbsramDataSize = 0x0002C000; } } 113
- 28. Real-Time Digital Signal Processing Based on the TMS320C6000 Main() hookint() Interrupt service routine Start Initialize interrupt Read samples service table pointer from the DRR Initialize EVM (Data Receive Register) No Map the DRR interrupt Succeeded? End to CPU interrupt 15 Yes Put your DSP codes Initialize McBSP: set here default parameters Connect CPU interrupt 15 to an interrupt service routine Open a handle to McBSP for data transfer Write data to the DXR (Data Enable the interrupts Transmit No Succeeded? End Register) Yes Adjust the behavior of McBSP Initialize codec: set default parameters Adjust the behavior of codec Enable codec to generate interrupts as data is received in the data receive register (DRR) Call hookint(): Set the interrupt to an ISR Keep the program running; wait for interrupt Figure 5-9: Flowchart of sampling program for EVM. 114
- 29. Lab 2: Audio Signal Sampling Bibliography [1] Texas Instruments, TMS320C6000 Chip Support Library API Reference Guide, Literature ID# SPRU 401G, 2003. [2] Texas Instruments, TMS320C6201/6701 Evaluation Module User’s Guide, Literature ID# SPRU 269F, 2002. [3] Texas Instruments, Stereo Audio D/A Converter, 8-to 96-KHz, With Integrated Headphone Amplifier, Literature ID# SLWS 106G, 2003. [4] Spectrum Digital Inc., TMS320C6416 DSK Technical Reference, 2003. 115