The document discusses various editing techniques used to create a music video in Adobe Premiere. It describes using the reverse speed option to play a clip backwards and increase its speed to create a disorienting effect. It also discusses using the razor tool to cut clips and create quick cuts, flipping clips horizontally to make split screens, adjusting brightness to improve dark footage, inserting an image of a play button, adding titles to identify the song and introduce elements, applying noise and tint effects, using strobe and ghosting effects to simulate party lights and atmosphere, and fading out the song audio while fading in real party audio using constant power and gain tools to create a natural close to the video.
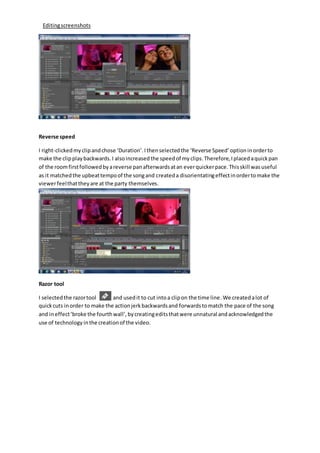
1. Reverse speed
I right-clickedmyclipandchose ‘Duration’.Ithenselectedthe ‘Reverse Speed’ optioninorderto
make the clipplaybackwards.I alsoincreasedthe speedof myclips.Therefore,Iplacedaquickpan
of the roomfirstfollowedbyareverse panafterwardsatan everquickerpace.Thisskill wasuseful
as it matchedthe upbeattempoof the songand createda disorientatingeffectinordertomake the
viewerfeelthattheyare at the party themselves.
Razor tool
I selectedthe razortool and usedit to cut intoa clipon the time line.We createdalot of
quickcuts inorder to make the actionjerkbackwardsand forwardstomatch the pace of the song
and ineffect‘broke the fourthwall’,bycreatingeditsthatwere unnatural andacknowledgedthe
use of technology inthe creationof the video.
Editingscreenshots
2. Horizontal flip
By draggingthe ‘Horizontal Flip’effectoveraclipwe were able tocreate splitscreens.These were
usedfrequentlyinourvideoinordertocreate a mirroreffectandmake the videomore engaging
and enjoyabletowatch,byusinga varietyof stylesasopposedtoone plainimage.
Correctingbrightness
By usingthe BrightnessandContrasteffectappropriatelywe were abletoliftimagesthatwere shot
ina dark roomand make themmore clear andprofessional.Asthe majorityof ourfootage wasshot
ina dark environment,thistool proveduseful asitenabledustomake the most outof our footage.
3. Insertingimage
We downloadedanimage fromthe interne of aPlayButton andusedPhotoshoptoremove the
background.We thenimportedthe image anddraggedintothe Video2timeline, sothatitwas
placedabove the footage.We didthisinorderto create the impressionthatthe maincharacter was
pressingplayonthe video,andthe image fadedawayasit wouldonan iPhone orcomputer.
Editingtitle
We usedtwotitlesinourmusicvideo.The firstshowedthe title of the songandfadedintothe
video.Tocreate the title we usedthe Texttool and alsothe shape inorder tocreate an underline
whichaddedsome dimensiontothe title.We alsousedatitle thatfadedfromblackto clear behind
the playbutton,whenthe maincharacter watchesthe surprise videoonherphone
4. Tint and Noise
We usedthe Noise effectonfootage thatwasusedafterthe initial shootingof the footage.We did
thisinorder to make the footage matchthe handheldstyle of filmingbymakingthe image slightly
grainierandlessfocused.We alsousedthe tinteffecttomake the footage matchthe rest interms
of colour,aspinklightswere usedatour location.
Strobe and Ghosting
We usedthe Strobe effectasit was appropriate forourparty themedvideo,aswe were able toadd
the effectof strobe lightslaterinPremiere.Thishelpedinmakingsome basicfootage more
interestingtowatchand more conventional of the genre of house music.We alsousedthe Ghosting
effectinorderto blurour footage andhave a disorientatingeffectonthe audience,bymakingthem
feel asthoughtheyare at the party.
5. Constant Power and Constant Gain
We decidedtouse audiofromthe actual party at the endof our video,inordertomake it more
realisticandtorepresentthe endof the nightand the fall inaction.To do this,we usedthe Constant
Powereffecttofade outthe audiofrom the songin conjunctionwiththe ConstantGaintool,to
bringin the audiofromthe party. This createssatisfying close tothe videobyallowingthe musicto
fade out naturally,andthe additionof the real life audioisaconventionalfeature of manymusic
videos.