

Recomendados
Más contenido relacionado
La actualidad más candente
La actualidad más candente (20)
Destacado
Destacado (20)
Similar a Overhead projector getes
Similar a Overhead projector getes (20)
Más de SFYC
Más de SFYC (20)
Último
Último (20)
Overhead projector getes
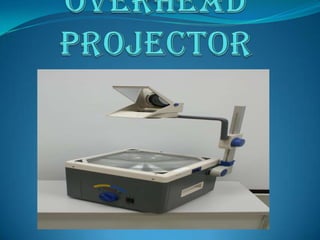
- 2. DEFINITION a projector having a flat, transparent top on which a sheetlike transparency is placed, and an overhead mirror that reflects the image on the transparency to a screen A projector capable of projecting enlarged images of written or pictorial material onto a screen or wall from a transparency placed horizontally below the projector and lighted from underneath.
- 3. MECHANISM An overhead projector typically consists of a large box containing a very bright lamp and a fan to cool it. On top of the box is a large fresnel lens that collimates the light. Above the box, typically on a long arm, is a mirror and lens that focusses and redirects the light forward instead of up. Transparencies are placed on top of the lens for display. The light from the lamp travels through the transparency and into the mirror where it is shone forward onto a screen for display. The mirror allows both the presenter and the audience to see the image at the same time, the presenter looking down at the transparency as if writing, the audience looking forward at the screen. The height of the mirror can be adjusted, to both focus the image and to make the image larger or smaller depending on how close the projector is to the screen.
- 4. FOCAL-LENGTH ADJUSTMENT Better-quality overhead projectors offer an adjustment wheel or screw on the body of the projector, to move the lamp towards or away from the fresnel lens. When the mirror above the lens is moved too high or too low, it moves out of the best focal distance for an evenly white image, resulting in a projected image with either blue or brown color fringing around the outside edge of the screen. Turning the adjustment wheel moves the lamp to correct the focal distance and restores the all- white projected image.
- 5. ILLUMINATION The lamp technology of an overhead projector is typically very simple compared to a modern LCD or DLP video projector. Most overheads use an extremely high-power halogen lamp that may consume up to 750 watts yet produces a fairly dim, yellowed image. A high-flow blower is required to keep the bulb from melting itself due to the heat output. Further, the intense heat usually causes the halogen lamp to fail quickly, often lasting less than 100 hours before failing and requiring replacement. A modern LCD or DLP uses an arc lamp which has a higher luminous efficacy and lasts for thousands of hours. A negative to LCD/DLP technology is the warm up time required for arc lamps.
- 6. HOW TO USE Situate the overhead projector on a low table that is 2 to 3 feet off the floor. Make sure the overhead projector is plugged into a reliable power source. Place an overhead transparency on top of the flat glass surface of the projector. Transparencies can be written on directly with a wet erase overhead pen. Alternatively, a transparency can be fed into a laser printer, and information from programs such as spreadsheets and databases can be directly printed on the transparency.
- 7. Turn on the overhead projector. Most machines have a large, circular button on the front for this purpose, but on/off switch locations can vary. Angle the mirror at the top of the projection arm until the image is properly aligned onto a blank wall or drop-down projection screen Move the table holding the overhead projector forward or backward (if necessary) until the projection image approximates the size of the projection screen or blank wall space. Turn the circular knob at the top of the projector arm until the projected image comes into focus. Press the on/off button again when finished with your presentation. Allow the overhead projector to completely cool down before using it again.
- 8. Older overhead projectors used a tubular quartz lamp body containing the filament only, which mounted above a bowl- shaped polished reflector. However because the lamp was suspended above and outside the reflector, a large amount of light was cast to the sides inside the projector body that was wasted and required a very large lamp for sufficient screen illumination. More recent projectors use an integrated lamp and conical reflector assembly that allows the lamp to be located deep within the reflector so that more light is focused towards the fresnel lens, allowing for a lower-power lamp. The most recent innovation for overhead projectors with integrated lamps/reflectors is the quick-swap dual-lamp control, allowing two lamps to be installed in the projector in movable sockets. If one lamp fails during a presentation, the presenter can merely move a lever to slide the spare into position and continue with the presentation, without needing to open the projection unit or waiting for the failed bulb to cool before replacing it.
- 9. Guidelines and Tips Practice giving your presentation using your visual aids to check out how well they project. This is a good time to also check for spelling errors. Have a friend sit and watch your presentation and make notes on any problems or needed improvements with your visual aids. Practice using your overhead transparencies so you will be comfortable with handling them correctly. Stand off to one side of the overhead projector while you face the audience - Too many people stand between the overhead projector and the screen causing a shadow of the presenter's body. Standing to one side will allow the audience to see you as the presenter and will prevent you from blocking their view of your visual aid.
- 10. Do not face the "projected" image on the screen - Face your audience and not the screen. Many presenters face the screen and end up talking to the screen. Cover the transparency when you are done using it- with an opaque piece of cardboard (I usually mount a solid sheet of paper on one of my transparency frames). You may also turn off the projector completely, but beware, this can cause the projector bulb to burn out sooner. Bring a spare bulb!-Nothing is more unsettling than to have your overhead projector bulb burn out during your presentation. Bring spare bulbs and a glove to change the bulb. The old bulb will be HOT! Make sure you know how to change the bulb. CAUTION: Remember HOT glass looks the same as cold glass!
- 11. Place the overhead to your RIGHT if you are right handed and to your LEFT if you are left handed- This will make it easier for you to face your audience and write if you need to. In either case, you want to stand in the center of the speaking area and face the audience when you speak. Place your overhead projector on a table low enough so it does not block you or the screen. Have a small table next to the overhead so you can stack your overheads before and after you use them. Place your screen on a diagonal instead of directly behind you-this will assure that you do not block the view for your audience. Also, have the top of the screen tilted forward towards the overhead projector (if possible) to prevent the "keystone" effect (This is where the top of the image is larger than the bottom).
- 12. Tape the power chord to the floor-to protect you or someone else from tripping. As the presenter, tripping over the chord and falling, although humorous, is one large gesture you would prefer to avoid. Store your overhead transparencies in a sturdy box or container so they will stay clean and protected for the next time you need them. Label the box and include a "clean" copy of your handouts in the box. This will make it easier for you the next time you give your award winning presentation again.
- 13. USES IN EDUCATION The overhead projector facilitates an easy low-cost interactive environment for educators. Teaching materials can be pre-printed on plastic sheets, upon which the educator can directly write using a non- permanent, washable color marking pen. This saves time, since the transparency can be pre-printed and used repetitively, rather than having materials written manually before each class.
- 14. The overhead is typically placed at a comfortable writing height for the educator and allows the educator to face the class, facilitating better communication between the students and teacher. The enlarging features of the projector allow the educator to write in a comfortable small script in a natural writing position rather than writing in an overly large script on a blackboard and having to constantly hold his arm out in midair to write on the blackboard. When the transparency sheet is full of written or drawn material, it can simply be replaced with a new, fresh sheet with more pre-printed material, again saving class time vs a blackboard that would need to be erased and teaching materials rewritten by the educator. Following the class period, the transparencies are easily restored to their original unused state by washing off with soap and water.
- 15. DECLINE IN USE Overhead projectors were once a common fixture in most classrooms and business conference rooms, but today are slowly being replaced by document cameras, dedicated computer projection systems and interactive whiteboards. Such systems allow users to make animated, interactive presentations with movement and video, typically using software like Microsoft PowerPoint. The primary reason for this gradual replacement is the deeply ingrained use of computing technology in modern society and the inability of overheads to easily support the features that modern users demand. While an overhead can display static images fairly well, it performs poorly at displaying moving images. The LCD video display panels that were once used have fallen out of favor due to the limited resolution available and relatively dim, fuzzy image produced by the overhead.
- 16. The standards of users have also increased, so that a dim, fuzzy overhead projection that is too bright in the center and too dim around the edges is no longer acceptable. The optical focus, linearity, brightness and clarity of an overhead generally cannot match that of a video projector primarily due to the plastic fresnel lens, which can only approximate what would normally be an extremely large and heavy glass lens. Video projectors utilize extremely small picture generation mechanisms, allowing for precision optics that far exceed the plastic fresnel lens' optical performance. They also include additional optics that eliminate the hotspot in the center of the screen directly above the light source, so that the brightness is uniform everywhere on the projection screen.
- 17. Critics feel that there are some downsides as these technologies are more prone to failure and have a much steeper learning curve for the user than a standard overhead projector. While a computer projection system eliminates the need to create hard copy transparencies (which can be quite expensive, particularly if made in color) of the slide show presentation, many presenters make both in case the computer hardware fails. Furthermore, the overhead projector allows a more direct interaction through live writing on the transparency.