Constructing a Metro Cold Frame - for Winter Gardening

Constructing a Metro Cold Frame - for Winter Gardening ` For more information, Please see websites below: ` Organic Edible Schoolyards & Gardening with Children = http://scribd.com/doc/239851214 ~ ` Double Food Production from your School Garden with Organic Tech = http://scribd.com/doc/239851079 ~ ` Free School Gardening Art Posters = http://scribd.com/doc/239851159 ~ ` Increase Food Production with Companion Planting in your School Garden = http://scribd.com/doc/239851159 ~ ` Healthy Foods Dramatically Improves Student Academic Success = http://scribd.com/doc/239851348 ~ ` City Chickens for your Organic School Garden = http://scribd.com/doc/239850440 ~ ` Huerto Ecológico, Tecnologías Sostenibles, Agricultura Organica http://scribd.com/doc/239850233 ` Simple Square Foot Gardening for Schools - Teacher Guide = http://scribd.com/doc/239851110 ~

Recomendados
Recomendados
Más contenido relacionado
Destacado
Destacado (11)
Más de School Vegetable Gardening - Victory Gardens
Más de School Vegetable Gardening - Victory Gardens (20)
Último
Último (20)
Constructing a Metro Cold Frame - for Winter Gardening
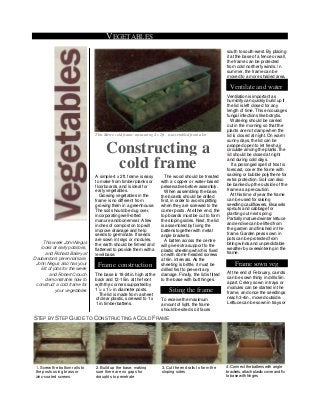
- 1. VEGETABLES This week John Negus looks at early potatoes, and Richard Bailey at Daubenton's perennial kale. John Negus also has your list of jobs for the week and Robert Crouch demonstrates how to construct a cold frame for your vegetables A simple 4 x 2ft. frame is easy to make from timber planks or floorboards, and is ideal for early vegetables. Growing vegetables in the frame is no different from growing them in a greenhouse. The soil should be dug over, incorporating well-rotted manure and bonemeal. A few inches of compost on top will improve drainage and help seeds to germinate. If seeds are sown in trays or modules, the earth should be firmed and flattened to provide them with a level base. Frame construction The base is 18-24in. high at the back and 12-15in. at the front with the corners supported by 11 /2 x 11 /2 in. diameter posts. The lid is made from a sheet of clear plastic, screwed to 1 x 1 in. timber battens. The wood should be treated with a copper or water-based preservative before assembly. When assembling the base, the boards should be drilled first, in order to avoid splitting when they are screwed to the corner posts. At either end, the top boards must be cut to form the sloping sides. Next, the lid is assembled by fixing the battens together with metal angle brackets. A batten across the centre will give extra support to the plastic sheeting which is fixed on with dome-headed screws at 6in. intervals. As the sheeting is brittle, it must be drilled first to prevent any damage. Finally, the lid is fitted to the base with butt hinges. Siting the frame To receive the maximum amount of light, the frame should be sited so it faces south to south-west. By placing it at the base of a fence or wall, the frame can be protected from cold northerly winds. In summer, the frame can be moved to a more shaded area. Ventilate and water Ventilation is important as humidity can quickly build up if the lid is left closed for any length of time. This encourages fungal infections like botrytis. Watering should be carried out in the morning so that the plants are not damp when the lid is closed at night. On warm sunny days, the lid can be propped open to let fresh air circulate among the plants.The lid should be closed at night and during cold days. This Metro cold frame, measuring 4 x 2ft., is assembled from a kit Constructing a cold frame If a prolonged spell of frost is forecast, cover the frame with sacking or bubble polythene for extra protection. Soil can also be banked up the outside of the frame as a precaution. At this time of year the frame can be used for raising seedling cauliflowers, Brussels sprouts and cabbage for planting out next spring. Partially matured winter lettuce and endive can be lifted from the garden and finished in the frame. Garden peas sown in pots can be protected from biting winds and unpredictable weather by overwintering in the frame. Frame sown veg At the end of February, carrots can be sown thinly in drills 5in. apart. Celery sown in trays or modules can be started in the frame, and once the seedlings reach 3-4in., moved outside. Lettuce can be sown in trays or STEP BY STEP GUIDE TO CONSTRUCTING A COLD FRAME 1. Screw the bottom rails to the posts using brass or zinc-coated screws 2. Build up the base, making sure there are no gaps for draughts to penetrate 3. Cut the end rails to form the sloping sides 4. Connect the battens with angle brackets, attach plastic cover and fix to base with hinges
- 2. directly into the soil, where it should be thinned to leave 5in. between plants in all directions. Radishes can be grown between the lettuce to make the best use of the space. With careful planning, new crops can go in as the lettuce and radish are harvested. Beetroot, peas and broad beans can be sown from mid March to produce early crops. At the same time, bush tomato, pepper, aubergine and onion seeds can be germinated indoors and transferred to the frame from late April onwards. Sweet corn, French and runner beans can be sown during April and transplanted in the garden once the last frosts have gone. Cucumbers can be started in the frame at the end of the month, or during May in colder areas, to fruit in summer. Shading the frame Seedlings can be shielded from direct sunlight by covering the lid of the frame with shading material. Alternatively, a coat of greenhouse white will prevent the sun from scorching the plants. If height is a problem, extra height can be added by siting the frame on a course or two of brickwork. Alternatively the soil level inside can be reduced a few inches before planting. In August the cycle can begin again with winter lettuce and onions. By adding a second frame, seedlings can be pricked out of one into the other. If space is available, individual crops can be grown in their own frames. Robert Crouch