This deck explains how to automatically send handwritten cards by connecting Salesforce to Thankster.com via Zapier.com. Great for CRM, lead gen, marketing automation.
Cartona.pptx. Marketing how to present your project very well , discussed a...
Thankster Zapier app instructions for Salesforce
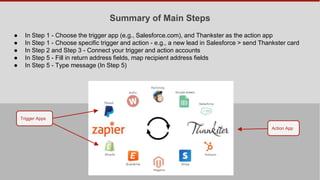
1. Summary of Main Steps
● In Step 1 - Choose the trigger app (e.g., Salesforce.com), and Thankster as the action app
● In Step 1 - Choose specific trigger and action - e.g., a new lead in Salesforce > send Thankster card
● In Step 2 and Step 3 - Connect your trigger and action accounts
● In Step 4 - Fill in return address fields, map recipient address fields
● In Step 5 - Type your card message!
Trigger Apps
Action App
2. Step 1a - Start by Clicking “Make a Zap!”
Click here
3. Step 1b - Choose Salesforce as the Trigger App
Pick Salesforce as
the trigger app
4. Step 1c - Choose a Specific Trigger, Such as New Lead
Pick “New Lead”, or “New
Account” - whatever you want to
generate the handwritten card
5. Step 2 - Connect and test your Salesforce account
You must have accounts for both
Login to Salesforce here
6. Step 2b - Filter Your Trigger (Optional)
You can skip this step, unless you
want to be more specific about which
New Leads are mailed.
7. Step 3 - Choose Thankster as the Action App
Pick Thankster as
the action app
8. Step 3b - Choose the Specific Action
Pick “Send Cards”
Note: You can click
“Plus” symbol to add
another action
9. Step 3c - Connect Your Thankster Account
Select your
Thankster account
Or connect a new
account using the
API key from
Thankster’s website
First Time Only
11. Step 4 - Match Up Fields
Pick a Thankster project from your
account. The font and message styles
(such as font color and line angle) will
be taken from this project.
Fill in the sender fields. These will be
used for the return address in your
envelopes, and will appear in the same
handwriting font as your message.
12. Step 4 - Match Up Fields (Continued)
Click the “insert fields” icon to insert each
receiver field. Do not type them in. Each
field you insert indicates which Salesforce
field to grab this data from. These will
populate the recipient addresses on your
envelopes, and will appear in the same
handwriting font as they are in your selected
Thankster message.
13. Step 5 - Write Message
Put the cursor after “Dear “, and
click the “Insert fields icon”. Then
Select the Salesforce field
corresponding to first name. The
lead’s first name will be grabbed
from Salesforce.
Then type your main message.
** IMPORTANT: Don’t
type more than 150
characters on either page
unless you check to be
sure your message fits
using the Thankster
project selected at the
beginning of Step 5.
If you need to write more, you can write
on the other inside page (Thankster
cards are folder cards).
14. Step 6 - Test Your Zap
NOTE: When you test your Zap here, an
order will get sent to Thankster for fulfillment.
So it is best to put the words "TESTING
ONLY" either in recipient address or in the
message (or both), so we know not to fulfill it.
Once the test succeeds, put the real
information back.
15. Step 7 - Name and Turn on Your Zap
Click here to turn
on your Zap.