SlideShare una empresa de Scribd logo
1 de 8
Descargar para leer sin conexión
SHARED COMPUTING SERVICES
                                     Microsoft Word XP/2003, Level 100
Better Documents in Less Time
Updated 12/14/05


Getting Around in Microsoft Word
The Basics                                                                                          Tips, Tricks and Shortcuts
                                                                                                       • Filenames can have up to 255
   •    New       on the Standard toolbar OR CTRL+Ncreates a new document.                                characters, including spaces
   •    To create a new document based on a template, go to the File menu and select New…              • Filenames cannot include the
   •    To save a document, click Save      on the Standard toolbar                                       characters /  < > * ? “ ; : |
                                                                                                       • Press F12 for Save As…
        OR go to the File menu and select Save OR press CTRL+S.
   •    To view the non-printing characters such as Tab ( ), Enter (¶), or Space (·), click
        Show/Hide ¶ on the Standard toolbar.
   •    Insert the current date/time from the Insert menu and select Date and Time… OR press ALT+SHIFT+D.
   •    Toggle Overtype mode on/off by pressing INSERT or double-click OVR in the status bar.

   •    To view more buttons on your toolbars, click Toolbar Options .
   •    Customize the menus and toolbars by going to the Tools menu and select Customize…


        When the Standard and Formatting toolbars are
        displayed, this option positions the toolbars on
        two rows in the document window. If cleared,
        shows basic and frequently used tools on the
        toolbars.

        If selected, shows all the commands on the
        menus. If cleared, shows basic and frequently
        used commands on the menus. When you select
        or clear this check box, the setting affects all your
        Microsoft Office Programs.


Views
             Use Normal view for typing, editing, and formatting text quickly. Page boundaries, headers and footers, backgrounds,
             drawing objects, and pictures do not appear.
             Use Web Layout view when you are creating a Web page or a document that is viewed on the screen.
             Use Print Layout view to see how text, graphics, and other elements will be positioned on the printed page. Useful for
             editing headers and footers, adjusting margins, and for working with columns and drawing objects.
             Use Outline view to look at the structure of a document and to move, copy, and reorganize text by dragging headings.
Microsoft Word XP/2003, Level 100
Better Word Documents in Less Time
            (Word 2003 only) Use Reading Layout to display your document like pages in a book. The pages are designed to fit well
            on your screen.

Quick Navigation and Selection
Navigate
    •    Go to the beginning. Press HOME to move the cursor to the beginning of a line or CTRLHOME to move to the beginning of the
         document
    •    Go to the end. Press END to move the cursor to the end of a line or CTRLEND to move to the end of the document.
    •    Move one word at a time. Hold CTRL when using the left or right arrow keys ( or ).
    •    Move one paragraph at a time. Hold CTRL when using the up or down arrow keys ( or ).
    •    Go to. Double-click the left end of the status bar (where you see the page number) OR go to the Edit menu and select Go
         To… OR press CTRL+G OR click Browse Select             and click Go To      .
Select
    •    Select a Word. Double-click a word to select it.
    •    Select a Sentence. Ctrl-click the sentence to select it.
    •    Select a Paragraph. Triple-click the paragraph to select it.
    •    Select All. Press CTRL+A to select all the text (also found in the Edit menu and choose Select All).
    •    Using the keyboard. Hold SHIFT when using the arrows keys to select text.

Work with Multiple Documents                                            Print Envelopes & Labels
    •    To view a list of all documents you have open, go to                  1.   Go to the Tools menu, Letters and Mailings    and
         the Window menu.                                                           select Envelopes and Labels…
    •    To view all open documents tiled horizontally, from                   2.   Select the Envelope or Label tab.
         the Window menu, select Arrange All.                                  3.   Type the address and click Print .
    •    To open a document you’ve recently worked on, go
         to the File menu and select the document from the
         bottom of the menu.

Manage Documents from within Word
    1.   Copy or move files while in the Open or Save As dialog boxes by right-clicking the document and select either Copy or Cut.
    2.   Then navigate to the correct folder, right-click and select Paste.

Add a shortcut to the My Places bar                                  Delete a shortcut from the My Places bar
    1.   On the File menu, click Open.                                    1. On the File menu, click Open.
    2.   In the Look in list, click the drive, folder, or Internet        2. On the My Places bar, right-click the shortcut that you
         location that contains the folder where you want to                 want to delete, and then click Remove.
         create a shortcut to in the My Places bar.                          You can only delete shortcuts that you've added to the
    3.   Click the desired folder, click Tools, and then click Add        My Places bar. You cannot delete default places such as My
         to "My Places". Your shortcut appears in the My Places           Documents.
         bar to the left of the folder and files list.

Rearrange shortcuts on the My Places bar                             Change the size of icons on the My Places bar
    1.   On the File menu, click Save As.                                 1.    On the File menu, click Save As.
    2.   On the My Places bar, right-click the shortcut that you          2.    Right-click the My Places bar, and then click Small
         want to move, and then click Move Up or Move Down                      Icons or Large Icons on the shortcut menu.
         on the shortcut menu.


page 2                                                                                                      Shared Computing Services
Microsoft Word XP/2003, Level 100
                                                                                                   Better Word Documents in Less Time


Editing and Formatting
Layout the Page
    •    Go to the File menu and select Page Setup… OR double-click the gray margin area of the ruler bar.
    •    Margins can also be adjusted from the Ruler bar (if not visible, go to the View menu and select Ruler). Place your cursor on
         the division of the gray and white to get a resizing arrow, then click and drag to adjust the margin. Press ALT while adjusting
         the margin to see the exact measurements.

The Wonders of Cut, Copy and Paste
Click Copy       on Standard toolbar           Click Cut      on Standard toolbar            Click Paste       on the Standard toolbar
OR on the Edit menu and select Copy            OR on the Edit menu and select Cut            OR on the Edit menu and select Paste
OR press CTRL+C                                OR press CTRL+X                               OR press CTRL+V
OR right-click and select Copy                 OR right-click and select Cut                 OR right-click and select Paste
Smart Tags: The Paste Options button         appears below a             Drag and Drop.
block of pasted text. When you click the button, a list appears               1.   Select the text to move or copy.
that lets you specify how Word pastes the information into                    2.   Use the right-mouse button to click and hold the
your document. The available options depend on the type of                         highlighted text and drag it to a new location.
content you are pasting, the program you are pasting from,                    3.   When you release the mouse button, select either
and the format of the text where you are pasting.                                  Move Here or Copy Here from the shortcut menu
                                                                                   that appears.

Copy and Paste Multiple Items
Copy Multiple Items
    1. Make sure that the Microsoft Office Clipboard is displayed in the task pane (click Office Clipboard on the Edit menu).
       Click Options , and then make sure the Collect Without Showing Office Clipboard option is checked.
   2. Select the first item and copy. Continue copying items until you have
       collected all of the items you want (up to 24).                                      To copy multiple items that aren't
Paste Collected Items                                                                    next to each other, you can select one
   1. Make sure that the Microsoft Office Clipboard is displayed in the task pane        item, hold down CTRL, and then select
       (click Office Clipboard on the Edit menu).                                        the next item. Then, you can copy and
   2. Click where you want the items to be pasted. You can paste collected items         paste them as you would any item.
       into any Microsoft Office program.
   3. Click the item you want to paste OR click Paste All .

Paste Special
You can specify how you want to paste items by selecting
options in the Paste Special dialog box.


Inserts or embeds the Clipboard contents at the
insertion point in the format you select in the As box.


Shared Computing Services                                                                                                         page 3
Microsoft Word XP/2003, Level 100
Better Word Documents in Less Time

Format Text                                                             Format Paragraphs
     •    Go to the Format menu and select Font.                             •   Go to the Format menu and select Paragraph
          OR right-click the selected text and choose Font.                      OR right-click the paragraph and select Paragraph
     •    Use the Formatting toolbar for the font type                       •   Use the Formatting toolbar for the Alignment
                                , size                                                            ,
          and style                or to turn on/off the                         Bullets and Numbering             or
          highlighter      .                                                     Indentation          .
Tips, Tricks and Shortcuts                                              Tips, Tricks and Shortcuts
To do this                         Press                                To do this                        Press
Bold                               CTRL+B                               Single line spacing               CTRL+1
Italics                            CTRL+I                               Double line spacing               CTRL+2
Underline                          CTRL+U                               1.5 line spacing                  CTRL+5
Increase font size                 CTRL+>                               Left alignment                    CTRL+L
Decrease font size                 CTRL+<                               Right alignment                   CTRL+R
                                                                        Center alignment                  CTRL+E
Copy and Paste Formatting
Format Painter
     1.   Select the text that contains the formatting you’d like to copy.
     2.   Click Format Painter          (CTRL+SHIFT+C)on the Standard toolbar to turn it on.
          Double-click the button is you’d like it to remain on for multiple applications.
     3.   Select the text you’d like to have the formatting applied to (CTRL+SHIFT+V).

Add Special Symbols
     1.   Go to the Insert menu and select Symbol…
          Use the (normal text) font to find international characters.
          Common dingbat fonts include Monotype Sorts, Webdings, and Windings.

                                                                                          Includes characters such as en dash
                                                                                          or em dash and non-breaking space
          Select the font to use


   If you use this symbol a lot,
   add it to AutoCorrect

                                            If you use this symbol a lot, learn the
                                            shortcut key to insert the symbol without
                                            opening the Symbol window
page 4                                                                                                       Shared Computing Services
Microsoft Word XP/2003, Level 100
                                                                                                     Better Word Documents in Less Time
Understanding Tabs
     Tab stops positioned along the horizontal ruler.             A Left Tab stop sets the start position of text that will then run to the
                                                                  right as you type.
                                                                  A Center Tab stop sets the position of the middle of the text. Text
                                                                  centers on this position as you type.
                                                                  A Right Tab stop sets the right end of the text. As you type, the text
                                                                  moves to the left.
                                                                  A Decimal Tab stop aligns numbers around a decimal point.
                                                                  Independent of the number of digits, the decimal point will be in the
               The tab selector button.                           same position. (You can align numbers around a decimal character
               Click to cycle through all                         only; you cannot use the decimal tab to align numbers around a
               the types of tab stops.                            different character, such as a hyphen or an ampersand symbol.)
                                                                  A Bar Tab stop is the odd one out because it doesn't position text. It
                                                                  inserts a vertical bar at the tab position.

Set a Tab Stop
     1.   Go to the Format menu and select Tabs…
     2.   Type the measurement for the stop, the tab stop type and line leader.
     3.   Click Set to apply the tab stop. If you add additional tab stops, you must click Set after each tab stop.
     4.   When finished, click OK and you’ll see your tab stops set on the ruler.
OR
     1.   Click the tab selector until it displays the type of tab you want
     2.   Click on the ruler bar where you want the tab stop. A mark will be placed on the ruler.
Edit a Tab Stop
     1.   Click-and-drag the mark on the ruler to a new location
          OR Go to the Format menu and select Tabs… Select the tab to be moved and type a new measurement.
     2.   Double-click the tab or go to the Format menu and select Tabs…, select the tab and then select the new type or leader.
Delete a Tab Stop
     1.   Drag the mark off the ruler into your document. OR Go to the Format menu and select Tabs… Select the tab and click
          Clear . Clear All will delete all tabs set for the paragraph(s) you have selected.


Automatic Formatting
How to Use Those Squiggly Lines
Green recognizes grammatical errors and Red recognizes spelling errors.
Correct errors by right-clicking the underlined word and select the correct option from the shortcut menu.
    1. Find all errors in a document quickly by double-clicking the Spell It icon       in the Status bar.
    2. After making the correction, double-click the icon again to move to the next error. If the icon displays a red       , there are no
         errors. If it displays a red , there are errors in your document.

Make Word Do It for You
Use AutoCorrect
     1.   Go to the Tools menu and select AutoCorrect Options.
     2.   Add your own entries to AutoCorrect when doing a spell-check (look for the AutoCorrect option when you right-click) or in
          the Check Spelling dialog box.
     3.   Type the incorrect spelling or abbreviation in the Replace: field and the corrected word or phrase in the With: field.
     •    Smart Tags: The AutoCorrect Options button             first appears when you rest the pointer near text that was automatically
          corrected.


Shared Computing Services                                                                                                            page 5
Microsoft Word XP/2003, Level 100
Better Word Documents in Less Time
Use AutoText
    1.   Select the text to be saved.
    2.   From the Insert menu, move to AutoText and select New or press CTRL+F3.
    3.   Give the entry a name and click OK .
    •    To restore an AutoText entry, begin typing the name until you see the tool tip with your entry and then press ENTER OR
         From the Insert menu, move to AutoText and select AutoText, select the entry and click OK .

Understanding Undo and Redo
Undo      on the Standard toolbar (also located under the            Redo      on the Standard toolbar (also located under the
Edit menu or press CTRL+Z) — undo any actions you’ve                 Edit menu or press CTRL+Y) — redo any actions you’ve
performed since you opened the document.                             performed since you opened the document.
• Press F4 to repeat your last action.

Automatic Documents (Wizards)
    1.   Go to the File menu and select New…                          Save time by using ready-made templates
    2.   Choose the type of document, then select the                 You can get your work done faster by starting from a
         appropriate wizard and select OK .                           professionally created template. The Microsoft Office Online
    3.   Follow the steps, completing the information as              Template Web site has hundreds of sample documents and
         requested.                                                   templates Visit http://office.microsoft.com and click the link to
                                                                      the Template Gallery.

The Final Touches
Use the Thesaurus
    1.   Select the word to find the synonym or antonym for.
    2.   Go to the Tools menu and select Language, then
         Thesaurus….
    3.   Select the correct meaning of the word.
    4.   Select the word to replace with.
    5.   Click when finished to replace words.


page 6                                                                                                    Shared Computing Services
Microsoft Word XP/2003, Level 100
                                                                                                             Better Word Documents in Less Time

Find and Replace Text
Find
Go to the Edit menu and select Find OR press CTRL+F.


                          ---Type the word or phrase you’re looking for here---
                                                                                                           Click to find all occurrences of the
                                                                                                           word or phrase. If the first
             Click to expand the window and                                                                occurrence is not the one you’re
             look for a specific font style,                                                               looking for, click again to go to
             paragraph format or special                                                                   the next occurrence.


Replace
Go to the Edit menu and select Replace OR press CTRL+H.


                                                                                                                    Click to find the first occurrence
                           ---Type the word or phrase you’re looking for here---
                                                                                                                    of the word or phrase. If the first
                                                                                                                    occurrence is not the one you’re
                                                                                                                    looking for, click again to go to
                          ---Type the word or phrase to replace the above with here---                              the next occurrence.
                          If left empty, it will delete all occurrences of the above
                          throughout your document


                                                                               Click to replace the currently selected
                                                                               occurrence or to replace all occurrences at once

Create Headers and Footers
    •    Go to the View menu and select Headers and Footers. The header and footer sections will open and the document text will
         be grayed out. The Header and Footer toolbar will open.
    • Edit a Header or Footer by double-clicking the area.
                                                                                                         Switch between header and footer will
     Insert the current                Format the page                                                   move the insertion point to the header
                                                                             Insert the print time
     page number                       numbering style                                                   or footer of the current section


                                                                                                                              Move to the header or footer of the
                 Insert the total
                                            Insert the print date                                                             previous or next section
                 number of pages
                                                                                                 Show or hide the
                                                                                                 document text                 Same as previous will repeat the
                                                  Format the page layout for                                                   header or footer from the
                                                  headers and footers                                                          previous section

Shared Computing Services                                                                                                                          page 7
Microsoft Word XP/2003, Level 100
Better Word Documents in Less Time

Ready to Print
    •    Click Print Preview        on the Standard toolbar OR go to the File menu and select Print Preview.
    •    Exit Print Preview by clicking Close on the toolbar.
    •    Print one copy of your document on the default printer by clicking Print     on the Standard toolbar.
    •    Change your print options by going to the File menu and select Print OR press CTRL+P.


                                    This is the page the insertion point is on,
                                    not necessarily the page you are viewing.


page 8                                                                                                   Shared Computing Services

Más contenido relacionado

La actualidad más candente

An introduction to microsoft office 2007 lecture
An introduction to microsoft office 2007 lectureAn introduction to microsoft office 2007 lecture
An introduction to microsoft office 2007 lectureSukh Sandhu
 
Microsoft Word
Microsoft WordMicrosoft Word
Microsoft WordJack Frost
 
Lecture4 1
Lecture4 1Lecture4 1
Lecture4 1sajib333
 
MICROSOFT WORD 2007 FULL PRESENTATION BY sarmad khosa
MICROSOFT WORD 2007 FULL PRESENTATION BY sarmad khosaMICROSOFT WORD 2007 FULL PRESENTATION BY sarmad khosa
MICROSOFT WORD 2007 FULL PRESENTATION BY sarmad khosaSarmad Baloch
 
intro of ms word 2007
intro of ms word 2007intro of ms word 2007
intro of ms word 2007Pakeeza Noor
 
Ms word and Ms Excel Presentation
Ms word and Ms Excel PresentationMs word and Ms Excel Presentation
Ms word and Ms Excel Presentationharis601
 
Introduction to MS WORD
Introduction to MS WORDIntroduction to MS WORD
Introduction to MS WORDMuhammad Irfan
 
Basic formatting operations in ms word
Basic formatting operations in ms wordBasic formatting operations in ms word
Basic formatting operations in ms wordDr. Sunil Kumar
 
Microsoft Word Home tab Presentation
Microsoft Word Home tab PresentationMicrosoft Word Home tab Presentation
Microsoft Word Home tab PresentationTanveer Ahmed
 
Components of the word window
Components of the word windowComponents of the word window
Components of the word windowsusoav
 

La actualidad más candente (20)

Word lecture 3
Word lecture 3Word lecture 3
Word lecture 3
 
An introduction to microsoft office 2007 lecture
An introduction to microsoft office 2007 lectureAn introduction to microsoft office 2007 lecture
An introduction to microsoft office 2007 lecture
 
Microsoft Word
Microsoft WordMicrosoft Word
Microsoft Word
 
Lecture4 1
Lecture4 1Lecture4 1
Lecture4 1
 
MS Word 2007
MS Word 2007MS Word 2007
MS Word 2007
 
MICROSOFT WORD 2007 FULL PRESENTATION BY sarmad khosa
MICROSOFT WORD 2007 FULL PRESENTATION BY sarmad khosaMICROSOFT WORD 2007 FULL PRESENTATION BY sarmad khosa
MICROSOFT WORD 2007 FULL PRESENTATION BY sarmad khosa
 
intro of ms word 2007
intro of ms word 2007intro of ms word 2007
intro of ms word 2007
 
Word 2003
Word 2003Word 2003
Word 2003
 
Ms word and Ms Excel Presentation
Ms word and Ms Excel PresentationMs word and Ms Excel Presentation
Ms word and Ms Excel Presentation
 
Basics of Microsoft Word
Basics of Microsoft WordBasics of Microsoft Word
Basics of Microsoft Word
 
Introduction to MS WORD
Introduction to MS WORDIntroduction to MS WORD
Introduction to MS WORD
 
Basic formatting operations in ms word
Basic formatting operations in ms wordBasic formatting operations in ms word
Basic formatting operations in ms word
 
Word
WordWord
Word
 
Microsoft Word Home tab Presentation
Microsoft Word Home tab PresentationMicrosoft Word Home tab Presentation
Microsoft Word Home tab Presentation
 
Word
WordWord
Word
 
Ms word
Ms wordMs word
Ms word
 
Microsoft Word intermediate
Microsoft Word intermediateMicrosoft Word intermediate
Microsoft Word intermediate
 
Components of the word window
Components of the word windowComponents of the word window
Components of the word window
 
Word for Beginners
Word for BeginnersWord for Beginners
Word for Beginners
 
Ms office 2013
Ms office 2013Ms office 2013
Ms office 2013
 

Destacado

Lecture#2 hardware
Lecture#2   hardwareLecture#2   hardware
Lecture#2 hardwarerasha3
 
Programming languagetypes
Programming languagetypesProgramming languagetypes
Programming languagetypesrasha3
 
Qr word-quick-reference-2007
Qr word-quick-reference-2007Qr word-quick-reference-2007
Qr word-quick-reference-2007rasha3
 
Computertypes&soft
Computertypes&softComputertypes&soft
Computertypes&softrasha3
 
Sheet1 email
Sheet1 emailSheet1 email
Sheet1 emailrasha3
 
Tech130presentationproject
Tech130presentationprojectTech130presentationproject
Tech130presentationprojectrasha3
 

Destacado (6)

Lecture#2 hardware
Lecture#2   hardwareLecture#2   hardware
Lecture#2 hardware
 
Programming languagetypes
Programming languagetypesProgramming languagetypes
Programming languagetypes
 
Qr word-quick-reference-2007
Qr word-quick-reference-2007Qr word-quick-reference-2007
Qr word-quick-reference-2007
 
Computertypes&soft
Computertypes&softComputertypes&soft
Computertypes&soft
 
Sheet1 email
Sheet1 emailSheet1 email
Sheet1 email
 
Tech130presentationproject
Tech130presentationprojectTech130presentationproject
Tech130presentationproject
 

Similar a Word100

Similar a Word100 (20)

Word 2007 intro
Word 2007 introWord 2007 intro
Word 2007 intro
 
Word presentation ict1b
Word presentation ict1bWord presentation ict1b
Word presentation ict1b
 
Introduction to-word-2016
Introduction to-word-2016Introduction to-word-2016
Introduction to-word-2016
 
Word2016.pptx
Word2016.pptxWord2016.pptx
Word2016.pptx
 
Practical File Itm
Practical File ItmPractical File Itm
Practical File Itm
 
Microsoft word 2007 part 1
Microsoft word 2007 part 1Microsoft word 2007 part 1
Microsoft word 2007 part 1
 
MS word.pptx
MS word.pptxMS word.pptx
MS word.pptx
 
Word 2010 tutorial
Word 2010 tutorialWord 2010 tutorial
Word 2010 tutorial
 
Word processing
Word processingWord processing
Word processing
 
Introduction to Microsoft Office
Introduction to Microsoft OfficeIntroduction to Microsoft Office
Introduction to Microsoft Office
 
Microsoft word for beginners
Microsoft word for beginnersMicrosoft word for beginners
Microsoft word for beginners
 
Welcome to word 2016
Welcome to word 2016Welcome to word 2016
Welcome to word 2016
 
awert.pptx
awert.pptxawert.pptx
awert.pptx
 
chapter1computers2-160923133049.pdf
chapter1computers2-160923133049.pdfchapter1computers2-160923133049.pdf
chapter1computers2-160923133049.pdf
 
Microsoft Word 2010
Microsoft Word 2010Microsoft Word 2010
Microsoft Word 2010
 
Slide Share on M.S. Office Presentation
Slide Share on M.S. Office PresentationSlide Share on M.S. Office Presentation
Slide Share on M.S. Office Presentation
 
Word2016.pptx
Word2016.pptxWord2016.pptx
Word2016.pptx
 
Word2016.pptx
Word2016.pptxWord2016.pptx
Word2016.pptx
 
Word2016.pptx
Word2016.pptxWord2016.pptx
Word2016.pptx
 
Word2016.pptx
Word2016.pptxWord2016.pptx
Word2016.pptx
 

Word100

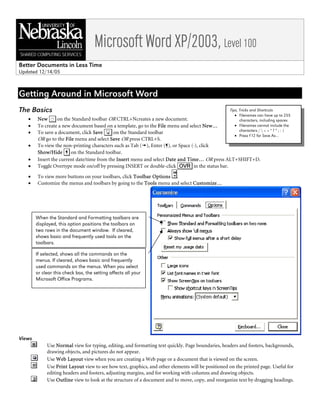
  • 1. SHARED COMPUTING SERVICES Microsoft Word XP/2003, Level 100 Better Documents in Less Time Updated 12/14/05 Getting Around in Microsoft Word The Basics Tips, Tricks and Shortcuts • Filenames can have up to 255 • New on the Standard toolbar OR CTRL+Ncreates a new document. characters, including spaces • To create a new document based on a template, go to the File menu and select New… • Filenames cannot include the • To save a document, click Save on the Standard toolbar characters / < > * ? “ ; : | • Press F12 for Save As… OR go to the File menu and select Save OR press CTRL+S. • To view the non-printing characters such as Tab ( ), Enter (¶), or Space (·), click Show/Hide ¶ on the Standard toolbar. • Insert the current date/time from the Insert menu and select Date and Time… OR press ALT+SHIFT+D. • Toggle Overtype mode on/off by pressing INSERT or double-click OVR in the status bar. • To view more buttons on your toolbars, click Toolbar Options . • Customize the menus and toolbars by going to the Tools menu and select Customize… When the Standard and Formatting toolbars are displayed, this option positions the toolbars on two rows in the document window. If cleared, shows basic and frequently used tools on the toolbars. If selected, shows all the commands on the menus. If cleared, shows basic and frequently used commands on the menus. When you select or clear this check box, the setting affects all your Microsoft Office Programs. Views Use Normal view for typing, editing, and formatting text quickly. Page boundaries, headers and footers, backgrounds, drawing objects, and pictures do not appear. Use Web Layout view when you are creating a Web page or a document that is viewed on the screen. Use Print Layout view to see how text, graphics, and other elements will be positioned on the printed page. Useful for editing headers and footers, adjusting margins, and for working with columns and drawing objects. Use Outline view to look at the structure of a document and to move, copy, and reorganize text by dragging headings.
  • 2. Microsoft Word XP/2003, Level 100 Better Word Documents in Less Time (Word 2003 only) Use Reading Layout to display your document like pages in a book. The pages are designed to fit well on your screen. Quick Navigation and Selection Navigate • Go to the beginning. Press HOME to move the cursor to the beginning of a line or CTRLHOME to move to the beginning of the document • Go to the end. Press END to move the cursor to the end of a line or CTRLEND to move to the end of the document. • Move one word at a time. Hold CTRL when using the left or right arrow keys ( or ). • Move one paragraph at a time. Hold CTRL when using the up or down arrow keys ( or ). • Go to. Double-click the left end of the status bar (where you see the page number) OR go to the Edit menu and select Go To… OR press CTRL+G OR click Browse Select and click Go To . Select • Select a Word. Double-click a word to select it. • Select a Sentence. Ctrl-click the sentence to select it. • Select a Paragraph. Triple-click the paragraph to select it. • Select All. Press CTRL+A to select all the text (also found in the Edit menu and choose Select All). • Using the keyboard. Hold SHIFT when using the arrows keys to select text. Work with Multiple Documents Print Envelopes & Labels • To view a list of all documents you have open, go to 1. Go to the Tools menu, Letters and Mailings and the Window menu. select Envelopes and Labels… • To view all open documents tiled horizontally, from 2. Select the Envelope or Label tab. the Window menu, select Arrange All. 3. Type the address and click Print . • To open a document you’ve recently worked on, go to the File menu and select the document from the bottom of the menu. Manage Documents from within Word 1. Copy or move files while in the Open or Save As dialog boxes by right-clicking the document and select either Copy or Cut. 2. Then navigate to the correct folder, right-click and select Paste. Add a shortcut to the My Places bar Delete a shortcut from the My Places bar 1. On the File menu, click Open. 1. On the File menu, click Open. 2. In the Look in list, click the drive, folder, or Internet 2. On the My Places bar, right-click the shortcut that you location that contains the folder where you want to want to delete, and then click Remove. create a shortcut to in the My Places bar. You can only delete shortcuts that you've added to the 3. Click the desired folder, click Tools, and then click Add My Places bar. You cannot delete default places such as My to "My Places". Your shortcut appears in the My Places Documents. bar to the left of the folder and files list. Rearrange shortcuts on the My Places bar Change the size of icons on the My Places bar 1. On the File menu, click Save As. 1. On the File menu, click Save As. 2. On the My Places bar, right-click the shortcut that you 2. Right-click the My Places bar, and then click Small want to move, and then click Move Up or Move Down Icons or Large Icons on the shortcut menu. on the shortcut menu. page 2 Shared Computing Services
  • 3. Microsoft Word XP/2003, Level 100 Better Word Documents in Less Time Editing and Formatting Layout the Page • Go to the File menu and select Page Setup… OR double-click the gray margin area of the ruler bar. • Margins can also be adjusted from the Ruler bar (if not visible, go to the View menu and select Ruler). Place your cursor on the division of the gray and white to get a resizing arrow, then click and drag to adjust the margin. Press ALT while adjusting the margin to see the exact measurements. The Wonders of Cut, Copy and Paste Click Copy on Standard toolbar Click Cut on Standard toolbar Click Paste on the Standard toolbar OR on the Edit menu and select Copy OR on the Edit menu and select Cut OR on the Edit menu and select Paste OR press CTRL+C OR press CTRL+X OR press CTRL+V OR right-click and select Copy OR right-click and select Cut OR right-click and select Paste Smart Tags: The Paste Options button appears below a Drag and Drop. block of pasted text. When you click the button, a list appears 1. Select the text to move or copy. that lets you specify how Word pastes the information into 2. Use the right-mouse button to click and hold the your document. The available options depend on the type of highlighted text and drag it to a new location. content you are pasting, the program you are pasting from, 3. When you release the mouse button, select either and the format of the text where you are pasting. Move Here or Copy Here from the shortcut menu that appears. Copy and Paste Multiple Items Copy Multiple Items 1. Make sure that the Microsoft Office Clipboard is displayed in the task pane (click Office Clipboard on the Edit menu). Click Options , and then make sure the Collect Without Showing Office Clipboard option is checked. 2. Select the first item and copy. Continue copying items until you have collected all of the items you want (up to 24). To copy multiple items that aren't Paste Collected Items next to each other, you can select one 1. Make sure that the Microsoft Office Clipboard is displayed in the task pane item, hold down CTRL, and then select (click Office Clipboard on the Edit menu). the next item. Then, you can copy and 2. Click where you want the items to be pasted. You can paste collected items paste them as you would any item. into any Microsoft Office program. 3. Click the item you want to paste OR click Paste All . Paste Special You can specify how you want to paste items by selecting options in the Paste Special dialog box. Inserts or embeds the Clipboard contents at the insertion point in the format you select in the As box. Shared Computing Services page 3
  • 4. Microsoft Word XP/2003, Level 100 Better Word Documents in Less Time Format Text Format Paragraphs • Go to the Format menu and select Font. • Go to the Format menu and select Paragraph OR right-click the selected text and choose Font. OR right-click the paragraph and select Paragraph • Use the Formatting toolbar for the font type • Use the Formatting toolbar for the Alignment , size , and style or to turn on/off the Bullets and Numbering or highlighter . Indentation . Tips, Tricks and Shortcuts Tips, Tricks and Shortcuts To do this Press To do this Press Bold CTRL+B Single line spacing CTRL+1 Italics CTRL+I Double line spacing CTRL+2 Underline CTRL+U 1.5 line spacing CTRL+5 Increase font size CTRL+> Left alignment CTRL+L Decrease font size CTRL+< Right alignment CTRL+R Center alignment CTRL+E Copy and Paste Formatting Format Painter 1. Select the text that contains the formatting you’d like to copy. 2. Click Format Painter (CTRL+SHIFT+C)on the Standard toolbar to turn it on. Double-click the button is you’d like it to remain on for multiple applications. 3. Select the text you’d like to have the formatting applied to (CTRL+SHIFT+V). Add Special Symbols 1. Go to the Insert menu and select Symbol… Use the (normal text) font to find international characters. Common dingbat fonts include Monotype Sorts, Webdings, and Windings. Includes characters such as en dash or em dash and non-breaking space Select the font to use If you use this symbol a lot, add it to AutoCorrect If you use this symbol a lot, learn the shortcut key to insert the symbol without opening the Symbol window page 4 Shared Computing Services
  • 5. Microsoft Word XP/2003, Level 100 Better Word Documents in Less Time Understanding Tabs Tab stops positioned along the horizontal ruler. A Left Tab stop sets the start position of text that will then run to the right as you type. A Center Tab stop sets the position of the middle of the text. Text centers on this position as you type. A Right Tab stop sets the right end of the text. As you type, the text moves to the left. A Decimal Tab stop aligns numbers around a decimal point. Independent of the number of digits, the decimal point will be in the The tab selector button. same position. (You can align numbers around a decimal character Click to cycle through all only; you cannot use the decimal tab to align numbers around a the types of tab stops. different character, such as a hyphen or an ampersand symbol.) A Bar Tab stop is the odd one out because it doesn't position text. It inserts a vertical bar at the tab position. Set a Tab Stop 1. Go to the Format menu and select Tabs… 2. Type the measurement for the stop, the tab stop type and line leader. 3. Click Set to apply the tab stop. If you add additional tab stops, you must click Set after each tab stop. 4. When finished, click OK and you’ll see your tab stops set on the ruler. OR 1. Click the tab selector until it displays the type of tab you want 2. Click on the ruler bar where you want the tab stop. A mark will be placed on the ruler. Edit a Tab Stop 1. Click-and-drag the mark on the ruler to a new location OR Go to the Format menu and select Tabs… Select the tab to be moved and type a new measurement. 2. Double-click the tab or go to the Format menu and select Tabs…, select the tab and then select the new type or leader. Delete a Tab Stop 1. Drag the mark off the ruler into your document. OR Go to the Format menu and select Tabs… Select the tab and click Clear . Clear All will delete all tabs set for the paragraph(s) you have selected. Automatic Formatting How to Use Those Squiggly Lines Green recognizes grammatical errors and Red recognizes spelling errors. Correct errors by right-clicking the underlined word and select the correct option from the shortcut menu. 1. Find all errors in a document quickly by double-clicking the Spell It icon in the Status bar. 2. After making the correction, double-click the icon again to move to the next error. If the icon displays a red , there are no errors. If it displays a red , there are errors in your document. Make Word Do It for You Use AutoCorrect 1. Go to the Tools menu and select AutoCorrect Options. 2. Add your own entries to AutoCorrect when doing a spell-check (look for the AutoCorrect option when you right-click) or in the Check Spelling dialog box. 3. Type the incorrect spelling or abbreviation in the Replace: field and the corrected word or phrase in the With: field. • Smart Tags: The AutoCorrect Options button first appears when you rest the pointer near text that was automatically corrected. Shared Computing Services page 5
  • 6. Microsoft Word XP/2003, Level 100 Better Word Documents in Less Time Use AutoText 1. Select the text to be saved. 2. From the Insert menu, move to AutoText and select New or press CTRL+F3. 3. Give the entry a name and click OK . • To restore an AutoText entry, begin typing the name until you see the tool tip with your entry and then press ENTER OR From the Insert menu, move to AutoText and select AutoText, select the entry and click OK . Understanding Undo and Redo Undo on the Standard toolbar (also located under the Redo on the Standard toolbar (also located under the Edit menu or press CTRL+Z) — undo any actions you’ve Edit menu or press CTRL+Y) — redo any actions you’ve performed since you opened the document. performed since you opened the document. • Press F4 to repeat your last action. Automatic Documents (Wizards) 1. Go to the File menu and select New… Save time by using ready-made templates 2. Choose the type of document, then select the You can get your work done faster by starting from a appropriate wizard and select OK . professionally created template. The Microsoft Office Online 3. Follow the steps, completing the information as Template Web site has hundreds of sample documents and requested. templates Visit http://office.microsoft.com and click the link to the Template Gallery. The Final Touches Use the Thesaurus 1. Select the word to find the synonym or antonym for. 2. Go to the Tools menu and select Language, then Thesaurus…. 3. Select the correct meaning of the word. 4. Select the word to replace with. 5. Click when finished to replace words. page 6 Shared Computing Services
  • 7. Microsoft Word XP/2003, Level 100 Better Word Documents in Less Time Find and Replace Text Find Go to the Edit menu and select Find OR press CTRL+F. ---Type the word or phrase you’re looking for here--- Click to find all occurrences of the word or phrase. If the first Click to expand the window and occurrence is not the one you’re look for a specific font style, looking for, click again to go to paragraph format or special the next occurrence. Replace Go to the Edit menu and select Replace OR press CTRL+H. Click to find the first occurrence ---Type the word or phrase you’re looking for here--- of the word or phrase. If the first occurrence is not the one you’re looking for, click again to go to ---Type the word or phrase to replace the above with here--- the next occurrence. If left empty, it will delete all occurrences of the above throughout your document Click to replace the currently selected occurrence or to replace all occurrences at once Create Headers and Footers • Go to the View menu and select Headers and Footers. The header and footer sections will open and the document text will be grayed out. The Header and Footer toolbar will open. • Edit a Header or Footer by double-clicking the area. Switch between header and footer will Insert the current Format the page move the insertion point to the header Insert the print time page number numbering style or footer of the current section Move to the header or footer of the Insert the total Insert the print date previous or next section number of pages Show or hide the document text Same as previous will repeat the Format the page layout for header or footer from the headers and footers previous section Shared Computing Services page 7
  • 8. Microsoft Word XP/2003, Level 100 Better Word Documents in Less Time Ready to Print • Click Print Preview on the Standard toolbar OR go to the File menu and select Print Preview. • Exit Print Preview by clicking Close on the toolbar. • Print one copy of your document on the default printer by clicking Print on the Standard toolbar. • Change your print options by going to the File menu and select Print OR press CTRL+P. This is the page the insertion point is on, not necessarily the page you are viewing. page 8 Shared Computing Services