SlideShare a Scribd company logo
1 of 8
Download to read offline
Lab 9.1.5b Trunking with 802.1q 
Objective 
• Create a basic switch configuration and verify it. 
• Create multiple VLANs, name them, and assign multiple member ports to them. 
• Create an 802.1q trunk line between the two switches to allow communication between paired VLANs. 
• Test the VLANs functionality by moving a workstation from one VLAN to another. 
Background/Preparation 
Trunking changes the formatting of the packets. The ports need to be in agreement as to which format is being used to transmit data on the trunk or no data will be passed. If there is different trunking encapsulation on the two ends of the link they will not able to communicate. Similar situation will occur if one of the ports is configured in trunking mode (unconditionally) and the other one is in access mode (unconditionally). 
When managing a switch, the Management Domain is always VLAN 1. The Network Administrator's workstation must have access to a port in the VLAN 1 Management Domain. All ports are assigned to VLAN 1 by default. This lab will also help demonstrate how VLANs can be used to separate traffic and reduce broadcast domains. 
1 - 8 CCNA 3: Switching Basics and Intermediate Routing v 3.1 - Lab 9.1.5b Copyright  2003, Cisco Systems, Inc.
Cable a network similar to one of the diagram. The configuration output used in this lab is produced from 2950 series switch. Any other switch used may produce different output. The following steps are intended to be executed on each switch unless specifically instructed otherwise. 
Start a HyperTerminal session. 
Note: Go to the erase and reload instructions at the end of this lab. Perform those steps on all switches in this lab assignment before continuing. 
Step 1 Configure the switch 
Configure the Hostname, access and command mode passwords, as well as the management LAN settings. These values are shown in the chart. If problems occur while performing this configuration, refer to the “Basic Switch Configuration lab”. Do not configure VLANs and trunking yet. 
Step 2 Configure the hosts attached to the switch 
Configure the IP address, mask, and default gateway on each host. Be sure to choose addresses that are on the same subnet as the switch. 
Step 3 Verify connectivity 
a. To verify that the host and switch are correctly configured, ping the switch from the hosts. 
b. Were the pings successful? __________________________________________________ 
c. If the answer is no, troubleshoot the host and switches configurations. 
Step 4 Display the VLAN interface information 
On Switch_A, type the command show vlan at the Privileged EXEC prompt as follows: 
Switch_A#show vlan 
Note: There should be an entry for VLAN 1 and the default VLANs (1002 +). If other VLANs appear, they could be deleted as instructed in Step 2 of the Erasing and Reloading instructions at the end of this lab or refer to the Lab Exercise: Deleting VLAN Configurations. 
Step 5 Create and name three VLANs 
Enter the following commands to create and name three VLANs: 
Switch_A#vlan database 
Switch_A(vlan)#vlan 10 name Accounting 
Switch_A(vlan)#vlan 20 name Marketing 
Switch_A(vlan)#vlan 30 name Engineering 
Switch_A(vlan)#exit 
Use the show vlan command to verify that the VLANs have been created correctly. 
Step 6 Assign ports to a VLAN 10 
Assigning ports to VLANs must be done from the interface mode. Enter the following commands to add ports 0/4 to 0/6 to VLAN 10: 
Switch_A#configure terminal 
Switch_A(config)#interface fastethernet 0/4 
Switch_A(config-if)#switchport mode access 
Switch_A(config-if)#switchport access vlan 10 2 - 8 CCNA 3: Switching Basics and Intermediate Routing v 3.1 - Lab 9.1.5b Copyright  2003, Cisco Systems, Inc.
Switch_A(config-if)#interface fastethernet 0/5 
Switch_A(config-if)#switchport mode access 
Switch_A(config-if)#switchport access vlan 10 
Switch_A(config-if)#interface fastethernet 0/6 
Switch_A(config-if)#switchport mode access 
Switch_A(config-if)#switchport access vlan 10 
Switch_A(config-if)#end 
Step 7 Assign ports to VLAN 20 
Enter the following commands to add ports 0/7 to 0/9 to VLAN 20: 
Switch_A#configure terminal 
Switch_A(config)#interface fastethernet 0/7 
Switch_A(config-if)#switchport mode access 
Switch_A(config-if)#switchport access vlan 20 
Switch_A(config-if)#interface fastethernet 0/8 
Switch_A(config-if)#switchport mode access 
Switch_A(config-if)#switchport access vlan 20 
Switch_A(config-if)#interface fastethernet 0/9 
Switch_A(config-if)#switchport mode access 
Switch_A(config-if)#switchport access vlan 20 
Switch_A(config-if)#end 
Step 8 Assign ports to VLAN 30 
Enter the following commands to add ports 0/10 to 0/12 to VLAN 30: 
Switch_A#configure terminal 
Switch_A(config)#interface fastethernet 0/10 
Switch_A(config-if)#switchport mode access 
Switch_A(config-if)#switchport access vlan 30 
Switch_A(config-if)#interface fastethernet 0/11 
Switch_A(config-if)#switchport mode access 
Switch_A(config-if)#switchport access vlan 30 
Switch_A(config-if)#interface fastethernet 0/12 
Switch_A(config-if)#switchport mode access 
Switch_A(config-if)#switchport access vlan 30 
Switch_A(config-if)#end 
Step 9 Create VLANs on Switch_B 
Repeat Steps 5 through 9 on Switch_B to create its VLANs 
Step 10 Display the VLAN interface information 
a. On both switches, type the command show vlan at the Privileged EXEC prompt as follows: 
Switch_A#show vlan 
b. Are ports 0/10 through 0/12 assigned to VLAN 30? 
__________________________________________________________________________ 
3 - 8 CCNA 3: Switching Basics and Intermediate Routing v 3.1 - Lab 9.1.5b Copyright  2003, Cisco Systems, Inc.
Step 11 Test the VLANs 
Ping from the host in Switch_A port 0/12 to the host in Switch_B port 0/12. 
a. Was the ping successful? ___________________________________________________ 
b. Why? __________________________________________________________________ 
Ping from the host in Switch_A port 0/12 to the switch IP 192.168.1.2. 
c. Was the ping successful? ___________________________________________________ 
d. Why? __________________________________________________________________ 
Step 12 Create the trunk 
On both switches, Switch_A and Switch_B, type the following command at the fastethernet 0/1 interface command prompt. Note that it is not necessary to specify the encapsulation on a 2950, since it only supports 802.1Q. 
Switch_A(config)#interface fastethernet 0/1 
Switch_A(config-if)#switchport mode trunk 
Switch_A(config-if)#end 
Switch_B(config)#interface fastethernet 0/1 
Switch_B(config-if)#switchport mode trunk 
Switch_B(config-if)#end 
2900: 
Switch_A(config)#interface fastethernet0/1 
Switch_A(config-if)#switchport mode trunk 
Switch_A(config-if)#switchport trunk encapsulation dot1q 
S 
witch_A(config-if)#end 
Switch_B(config)#interface fastethernet0/1 
Switch_B(config-if)#switchport mode trunk 
Switch_B(config-if)#switchport trunk encapsulation dot1q 
Switch_B(config-if)#end 
Step 13 Verify the trunk 
a. To verify that port Fast Ethernet 0/1 has been established as a trunk port, type show interface fastethernet 0/1 switchport at the Privileged EXEC mode prompt. 
b. What type of trunking encapsulation is shown on the output results? 
__________________________________________________________________________ 
c. According to the output with show interface fastethernet 0/1 switchport on Switch_B, is there a difference from the Administrative Trunking Encapsulation from the Operational Trunking Encapsulation? 
__________________________________________________________________________ 
d. On the fragment “Trunking VLANs Enable” from the output, what does the word “ALL” mean? 
__________________________________________________________________________ 
e. What would happen if the two ports of the trunk were using different encapsulation? _________ 
f. Explain _________________________________________________________________ 4 - 8 CCNA 3: Switching Basics and Intermediate Routing v 3.1 - Lab 9.1.5b Copyright  2003, Cisco Systems, Inc.
Step 14 Test the VLANS and the trunk 
Ping from the host in Switch_A port 0/12 to the host in Switch_B port 0/12. 
a. Was the ping successful? ___________________________________________________ 
b. Why? __________________________________________________________________ 
Ping from the host in Switch_A port 0/12 to the switch IP 192.168.1.2. 
c. Was the ping successful? ___________________________________________________ 
d. Why? __________________________________________________________________ 
Step 15 Move host. 
Move the host in Switch_A from port 0/12 to port 0/8. Wait until the port LED goes green and then go to the next step. 
Step 16 Test the VLANS and the trunk 
Ping from the host in Switch_A port 0/8 to the host in Switch_B port 0/12. 
a. Was the ping successful? ___________________________________________________ 
b. Why? __________________________________________________________________ 
Ping from the host in Switch_A port 0/8 to the switch IP 192.168.1.2. 
c. Was the ping successful? ___________________________________________________ 
d. Why? __________________________________________________________________ 
Step 17 Move host 
Move the host in Switch_B from port 0/12 to port 0/7. Wait until the port LED goes green and then go to the next step. 
Step 18 Test the VLANS and the trunk 
Ping from the host in Switch_A port 0/8 to the host in Switch_B port 0/7. 
a. Was the ping successful? ___________________________________________________ 
b. Why? __________________________________________________________________ 
Ping from the host in Switch_A port 0/8 to the switch IP 192.168.1.2. 
c. Was the ping successful? ___________________________________________________ 
d. Why? __________________________________________________________________ 
Step 19 Move hosts 
Move the host in Switch_A from port 0/8 to port 0/2. Wait until the port LED goes green and then go to the next step. 
Step 20 Test the VLANS and the trunk 
Ping from the host in Switch_A port 0/2 to the host in Switch_B port 0/7. 
a. Was the ping successful? ___________________________________________________ 
Ping from the host in Switch_A port 0/2 to the switch IP 192.168.1.2. 
5 - 8 CCNA 3: Switching Basics and Intermediate Routing v 3.1 - Lab 9.1.5b Copyright  2003, Cisco Systems, Inc.
b. Was the ping successful? ___________________________________________________ 
c. Why? __________________________________________________________________ 
Step 21 Move host 
Move the host in Switch_B from port 0/7 to port 0/3. Wait until the port LED goes green and then go to the next step. 
Step 22 Test the VLANS and the trunk 
Ping from the host in Switch_A port 0/2 to the host in Switch_B port 0/3. 
a. Was the ping successful? ___________________________________________________ 
b. Why? __________________________________________________________________ 
Ping from the host in Switch_B port 0/3 to the switch IP 192.168.1.2. 
c. Was the ping successful? ___________________________________________________ 
d. Why? __________________________________________________________________ 
Ping from the host in Switch_B port 0/3 to the switch IP 192.168.1.3. 
e. Was the ping successful? ___________________________________________________ 
f. Why? __________________________________________________________________ 
g. What conclusions can be drawn from the testing that was just performed in regards to VLAN membership and VLANs across a trunk? 
__________________________________________________________________________ 
__________________________________________________________________________ 
__________________________________________________________________________ 
Once the steps are complete, logoff by typing exit, and turn all the devices off. Then remove and store the cables and adapter. 
6 - 8 CCNA 3: Switching Basics and Intermediate Routing v 3.1 - Lab 9.1.5b Copyright  2003, Cisco Systems, Inc.
Erasing and Reloading the Switch 
For the majority of the labs in CCNA 3 and CCNA 4 it is necessary to start with an unconfigured switch. Use of a switch with an existing configuration may produce unpredictable results. These instructions allow preparation of the switch prior to performing the lab so previous configuration options do not interfere. The following is the procedure for clearing out previous configurations and starting with an unconfigured switch. Instructions are provided for the 2900, 2950, and 1900 Series switches. 
2900 and 2950 Series Switches 
1. Enter into the Privileged EXEC mode by typing enable. 
Switch>enable 
If prompted for a password, enter class, if that does not work, ask the instructor. 
2. Remove the VLAN database information file. 
Switch#delete flash:vlan.dat 
Delete filename [vlan.dat]?[Enter] 
Delete flash:vlan.dat? [confirm] [Enter] 
If there was no VLAN file, this message is displayed. 
%Error deleting flash:vlan.dat (No such file or directory) 
3. Remove the switch startup configuration file from NVRAM. 
Switch#erase startup-config 
The responding line prompt will be: 
Erasing the nvram filesystem will remove all files! Continue? [confirm] 
Press Enter to confirm. 
The response should be: 
Erase of nvram: complete 
4. Check that VLAN information was deleted. 
Verify that the VLAN configuration was deleted in Step 2 using the show vlan command. If previous VLAN configuration information (other than the default management VLAN 1) is still present it will be necessary to power cycle the switch (hardware restart) instead of issuing the reload command. To power cycle the switch, remove the power cord from the back of the switch or unplug it. Then plug it back in. 
If the VLAN information was successfully deleted in Step 2, go to Step 5 and restart the switch using the reload command. 
5. Software restart (using the reload command) 
7 - 8 CCNA 3: Switching Basics and Intermediate Routing v 3.1 - Lab 9.1.5b Copyright  2003, Cisco Systems, Inc.
Note: This step is not necessary if the switch was restarted using the power cycle method. 
a. At the Privileged EXEC mode enter the command reload. 
Switch(config)#reload 
The responding line prompt will be: 
System configuration has been modified. Save? [yes/no]: 
b. Type n and then press Enter. 
The responding line prompt will be: 
Proceed with reload? [confirm] [Enter] 
The first line of the response will be: 
Reload requested by console. 
After the switch has reloaded, the line prompt will be: 
Would you like to enter the initial configuration dialog? [yes/no]: 
c. Type n and then press Enter. 
The responding line prompt will be: 
Press RETURN to get started! [Enter] 
1900 Series Switches 
1. Remove VLAN Trunking Protocol (VTP) information. 
#delete vtp 
This command resets the switch with VTP parameters set to factory defaults. 
All other parameters will be unchanged. 
Reset system with VTP parameters set to factory defaults, [Y]es or [N]o? 
Enter y and press Enter. 
2. Remove the switch startup configuration from NVRAM. 
#delete nvram 
This command resets the switch with factory defaults. All system parameters will revert to their default factory settings. All static and dynamic addresses will be removed. 
Reset system with factory defaults, [Y]es or [N]o? 
Enter y and press Enter. 
8 - 8 CCNA 3: Switching Basics and Intermediate Routing v 3.1 - Lab 9.1.5b Copyright  2003, Cisco Systems, Inc.

More Related Content

What's hot

3.4.6-lab---configure-vlans-and-trunking.pdf
3.4.6-lab---configure-vlans-and-trunking.pdf3.4.6-lab---configure-vlans-and-trunking.pdf
3.4.6-lab---configure-vlans-and-trunking.pdfarif hamidi
 
Comandos
ComandosComandos
Comandos1 2d
 
Troubleshoot cisco 3750 x stack power feature
Troubleshoot cisco 3750 x stack power featureTroubleshoot cisco 3750 x stack power feature
Troubleshoot cisco 3750 x stack power featureMona Liu
 
Ccna 3 v 4.0 final-exam-17-07-2010
Ccna 3 v 4.0 final-exam-17-07-2010Ccna 3 v 4.0 final-exam-17-07-2010
Ccna 3 v 4.0 final-exam-17-07-2010irbas
 
How to configure vlan, stp, dtp step by step guide
How to configure vlan, stp, dtp step by step guideHow to configure vlan, stp, dtp step by step guide
How to configure vlan, stp, dtp step by step guideIT Tech
 
CCN3Switching_lab_5_5_2
CCN3Switching_lab_5_5_2CCN3Switching_lab_5_5_2
CCN3Switching_lab_5_5_2alan moreno
 
Chapter 14 - Sw Conf
Chapter 14 - Sw ConfChapter 14 - Sw Conf
Chapter 14 - Sw Confphanleson
 
Ccna2 mod3-configuring a-router
Ccna2 mod3-configuring a-routerCcna2 mod3-configuring a-router
Ccna2 mod3-configuring a-router97148881557
 
Ccna icnd1-labs - exercices
Ccna icnd1-labs - exercicesCcna icnd1-labs - exercices
Ccna icnd1-labs - exercicessaqrjareh
 
Lab 6.4.1 InterVLAN routing
Lab 6.4.1 InterVLAN routingLab 6.4.1 InterVLAN routing
Lab 6.4.1 InterVLAN routingMuhd Mu'izuddin
 
Ch3 ccna exploration 3 lan switching and wireless
Ch3 ccna exploration 3 lan switching and wirelessCh3 ccna exploration 3 lan switching and wireless
Ch3 ccna exploration 3 lan switching and wirelesskratos2424
 
KPUCC-Rs instructor ppt_chapter3_final
KPUCC-Rs instructor ppt_chapter3_finalKPUCC-Rs instructor ppt_chapter3_final
KPUCC-Rs instructor ppt_chapter3_finalFisal Anwari
 
CCIE Real LAB LAB 1.1 CCIEREALLABWORKBOOK.COM
CCIE Real LAB LAB 1.1  CCIEREALLABWORKBOOK.COMCCIE Real LAB LAB 1.1  CCIEREALLABWORKBOOK.COM
CCIE Real LAB LAB 1.1 CCIEREALLABWORKBOOK.COMcciereallabworkbooks
 

What's hot (17)

3.4.6-lab---configure-vlans-and-trunking.pdf
3.4.6-lab---configure-vlans-and-trunking.pdf3.4.6-lab---configure-vlans-and-trunking.pdf
3.4.6-lab---configure-vlans-and-trunking.pdf
 
Comandos
ComandosComandos
Comandos
 
Troubleshoot cisco 3750 x stack power feature
Troubleshoot cisco 3750 x stack power featureTroubleshoot cisco 3750 x stack power feature
Troubleshoot cisco 3750 x stack power feature
 
Day 14.2 configuringvla ns
Day 14.2 configuringvla nsDay 14.2 configuringvla ns
Day 14.2 configuringvla ns
 
VLAN
VLANVLAN
VLAN
 
Ccna 3 v 4.0 final-exam-17-07-2010
Ccna 3 v 4.0 final-exam-17-07-2010Ccna 3 v 4.0 final-exam-17-07-2010
Ccna 3 v 4.0 final-exam-17-07-2010
 
RFI
RFIRFI
RFI
 
How to configure vlan, stp, dtp step by step guide
How to configure vlan, stp, dtp step by step guideHow to configure vlan, stp, dtp step by step guide
How to configure vlan, stp, dtp step by step guide
 
CCN3Switching_lab_5_5_2
CCN3Switching_lab_5_5_2CCN3Switching_lab_5_5_2
CCN3Switching_lab_5_5_2
 
Chapter 14 - Sw Conf
Chapter 14 - Sw ConfChapter 14 - Sw Conf
Chapter 14 - Sw Conf
 
VTP
VTPVTP
VTP
 
Ccna2 mod3-configuring a-router
Ccna2 mod3-configuring a-routerCcna2 mod3-configuring a-router
Ccna2 mod3-configuring a-router
 
Ccna icnd1-labs - exercices
Ccna icnd1-labs - exercicesCcna icnd1-labs - exercices
Ccna icnd1-labs - exercices
 
Lab 6.4.1 InterVLAN routing
Lab 6.4.1 InterVLAN routingLab 6.4.1 InterVLAN routing
Lab 6.4.1 InterVLAN routing
 
Ch3 ccna exploration 3 lan switching and wireless
Ch3 ccna exploration 3 lan switching and wirelessCh3 ccna exploration 3 lan switching and wireless
Ch3 ccna exploration 3 lan switching and wireless
 
KPUCC-Rs instructor ppt_chapter3_final
KPUCC-Rs instructor ppt_chapter3_finalKPUCC-Rs instructor ppt_chapter3_final
KPUCC-Rs instructor ppt_chapter3_final
 
CCIE Real LAB LAB 1.1 CCIEREALLABWORKBOOK.COM
CCIE Real LAB LAB 1.1  CCIEREALLABWORKBOOK.COMCCIE Real LAB LAB 1.1  CCIEREALLABWORKBOOK.COM
CCIE Real LAB LAB 1.1 CCIEREALLABWORKBOOK.COM
 

Viewers also liked

Final eng report 4
Final eng report 4Final eng report 4
Final eng report 4Schani B
 
Atelier 20x20 (creating a broshure)
Atelier 20x20 (creating a broshure)Atelier 20x20 (creating a broshure)
Atelier 20x20 (creating a broshure)Lidia Dranik
 
Cisco router configuration
Cisco router configurationCisco router configuration
Cisco router configurationvin424
 
Interviewing Practices
Interviewing PracticesInterviewing Practices
Interviewing Practicesshahid khan
 
anatomy of Paranasal sinus
anatomy of Paranasal sinusanatomy of Paranasal sinus
anatomy of Paranasal sinusEbtisam ~
 
Top 10 custodial interview questions with answers
Top 10 custodial interview questions with answersTop 10 custodial interview questions with answers
Top 10 custodial interview questions with answerscuthbertsonderon
 

Viewers also liked (7)

Final eng report 4
Final eng report 4Final eng report 4
Final eng report 4
 
Atelier 20x20 (creating a broshure)
Atelier 20x20 (creating a broshure)Atelier 20x20 (creating a broshure)
Atelier 20x20 (creating a broshure)
 
Cisco router configuration
Cisco router configurationCisco router configuration
Cisco router configuration
 
Interviewing Practices
Interviewing PracticesInterviewing Practices
Interviewing Practices
 
anatomy of Paranasal sinus
anatomy of Paranasal sinusanatomy of Paranasal sinus
anatomy of Paranasal sinus
 
Top 10 custodial interview questions with answers
Top 10 custodial interview questions with answersTop 10 custodial interview questions with answers
Top 10 custodial interview questions with answers
 
Powerpoint de los_santos_micaela
Powerpoint de los_santos_micaelaPowerpoint de los_santos_micaela
Powerpoint de los_santos_micaela
 

Similar to Ccna3 lab 9_1_5b_en

Cisco labs practical7
Cisco labs practical7Cisco labs practical7
Cisco labs practical7Tai Lam
 
Switch inter vlan_routing
Switch inter vlan_routingSwitch inter vlan_routing
Switch inter vlan_routingRamesh Thumburu
 
Vlan lab
Vlan labVlan lab
Vlan labtmim8
 
Cisco labs practical6
Cisco labs practical6Cisco labs practical6
Cisco labs practical6Tai Lam
 
07 module extending switched netwroks with virtual la ns
07  module extending switched netwroks with virtual la ns07  module extending switched netwroks with virtual la ns
07 module extending switched netwroks with virtual la nsAsif
 
Pe1 configuring pvst+ rapid pvst+
Pe1   configuring pvst+  rapid pvst+Pe1   configuring pvst+  rapid pvst+
Pe1 configuring pvst+ rapid pvst+mohdsyahmi789
 
How to Configure QinQ?
How to Configure QinQ?How to Configure QinQ?
How to Configure QinQ?Huanetwork
 
6.5.1.3 packet tracer layer 2 vlan security instructor
6.5.1.3 packet tracer   layer 2 vlan security instructor6.5.1.3 packet tracer   layer 2 vlan security instructor
6.5.1.3 packet tracer layer 2 vlan security instructorSalem Trabelsi
 
Interconnecting cisco networking devices part-2
Interconnecting cisco networking devices part-2Interconnecting cisco networking devices part-2
Interconnecting cisco networking devices part-2DAVID RAUDALES
 
Ccna icnd2-labs exercices
Ccna icnd2-labs exercicesCcna icnd2-labs exercices
Ccna icnd2-labs exercicessaqrjareh
 
Exercise 4c stp rapid pvst+ question
Exercise 4c   stp rapid pvst+ questionExercise 4c   stp rapid pvst+ question
Exercise 4c stp rapid pvst+ questionsufi1248
 
Vlan truks
Vlan truksVlan truks
Vlan truks1 2d
 
Virtual LAN and Vlan Trunking Protocol.pptx
Virtual LAN and Vlan Trunking Protocol.pptxVirtual LAN and Vlan Trunking Protocol.pptx
Virtual LAN and Vlan Trunking Protocol.pptxmarunkumareee77
 
Configuration steps for the cisco 300 series switches v3
Configuration steps for the cisco 300 series switches v3Configuration steps for the cisco 300 series switches v3
Configuration steps for the cisco 300 series switches v3Conrad Cruz
 
06 vlan configuration commands
06 vlan configuration commands06 vlan configuration commands
06 vlan configuration commandsAndri Martian
 
VIRTUAL LANS
VIRTUAL LANSVIRTUAL LANS
VIRTUAL LANSanilinvns
 
Day 5 VIRTUAL LANS
Day 5 VIRTUAL LANSDay 5 VIRTUAL LANS
Day 5 VIRTUAL LANSanilinvns
 

Similar to Ccna3 lab 9_1_5b_en (20)

Cisco labs practical7
Cisco labs practical7Cisco labs practical7
Cisco labs practical7
 
Switch inter vlan_routing
Switch inter vlan_routingSwitch inter vlan_routing
Switch inter vlan_routing
 
Vlan lab
Vlan labVlan lab
Vlan lab
 
Cisco labs practical6
Cisco labs practical6Cisco labs practical6
Cisco labs practical6
 
07 module extending switched netwroks with virtual la ns
07  module extending switched netwroks with virtual la ns07  module extending switched netwroks with virtual la ns
07 module extending switched netwroks with virtual la ns
 
Pe1 configuring pvst+ rapid pvst+
Pe1   configuring pvst+  rapid pvst+Pe1   configuring pvst+  rapid pvst+
Pe1 configuring pvst+ rapid pvst+
 
How to Configure QinQ?
How to Configure QinQ?How to Configure QinQ?
How to Configure QinQ?
 
6.5.1.3 packet tracer layer 2 vlan security instructor
6.5.1.3 packet tracer   layer 2 vlan security instructor6.5.1.3 packet tracer   layer 2 vlan security instructor
6.5.1.3 packet tracer layer 2 vlan security instructor
 
Interconnecting cisco networking devices part-2
Interconnecting cisco networking devices part-2Interconnecting cisco networking devices part-2
Interconnecting cisco networking devices part-2
 
Ccna icnd2-labs exercices
Ccna icnd2-labs exercicesCcna icnd2-labs exercices
Ccna icnd2-labs exercices
 
Exercise 4c stp rapid pvst+ question
Exercise 4c   stp rapid pvst+ questionExercise 4c   stp rapid pvst+ question
Exercise 4c stp rapid pvst+ question
 
Lab6.4.1
Lab6.4.1Lab6.4.1
Lab6.4.1
 
Vlan truks
Vlan truksVlan truks
Vlan truks
 
Virtual LAN and Vlan Trunking Protocol.pptx
Virtual LAN and Vlan Trunking Protocol.pptxVirtual LAN and Vlan Trunking Protocol.pptx
Virtual LAN and Vlan Trunking Protocol.pptx
 
3 2
3 23 2
3 2
 
Configuration steps for the cisco 300 series switches v3
Configuration steps for the cisco 300 series switches v3Configuration steps for the cisco 300 series switches v3
Configuration steps for the cisco 300 series switches v3
 
06 vlan configuration commands
06 vlan configuration commands06 vlan configuration commands
06 vlan configuration commands
 
corporate network
corporate networkcorporate network
corporate network
 
VIRTUAL LANS
VIRTUAL LANSVIRTUAL LANS
VIRTUAL LANS
 
Day 5 VIRTUAL LANS
Day 5 VIRTUAL LANSDay 5 VIRTUAL LANS
Day 5 VIRTUAL LANS
 

Recently uploaded

22CYT12 & Chemistry for Computer Systems_Unit-II-Corrosion & its Control Meth...
22CYT12 & Chemistry for Computer Systems_Unit-II-Corrosion & its Control Meth...22CYT12 & Chemistry for Computer Systems_Unit-II-Corrosion & its Control Meth...
22CYT12 & Chemistry for Computer Systems_Unit-II-Corrosion & its Control Meth...KrishnaveniKrishnara1
 
Katarzyna Lipka-Sidor - BIM School Course
Katarzyna Lipka-Sidor - BIM School CourseKatarzyna Lipka-Sidor - BIM School Course
Katarzyna Lipka-Sidor - BIM School Coursebim.edu.pl
 
70 POWER PLANT IAE V2500 technical training
70 POWER PLANT IAE V2500 technical training70 POWER PLANT IAE V2500 technical training
70 POWER PLANT IAE V2500 technical trainingGladiatorsKasper
 
Curve setting (Basic Mine Surveying)_MI10412MI.pptx
Curve setting (Basic Mine Surveying)_MI10412MI.pptxCurve setting (Basic Mine Surveying)_MI10412MI.pptx
Curve setting (Basic Mine Surveying)_MI10412MI.pptxRomil Mishra
 
Robotics-Asimov's Laws, Mechanical Subsystems, Robot Kinematics, Robot Dynami...
Robotics-Asimov's Laws, Mechanical Subsystems, Robot Kinematics, Robot Dynami...Robotics-Asimov's Laws, Mechanical Subsystems, Robot Kinematics, Robot Dynami...
Robotics-Asimov's Laws, Mechanical Subsystems, Robot Kinematics, Robot Dynami...Sumanth A
 
Secure Key Crypto - Tech Paper JET Tech Labs
Secure Key Crypto - Tech Paper JET Tech LabsSecure Key Crypto - Tech Paper JET Tech Labs
Secure Key Crypto - Tech Paper JET Tech Labsamber724300
 
Module-1-Building Acoustics(Introduction)(Unit-1).pdf
Module-1-Building Acoustics(Introduction)(Unit-1).pdfModule-1-Building Acoustics(Introduction)(Unit-1).pdf
Module-1-Building Acoustics(Introduction)(Unit-1).pdfManish Kumar
 
STATE TRANSITION DIAGRAM in psoc subject
STATE TRANSITION DIAGRAM in psoc subjectSTATE TRANSITION DIAGRAM in psoc subject
STATE TRANSITION DIAGRAM in psoc subjectGayathriM270621
 
Comprehensive energy systems.pdf Comprehensive energy systems.pdf
Comprehensive energy systems.pdf Comprehensive energy systems.pdfComprehensive energy systems.pdf Comprehensive energy systems.pdf
Comprehensive energy systems.pdf Comprehensive energy systems.pdfalene1
 
Gravity concentration_MI20612MI_________
Gravity concentration_MI20612MI_________Gravity concentration_MI20612MI_________
Gravity concentration_MI20612MI_________Romil Mishra
 
Introduction to Artificial Intelligence: Intelligent Agents, State Space Sear...
Introduction to Artificial Intelligence: Intelligent Agents, State Space Sear...Introduction to Artificial Intelligence: Intelligent Agents, State Space Sear...
Introduction to Artificial Intelligence: Intelligent Agents, State Space Sear...shreenathji26
 
KCD Costa Rica 2024 - Nephio para parvulitos
KCD Costa Rica 2024 - Nephio para parvulitosKCD Costa Rica 2024 - Nephio para parvulitos
KCD Costa Rica 2024 - Nephio para parvulitosVictor Morales
 
Turn leadership mistakes into a better future.pptx
Turn leadership mistakes into a better future.pptxTurn leadership mistakes into a better future.pptx
Turn leadership mistakes into a better future.pptxStephen Sitton
 
Structural Integrity Assessment Standards in Nigeria by Engr Nimot Muili
Structural Integrity Assessment Standards in Nigeria by Engr Nimot MuiliStructural Integrity Assessment Standards in Nigeria by Engr Nimot Muili
Structural Integrity Assessment Standards in Nigeria by Engr Nimot MuiliNimot Muili
 
Indian Tradition, Culture & Societies.pdf
Indian Tradition, Culture & Societies.pdfIndian Tradition, Culture & Societies.pdf
Indian Tradition, Culture & Societies.pdfalokitpathak01
 
Javier_Fernandez_CARS_workshop_presentation.pptx
Javier_Fernandez_CARS_workshop_presentation.pptxJavier_Fernandez_CARS_workshop_presentation.pptx
Javier_Fernandez_CARS_workshop_presentation.pptxJavier Fernández Muñoz
 
Analysis and Evaluation of Dal Lake Biomass for Conversion to Fuel/Green fert...
Analysis and Evaluation of Dal Lake Biomass for Conversion to Fuel/Green fert...Analysis and Evaluation of Dal Lake Biomass for Conversion to Fuel/Green fert...
Analysis and Evaluation of Dal Lake Biomass for Conversion to Fuel/Green fert...arifengg7
 
CS 3251 Programming in c all unit notes pdf
CS 3251 Programming in c all unit notes pdfCS 3251 Programming in c all unit notes pdf
CS 3251 Programming in c all unit notes pdfBalamuruganV28
 
SOFTWARE ESTIMATION COCOMO AND FP CALCULATION
SOFTWARE ESTIMATION COCOMO AND FP CALCULATIONSOFTWARE ESTIMATION COCOMO AND FP CALCULATION
SOFTWARE ESTIMATION COCOMO AND FP CALCULATIONSneha Padhiar
 

Recently uploaded (20)

22CYT12 & Chemistry for Computer Systems_Unit-II-Corrosion & its Control Meth...
22CYT12 & Chemistry for Computer Systems_Unit-II-Corrosion & its Control Meth...22CYT12 & Chemistry for Computer Systems_Unit-II-Corrosion & its Control Meth...
22CYT12 & Chemistry for Computer Systems_Unit-II-Corrosion & its Control Meth...
 
Katarzyna Lipka-Sidor - BIM School Course
Katarzyna Lipka-Sidor - BIM School CourseKatarzyna Lipka-Sidor - BIM School Course
Katarzyna Lipka-Sidor - BIM School Course
 
70 POWER PLANT IAE V2500 technical training
70 POWER PLANT IAE V2500 technical training70 POWER PLANT IAE V2500 technical training
70 POWER PLANT IAE V2500 technical training
 
Curve setting (Basic Mine Surveying)_MI10412MI.pptx
Curve setting (Basic Mine Surveying)_MI10412MI.pptxCurve setting (Basic Mine Surveying)_MI10412MI.pptx
Curve setting (Basic Mine Surveying)_MI10412MI.pptx
 
Robotics-Asimov's Laws, Mechanical Subsystems, Robot Kinematics, Robot Dynami...
Robotics-Asimov's Laws, Mechanical Subsystems, Robot Kinematics, Robot Dynami...Robotics-Asimov's Laws, Mechanical Subsystems, Robot Kinematics, Robot Dynami...
Robotics-Asimov's Laws, Mechanical Subsystems, Robot Kinematics, Robot Dynami...
 
Secure Key Crypto - Tech Paper JET Tech Labs
Secure Key Crypto - Tech Paper JET Tech LabsSecure Key Crypto - Tech Paper JET Tech Labs
Secure Key Crypto - Tech Paper JET Tech Labs
 
Module-1-Building Acoustics(Introduction)(Unit-1).pdf
Module-1-Building Acoustics(Introduction)(Unit-1).pdfModule-1-Building Acoustics(Introduction)(Unit-1).pdf
Module-1-Building Acoustics(Introduction)(Unit-1).pdf
 
STATE TRANSITION DIAGRAM in psoc subject
STATE TRANSITION DIAGRAM in psoc subjectSTATE TRANSITION DIAGRAM in psoc subject
STATE TRANSITION DIAGRAM in psoc subject
 
Comprehensive energy systems.pdf Comprehensive energy systems.pdf
Comprehensive energy systems.pdf Comprehensive energy systems.pdfComprehensive energy systems.pdf Comprehensive energy systems.pdf
Comprehensive energy systems.pdf Comprehensive energy systems.pdf
 
Gravity concentration_MI20612MI_________
Gravity concentration_MI20612MI_________Gravity concentration_MI20612MI_________
Gravity concentration_MI20612MI_________
 
Introduction to Artificial Intelligence: Intelligent Agents, State Space Sear...
Introduction to Artificial Intelligence: Intelligent Agents, State Space Sear...Introduction to Artificial Intelligence: Intelligent Agents, State Space Sear...
Introduction to Artificial Intelligence: Intelligent Agents, State Space Sear...
 
KCD Costa Rica 2024 - Nephio para parvulitos
KCD Costa Rica 2024 - Nephio para parvulitosKCD Costa Rica 2024 - Nephio para parvulitos
KCD Costa Rica 2024 - Nephio para parvulitos
 
Turn leadership mistakes into a better future.pptx
Turn leadership mistakes into a better future.pptxTurn leadership mistakes into a better future.pptx
Turn leadership mistakes into a better future.pptx
 
Structural Integrity Assessment Standards in Nigeria by Engr Nimot Muili
Structural Integrity Assessment Standards in Nigeria by Engr Nimot MuiliStructural Integrity Assessment Standards in Nigeria by Engr Nimot Muili
Structural Integrity Assessment Standards in Nigeria by Engr Nimot Muili
 
Indian Tradition, Culture & Societies.pdf
Indian Tradition, Culture & Societies.pdfIndian Tradition, Culture & Societies.pdf
Indian Tradition, Culture & Societies.pdf
 
Javier_Fernandez_CARS_workshop_presentation.pptx
Javier_Fernandez_CARS_workshop_presentation.pptxJavier_Fernandez_CARS_workshop_presentation.pptx
Javier_Fernandez_CARS_workshop_presentation.pptx
 
Analysis and Evaluation of Dal Lake Biomass for Conversion to Fuel/Green fert...
Analysis and Evaluation of Dal Lake Biomass for Conversion to Fuel/Green fert...Analysis and Evaluation of Dal Lake Biomass for Conversion to Fuel/Green fert...
Analysis and Evaluation of Dal Lake Biomass for Conversion to Fuel/Green fert...
 
ASME-B31.4-2019-estandar para diseño de ductos
ASME-B31.4-2019-estandar para diseño de ductosASME-B31.4-2019-estandar para diseño de ductos
ASME-B31.4-2019-estandar para diseño de ductos
 
CS 3251 Programming in c all unit notes pdf
CS 3251 Programming in c all unit notes pdfCS 3251 Programming in c all unit notes pdf
CS 3251 Programming in c all unit notes pdf
 
SOFTWARE ESTIMATION COCOMO AND FP CALCULATION
SOFTWARE ESTIMATION COCOMO AND FP CALCULATIONSOFTWARE ESTIMATION COCOMO AND FP CALCULATION
SOFTWARE ESTIMATION COCOMO AND FP CALCULATION
 

Ccna3 lab 9_1_5b_en

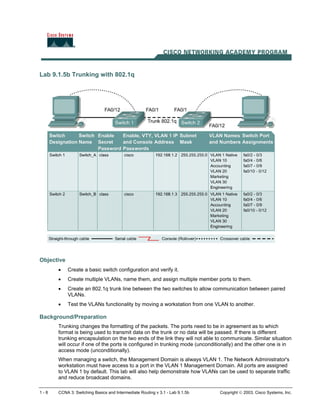
  • 1. Lab 9.1.5b Trunking with 802.1q Objective • Create a basic switch configuration and verify it. • Create multiple VLANs, name them, and assign multiple member ports to them. • Create an 802.1q trunk line between the two switches to allow communication between paired VLANs. • Test the VLANs functionality by moving a workstation from one VLAN to another. Background/Preparation Trunking changes the formatting of the packets. The ports need to be in agreement as to which format is being used to transmit data on the trunk or no data will be passed. If there is different trunking encapsulation on the two ends of the link they will not able to communicate. Similar situation will occur if one of the ports is configured in trunking mode (unconditionally) and the other one is in access mode (unconditionally). When managing a switch, the Management Domain is always VLAN 1. The Network Administrator's workstation must have access to a port in the VLAN 1 Management Domain. All ports are assigned to VLAN 1 by default. This lab will also help demonstrate how VLANs can be used to separate traffic and reduce broadcast domains. 1 - 8 CCNA 3: Switching Basics and Intermediate Routing v 3.1 - Lab 9.1.5b Copyright  2003, Cisco Systems, Inc.
  • 2. Cable a network similar to one of the diagram. The configuration output used in this lab is produced from 2950 series switch. Any other switch used may produce different output. The following steps are intended to be executed on each switch unless specifically instructed otherwise. Start a HyperTerminal session. Note: Go to the erase and reload instructions at the end of this lab. Perform those steps on all switches in this lab assignment before continuing. Step 1 Configure the switch Configure the Hostname, access and command mode passwords, as well as the management LAN settings. These values are shown in the chart. If problems occur while performing this configuration, refer to the “Basic Switch Configuration lab”. Do not configure VLANs and trunking yet. Step 2 Configure the hosts attached to the switch Configure the IP address, mask, and default gateway on each host. Be sure to choose addresses that are on the same subnet as the switch. Step 3 Verify connectivity a. To verify that the host and switch are correctly configured, ping the switch from the hosts. b. Were the pings successful? __________________________________________________ c. If the answer is no, troubleshoot the host and switches configurations. Step 4 Display the VLAN interface information On Switch_A, type the command show vlan at the Privileged EXEC prompt as follows: Switch_A#show vlan Note: There should be an entry for VLAN 1 and the default VLANs (1002 +). If other VLANs appear, they could be deleted as instructed in Step 2 of the Erasing and Reloading instructions at the end of this lab or refer to the Lab Exercise: Deleting VLAN Configurations. Step 5 Create and name three VLANs Enter the following commands to create and name three VLANs: Switch_A#vlan database Switch_A(vlan)#vlan 10 name Accounting Switch_A(vlan)#vlan 20 name Marketing Switch_A(vlan)#vlan 30 name Engineering Switch_A(vlan)#exit Use the show vlan command to verify that the VLANs have been created correctly. Step 6 Assign ports to a VLAN 10 Assigning ports to VLANs must be done from the interface mode. Enter the following commands to add ports 0/4 to 0/6 to VLAN 10: Switch_A#configure terminal Switch_A(config)#interface fastethernet 0/4 Switch_A(config-if)#switchport mode access Switch_A(config-if)#switchport access vlan 10 2 - 8 CCNA 3: Switching Basics and Intermediate Routing v 3.1 - Lab 9.1.5b Copyright  2003, Cisco Systems, Inc.
  • 3. Switch_A(config-if)#interface fastethernet 0/5 Switch_A(config-if)#switchport mode access Switch_A(config-if)#switchport access vlan 10 Switch_A(config-if)#interface fastethernet 0/6 Switch_A(config-if)#switchport mode access Switch_A(config-if)#switchport access vlan 10 Switch_A(config-if)#end Step 7 Assign ports to VLAN 20 Enter the following commands to add ports 0/7 to 0/9 to VLAN 20: Switch_A#configure terminal Switch_A(config)#interface fastethernet 0/7 Switch_A(config-if)#switchport mode access Switch_A(config-if)#switchport access vlan 20 Switch_A(config-if)#interface fastethernet 0/8 Switch_A(config-if)#switchport mode access Switch_A(config-if)#switchport access vlan 20 Switch_A(config-if)#interface fastethernet 0/9 Switch_A(config-if)#switchport mode access Switch_A(config-if)#switchport access vlan 20 Switch_A(config-if)#end Step 8 Assign ports to VLAN 30 Enter the following commands to add ports 0/10 to 0/12 to VLAN 30: Switch_A#configure terminal Switch_A(config)#interface fastethernet 0/10 Switch_A(config-if)#switchport mode access Switch_A(config-if)#switchport access vlan 30 Switch_A(config-if)#interface fastethernet 0/11 Switch_A(config-if)#switchport mode access Switch_A(config-if)#switchport access vlan 30 Switch_A(config-if)#interface fastethernet 0/12 Switch_A(config-if)#switchport mode access Switch_A(config-if)#switchport access vlan 30 Switch_A(config-if)#end Step 9 Create VLANs on Switch_B Repeat Steps 5 through 9 on Switch_B to create its VLANs Step 10 Display the VLAN interface information a. On both switches, type the command show vlan at the Privileged EXEC prompt as follows: Switch_A#show vlan b. Are ports 0/10 through 0/12 assigned to VLAN 30? __________________________________________________________________________ 3 - 8 CCNA 3: Switching Basics and Intermediate Routing v 3.1 - Lab 9.1.5b Copyright  2003, Cisco Systems, Inc.
  • 4. Step 11 Test the VLANs Ping from the host in Switch_A port 0/12 to the host in Switch_B port 0/12. a. Was the ping successful? ___________________________________________________ b. Why? __________________________________________________________________ Ping from the host in Switch_A port 0/12 to the switch IP 192.168.1.2. c. Was the ping successful? ___________________________________________________ d. Why? __________________________________________________________________ Step 12 Create the trunk On both switches, Switch_A and Switch_B, type the following command at the fastethernet 0/1 interface command prompt. Note that it is not necessary to specify the encapsulation on a 2950, since it only supports 802.1Q. Switch_A(config)#interface fastethernet 0/1 Switch_A(config-if)#switchport mode trunk Switch_A(config-if)#end Switch_B(config)#interface fastethernet 0/1 Switch_B(config-if)#switchport mode trunk Switch_B(config-if)#end 2900: Switch_A(config)#interface fastethernet0/1 Switch_A(config-if)#switchport mode trunk Switch_A(config-if)#switchport trunk encapsulation dot1q S witch_A(config-if)#end Switch_B(config)#interface fastethernet0/1 Switch_B(config-if)#switchport mode trunk Switch_B(config-if)#switchport trunk encapsulation dot1q Switch_B(config-if)#end Step 13 Verify the trunk a. To verify that port Fast Ethernet 0/1 has been established as a trunk port, type show interface fastethernet 0/1 switchport at the Privileged EXEC mode prompt. b. What type of trunking encapsulation is shown on the output results? __________________________________________________________________________ c. According to the output with show interface fastethernet 0/1 switchport on Switch_B, is there a difference from the Administrative Trunking Encapsulation from the Operational Trunking Encapsulation? __________________________________________________________________________ d. On the fragment “Trunking VLANs Enable” from the output, what does the word “ALL” mean? __________________________________________________________________________ e. What would happen if the two ports of the trunk were using different encapsulation? _________ f. Explain _________________________________________________________________ 4 - 8 CCNA 3: Switching Basics and Intermediate Routing v 3.1 - Lab 9.1.5b Copyright  2003, Cisco Systems, Inc.
  • 5. Step 14 Test the VLANS and the trunk Ping from the host in Switch_A port 0/12 to the host in Switch_B port 0/12. a. Was the ping successful? ___________________________________________________ b. Why? __________________________________________________________________ Ping from the host in Switch_A port 0/12 to the switch IP 192.168.1.2. c. Was the ping successful? ___________________________________________________ d. Why? __________________________________________________________________ Step 15 Move host. Move the host in Switch_A from port 0/12 to port 0/8. Wait until the port LED goes green and then go to the next step. Step 16 Test the VLANS and the trunk Ping from the host in Switch_A port 0/8 to the host in Switch_B port 0/12. a. Was the ping successful? ___________________________________________________ b. Why? __________________________________________________________________ Ping from the host in Switch_A port 0/8 to the switch IP 192.168.1.2. c. Was the ping successful? ___________________________________________________ d. Why? __________________________________________________________________ Step 17 Move host Move the host in Switch_B from port 0/12 to port 0/7. Wait until the port LED goes green and then go to the next step. Step 18 Test the VLANS and the trunk Ping from the host in Switch_A port 0/8 to the host in Switch_B port 0/7. a. Was the ping successful? ___________________________________________________ b. Why? __________________________________________________________________ Ping from the host in Switch_A port 0/8 to the switch IP 192.168.1.2. c. Was the ping successful? ___________________________________________________ d. Why? __________________________________________________________________ Step 19 Move hosts Move the host in Switch_A from port 0/8 to port 0/2. Wait until the port LED goes green and then go to the next step. Step 20 Test the VLANS and the trunk Ping from the host in Switch_A port 0/2 to the host in Switch_B port 0/7. a. Was the ping successful? ___________________________________________________ Ping from the host in Switch_A port 0/2 to the switch IP 192.168.1.2. 5 - 8 CCNA 3: Switching Basics and Intermediate Routing v 3.1 - Lab 9.1.5b Copyright  2003, Cisco Systems, Inc.
  • 6. b. Was the ping successful? ___________________________________________________ c. Why? __________________________________________________________________ Step 21 Move host Move the host in Switch_B from port 0/7 to port 0/3. Wait until the port LED goes green and then go to the next step. Step 22 Test the VLANS and the trunk Ping from the host in Switch_A port 0/2 to the host in Switch_B port 0/3. a. Was the ping successful? ___________________________________________________ b. Why? __________________________________________________________________ Ping from the host in Switch_B port 0/3 to the switch IP 192.168.1.2. c. Was the ping successful? ___________________________________________________ d. Why? __________________________________________________________________ Ping from the host in Switch_B port 0/3 to the switch IP 192.168.1.3. e. Was the ping successful? ___________________________________________________ f. Why? __________________________________________________________________ g. What conclusions can be drawn from the testing that was just performed in regards to VLAN membership and VLANs across a trunk? __________________________________________________________________________ __________________________________________________________________________ __________________________________________________________________________ Once the steps are complete, logoff by typing exit, and turn all the devices off. Then remove and store the cables and adapter. 6 - 8 CCNA 3: Switching Basics and Intermediate Routing v 3.1 - Lab 9.1.5b Copyright  2003, Cisco Systems, Inc.
  • 7. Erasing and Reloading the Switch For the majority of the labs in CCNA 3 and CCNA 4 it is necessary to start with an unconfigured switch. Use of a switch with an existing configuration may produce unpredictable results. These instructions allow preparation of the switch prior to performing the lab so previous configuration options do not interfere. The following is the procedure for clearing out previous configurations and starting with an unconfigured switch. Instructions are provided for the 2900, 2950, and 1900 Series switches. 2900 and 2950 Series Switches 1. Enter into the Privileged EXEC mode by typing enable. Switch>enable If prompted for a password, enter class, if that does not work, ask the instructor. 2. Remove the VLAN database information file. Switch#delete flash:vlan.dat Delete filename [vlan.dat]?[Enter] Delete flash:vlan.dat? [confirm] [Enter] If there was no VLAN file, this message is displayed. %Error deleting flash:vlan.dat (No such file or directory) 3. Remove the switch startup configuration file from NVRAM. Switch#erase startup-config The responding line prompt will be: Erasing the nvram filesystem will remove all files! Continue? [confirm] Press Enter to confirm. The response should be: Erase of nvram: complete 4. Check that VLAN information was deleted. Verify that the VLAN configuration was deleted in Step 2 using the show vlan command. If previous VLAN configuration information (other than the default management VLAN 1) is still present it will be necessary to power cycle the switch (hardware restart) instead of issuing the reload command. To power cycle the switch, remove the power cord from the back of the switch or unplug it. Then plug it back in. If the VLAN information was successfully deleted in Step 2, go to Step 5 and restart the switch using the reload command. 5. Software restart (using the reload command) 7 - 8 CCNA 3: Switching Basics and Intermediate Routing v 3.1 - Lab 9.1.5b Copyright  2003, Cisco Systems, Inc.
  • 8. Note: This step is not necessary if the switch was restarted using the power cycle method. a. At the Privileged EXEC mode enter the command reload. Switch(config)#reload The responding line prompt will be: System configuration has been modified. Save? [yes/no]: b. Type n and then press Enter. The responding line prompt will be: Proceed with reload? [confirm] [Enter] The first line of the response will be: Reload requested by console. After the switch has reloaded, the line prompt will be: Would you like to enter the initial configuration dialog? [yes/no]: c. Type n and then press Enter. The responding line prompt will be: Press RETURN to get started! [Enter] 1900 Series Switches 1. Remove VLAN Trunking Protocol (VTP) information. #delete vtp This command resets the switch with VTP parameters set to factory defaults. All other parameters will be unchanged. Reset system with VTP parameters set to factory defaults, [Y]es or [N]o? Enter y and press Enter. 2. Remove the switch startup configuration from NVRAM. #delete nvram This command resets the switch with factory defaults. All system parameters will revert to their default factory settings. All static and dynamic addresses will be removed. Reset system with factory defaults, [Y]es or [N]o? Enter y and press Enter. 8 - 8 CCNA 3: Switching Basics and Intermediate Routing v 3.1 - Lab 9.1.5b Copyright  2003, Cisco Systems, Inc.