SlideShare una empresa de Scribd logo
1 de 5
Descargar para leer sin conexión
RRRRRRRRRRRRRRRRRRRRRRRRRRR

projectlibrary


                                                    Make Your Own Jump Rings
                                                                                by Howard Siegel
                                                                        An artist’s money-saving method

                                                                                                                                       MATERIALS:
                                                                                                                                       18-gauge round fine silver wire, 50”
                                                                                                                                       18-gauge round sterling wire, 9’

                                                                                                                                       TOOLS:
                                                                                                                                       Coil winder
                                                                                                                                       3/8" (0.375") diameter mandrel
                                                                                                                                       0.147" diameter mandrel (made from a 12
                                                                                                                                       penny common nail 3?" long)
  Photos courtesy of the author and Herb Halpern.


                                                                                                                                       Spring clothes pin tool for applying tension
                                                                                                                                       and guiding the wire
                                                                                                                                       Flush wire cutter
                                                                                                                                       Two small plastic containers for holding coils
                                                                                                                                       and cut rings
                                                                                                                                       Jeweler’s saw
                                                                                                                                       2/0 or 3/0 jeweler’s saw blades.
                                                                                                                                       V block tool used to hold the sterling coils
                                                                                                                                       for sawing.
                                                                                                                                       Sharp scissors with long handles and short
                                                                                                                                       blades used to cut the fine silver coil.

  Howard Siegel offers this tutorial on an
  affordable way to make your own jump rings
  with 18g wire. The rings he makes in this                                                                                            TECHNIQUES:
                                                                                                                                       Wire, tool-making.
  tutorial were used to make the Chinese
  Stretched Knot Chain that can be found in Step
  by Step Wire Jewelry’s Spring 2008 issue.


                                                                           Copyright Interweave Not to be reprinted. All rights reserved.

                                                                                                     page 1


                                                       publishers of Step by Step Wire Jewelry magazine . . . join the online beading community at www.BeadingDaily.com
Make Your Own Jump Rings

   Step 1: Place the 0.375" diameter mandrel into the coil
           winder. Insert one end of the 18-gauge fine
           silver wire into a small hole, drilled through
           one leg of the spring clothes pin that comes
           out inside the rope groove.
           Pull about 1” of the wire through this hole, and
           through the jaws of the clothes pin. With chain
           nose pliers, make a 90° bend about 1/2" from
           the end of the wire. Insert the bent end
           between two of the jaws of the chuck holding
           the mandrel. This will hold the wire so that you
           can wind the coil.
           Turn the crank of the coil winder clockwise to
           wind the wire around the mandrel. Use the
           clothes pin tool to guide the wire so that the                                 Saw through the coil with the saw blade tipped
                                                                                                            Step 1
           turns of the wire coil lie side by side with no                                at about a 45 angle so that you are only
           gap between the turns.                                                         cutting through two or three turns at any time.
           Continue winding with the remainder of the                                     When the stack of cut rings becomes unstable
           wire. Slide the coil off the mandrel and place
           into one of the plastic containers. The coil
           should have at least 37 turns.

   Step 2: Place the 0.147" diameter mandrel into the coil
           winder.
           Make a 90° bend about 1/2" from the end of
           the wire. Wind a coil about 2” long. Cut the
           wire. Continue winding coils until all of the 18g
           sterling wire has been used.
           Tip: Limiting the length of the sterling coils to
           about 2” makes them easier to cut in the V
           block tool using the jeweler’s saw.
                                                                                                                   Step 2
   Step 3: Place a saw blade into one end of the jeweler’s                                and shifts, stop sawing, and remove the saw
           saw frame. Insert the saw blade through the                                    and coil from the V. Use the pointed scribe or
           center of a sterling coil. Place the other end of
           the saw blade into the other saw clamp,
           slightly compress the saw frame, and tighten
           the clamp on the saw blade. This applies
           tension on the saw blade making it easier to
           cut.
           Apply lubricant to the saw blade by pulling the
           teeth of the saw through beeswax or another
           suitable lubricant.
           Place the coil in the bottom of the V and pull
           the coil forward, using the teeth of the saw
           blade, until the near end of the coil is firmly
           against the stop. Hold the back of the coil
           with you left hand always maintaining pressure
                                                                                                                   Step 3
           against the end stop.                                                          awl to pull the cut rings from the rear of the V
                                                 Copyright Interweave. Not to be reprinted. All rights reserved.

                                                                           page 2


                   publishers of Step by Step Wire Jewelry magazine . . . join the online beading community at www.BeadingDaily.com
Make Your Own Jump Rings

            Saw through the coil with the saw blade tipped                                    pointing down the length of the coil and
            at about a 45° angle so that you are only                                         should also be pointed between the pad of your
            cutting through two or three turns at any time.                                   thumb and your fingers. This will assure that
            When the stack of cut rings becomes unstable                                      you do not cut your hand.
            and shifts, stop sawing, and remove the saw                                       With the scissors, cut the coil. When further
            and coil from the V. Use the pointed scribe or                                    cutting becomes difficult, withdraw the scissors
            awl to pull the cut rings from the rear of the V                                  from the coil. Brush the cut rings from the
            into the plastic container.                                                       scissor blade into the second plastic container.
            Reinsert the coil into the V, being very careful                                  Reinsert the scissors into the coil. Take care to
            to align the saw blade with the cut end of the                                    align the blades with the cut end of the last
            last ring. It is imperative that the saw blade be                                 turn on the coil. Continue cutting the coil until
            aligned with the partial cut in the rings on the                                  it has all been reduced to rings.
            coil. If not properly aligned, there will be two
            cuts in the ring, one only partially through the
            ring. When you try to open a ring with this
            second partial cut, the ring will break. After                           HOWARD SIEGEL
            properly aligning the blade in the coil,                                 Retired from an engineering
            continue sawing until all of the rings on the                            career in 1992, and has been
            coil have been cut.                                                      taking classes at the William
            TIP: There may be some cut rings on the saw                              Holland School since 1994.
            blade. These rings must be removed by rotating                           He has been actively working
            them until the cut through the ring is aligned                           in the lapidary arts,
            with the blade. The rings will then just slide                           silversmithing and chain
            off the blade.                                                           making. He teaches lost wax
                                                                                     casting and advanced chain making at the William
   Step 4: Grasp the fine silver coil in your left hand (if                          Holland School. He is a past president and active
           you’re right-handed) and hold the coil against                            member of the Society for Midwest Metalsmiths in
           the pad of your thumb with your fingers. The                              St. Louis, Mo. and has taught chain making
           coil should cross your palm at about a 45°                                workshops for them, Craft Alliance, and the Jacoby
           angle. Take the scissors in your right hand, and                          Arts Center, Alton, Ill. He has a Masters in
           insert one blade inside the coil while the other                          Metallurgy, and taught it at Washington University
           blade is above the coil. The scissors should be                           for 10 years. His work will be featured in a soon to
                                                                                     be released book, Twisted Wire.


                              Step 4


                                          Copyright Interweave. Not to be reprinted. All rights reserved.

                                                                    page 3


                publishers of Step by Step Wire Jewelry magazine . . . join the online beading community at www.BeadingDaily.com
RRRRRRRRRRRRRRRRRRRRRRRRRRR

projectlibrary


                                                           Fusing Fine Silver Rings
                                                                                            by Howard Siegel


                                                                                                                                                   TOOLS:
                                                                                                                                                   Fusing or soldering board with smooth
                                                                                                                                                   surface
                                                                                                                                                   Fire brick or an annealing pan
                                                                                                                                                   Butane fueled torch or Bernz-O-Matic
                                                                                                                                                   propane fueled pencil torch
                                                                                                                                                   Tweezers
                                                                                                                                                   Open one quart plastic container with water
                                                                                                                                                   Optivisor or similar magnifier
                                                                                                                                                   Resource: Butane torch from Harbor Freight
  Photos courtesy of the author and Herb Halpern.


                                                                                                                                                   Tool, harborfreight.com


                                                                                                                                                   TECHNIQUES:
                                                                                                                                                   Wire, fusing.


                                                                                                                                     Step 1: Place the fusing plate on the annealing pan
                                                                                                                                             or on top of the fire brick to lift it from the
                                                                                                                                             surface of your bench to prevent burning
                                                                                                                                             the bench with your torch.

                                                    Now that you’ve learned how to make your                                         Step 2: Close the fine silver rings so that the cut
                                                                                                                                             edges of the rings are in very good contact.
                                                    own jump rings, Howard Siegel explains how                                               This is done by over-forming the rings (or
                                                    to fuse them. The rings made in this tutorial                                            bringing the cut edges of the rings past
                                                                                                                                             each other, carefully pulling them apart,
                                                    can be used in his Chinese Stretched Knot                                                aligning the cut edges so that they are
                                                    Chain project in the Spring 2008 issue of Step                                           even when viewed from the edge of the
                                                                                                                                             ring, and when looking down the center of
                                                    by Step Wire Jewelry. Fusing is creating a joint                                         the ring.
                                                    in your rings, without the use of solder.


                                                                                       Copyright Interweave Not to be reprinted. All rights reserved.

                                                                                                                 page 1


                                                                   publishers of Step by Step Wire Jewelry magazine . . . join the online beading community at www.BeadingDaily.com
Fusing Fine Silver Rings


    Step 3: Place the closed ring on the fusing plate with
            the cut facing forward. Close all of the fine
            silver rings and place them in rows across the
            fusing plate with the cut in each ring facing
            the front of the plate.

    Step 4: Turn down the lighting in the room to make it
            easier to see the change in color of the rings as
            they are heated for fusing. Put on your
            Optivisor so that you can clearly watch the
            joint in each ring as it is heated for fusing.

    Step 5: Light the torch. Start with the ring at the rear
            left of the plate if holding the torch in your                                                                   Step 3
            right hand. This will keep you hand away from
            previously fused rings, and minimizes the
            opportunity to be accidentally burned.

    Step 6: Move the torch flame in a circular motion
            around the ring to be fused until it turns dull
            red. Move the flame to the joint in the ring and
            move the flame in a small circle concentrating
            the heat evenly on both sides of the joint.
            If the flame continues to be held on the joint,
            the ring will melt completely through, and a
            ball of metal will start to form on either side of
            the joint. If this occurs, toss it, the ring is
            scrap.
                                                                                                                         Step 6a
    Step 7: Fuse all of the fine silver rings. You will need                                   In a short time the silver at the joint will melt and
            30 fused rings to complete the Chinese                                             surface tension will pull the molten metal together
                                                                                               forming a joint. As soon as the metal melts, the flame
            Stretched Knot Chain in the Spring issue of                                        must be removed from the joint. If the flame is kept on
            Step by Step Wire Jewelry. Slide all of the fused                                  the joint, the joint area will get hotter and begin to thin
            rings off the fusing plate and into the water                                      out.
            filled container to cool them.

    Step 8: As an experiment, deliberately overheat the
            first ring that you try to fuse so that you can
            observe what happens when a ring is
            overheated. This operation is called fusing, and
            creates a joint without the use of solder.

      HOWARD SIEGEL
      Retired from an engineering career in 1992, and has been taking
      classes at the William Holland School since 1994. He has been actively
      working in the lapidary arts, silversmithing and chain making. He
      teaches lost wax casting and advanced chain making at the William
      Holland School. He is a past president and active member of the
      Society for Midwest Metalsmiths in St. Louis, Mo. and has taught
      chain making workshops for them, Craft Alliance, and the Jacoby Arts                                                   Step 6b
      Center, Alton, Ill. He has a Masters in Metallurgy, and taught it at
      Washington University for 10 years. His work will be featured in a
      soon to be released book, Twisted Wire.

                                                           Copyright Interweave. Not to be reprinted. All rights reserved.

                                                                                     page 2


                       publishers of Step by Step Wire Jewelry magazine . . . join the online beading community at www.BeadingDaily.com

Más contenido relacionado

La actualidad más candente (8)

Ice rings instruction
Ice rings instructionIce rings instruction
Ice rings instruction
 
Artistic wire catalog
Artistic wire catalogArtistic wire catalog
Artistic wire catalog
 
Costume shop tour
Costume shop tourCostume shop tour
Costume shop tour
 
Art on0508
Art on0508Art on0508
Art on0508
 
Process journal
Process journalProcess journal
Process journal
 
Skills lab
Skills labSkills lab
Skills lab
 
Handicrafts Catalog 2011 | Embroidered Bedding
Handicrafts Catalog 2011 | Embroidered BeddingHandicrafts Catalog 2011 | Embroidered Bedding
Handicrafts Catalog 2011 | Embroidered Bedding
 
Timber cutting hand saws
Timber cutting hand sawsTimber cutting hand saws
Timber cutting hand saws
 

Destacado (15)

Copper rivets
Copper rivetsCopper rivets
Copper rivets
 
Bead braceletfreem%20(2)
Bead braceletfreem%20(2)Bead braceletfreem%20(2)
Bead braceletfreem%20(2)
 
Jan. 2011 classes
Jan. 2011 classesJan. 2011 classes
Jan. 2011 classes
 
Beading daily-wire-wrapping
Beading daily-wire-wrappingBeading daily-wire-wrapping
Beading daily-wire-wrapping
 
How to Determine if Gold is Real or Fake
How to Determine if Gold is Real or FakeHow to Determine if Gold is Real or Fake
How to Determine if Gold is Real or Fake
 
XSS - Attacks & Defense
XSS - Attacks & DefenseXSS - Attacks & Defense
XSS - Attacks & Defense
 
Rivset Brochure
Rivset BrochureRivset Brochure
Rivset Brochure
 
Ci 102 Beading Jewlery Making
Ci 102 Beading Jewlery MakingCi 102 Beading Jewlery Making
Ci 102 Beading Jewlery Making
 
Finishing and polishing materials
Finishing and polishing materialsFinishing and polishing materials
Finishing and polishing materials
 
Reverse proxy
Reverse proxyReverse proxy
Reverse proxy
 
effects of Oxidation in daily life
effects of Oxidation in daily lifeeffects of Oxidation in daily life
effects of Oxidation in daily life
 
Soldering process
Soldering processSoldering process
Soldering process
 
Riveted joints
Riveted jointsRiveted joints
Riveted joints
 
Step by step_wire_jewelry_vol.1_no1
Step by step_wire_jewelry_vol.1_no1Step by step_wire_jewelry_vol.1_no1
Step by step_wire_jewelry_vol.1_no1
 
Learn to-bead-beads
Learn to-bead-beadsLearn to-bead-beads
Learn to-bead-beads
 

Similar a Make your-own-jump-rings-b

Similar a Make your-own-jump-rings-b (20)

Charming dream hacker_web
Charming dream hacker_webCharming dream hacker_web
Charming dream hacker_web
 
Art on0208
Art on0208Art on0208
Art on0208
 
Kumihimo crystal
Kumihimo crystalKumihimo crystal
Kumihimo crystal
 
Spiralbeadring
SpiralbeadringSpiralbeadring
Spiralbeadring
 
Spiralbeadring
SpiralbeadringSpiralbeadring
Spiralbeadring
 
Hogsett garnet goldwaves
Hogsett garnet goldwavesHogsett garnet goldwaves
Hogsett garnet goldwaves
 
Bbpdf0404106
Bbpdf0404106Bbpdf0404106
Bbpdf0404106
 
Hand Sewing Needles
Hand Sewing NeedlesHand Sewing Needles
Hand Sewing Needles
 
Qop0904layout
Qop0904layoutQop0904layout
Qop0904layout
 
Rajeev kt ppt
Rajeev kt pptRajeev kt ppt
Rajeev kt ppt
 
Wire jewelry-free-ebook
Wire jewelry-free-ebookWire jewelry-free-ebook
Wire jewelry-free-ebook
 
Big bold briolettes
Big bold briolettesBig bold briolettes
Big bold briolettes
 
Fanciful hoop earrings(2)
Fanciful hoop earrings(2)Fanciful hoop earrings(2)
Fanciful hoop earrings(2)
 
Coiled gemdrops
Coiled gemdropsCoiled gemdrops
Coiled gemdrops
 
Dragonfly earrings
Dragonfly earringsDragonfly earrings
Dragonfly earrings
 
Angel earrings tutorial
Angel earrings tutorialAngel earrings tutorial
Angel earrings tutorial
 
How to Make Fantastic Fall Earrings DIY Jewelry Making Tutorial
How to Make Fantastic Fall Earrings DIY Jewelry Making TutorialHow to Make Fantastic Fall Earrings DIY Jewelry Making Tutorial
How to Make Fantastic Fall Earrings DIY Jewelry Making Tutorial
 
How to Make Wire Wrapped Ammonite Jewelry DIY Jewelry Making Tutorial
How to Make Wire Wrapped Ammonite Jewelry DIY Jewelry Making TutorialHow to Make Wire Wrapped Ammonite Jewelry DIY Jewelry Making Tutorial
How to Make Wire Wrapped Ammonite Jewelry DIY Jewelry Making Tutorial
 
Form metrology Thread measurement in metrology.pptx
Form metrology Thread measurement in metrology.pptxForm metrology Thread measurement in metrology.pptx
Form metrology Thread measurement in metrology.pptx
 
Crystal blackberry
Crystal blackberryCrystal blackberry
Crystal blackberry
 

Más de Jose Miguel Lopez Garcia

ORDENANZA PARA LA PRESERVACIÓN, PROTECCIÓN Y FOMENTO AL DESARROLLO DE LA ACTI...
ORDENANZA PARA LA PRESERVACIÓN, PROTECCIÓN Y FOMENTO AL DESARROLLO DE LA ACTI...ORDENANZA PARA LA PRESERVACIÓN, PROTECCIÓN Y FOMENTO AL DESARROLLO DE LA ACTI...
ORDENANZA PARA LA PRESERVACIÓN, PROTECCIÓN Y FOMENTO AL DESARROLLO DE LA ACTI...Jose Miguel Lopez Garcia
 
El Artesano en el Codigo de Comercio de Venezuela / Chang Mora Kimlen y Salas...
El Artesano en el Codigo de Comercio de Venezuela / Chang Mora Kimlen y Salas...El Artesano en el Codigo de Comercio de Venezuela / Chang Mora Kimlen y Salas...
El Artesano en el Codigo de Comercio de Venezuela / Chang Mora Kimlen y Salas...Jose Miguel Lopez Garcia
 
La producción artesanal (Venezuela) / Bustos Flores , Carlos
La producción artesanal (Venezuela) / Bustos Flores , Carlos La producción artesanal (Venezuela) / Bustos Flores , Carlos
La producción artesanal (Venezuela) / Bustos Flores , Carlos Jose Miguel Lopez Garcia
 
Proyecto Ley de fomento y proteccion al desarrollo artesanal
Proyecto Ley de fomento y proteccion al desarrollo artesanalProyecto Ley de fomento y proteccion al desarrollo artesanal
Proyecto Ley de fomento y proteccion al desarrollo artesanalJose Miguel Lopez Garcia
 
Ley de-fomento-y-proteccion-al-desarrollo-artesanal año 93
Ley de-fomento-y-proteccion-al-desarrollo-artesanal año 93Ley de-fomento-y-proteccion-al-desarrollo-artesanal año 93
Ley de-fomento-y-proteccion-al-desarrollo-artesanal año 93Jose Miguel Lopez Garcia
 
Carta adhesion al sistema de Culturas Populares
Carta adhesion al sistema de Culturas PopularesCarta adhesion al sistema de Culturas Populares
Carta adhesion al sistema de Culturas PopularesJose Miguel Lopez Garcia
 
Gaceta oficial 39887 decreto dia del artesano
Gaceta oficial 39887 decreto dia del artesanoGaceta oficial 39887 decreto dia del artesano
Gaceta oficial 39887 decreto dia del artesanoJose Miguel Lopez Garcia
 
Proyecto de Ley de Fomento y Proteccion Artesanal de la republica Bolivariana...
Proyecto de Ley de Fomento y Proteccion Artesanal de la republica Bolivariana...Proyecto de Ley de Fomento y Proteccion Artesanal de la republica Bolivariana...
Proyecto de Ley de Fomento y Proteccion Artesanal de la republica Bolivariana...Jose Miguel Lopez Garcia
 

Más de Jose Miguel Lopez Garcia (20)

Presentación HUELLA ARTESANAL ccs 2023
Presentación HUELLA ARTESANAL ccs 2023Presentación HUELLA ARTESANAL ccs 2023
Presentación HUELLA ARTESANAL ccs 2023
 
ORDENANZA PARA LA PRESERVACIÓN, PROTECCIÓN Y FOMENTO AL DESARROLLO DE LA ACTI...
ORDENANZA PARA LA PRESERVACIÓN, PROTECCIÓN Y FOMENTO AL DESARROLLO DE LA ACTI...ORDENANZA PARA LA PRESERVACIÓN, PROTECCIÓN Y FOMENTO AL DESARROLLO DE LA ACTI...
ORDENANZA PARA LA PRESERVACIÓN, PROTECCIÓN Y FOMENTO AL DESARROLLO DE LA ACTI...
 
Ordenanza artesanal del municipio Chacao
Ordenanza artesanal del municipio ChacaoOrdenanza artesanal del municipio Chacao
Ordenanza artesanal del municipio Chacao
 
El Artesano en el Codigo de Comercio de Venezuela / Chang Mora Kimlen y Salas...
El Artesano en el Codigo de Comercio de Venezuela / Chang Mora Kimlen y Salas...El Artesano en el Codigo de Comercio de Venezuela / Chang Mora Kimlen y Salas...
El Artesano en el Codigo de Comercio de Venezuela / Chang Mora Kimlen y Salas...
 
La producción artesanal (Venezuela) / Bustos Flores , Carlos
La producción artesanal (Venezuela) / Bustos Flores , Carlos La producción artesanal (Venezuela) / Bustos Flores , Carlos
La producción artesanal (Venezuela) / Bustos Flores , Carlos
 
Proyecto Ley de fomento y proteccion al desarrollo artesanal
Proyecto Ley de fomento y proteccion al desarrollo artesanalProyecto Ley de fomento y proteccion al desarrollo artesanal
Proyecto Ley de fomento y proteccion al desarrollo artesanal
 
Ley de-fomento-y-proteccion-al-desarrollo-artesanal año 93
Ley de-fomento-y-proteccion-al-desarrollo-artesanal año 93Ley de-fomento-y-proteccion-al-desarrollo-artesanal año 93
Ley de-fomento-y-proteccion-al-desarrollo-artesanal año 93
 
Arte sano septiembre 2012
Arte sano septiembre 2012Arte sano septiembre 2012
Arte sano septiembre 2012
 
Carta adhesion al sistema de Culturas Populares
Carta adhesion al sistema de Culturas PopularesCarta adhesion al sistema de Culturas Populares
Carta adhesion al sistema de Culturas Populares
 
Arte sano noviembre 2012
Arte sano noviembre 2012Arte sano noviembre 2012
Arte sano noviembre 2012
 
Arte sano 01 noviembre2011
Arte sano 01 noviembre2011Arte sano 01 noviembre2011
Arte sano 01 noviembre2011
 
Arte sano 02 diciembre2011[1]
Arte sano 02 diciembre2011[1]Arte sano 02 diciembre2011[1]
Arte sano 02 diciembre2011[1]
 
El Artesan@
El Artesan@El Artesan@
El Artesan@
 
Gaceta oficial 39887 decreto dia del artesano
Gaceta oficial 39887 decreto dia del artesanoGaceta oficial 39887 decreto dia del artesano
Gaceta oficial 39887 decreto dia del artesano
 
Proyecto de Ley de Fomento y Proteccion Artesanal de la republica Bolivariana...
Proyecto de Ley de Fomento y Proteccion Artesanal de la republica Bolivariana...Proyecto de Ley de Fomento y Proteccion Artesanal de la republica Bolivariana...
Proyecto de Ley de Fomento y Proteccion Artesanal de la republica Bolivariana...
 
Bases generales Concurso Gran
Bases generales Concurso GranBases generales Concurso Gran
Bases generales Concurso Gran
 
Gran Explosion Bicentenaria Artesana
Gran Explosion Bicentenaria Artesana Gran Explosion Bicentenaria Artesana
Gran Explosion Bicentenaria Artesana
 
Step by step_wire_jewelry_vol.3_no.2_2007
Step by step_wire_jewelry_vol.3_no.2_2007Step by step_wire_jewelry_vol.3_no.2_2007
Step by step_wire_jewelry_vol.3_no.2_2007
 
Sswf1210 web
Sswf1210 webSswf1210 web
Sswf1210 web
 
Spider pinl
Spider pinlSpider pinl
Spider pinl
 

Make your-own-jump-rings-b

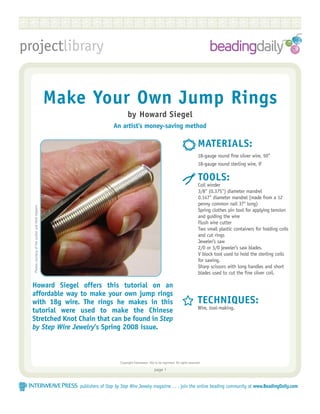
  • 1. RRRRRRRRRRRRRRRRRRRRRRRRRRR projectlibrary Make Your Own Jump Rings by Howard Siegel An artist’s money-saving method MATERIALS: 18-gauge round fine silver wire, 50” 18-gauge round sterling wire, 9’ TOOLS: Coil winder 3/8" (0.375") diameter mandrel 0.147" diameter mandrel (made from a 12 penny common nail 3?" long) Photos courtesy of the author and Herb Halpern. Spring clothes pin tool for applying tension and guiding the wire Flush wire cutter Two small plastic containers for holding coils and cut rings Jeweler’s saw 2/0 or 3/0 jeweler’s saw blades. V block tool used to hold the sterling coils for sawing. Sharp scissors with long handles and short blades used to cut the fine silver coil. Howard Siegel offers this tutorial on an affordable way to make your own jump rings with 18g wire. The rings he makes in this TECHNIQUES: Wire, tool-making. tutorial were used to make the Chinese Stretched Knot Chain that can be found in Step by Step Wire Jewelry’s Spring 2008 issue. Copyright Interweave Not to be reprinted. All rights reserved. page 1 publishers of Step by Step Wire Jewelry magazine . . . join the online beading community at www.BeadingDaily.com
  • 2. Make Your Own Jump Rings Step 1: Place the 0.375" diameter mandrel into the coil winder. Insert one end of the 18-gauge fine silver wire into a small hole, drilled through one leg of the spring clothes pin that comes out inside the rope groove. Pull about 1” of the wire through this hole, and through the jaws of the clothes pin. With chain nose pliers, make a 90° bend about 1/2" from the end of the wire. Insert the bent end between two of the jaws of the chuck holding the mandrel. This will hold the wire so that you can wind the coil. Turn the crank of the coil winder clockwise to wind the wire around the mandrel. Use the clothes pin tool to guide the wire so that the Saw through the coil with the saw blade tipped Step 1 turns of the wire coil lie side by side with no at about a 45 angle so that you are only gap between the turns. cutting through two or three turns at any time. Continue winding with the remainder of the When the stack of cut rings becomes unstable wire. Slide the coil off the mandrel and place into one of the plastic containers. The coil should have at least 37 turns. Step 2: Place the 0.147" diameter mandrel into the coil winder. Make a 90° bend about 1/2" from the end of the wire. Wind a coil about 2” long. Cut the wire. Continue winding coils until all of the 18g sterling wire has been used. Tip: Limiting the length of the sterling coils to about 2” makes them easier to cut in the V block tool using the jeweler’s saw. Step 2 Step 3: Place a saw blade into one end of the jeweler’s and shifts, stop sawing, and remove the saw saw frame. Insert the saw blade through the and coil from the V. Use the pointed scribe or center of a sterling coil. Place the other end of the saw blade into the other saw clamp, slightly compress the saw frame, and tighten the clamp on the saw blade. This applies tension on the saw blade making it easier to cut. Apply lubricant to the saw blade by pulling the teeth of the saw through beeswax or another suitable lubricant. Place the coil in the bottom of the V and pull the coil forward, using the teeth of the saw blade, until the near end of the coil is firmly against the stop. Hold the back of the coil with you left hand always maintaining pressure Step 3 against the end stop. awl to pull the cut rings from the rear of the V Copyright Interweave. Not to be reprinted. All rights reserved. page 2 publishers of Step by Step Wire Jewelry magazine . . . join the online beading community at www.BeadingDaily.com
  • 3. Make Your Own Jump Rings Saw through the coil with the saw blade tipped pointing down the length of the coil and at about a 45° angle so that you are only should also be pointed between the pad of your cutting through two or three turns at any time. thumb and your fingers. This will assure that When the stack of cut rings becomes unstable you do not cut your hand. and shifts, stop sawing, and remove the saw With the scissors, cut the coil. When further and coil from the V. Use the pointed scribe or cutting becomes difficult, withdraw the scissors awl to pull the cut rings from the rear of the V from the coil. Brush the cut rings from the into the plastic container. scissor blade into the second plastic container. Reinsert the coil into the V, being very careful Reinsert the scissors into the coil. Take care to to align the saw blade with the cut end of the align the blades with the cut end of the last last ring. It is imperative that the saw blade be turn on the coil. Continue cutting the coil until aligned with the partial cut in the rings on the it has all been reduced to rings. coil. If not properly aligned, there will be two cuts in the ring, one only partially through the ring. When you try to open a ring with this second partial cut, the ring will break. After HOWARD SIEGEL properly aligning the blade in the coil, Retired from an engineering continue sawing until all of the rings on the career in 1992, and has been coil have been cut. taking classes at the William TIP: There may be some cut rings on the saw Holland School since 1994. blade. These rings must be removed by rotating He has been actively working them until the cut through the ring is aligned in the lapidary arts, with the blade. The rings will then just slide silversmithing and chain off the blade. making. He teaches lost wax casting and advanced chain making at the William Step 4: Grasp the fine silver coil in your left hand (if Holland School. He is a past president and active you’re right-handed) and hold the coil against member of the Society for Midwest Metalsmiths in the pad of your thumb with your fingers. The St. Louis, Mo. and has taught chain making coil should cross your palm at about a 45° workshops for them, Craft Alliance, and the Jacoby angle. Take the scissors in your right hand, and Arts Center, Alton, Ill. He has a Masters in insert one blade inside the coil while the other Metallurgy, and taught it at Washington University blade is above the coil. The scissors should be for 10 years. His work will be featured in a soon to be released book, Twisted Wire. Step 4 Copyright Interweave. Not to be reprinted. All rights reserved. page 3 publishers of Step by Step Wire Jewelry magazine . . . join the online beading community at www.BeadingDaily.com
  • 4. RRRRRRRRRRRRRRRRRRRRRRRRRRR projectlibrary Fusing Fine Silver Rings by Howard Siegel TOOLS: Fusing or soldering board with smooth surface Fire brick or an annealing pan Butane fueled torch or Bernz-O-Matic propane fueled pencil torch Tweezers Open one quart plastic container with water Optivisor or similar magnifier Resource: Butane torch from Harbor Freight Photos courtesy of the author and Herb Halpern. Tool, harborfreight.com TECHNIQUES: Wire, fusing. Step 1: Place the fusing plate on the annealing pan or on top of the fire brick to lift it from the surface of your bench to prevent burning the bench with your torch. Now that you’ve learned how to make your Step 2: Close the fine silver rings so that the cut edges of the rings are in very good contact. own jump rings, Howard Siegel explains how This is done by over-forming the rings (or to fuse them. The rings made in this tutorial bringing the cut edges of the rings past each other, carefully pulling them apart, can be used in his Chinese Stretched Knot aligning the cut edges so that they are Chain project in the Spring 2008 issue of Step even when viewed from the edge of the ring, and when looking down the center of by Step Wire Jewelry. Fusing is creating a joint the ring. in your rings, without the use of solder. Copyright Interweave Not to be reprinted. All rights reserved. page 1 publishers of Step by Step Wire Jewelry magazine . . . join the online beading community at www.BeadingDaily.com
  • 5. Fusing Fine Silver Rings Step 3: Place the closed ring on the fusing plate with the cut facing forward. Close all of the fine silver rings and place them in rows across the fusing plate with the cut in each ring facing the front of the plate. Step 4: Turn down the lighting in the room to make it easier to see the change in color of the rings as they are heated for fusing. Put on your Optivisor so that you can clearly watch the joint in each ring as it is heated for fusing. Step 5: Light the torch. Start with the ring at the rear left of the plate if holding the torch in your Step 3 right hand. This will keep you hand away from previously fused rings, and minimizes the opportunity to be accidentally burned. Step 6: Move the torch flame in a circular motion around the ring to be fused until it turns dull red. Move the flame to the joint in the ring and move the flame in a small circle concentrating the heat evenly on both sides of the joint. If the flame continues to be held on the joint, the ring will melt completely through, and a ball of metal will start to form on either side of the joint. If this occurs, toss it, the ring is scrap. Step 6a Step 7: Fuse all of the fine silver rings. You will need In a short time the silver at the joint will melt and 30 fused rings to complete the Chinese surface tension will pull the molten metal together forming a joint. As soon as the metal melts, the flame Stretched Knot Chain in the Spring issue of must be removed from the joint. If the flame is kept on Step by Step Wire Jewelry. Slide all of the fused the joint, the joint area will get hotter and begin to thin rings off the fusing plate and into the water out. filled container to cool them. Step 8: As an experiment, deliberately overheat the first ring that you try to fuse so that you can observe what happens when a ring is overheated. This operation is called fusing, and creates a joint without the use of solder. HOWARD SIEGEL Retired from an engineering career in 1992, and has been taking classes at the William Holland School since 1994. He has been actively working in the lapidary arts, silversmithing and chain making. He teaches lost wax casting and advanced chain making at the William Holland School. He is a past president and active member of the Society for Midwest Metalsmiths in St. Louis, Mo. and has taught chain making workshops for them, Craft Alliance, and the Jacoby Arts Step 6b Center, Alton, Ill. He has a Masters in Metallurgy, and taught it at Washington University for 10 years. His work will be featured in a soon to be released book, Twisted Wire. Copyright Interweave. Not to be reprinted. All rights reserved. page 2 publishers of Step by Step Wire Jewelry magazine . . . join the online beading community at www.BeadingDaily.com