The Emancipation of Intelligence- Math Projects
•
1 recomendación•2,212 vistas

The Emancipation of Intelligence- Math Projects

Recomendados
Más contenido relacionado
La actualidad más candente
La actualidad más candente (20)
Similar a The Emancipation of Intelligence- Math Projects
Similar a The Emancipation of Intelligence- Math Projects (20)
Más de North Carolina Association for Middle Level Education
Más de North Carolina Association for Middle Level Education (20)
Último
Último (20)
The Emancipation of Intelligence- Math Projects
- 1. Chocolate Vanilla Strawberry Other By Brad Fulton California League of Middle Schools Educator of the Year, 2005 brad@tttpress.com Teacher to Teacher Press www.tttpress.com PO Box 233, Millville, CA 96062 Phone: (530) 547-4687 Fax: (530) 547-4317 © 2009, by Teacher to Teacher Press
- 2. Brad Fulton and Bill Lombard Teacher to Teacher Press “Building Mathematical Skill on a Foundation of Understanding” B r a d F u l t o n ♦ Consultants ♦ Educators ♦ Authors ♦ Seminar leaders ♦ Teacher trainers ♦ Conference speakers PO Box 233, Millville, CA 96062 (530) 547-4687 brad@tttpress.com Bill Lomba rd 5885 Avery Way, Redding, CA 96003 (530) 243-2064 bill@tttpress.com Known throughout the country for motivating and engaging teachers and students, Brad and Bill have authored over ten books that provide easy-to-teach yet mathematically-rich activities for busy teachers. In addition, they have co-authored six teacher training manuals full of activities and ideas that help teachers who believe mathematics must be both meaningful and powerful. Seminar leaders and trainers of mathematics teachers ♦ California Math Council and NCTM presenters ♦ Lead trainers for summer teacher training institutes ♦ Trainers/consultants for district, county, regional, and national workshops Authors and co-authors of mathematics curriculum ♦ Simply Great Math Activities series: five books covering all major strands ♦ Math Discoveries series: bringing math alive for students in middle schools ♦ Teacher training seminar materials handbooks for elementary, middle, and secondary school Available for workshops, keynote addresses, and conference sessions. All workshops provide participants with complete and ready-to-use activities. These activities require minimal preparation, use materials commonly found in classrooms, and give clear and specific directions and format. Participants will also receive journal prompts, homework suggestions, and ideas for extensions and assessment. Brad and Bill's math activities are the best I've seen in 30 years of teaching! Wayne Dequer, 7th grade math teacher "The high-energy, easy-to-follow handouts were clear. The instructors were great!" DeLinda Van Dyke, middle school teacher References available upon request © 2009, by Teacher to Teacher Press
- 3. Six projects are available on our “Math Projects” DVD: Baravelle’s Spiral, Proportional Reasoning, Exponential Growth, Pythagorean Spiral, Venn Diagram, and 3-D Name, plus complete instructions! NEW PRODUCT! Simply Great Math Activities DVDs! You asked, and we listened! So many of you have wanted us to put our math workshops on DVDs, and now they are available. Each professional quality DVD is approximately 30 to 45 minutes in length and comes with all the files of the worksheets along with instructional demonstrations and teaching tips. Now you can “attend” your own Bill and Brad workshop anytime you want. We offer DVD versions of some of our most popular activities. Check our website to see the latest titles. www.tttpress.com © 2009, by Teacher to Teacher Press
- 4. Visit the Teacher to Teacher Press website at… www.tttpress.com …for many other great math activities. On our website you will find: ♦ A complete catalog of our materials ♦ Free sample chapters from our books ♦ Downloadable handouts from our workshops ♦ Quotes for motivating students ♦ Links to other valuable resource websites ♦ Order forms for our materials ♦ A bibliography of great mathematical reading ♦ Calendars showing where and when you can hear Bill and Brad present Happy surfing! © 2009 by Teacher to Teacher Press © 2009, by Teacher to Teacher Press www.tttpress.com
- 5. Books by Brad and Bill The Language of Math helps teachers create a classroom environment rich in mathematical thinking by showing them how to easily incorporate oral and written language into their math classes. Over 100 journal and discussion starters are included along with extensive instructions for making the most of your math time. Here are a dozen unique and conceptual activities that will help your students add, subtract, multiply and divide fractions as well as connect them to decimal and percent representations. Both you and your students will love the novel and creative approach. Teachers are raving about how effective these activities have been in their classrooms. Children as young as fourth grade and college students alike say that algebra is easy and makes sense because of this incredible approach. Students don’t even think they are doing math sometimes because these activities are so fun and engaging, but they are developing rich and valuable number sense as they explore these eleven creative activities. © 2009, by Teacher to Teacher Press
- 6. Our first book is still one of our most popular. Every teacher we talk to who has tried this approach to functions has been amazed at what their students have learned and accomplished. Over 150 pages of multiple representations of functions cover such concepts as slope, intercept, and function notation. Even elementary students have developed an understanding of functions with this book. Exponents will finally make sense to your students after they participate in the unique activities found in this book. Both positive and negative exponents are demonstrated conceptually. Your students will even be able to explain why n0 = 1. Over one dozen geometry activities will excite your students as they discover the connections between geometry and fractions, decimals, percents, and even algebra. Area formulas, angle measurement, polygon attributes, vocabulary, and construction are covered. A dozen engaging and educational games await you and your students in this creative and highly adaptable book. You’ll find games that reinforce basic operations with whole numbers, fractions, decimals, and integers as well as algebraic skills. Game masters will serve a spectrum of grade levels and skill levels. Your students will beg for more! Download free sample chapters at our website: www.tttpress.com © 2009, by Teacher to Teacher Press
- 7. MATH............................... ____/50 _______________________________ _______________________________ MEASUREMENT .............. ____/25 _______________________________ _______________________________ PRESENTATION .............. ____/25 _______________________________ _______________________________ Other____________________________ TOTAL: .......................... ____/100 © 2009, by Teacher to Teacher Press
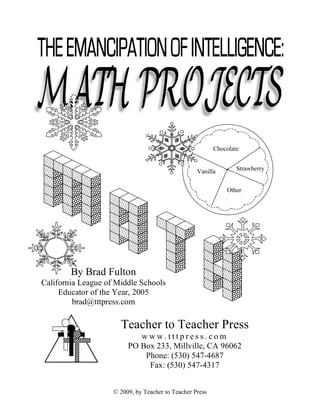
- 8. “Building Mathematical Skill on a Foundation of Understanding” Volume 401 November, 2004 Paper Plate Graphs Students enjoy studying data, especially when they create the data themselves. They tend to like making graphs of various types, but Chocolate they often need a lot of practice in what is most important: understanding the data. Often they spend so much time creating Strawberry representations of the data that they miss the more critical skills. Vanilla However in life outside the classroom, thought they are often bombarded with graphs, they are rarely required to create them. Other This month’s activity allows students to analyze data and draw conclusions about data without spending inordinate amounts of time creating the graphs. Students will be able to quickly create accurate pie charts that can be used for critical thinking activities. Procedure: Required Materials: Paper plates Optional Materials: Activity Master Transparency of Activity 1 Begin by asking the students to generate some data. Since they are making a pie graph, the data should be of the type in which it is helpful to compare parts to wholes. Lists of favorites, such as favorite foods, teams, sports, or pastimes are examples. For this Master description, we will pretend that a class of 24 students has been surveyed about their favorite flavors of ice cream with the top three responses shown here: Chocolate: 8 Vanilla: 6 Strawberry: 4 Other: 6 2 Now the students need to convert these to degrees. Though there are numerous ways to do this, an easy and efficient method is to multiply the respondents by 360 and divide by the total surveyed. For example, the 8 respondents who chose chocolate are multiplied by 360 and divided by 24 to get 120°. This results in 90° for vanilla, 60° for strawberry, and 90° for other. 3 Now students will make a pie graph of their data on a paper or Styrofoam plate. Notice that these plates have fluted edges for strength and design. Depending on size and brand, most plates have 18 or 24 scallops in the edge. Let’s assume we are using an 18-flute plate as in the activity master. Since the 18 flutes make up the entire 360° of the circular plate, each scallop must be 360 ÷ 18 = 20°. It is easy to make accurate estimations of the regions we need to graph. © 2009, by Teacher to Teacher Press
- 9. 4 The students will need to find the center of the plate. This can be done quite simply by either judging with the eye or by balancing the plate on a fingertip. For more accuracy, one creative method is to place a sheet of paper so that one corner touches the edge as shown. By connecting the points A and B where the paper intersects the edge of the plate, a diameter of the circle is created. All diameters pass through the center of a circle. Doing this once more from a different location results in two diameters that intersect at the circle’s center. A B 5 Now have them draw a line from the center to one of the points on the scalloped edge. The 120° section for chocolate will extend from this line through six scallops. A second line should be drawn there. The 90° vanilla section extends through 4½ scallops. The 60° strawberry section requires three scallops and the 90° section for other flavors uses the remaining 4½ scallops. 6 Although this is a simple graph, some very good questions can be asked about it. Here are some samples How much more popular is chocolate compared to strawberry? (Three times) How does the number of people who prefer chocolate compare to the combined total for vanilla and strawberry? (More total people like vanilla and strawberry.) What percent of people prefer vanilla? (25%) How does the way a question is phrased affect the results of the survey? For example, we could ask, “What is your favorite flavor of ice cream?” as opposed to, “Which of these is your favorite flavor: chocolate, vanilla, strawberry, fish, rutabagas, or dirt?” 7 You may want the students to graph the data on a plate that does not have 18 scallops just to compare the results. It is also a great idea to have them graph the results on a different size plate that has 18 scallops. This helps students see what it is they are measuring when they measure degrees. Many students are of the mistaken impression that the area of the wedge is important. They believe that 20° on a small plate represents a smaller group of respondents than 20° on a larger plate. This helps them see that what they are measuring is the degree of rotation about the center of the circle. The size of the circle is immaterial. 8 Good Tip! Buy different sizes and brands of plates. Some will have 18 flutes, some will have 24, and others may have more or less. Have students work with a variety of styles to gain a better sense of angles and their measures. Older students can use protractors to check for accuracy if you wish, but this skill is not required for this activity. © 2009, by Teacher to Teacher Press
- 10. We always love to hear from our readers. Email us with your comments on this activity at either brad@tttpress.com or bill@tttpress.com For More on Angle Measurement and Geometry: Geometry is often the forgotten strand. Often relegated to the back of the textbook, it is no wonder students often struggle with concepts such as angle measurement. Or book, Simply Great Explorations in Geometry offers many activities that make geometry easy to learn and simple to teach. Check it out on our website. www.tttpress.com © 2009, by Teacher to Teacher Press
- 14. “Building Mathematical Skill on a Foundation of Understanding” Volume 308 August, 2003 Getting to Know You As students begin their annual migration from swimming pools and summer camp back to their classrooms, their teachers will be looking for creative and powerful activities to welcome them back. Here we offer a fun activity that so engages students that they don’t even notice that they are doing fractions, decimals, percents, measurement, and Required Materials: data all at the same time! Paper Rulers Procedure: 1 2 3 On a piece of scratch paper, have students draw three interlocking circles forming seven enclosed regions as shown. Have them number the regions. Region eight is the area outside all three circles. Use the transparency master to model this. Next they should write a phrase that describes them or one of their interests on each of the three circles. Emphasize that these labels should portray positive characteristics about themselves. Each student then places a check mark or tally mark in the center region (number 5) since that region is within all three circles described by the three phrases. The Venn diagram should now look like as shown. Optional Materials: Transparency of Activity Master and Data Table Compasses and protractors I like basketball. 1 2 4 5 I have dark hair. 3 6 7 8 I am funny. 4 Explain that the students will leave their Venn diagrams on their desk as they go around the classroom and mark the diagrams of other students. For example, if a student likes basketball and is funny, but doesn’t have dark hair, he or she should put a mark in region four. If he or she is funny, but doesn’t have dark hair and doesn’t like basketball, he or she should mark region seven. If none of the traits applied, the student should mark region 8. 5 Allow time for the students to mark the other Venn diagrams. Then ask them to return to their seats to see the results. They will likely be surprised to find out there are other students who share their interests and characteristics. They will probably want to know who these people are. If you wish, you can have students sign their names or initials instead of making a mark to make identification possible. 6 Ask the students to get out another piece of paper, divide it into four columns. The first column should be labeled “region,” the second one “fraction,” the third one “decimal,” and Newsletter © 2003, by Teacher to Teacher Press To subscribe, log onto www.tttpress.com
- 15. 7 the last one “percent.” The leftmost column should then be numbered one through eight and “Total” should be written at the bottom as shown. Region Fraction Decimal Percent 1 Next the fraction column is filled in. To do this, the 2 student writes a ratio of the number of marks in 3 region one compared to the total number of marks 4 on the diagram. In the sample Venn diagram shown 5 at the bottom of this page, three of the 29 students 6 who marked the diagram marked region one. This 7 3 results in the fraction /29. The students should do 8 this for all eight regions. Total 8 Have them convert these fractions to decimals by dividing the numerator by the denominator. This can be done by pencil and paper or by calculator. The decimal should be rounded off to the thousandth place. The decimal for region one rounded to the thousandth place is .103. The students should convert their eight fractions into decimals. 9 The third step is to convert the decimals to percents. This is done by moving the decimal two places to the right and rounding to the nearest whole number. The decimal .103 would become 10%. Have the students convert all eight decimals to percents. 10 Next have the students total each column. Ask them what you should get when you add the 29 eight fractions. The answer for the sample should be /29. Ask them what this fraction means. It signifies that all 29 students, or one whole class, has signed the diagram. 11 Ask them what sum they expect to get in the decimal column. Some students may be alarmed that they get the answer .999. Ask them why this occurs. It is due to the rounding of the eight decimals and is an acceptable value. Ask them what a total of one means. Again it means that one whole class has responded. 12 Ask them what they think they will get for the sum of the percents. Although they will likely expect to get 100%, some diagrams may yield a total of 99% or 101%. Again this is due to rounding and is acceptable. 13 You may now ask students questions about either I like basketball. I have dark hair. their personal Venn diagram or the sample. These 1 3 2 questions use logic and and/or statements. Here are three questions about the sample and their 5 explanations: 6 4 1) What fraction of the students are funny? Explain your answer. 8 7 18 The fraction is /29. Although many students would 1 say the answer is only /29, the question includes all I am funny. students in the funny circle. This would include regions four (students who are funny, like basketball, but don’t have dark hair), five (students who are funny, like basketball, and have dark hair), Newsletter © 2003, by Teacher to Teacher Press To subscribe, log onto www.tttpress.com
- 16. six (students who are funny, don’t like basketball, but have dark hair), and seven (students who are funny, but don’t like basketball, and don’t have dark hair). 2) What percent of students are funny and have dark hair? Explain your answer. The percent of students who are funny and have dark hair is 48%. Since both conditions must be met, we must include only regions five and six. 3) What is the fraction for the number of students who are funny or have dark hair. In this case, since either condition can be true, we must include all regions in both the funny and dark hair circles. This means we count marks in regions two, three, four, five, six, and seven. Only the five students in regions one and eight are excluded. The 24 fraction is /29. I like basketball. 1 I have dark hair. 2 5 3 6 4 7 8 I am funny. I like basketball. I have dark hair. 1 2 5 3 6 4 7 8 I am funny. 14 For the final presentation copy, have the students neatly draw the three interlocking circles. You may wish to have them use a compass for this or trace around a circular object such as a can or roll of masking tape. For advanced students, you may wish to have them construct the Venn diagram using a compass and straightedge. 15 On a second piece of paper, students should make the table by drawing four columns using the following widths as measurements: Column 1 2 3 4 Width 1” 1.5” 2” 2” The columns are divided into nine one-inch tall rows Good Tip! for the eight regions and the total. This will result in a This is a great “getting-toone-inch border around the table. know-you” activity for the first week of school. Not only will 16 The data from the original scratch paper is transferred the students become more to this table using neat lettering or stencils. The Venn familiar with their classmates, diagram is also lettered neatly and the marks are the activity gets them started transferred. The student should letter their name neatly on some mathematics right too. The final project is then colored or decorated as away and shows the utility of desired. math. For young learners, you may wish to provide them with a copy of the blank Venn diagram rather than have them try to draw it. We always love to hear from our readers. Email us with your comments on this activity at either brad@tttpress.com or bill@tttpress.com Newsletter © 2003, by Teacher to Teacher Press To subscribe, log onto www.tttpress.com
- 17. Name_______________________ Activity master _______________ _______________ 1 3 2 4 5 6 7 8 _______________ Newsletter © 2003, by Teacher to Teacher Press To subscribe, log onto www.tttpress.com
- 18. Data table REGION FRACTION Newsletter © 2003, by Teacher to Teacher Press DECIMAL PERCENT To subscribe, log onto www.tttpress.com
- 19. Sample data table REGION FRACTION DECIMAL PERCENT 1 3 /29 .103 10% 2 2 /29 .069 7% 3 4 /29 .138 14% 4 3 /29 .103 10% 5 6 /29 .207 21% 6 8 /29 .276 28% 7 1 /29 .034 3% 8 2 /29 .069 7% TOTAL 29 .999 100% /29 Newsletter © 2003, by Teacher to Teacher Press To subscribe, log onto www.tttpress.com
- 20. Isometric Drawing A project in spatial visualization, volume, and surface area To help my students get their minds around the concepts of volume and surface area, and to foster spatial visualization skills, I had them practice making three-dimensional drawings on isometric paper. This paper has a system of triangular lines running diagonally in two directions and vertically. There are no horizontal lines. It is important to orient the paper to the sideways or landscape position before beginning. They began by sketching a single cube on their paper (Figure 1). Students should have a model such as a multi-link cube for this purpose. Another option is to project the cube onto a television by close-focusing a video camera onto the cube and feeding a cable from the camera to the TV. This insures that every student has the same view of the cube. They could see that its volume was one cube, and they knew its surface area was six square units. However, on the isometric paper, you could see exactly half of the surfaces. You could see the top, but not the bottom; the front, but not the back; and one side, but not the other. They realized that one of the advantages of an isometric view is that it shows you exactly half of the surface area. Then we snapped several cubes together and tried to sketch more advanced buildings (Figure 2). While some students found this challenging, others showed a natural talent for this skill. For those students, I asked them to try to sketch how the structure would look from the back without actually turning it around. Whether students were already proficient at isometric drawing or whether it was a struggle for them, they all improved quickly and dramatically. Even the students who initially said the assignment was difficult were genuinely engaged in the activity within a few minutes. Our next step was to try to sketch block letters (Figure 3). Some letters are simple while others are more complex (Figure 4). In general, students seemed to prefer the more advanced styles. In each case, students were asked to find the volume and surface area of each letter. Students then made isometric drawings of their names and found the volume and surface area of each letter and of their total name. These were then traced onto blank paper so the isometric lines no longer showed. While students were only asked to do their first name, some, such as Derek Turner, went well beyond my expectations creating incredible designs that contained optical illusions reminiscent of M.C. Eshcer’s art. Though some of Derek’s letters would be physically impossible to build, he has used the isometric paper to correctly find the volume and surface area of these imaginary letters. This project engaged not only my high mathematical thinkers, but many of my more reluctant learners as well. When visitors enter my room, these fine projects engage them as well and draw many “Oohs” and “Aahs”! Newsletter © 2003, by Teacher to Teacher Press To subscribe, log onto www.tttpress.com
- 21. Figure 1 Figure 2 Figure 3 Figure 4 Newsletter © 2003, by Teacher to Teacher Press To subscribe, log onto www.tttpress.com
- 22. Newsletter © 2003, by Teacher to Teacher Press To subscribe, log onto www.tttpress.com * * * * page are built on a 3 x 5 grid except those marked with an asterisk. *All letters on this
- 23. Newsletter © 2003, by Teacher to Teacher Press To subscribe, log onto www.tttpress.com
- 24. Name___________________ ________ TOP ISOMETRIC DRAWING PAPER Newsletter © 2003, by Teacher to Teacher Press To subscribe, log onto www.tttpress.com
- 25. Volume 212 December, 2002 Snowflake Geometry This seasonal project is a great motivator before or after Christmas vacation. It incorporates the concepts of lateral and rotational symmetry and makes a great art display too. Required Materials: paper (thin paper is best) scissors Optional Materials: construction paper glue spray paints Procedure: 1. Give students scissors and sheets of thin paper. Cheap printer paper works well. Even newsprint can be used, but white paper is better. 2. Begin by showing the students how to fold the five-point snowflake. This is the easier of the two patterns. Model each fold in front of the class, and check their progress often. C 3. Once they have reached the last step they will have a shape similar to the one on the right. They can cut away the shaded portion if they wish; it will not be used in the final snowflake. 4. They should then make cuts along edges AC and BC. These will form the design on the snowflake. Cuts made along edge AB will appear on the outer edge of the final B snowflake. Let them experiment. Cutting off point C will form a pentagonal hole in the center of the snowflake. Cutting off point C at an angle will form a five-point star in the center. 5. As the students experiment with various cuts along the edges, they will develop the concepts of lateral symmetry. For example, hearts and Christmas trees can be formed as shown here. When the snowflakes are unfolded, rotational symmetry can be observed. Lateral Symmetry Rotational Symmetry A
- 26. Teaching Tip: For a cool Yule look, cut snowflakes from gift-wrap paper. The paper is especially thin, and the seasonal designs are especially appropriate. 6. Using the six-point star pattern can create a more realistic snowflake. Although this is more difficult to fold and to cut, the students will be ready after practicing the five-point star. 7. Snowflakes can be displayed in many ways. White ones look great when glued on black or dark blue construction paper. These can be decorated with paint and glitter. Some students glue them onto holiday gift boxes for a unique handmade look. Consider using the "snow-in-a-can" that can be purchased in department stores. Lightly tack the snowflake onto a window using a glue stick, spray it with the canned snow, then peel off and discard the used snowflake for a wintry look. 8. Each snowflake creates both a "positive" and a "negative" image. Once a snowflake is cut out, it can be glued onto a contrasting color of paper. The scrap can also be unfolded and used as a stencil. Place the stencil over paper and spray it with a contrasting color of paint. The gold and silver metallic colors look nice. If your students like this activity, you can get many more great ideas and free lessons. Visit our web site at www.tttpress.com. Two new books! Simply Great Math Activities: Fractions, Decimals and Percents, and Simply Great Math Activities: Number Sense. These two new volumes are loaded with creative and high-interest activities that will jazz your most reluctant learners and challenge your most advanced thinkers. Get a preview and sample activities on our web site.
- 27. Five-point star: A Fold corner A to center point B. Begin with paper in "landscape" orientation. D Fold… C ..then unfold. Fold left edge to right edge. A B D B C C Fold lower left corner up along edge of CB. B Fold edge CD to edge CB. (Point C will be the center of the snowflake.) D Six-point star: Fold top edge to bottom edge. Begin with paper in "landscape" orientation. Fold top edge to bottom edge, then unfold. A Fold left edge to right edge. B D A B C Fold AB to center line, using point A as a corner. A Fold AD to AC. Point A is the center of the snowflake. C D