

Recomendados
Recomendados
Más contenido relacionado
La actualidad más candente
La actualidad más candente (19)
Destacado
Destacado (13)
Similar a Brother 720 dr 250
Similar a Brother 720 dr 250 (15)
Más de Valejet
Más de Valejet (9)
Brother 720 dr 250
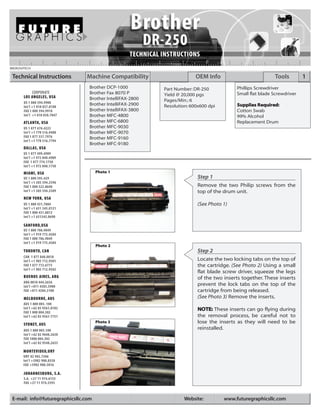
- 1. BRDR250TECH Technical Instructions Machine Compatibility OEM Info Tools 1 Brother DCP-1000 Part Number: DR-250 Phillips Screwdriver CORPORATE Brother Fax 8070 P Small flat blade Screwdriver LOS ANGELES, USA Yield @ 20,000 pgs Brother IntelliFAX-2800 Pages/Min.: 6 US 1 800 394.9900 Brother IntelliFAX-2900 Int’l +1 818 837.8100 Resolution: 600x600 dpi Supplies R equired: FAX 1 800 394.9910 Brother IntelliFAX-3800 Cotton Swab Int’l +1 818 838.7047 Brother MFC-4800 99% Alcohol ATLANTA, USA Brother MFC-6800 Replacement Drum US 1 877 676.4223 Brother MFC-9030 Int’l +1 770 516.9488 Brother MFC-9070 FAX 1 877 337.7976 Brother MFC-9160 Int’l +1 770 516.7794 Brother MFC-9180 DALLAS, USA US 1 877 499.4989 Int’l +1 972 840.4989 FAX 1 877 774.1750 Int’l +1 972 840.1750 MIAMI, USA Photo 1 US 1 800 595.429 Step 1 Int’l +1 305 594.3396 FAX 1 800 522.8640 Remove the two Philip screws from the Int’l +1 305 594.3309 top of the drum unit. NEW YORK, USA US 1 800 431.7884 (See Photo 1) Int’l +1 631 345.0121 FAX 1 800 431.8812 Int’l +1 631345.0690 SANFORD,USA US 1 800 786.9049 Int’l +1 919 775.4584 FAX 1 800 786.9049 Int’l +1 919 775.4584 Photo 2 TORONTO, CAN Step 2 CAN 1 877 848.0818 Int’l +1 905 712.9501 Locate the two locking tabs on the top of FAX 1 877 772.6773 the cartridge. (See Photo 2) Using a small Int’l +1 905 712.9502 flat blade screw driver, squeeze the legs BUENOS AIRES, ARG of the two inserts together. These inserts ARG 0810 444.2656 Int’l +011 4583.5900 prevent the lock tabs on the top of the FAX +011 4584.3100 cartridge from being released. MELBOURNE, AUS (See Photo 3) Remove the inserts. AUS 1 800 003. 100 Int’l +62 03 9561.8102 NOTE: These inserts can go flying during FAX 1 800 004.302 Int’l +62 03 9561-7751 the removal process, be careful not to SYDNEY, AUS Photo 3 lose the inserts as they will need to be AUS 1 800 003.100 reinstalled. Int’l +62 02 9648.2630 FAX 1800 004.302 Int’l +62 02 9548.2635 MONTEVIDEO,URY URY 02 902.7206 Int’l +5982 900.8358 FAX +5982 908.3816 JOHANNESBURG, S.A. S.A. +27 11 974.6155 FAX +27 11 974.3593 E-mail: info@futuregraphicsllc.com Website: www.futuregraphicsllc.com
- 2. 2 Brother DR-250 Technical Instructions Photo 4 Step 3 Step 3: Using a small flat blade screwdriv- er, release the two locking clips on the back of the cartridge. (See Photo 4) Photo 5 Step 4 Next to the locking tabs located on the top of the cartridge there are two slots were you can see the metal toner filling cover. Using a screwdriver push the cover down (towards the drum) till the guide tab is exposed. (See Photo 5) Photo 6 Photo 7 Step 5 Release the locking tabs on both sides of the cartridge. (See Photo 6 & 7) Photo 8 Step 6 Using a flat blade screwdriver release the two locking tabs from the top of the cartridge. (See Photo 8) Photo 9 Step 7 Step 7: Release the three locking tabs from the front of the cartridge. (See Photo 9) Need trustworthy, detailed Technical Instructions for another engine? Visit: www.futuregraphicsllc.com
- 3. Brother DR-250 Technical Instruction 3 Photo 10 Step 8 Lift the top cover of the cartridge to separate the two sections. Notes (See Photo 10) Photo 11 Step 9 Lift the transfer roller away from the drum. (See Photo 11) Clean the transfer roller using dry compressed air. Photo 12 Step 10 Remove the white transfer roller saddle from the non-gear side of the cartridge. (See Photo 12) Photo 13 Step 11 Remove the toner agitator drive gear from the side of the cartridge. (See Photo 13) Step 12 Rotate the drum locking hub counter- Photo 14 clockwise and remove the hub from the drum axle. (See Photo 14) Need help with a particular remanu- facturing problem? Call the Technical Resource Center from 8am - 5pm PST: 800 394.9900
- 4. 4 Brother DR-250 Technical Instructions Photo 15 Step 13 Slide the drum axle out from the drum. Notes (See Photo 15) Photo 16 Step 14 Lift out the drum from the cartridge. Remove the gray drive gear from the end of the drum. (See Photo 16) NOTE: The drive gear will need to be used with the new drum. It is important not to lose the gear. Photo 17 Step 15 Remove the Philips screw holding the metal gear housing end plate on the side of the cartridge. (See Photo 17) Photo 18 Step 16 Release the two locking tabs that hold the gear housing end plate in place. (See Photo 18) Remove the gear housing end plate. Photo 19 Step 17 Remove the large white gear and the developer roller drive gear from the end of the cartridge. (See Photo 19) Need trustworthy, detailed Technical Instructions for another engine? Visit: www.futuregraphicsllc.com
- 5. Brother DR-250 Technical Instruction 5 Photo 20 Step 18 Remove the metal developer roller bear- ing from the gear side of the cartridge. Notes (See Photo 20) Photo 21 Step 19 Move the developer roller contact bar to the side. (See Photo 21 & 22) Photo 22 Photo 23 Step 20 Move the drive gear end of the developer roller out and slide the roller away from the contact end. (See Photo 23) Photo 24 Step 21 Remove the gear and the metal developer roller bearing from the contact side of the roller. (See Photo 24) Need help with a particular remanu- facturing problem? Call the Technical Resource Center from 8am - 5pm PST: 800 394.9900
- 6. 6 Brother DR-250 Technical Instructions Photo 25 Step 22 Carefully remove the developer roller. Notes (See Photo 25) Clean the cartridge using dry compressed air or a vacuum. Photo 26 Step 23 Remove the bearing and spring from the end of the developer roller. (See Photo 26) Clean the roller using a dry lint free cloth. NOTE: Visually inspect the developer rollers. These rollers usually have a lot of wear and maybe unusable for a second cycle. Photo 27 Step 24 Clean the doctor blade using a cotton swab and Acetone. (See Photo 27) Photo 28 Step 25 Place the spring and bearing onto the developer roller. Install the developer roller back into the cartridge. (See Photo 28) Photo 29 Step 26 Install the developer roller bearing that’s has the smaller ID and the small gear onto the roller axle on the contact side. (See Photo 29) E-mail: info@futuregraphicsllc.com Website: www.futuregraphicsllc.com
- 7. Brother DR-250 Technical Instruction 7 Photo 30 Step 27 Pull the drive gear end of the developer roller out of the cartridge again. Install the Notes contact end gear onto the developer roller axle. Place the contact bar back onto the developer roller. (See Photo 30) Photo 31 Step 28 Install the developer roller bearing, drive gear and the large white gear onto the end of the cartridge. Place the metal gear housing end plate onto the cartridge and install the screw that holds the end plate in place. (See Photo 31) Photo 32 Step 29 Clean the corona wire using a cotton swab and alcohol. (See Photo 32) Photo 33 Step 30 Place the drive gear onto the drum and install the drum into the cartridge. (See Photo 33) Photo 34 Step 31 Slide the drum axle through the drum starting on the contact side. Install the drum axle locking hub onto the drum axle. Rotate the hub clock-wise to lock the hub in position. Need help with a particular remanu- (See Photo 34) facturing problem? Call the Technical Resource Center from 8am - 5pm PST: 800 394.9900
- 8. 8 Brother DR-250 Technical Instructions RESET TING THE DRUM COUNTER Photo 35 Step 32 Install the white transfer roller saddle onto the contact side of the cartridge. Step 1 Place the transfer roller into position, Install the jagged end of the clear atop of the drum. reset sheet into the cartridge between the drum and transfer (See Photo 35) roller. (See Photo 1) Photo 36 Photo 1 Step 33 Place the toner agitator gear onto the cartridge. (See Photo 36) Photo 37 Step 34 Place the top of the section of the Step 2 cartridge onto the bottom. Press down Rotate the drum so the reset sheet till the top of the cartridge snaps into is fed into the cartridge and the end place. Install the two screws that hold the of the sheet is flush with the end of lid in place. the cartridge with the jagged end of the sheet sticking out the top of (See Photo 37) the cartridge. (See Photo 2) NOTE: Once the sheet is fed through the printer, the machine Photo 38 Step 35 will reset the drum counter. Install the two inserts into the two lock- ing taps on top of the cartridge. Photo 2 (See Photo 38) NOTE: The two legs on the inserts will face up away from the locking tabs. Photo 39 Step 36 Slide the toner fill cover plate up so the top of the plate covers the guide tads on the top section of the cartridge. (See Photo 39) Need help with a particular remanu- facturing problem? Call the Technical Resource Center from Step 37 8am - 5pm PST: 800 394.9900 Insert toner cartridge and test.
- 9. Brother DR-250 Technical Instruction 9 Remanufacturing the Brother DR-250 This new family of multifunction Streaking caused by worn developer machines was released to replace the rollers is a common problem with these now discontinued Brother HL 720. Like drum units. Careful visual inspection of the HL720, these of machines use sepa- the developer roller is important to pro- rate drum and toner units. Similar look- ducing a quality product. ing in appearance to the DR200, the new DR-250 uses different drum gears and As with most new releases, an employs molding differences in the car- improvement to the engines perform- tridge prevents the cartridges from ance was accomplished by increasing being interchangeable. the printers speed to 10 pages per However, the same problems that minute while maintaining the same 600 DR-250 haunt the DR-200 also plague the DR-250. x 600dpi print resolution. Future Graphics (FG) is a distributor of compatible replacement parts and products for imagining equipment. None of FG's products are genuine OEM replacement parts and no affiliation or sponsorship is to be implied between FG and any OEM.