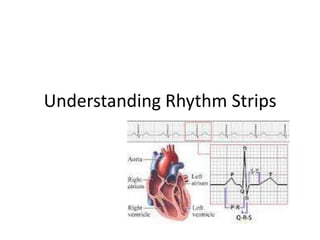
2. Waveforms and Components of The
ECG Pattern
• A waveform
– A positive or a negative defection that begins and ends at the
baseline
– It is an electrical representation of depolarization and
repolarization occurring in the heart
• When there is NO electrical activity is detected, a straight
line (isoelectric or base line) is recorded
• The waveforms produced by the heart’s electrical
conduction system are called
– P
– QRS
– T
– May or may not be a U Wave
3. ECG Waveforms
• P wave
– Occurs when the right and left atria are stimulated
• QRS complex
– Occurs when the right and left ventricles are
stimulated
• T wave
– Represents electrical recovery or return to a resting
state for the ventricles
• U wave
– If see, is thought to represent the repolarization of the
Purkinje fibers
4. ECG Waveforms
• P wave
– Normally an upright and rounded waveform
• QRS complex
– Usually the largest of all the waveforms and is spike
shaped and narrow in appearance
• T wave
– Appears as a slightly asymmetric upright waveform
– It is usually larger than the P wave and smaller than
the QRS
7. ECG Segments
• Segment
– Length of baseline between two waves
• PR segment
– Represents the delay of the impulse in the AV node
• ST segment
– Represents the early part of repolarization of the right and left
ventricles
8. ECG Intervals
• Interval is defined as the combination of a
wave or several waves and a segment
• By measuring time intervals on the ECG, it can
be determined how long the electrical wave
takes to pass through the heart
9. ECG Intervals
• PR interval
– P wave & PR segment
– Corresponds to the spread of the electrical
impulse through the atria and the delay of the
impulse in the AV node before it travels to the
ventricular muscle tissue
• QT interval
– QRS complex & ST segment & T wave
– Represents electrical stimulation and recovery of
the ventricles
11. ECG Paper and Measurements
• ECG paper
– Graph paper used to measure rates of impulse
formation and the duration of the electrical events
that occur in the heart
– Vertical and horizontal lines, which from large and
small boxes
– Vertical lines
• Measure voltage in millivolts
– Horizontal lines
• Measure time in seconds
12. ECG Paper and Measurements
• By counting the small or large boxes from the
beginning to the end of the ECG waveforms
and intervals, we can calculate the time it
takes for the electricity to travel through
certain parts of the heart and the rate at
which impulses occur
13. ECG Paper and Measurements
Time Equivalents of Small Boxes Time Equivalents of Large Boxes
• 1 small box = 0.04 second • 1 large box = 0.20 second
• 2 small boxes = 0.08 second • 5 large boxes = 1 second
• 3 small boxes = 0.12 second • 15 large boxes = 3 seconds
• 4 small boxes = 0.16 second • 30 large boxes = 6 seconds
• 5 small boxes = 0.20 second
14. Normal ECG Pattern and
Measurements
• P Wave: Upright, smooth and rounded, and
no more than 2.5 mm in height
15. Normal ECG Pattern and
Measurements
• PR Interval: Measure 0.12 to 0.20 second
wide or 3 to 5 small boxes
16. Normal ECG Pattern and
Measurements
• QRS: Narrow in appearance, upright in Leads
I, II, and III. Measures 0.04 to 0.11 second
wide or 1 to 2 ½ small boxes
18. Normal ECG Pattern and
Measurements
• T Wave: Slightly asymmetric, upright, and less
than half the height of the QRS complex or 5
mm in height or less
19. Normal ECG Pattern and
Measurements
• QT interval: QT interval is less than half the R-
R interval or 0.36 to 0.44 seconds or 9 to 11
small boxes
– The duration of the QT interval varies according to
age, gender, and heart rate
• As the heart rate increases
– QT interval decreases
• As the heart rate decreases
– QT interval increases
20. Normal ECG Pattern and
Measurements
• QT Interval
– Fast heart rate
• Small QT interval
– Slow heart rate
• Large QT interval
21. Normal ECG Pattern and
Measurements
• U Wave: Upright and rounded. Usually less
than 2 mm in height and smaller than that of
the preceding T wave
22. Abnormal Characteristics of the ECG
Pattern
• Abnormal P wave
– Wide or notched-Left atrial enlargement or
ectopic impulse from atria
– Tall and pointed (peaked) – Right atrial
enlargement or ectopic impulse from atria
– Negative (Inverted) - ectopic pacemaker in the AV
junction
23. Abnormal Characteristics of the ECG
Pattern
• Wide or notched
• Tall and pointed (peaked)
• Negative (inverted)
24. Abnormal Characteristics of the ECG
Pattern
• Abnormal PR Interval
– A PR interval greater than 0.20 second wide is
abnormal
– This may be seen in
• AV blocks
• Hypothyroidism
• Digitalis toxicity
25. Abnormal Characteristics of the ECG
Pattern
• Abnormal QRS complex:
– A wide QRS (greater than 0.12 second wide)
• may be seen when an impulse originates from an
ectopic site in the ventricular myocardium
• If there is a delay or block of the impulse in the bundle
branches
26. Abnormal Characteristics of the ECG
Pattern
• Abnormal ST segment
– Elevated ST segment
• Elevated more than 1 mm in the limb leads or 2 mm in
the precordial leads
– Suggestive of myocardial injury
» infarction
27. Abnormal Characteristics of the ECG
Pattern
• Abnormal ST segment
– Scoop ST depression
• May be caused by digitalis toxicity
– Depressed ST segment
• More than 1 mm
– Suggestive of myocardial ischemia
28. Abnormal Characteristics of the ECG
Pattern
• Abnormal T wave
– Negative (inverted)
• Suggest myocardial ischemia or infarction
29. Abnormal Characteristics of the ECG
Pattern
• Abnormal T wave
– Low, flattened T waves
• Can be seen with hypokalemia (low potassium)
30. Abnormal Characteristics of the ECG
Pattern
• Abnormal T Wave
– Tall Tented T waves
• Suggestive of hyperkalemia (high potassium)
31. Abnormal Characteristics of the ECG
Pattern
• Abnormal QT interval
– Prolonged (greater than 0.44 seconds)
• May be congenital or acquired
– i.e. medications, electrolyte abnormalities
32. Abnormal Characteristics of the ECG
Pattern
• Abnormal U Wave
– A U wave taller than 2 mm
• Electrolyte imbalance
• Medications
• Hyperthyroidism
• Central nervous system
disease
33. Steps for Analyzing a Rhythm Strip
• A quick method for analyzing a rhythm strip
– There are several steps in analyzing a rhythm strip
– When analyzing a rhythm strip, don’t forget to
check the patient
34. Steps for Analyzing a Rhythm Strip
• Step 1:
– Evaluate the P waves
• Look for the presence of P waves and compare the
shape and size of all P waves
• All the P waves should be upright and rounded and
uniform in appearance
• P wave should be present before each QRS
35. Steps for Analyzing a Rhythm Strip
• Step 2:
– Evaluate QRS Complexes
• All of the QRS’s should be uniform and narrow in
appearance
36. Steps for Analyzing a Rhythm Strip
• Step 2: continued
– Measuring the QRS less than 0.12
• Begin from the point where the first wave of the
complex begins to deviate from the baseline and end
where the complex returns to the baseline
• Count the number of small boxes and multiply by o.o4
seconds
37. Steps for Analyzing a Rhythm Strip
• Step 3:
– Calculate the Atrial and Ventricular Heart Rates
• There are a couple of methods to discuss
• One will only be used by an MST
– Six-Second Method
38. Steps for Analyzing a Rhythm Strip
• Step 3: continued
– A normal heart rate in the resting adult is between
60 and 100
– A rate below 60
• bradycardia
– A rate above 100
• tachycardia
– The atrial rate should be the same as the
ventricular rate
39. Steps for Analyzing a Rhythm Strip
• Step 3: continued
– Six-Second Method (can be used for regular or
irregular rhythm patterns)
• Print off six seconds of ECG paper (use markers at the
top or bottom of the paper
– Atrial Rate
» Count the number of P waves within a period of six
seconds and multiply that number by 10
– Ventricular Rate
» Count the number of QRS complexes within six seconds
and multiply by 10
40. Steps for Analyzing a Rhythm Strip
• Step 3: continued
– Small Box Method (best used if the rhythm is
regular, but may be used if the rhythm is irregular
and a rate range is given)
• Atrial rate
– Count the number of small boxes between two P waves, and
find the corresponding rate on the small box calculation chart
• Ventricular rate
– Count the number of small boxes between two QRS
complexes and find the corresponding rate on the small box
calculation chart
41. Steps for Analyzing a Rhythm Strip
• Step 4:
– Determine the regularity of the rhythm (pattern)
• Measure the distance between two consecutive QRS’s
and compare that distance with the other R-R intervals
• If the rhythm is regular, the R-R intervals will be the
same
42. Steps for Analyzing a Rhythm Strip
• Step 5:
– Measure the PR intervals
• Count the number of small boxes from the beginning of
the P wave to the beginning of the QRS
• Multiply this number by 0.04 seconds
• The PR intervals should all be the same and measure
0.12 to 0.20 seconds
43. Steps for Analyzing a Rhythm Strip
• Step 6:
– Measure the QT interval
• Count the number of small boxes from the beginning of
the Q wave to the end of the T wave
• Multiply this number by 0.04 seconds
• 0.36 to 0.44 seconds or 9 to 11 small boxes for normal
range
44. Steps for Analyzing a Rhythm Strip
• Step 7:
– Compare your findings to what is normal for the
patient