SlideShare una empresa de Scribd logo
1 de 2
Descargar para leer sin conexión
Electus Distribution Reference Data Sheet: RELAYDRV.PDF (1)

RELAY DRIVING BASICS
   Relays are components which allow a low-power circuit to
switch a relatively high current on and off, or to control signals                                   +12V                                    +12V
that must be electrically isolated from the controlling circuit                                                  RLY1                                   Q2
                                                                                                                                Vin    R2
itself. Newcomers to electronics sometimes want to use a
                                                                                             D1
relay for this type of application, but are unsure about the
details of doing so. Here’s a quick rundown.
   To make a relay operate, you have to pass a suitable ‘pull-in’                                                                                       RLY2
and ‘holding’ current (DC) through its energising coil. And
generally relay coils are designed to operate from a particular                                                                        D2
                                                                                      Vin     R1
supply voltage — often 12V or 5V, in the case of many of the                                                   Q1
small relays used for electronics work. In each case the coil has
a resistance which will draw the right pull-in and holding
currents when it’s connected to that supply voltage. So the
basic idea is to choose a relay with a coil designed to operate                        A. NPN driver, relay on for Vin = +12V    B. PNP driver, relay on for Vin = 0V
from the supply voltage you’re using for your control circuit                                            & off for Vin = 0V                         & off for Vin = +12V
(and with contacts capable of switching the currents you want
to control), and then provide a suitable ‘relay driver’ circuit so
that your low-power circuitry can control the current through                          If our relay has a coil resistance of say 180Ω, so that it draws
the relay’s coil. Typically this will be somewhere between 25mA                    say 67mA at 12V, we’d need to reduce R1 to say 8.2kΩ, to
and 70mA.                                                                          increase the base current to about 1.4mA. Conversely if the
   Often your relay driver can be very simple, using little more                   relay coil is 360Ω and draws only 33mA, we could increase R1
than an NPN or PNP transistor to control the coil current. All                     to 15kΩ, giving about 0.76mA of base current. Each time we
your low-power circuitry has to do is provide enough base                          go for about twice the relay coil current divided by Q1’s hFE —
current to turn the transistor on and off, as you can see from                     get the idea?
diagrams A and B.                                                                      As you can see a power diode D1 (1N4001 or similar) is
   In A, NPN transistor Q1 (say a BC337 or BC338) is being                         connected across the relay coil, to protect the transistor from
used to control a relay (RLY1) with a 12V coil, operating from                     damage due to the back-EMF pulse generated in the relay coil’s
a +12V supply. Series base resistor R1 is used to set the base                     inductance when Q1 turns off.
current for Q1, so that the transistor is driven into saturation                       The basic NPN circuit in diagram A is fine if you want the
(fully turned on) when the relay is to be energised. That way,                     relay to energise when your control voltage Vin is high (+12V),
the transistor will have minimal voltage drop, and hence                           and be off when Vin is low (0V). But what if you want the
dissipate very little power — as well as delivering most of the                    opposite? That’s where you’d opt for a circuit like that shown
12V to the relay coil.                                                             in diagram B, using a PNP transistor like the BC327 or BC328.
   How do you work out the value of R1? It’s not hard. Let’s                       This is essentially the same circuit as in A, just swung around
say RLY1 needs 50mA of coil current to pull in and hold                            to suit the PNP transistor’s polarity.
reliably, and has a resistance of 240Ω so it draws this current                        This time transistor Q2 will turn on and energise the relay
from 12V. Our BC337/338 transistor will need enough base                           when Vin is low (0V), and will turn off when Vin is high (+12V).
current to make sure it remains saturated at this collector                        Otherwise everything works just as before, and the value of
current level.                                                                     base resistor R2 is worked out in the same way as for R1. In
   To work this out, we simply make sure that the base current                     fact because the minimum hFE of the BC327/328 PNP
is greater than this collector current divided by the transistor’s                 transistors is also 100 at 100mA, you could use exactly the
minimum DC current gain hFE. So as the BC337/338 has a                             same values of R2 to suit each relay resistance/current.
minimum hFE of 100 (at 100mA), we’d need to provide it with                            The simple transistor driver circuits of A and B are very low
at least 50mA/100 = 0.5mA of base current.                                         in cost, and are generally fine for driving most relays. However
   In practice, you’d give it roughly double this value, say 1mA                   there may be occasions, such as when your control circuit is
of base current, just to make sure it does saturate. So if your                    based on CMOS logic, where the base current needed by
control signal Vin was switching between 0V and +12V, you’d                        these circuits is a bit too high.
give R1 a value of say 11kΩ, to provide the 1mA of base                                For these situations the circuit shown in C might be of
current needed to turn on both Q1 and the relay.                                   interest, because it needs rather less input current. As you can
                                                                                   see it uses a readily available and very low cost 555 IC as the
                                                                                   relay driver, plus only one extra component: bypass capacitor
                                              +5V                                  C1.
                                                                       RLY3            Although we normally think of the 555 as a timer/oscillator,
                                                    D3                             it’s actually very well suited for driving a small relay. Output pin
                              4           8                                        3 can both source and sink 200mA (enough to handle most
                     7
                                                                                   small relays comfortably), and the internal flipflop which
                     6            IC1           3                                  controls its output stage is triggered swiftly between its two
      Vin R3                                                                       states by internal comparators connected to the two sensing
                                  555
                     2                                                             inputs on pins 2 and 6. When these pins are taken to a voltage
                                                                                   above 2/3 the supply voltage, the output switches low (0V);
                              1           5                                        then they are taken below 1/3 the supply voltage, the output
                                              C1                                   swings high. And the 555 can happily work at 5V, as you can
                                              0.1uF                                see, so it’s very suitable for driving a 5V relay coil from this
                                                                                   supply voltage.
            C. 555 'timer' IC as relay driver. Relay on for Vin > 2/3Vcc (3.3V),
                                                                                       Because the sensing inputs of the 555 are voltage sensing
                                                  & off for Vin < 1/3Vcc (1.66V)   and need only a microamp or so of current, the value of input
Electus Distribution Reference Data Sheet: RELAYDRV.PDF (2)
resistor R3 can be much larger than for the transistor driver        circuit, but want to make the relay operate when Vin is low
circuits. Typically you’d use a value of say 100kΩ, or even          rather than high, simply connect the relay coil and D3 from pin
220kΩ for a circuit operating from 12V.                              3 of the 555 to ground — just like the arrangement shown in
    Although the push-pull output stage of the 555 automatically     diagram B.
shunts the relay coil when pin 3 is high, damping the back-EMF,         Finally in all of these circuits, it’s a good idea to fit the supply
it’s probably still a good idea to fit diode D3 as well —            line of the relay/driver stage with a reasonably high value of
especially when using this circuit from a 12V supply. That’s         bypass capacitor (say 100uF), to absorb the current transients
because the negative-going back-EMF pulse could cause damage         when the relay turns on and off. This will ensure more reliable
to the transistors inside the 555.                                   operation, and help prevent interference with the operation of
    Capacitor C1 is fitted to make sure that the 555 doesn’t         your control circuitry.
turn on the relay in response to noise spikes on te supply line.               (Copyright © Electus Distribution, 2001)
    By the way if you need the very low input current of this


THE MAJOR INTERNATIONAL TESTING AGENCIES
   Most of the developed countries have national testing agencies and
certification bodies, which perform testing and issue licences to certify
that equipment complies with the electrical safety standards of that
country (which are often based on, or derived from international
standards).
   Some of the main national testing/certification agencies are shown at
right, together with the symbols that are used on equipment to certify
that it has been tested and complies to their standards.


  Australia’s standards and certification agency is Standards Australia (SA), of PO Box 1055, Strathfield
(www.standards.org.au). The testing is done by accredited testing laboratories.

Más contenido relacionado

La actualidad más candente

integrator and differentiator op-amp
integrator and differentiator op-ampintegrator and differentiator op-amp
integrator and differentiator op-ampdanish iqbal
 
DVD Player Multiple Output Di115 2
DVD Player Multiple Output Di115 2DVD Player Multiple Output Di115 2
DVD Player Multiple Output Di115 2gueste54184
 
Anti bag snatching alarm
Anti bag snatching alarmAnti bag snatching alarm
Anti bag snatching alarmSaumya Tiwari
 
Elektronika daya kuliah ke 2
Elektronika daya kuliah ke 2Elektronika daya kuliah ke 2
Elektronika daya kuliah ke 2Sugeng Widodo
 
Power Supply Project
Power Supply ProjectPower Supply Project
Power Supply Projectusmanhadi91
 
Variable power supply with digital control with seven segments display
Variable power supply with digital control with seven segments displayVariable power supply with digital control with seven segments display
Variable power supply with digital control with seven segments displaypoornima college of engg. jaipur
 
A New Active Snubber Circuit for PFC Converter
A New Active Snubber Circuit for PFC ConverterA New Active Snubber Circuit for PFC Converter
A New Active Snubber Circuit for PFC ConverterIDES Editor
 
EC 2 lab manual with circulits
EC 2 lab manual with circulitsEC 2 lab manual with circulits
EC 2 lab manual with circulitsMurugan Dhandapani
 
Basic Electronics 5 by Dr. Mathivanan Velumani
Basic Electronics 5 by Dr. Mathivanan VelumaniBasic Electronics 5 by Dr. Mathivanan Velumani
Basic Electronics 5 by Dr. Mathivanan VelumaniMathivanan Velumani
 
Voltage supply inverter using ic 555
Voltage  supply     inverter using ic 555Voltage  supply     inverter using ic 555
Voltage supply inverter using ic 555suraj4
 
Basic Electronics 1 by Dr. Mathivanan Velumani
Basic Electronics 1 by Dr. Mathivanan VelumaniBasic Electronics 1 by Dr. Mathivanan Velumani
Basic Electronics 1 by Dr. Mathivanan VelumaniMathivanan Velumani
 
Operational amplifier
Operational amplifierOperational amplifier
Operational amplifierUnsa Shakir
 
Amplifier (Transformer Coupled)
Amplifier (Transformer Coupled)Amplifier (Transformer Coupled)
Amplifier (Transformer Coupled)Arpan Bose
 
Basic Electronics 3 by Dr. Mathivanan Velumani
Basic Electronics 3 by Dr. Mathivanan VelumaniBasic Electronics 3 by Dr. Mathivanan Velumani
Basic Electronics 3 by Dr. Mathivanan VelumaniMathivanan Velumani
 
741 Integrated circuit (IC)
741 Integrated circuit (IC)741 Integrated circuit (IC)
741 Integrated circuit (IC)HIMANSHU DIWAKAR
 

La actualidad más candente (20)

integrator and differentiator op-amp
integrator and differentiator op-ampintegrator and differentiator op-amp
integrator and differentiator op-amp
 
DVD Player Multiple Output Di115 2
DVD Player Multiple Output Di115 2DVD Player Multiple Output Di115 2
DVD Player Multiple Output Di115 2
 
Anti bag snatching alarm
Anti bag snatching alarmAnti bag snatching alarm
Anti bag snatching alarm
 
Oscillator
OscillatorOscillator
Oscillator
 
555 and 556 timer circuits
555 and 556 timer circuits555 and 556 timer circuits
555 and 556 timer circuits
 
Elektronika daya kuliah ke 2
Elektronika daya kuliah ke 2Elektronika daya kuliah ke 2
Elektronika daya kuliah ke 2
 
Power Supply Project
Power Supply ProjectPower Supply Project
Power Supply Project
 
Variable power supply with digital control with seven segments display
Variable power supply with digital control with seven segments displayVariable power supply with digital control with seven segments display
Variable power supply with digital control with seven segments display
 
A New Active Snubber Circuit for PFC Converter
A New Active Snubber Circuit for PFC ConverterA New Active Snubber Circuit for PFC Converter
A New Active Snubber Circuit for PFC Converter
 
EC 2 lab manual with circulits
EC 2 lab manual with circulitsEC 2 lab manual with circulits
EC 2 lab manual with circulits
 
Basic Electronics 5 by Dr. Mathivanan Velumani
Basic Electronics 5 by Dr. Mathivanan VelumaniBasic Electronics 5 by Dr. Mathivanan Velumani
Basic Electronics 5 by Dr. Mathivanan Velumani
 
Voltage supply inverter using ic 555
Voltage  supply     inverter using ic 555Voltage  supply     inverter using ic 555
Voltage supply inverter using ic 555
 
Basic Electronics 1 by Dr. Mathivanan Velumani
Basic Electronics 1 by Dr. Mathivanan VelumaniBasic Electronics 1 by Dr. Mathivanan Velumani
Basic Electronics 1 by Dr. Mathivanan Velumani
 
Edcqnaunit 8
Edcqnaunit 8Edcqnaunit 8
Edcqnaunit 8
 
Operational amplifier
Operational amplifierOperational amplifier
Operational amplifier
 
Amplifier (Transformer Coupled)
Amplifier (Transformer Coupled)Amplifier (Transformer Coupled)
Amplifier (Transformer Coupled)
 
Basic Electronics 3 by Dr. Mathivanan Velumani
Basic Electronics 3 by Dr. Mathivanan VelumaniBasic Electronics 3 by Dr. Mathivanan Velumani
Basic Electronics 3 by Dr. Mathivanan Velumani
 
LICA- DIFFERENTIAL APLIFIERS
LICA- DIFFERENTIAL APLIFIERSLICA- DIFFERENTIAL APLIFIERS
LICA- DIFFERENTIAL APLIFIERS
 
Ec ii lab manual
Ec ii lab manualEc ii lab manual
Ec ii lab manual
 
741 Integrated circuit (IC)
741 Integrated circuit (IC)741 Integrated circuit (IC)
741 Integrated circuit (IC)
 

Similar a Relay driver basic

Design and fabrication of over voltage relay
Design and fabrication of over voltage relay Design and fabrication of over voltage relay
Design and fabrication of over voltage relay Prem Kumar
 
08_electronics.basics and introduction12
08_electronics.basics and introduction1208_electronics.basics and introduction12
08_electronics.basics and introduction12vikknaguem
 
08_electronics.basics and introduction23
08_electronics.basics and introduction2308_electronics.basics and introduction23
08_electronics.basics and introduction23vikknaguem
 
Auto reset over under
Auto reset over underAuto reset over under
Auto reset over underECEland
 
Differentiator.ppt
Differentiator.pptDifferentiator.ppt
Differentiator.pptPonnalaguRN1
 
Automatic phase changer
Automatic phase changerAutomatic phase changer
Automatic phase changerviv3ksharma
 
Auto turn off battery charger
Auto turn off battery chargerAuto turn off battery charger
Auto turn off battery chargerviv3ksharma
 
Automatic control of street light using LDR
Automatic control of street light using LDRAutomatic control of street light using LDR
Automatic control of street light using LDRDevang Loharikar
 
Variable Regulated Power Supply
Variable Regulated Power SupplyVariable Regulated Power Supply
Variable Regulated Power SupplyBhanu Bhawesh
 
Automatic street light using ldr and relay
Automatic street light using ldr and relayAutomatic street light using ldr and relay
Automatic street light using ldr and relayShivam Raidas
 
direct coupled transistor logic
direct coupled transistor logicdirect coupled transistor logic
direct coupled transistor logicsonalijagtap15
 
basic-analog-electronics
basic-analog-electronicsbasic-analog-electronics
basic-analog-electronicsATTO RATHORE
 

Similar a Relay driver basic (20)

project
projectproject
project
 
Design and fabrication of over voltage relay
Design and fabrication of over voltage relay Design and fabrication of over voltage relay
Design and fabrication of over voltage relay
 
Self Switching Power Supply
Self Switching Power SupplySelf Switching Power Supply
Self Switching Power Supply
 
Aim p
Aim pAim p
Aim p
 
08_electronics.basics and introduction12
08_electronics.basics and introduction1208_electronics.basics and introduction12
08_electronics.basics and introduction12
 
08_electronics.basics and introduction23
08_electronics.basics and introduction2308_electronics.basics and introduction23
08_electronics.basics and introduction23
 
Auto reset over under
Auto reset over underAuto reset over under
Auto reset over under
 
Differentiator.ppt
Differentiator.pptDifferentiator.ppt
Differentiator.ppt
 
Automatic phase changer
Automatic phase changerAutomatic phase changer
Automatic phase changer
 
34866616-Relay.ppt
34866616-Relay.ppt34866616-Relay.ppt
34866616-Relay.ppt
 
Auto turn off battery charger
Auto turn off battery chargerAuto turn off battery charger
Auto turn off battery charger
 
10 lm 555 timer
10 lm 555 timer10 lm 555 timer
10 lm 555 timer
 
Automatic control of street light using LDR
Automatic control of street light using LDRAutomatic control of street light using LDR
Automatic control of street light using LDR
 
555 Timer IC
555 Timer IC555 Timer IC
555 Timer IC
 
Variable Regulated Power Supply
Variable Regulated Power SupplyVariable Regulated Power Supply
Variable Regulated Power Supply
 
Automatic street light using ldr and relay
Automatic street light using ldr and relayAutomatic street light using ldr and relay
Automatic street light using ldr and relay
 
AUTOMATIC STREET LIGHT.ppt
AUTOMATIC STREET LIGHT.pptAUTOMATIC STREET LIGHT.ppt
AUTOMATIC STREET LIGHT.ppt
 
direct coupled transistor logic
direct coupled transistor logicdirect coupled transistor logic
direct coupled transistor logic
 
basic-analog-electronics
basic-analog-electronicsbasic-analog-electronics
basic-analog-electronics
 
Security alarm
Security alarmSecurity alarm
Security alarm
 

Relay driver basic

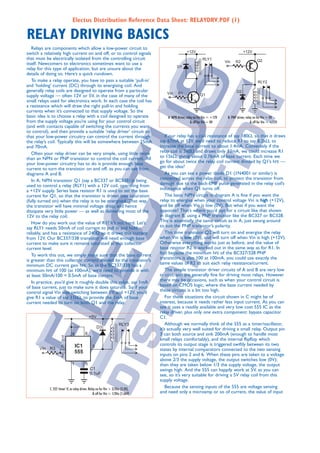
  • 1. Electus Distribution Reference Data Sheet: RELAYDRV.PDF (1) RELAY DRIVING BASICS Relays are components which allow a low-power circuit to switch a relatively high current on and off, or to control signals +12V +12V that must be electrically isolated from the controlling circuit RLY1 Q2 Vin R2 itself. Newcomers to electronics sometimes want to use a D1 relay for this type of application, but are unsure about the details of doing so. Here’s a quick rundown. To make a relay operate, you have to pass a suitable ‘pull-in’ RLY2 and ‘holding’ current (DC) through its energising coil. And generally relay coils are designed to operate from a particular D2 Vin R1 supply voltage — often 12V or 5V, in the case of many of the Q1 small relays used for electronics work. In each case the coil has a resistance which will draw the right pull-in and holding currents when it’s connected to that supply voltage. So the basic idea is to choose a relay with a coil designed to operate A. NPN driver, relay on for Vin = +12V B. PNP driver, relay on for Vin = 0V from the supply voltage you’re using for your control circuit & off for Vin = 0V & off for Vin = +12V (and with contacts capable of switching the currents you want to control), and then provide a suitable ‘relay driver’ circuit so that your low-power circuitry can control the current through If our relay has a coil resistance of say 180Ω, so that it draws the relay’s coil. Typically this will be somewhere between 25mA say 67mA at 12V, we’d need to reduce R1 to say 8.2kΩ, to and 70mA. increase the base current to about 1.4mA. Conversely if the Often your relay driver can be very simple, using little more relay coil is 360Ω and draws only 33mA, we could increase R1 than an NPN or PNP transistor to control the coil current. All to 15kΩ, giving about 0.76mA of base current. Each time we your low-power circuitry has to do is provide enough base go for about twice the relay coil current divided by Q1’s hFE — current to turn the transistor on and off, as you can see from get the idea? diagrams A and B. As you can see a power diode D1 (1N4001 or similar) is In A, NPN transistor Q1 (say a BC337 or BC338) is being connected across the relay coil, to protect the transistor from used to control a relay (RLY1) with a 12V coil, operating from damage due to the back-EMF pulse generated in the relay coil’s a +12V supply. Series base resistor R1 is used to set the base inductance when Q1 turns off. current for Q1, so that the transistor is driven into saturation The basic NPN circuit in diagram A is fine if you want the (fully turned on) when the relay is to be energised. That way, relay to energise when your control voltage Vin is high (+12V), the transistor will have minimal voltage drop, and hence and be off when Vin is low (0V). But what if you want the dissipate very little power — as well as delivering most of the opposite? That’s where you’d opt for a circuit like that shown 12V to the relay coil. in diagram B, using a PNP transistor like the BC327 or BC328. How do you work out the value of R1? It’s not hard. Let’s This is essentially the same circuit as in A, just swung around say RLY1 needs 50mA of coil current to pull in and hold to suit the PNP transistor’s polarity. reliably, and has a resistance of 240Ω so it draws this current This time transistor Q2 will turn on and energise the relay from 12V. Our BC337/338 transistor will need enough base when Vin is low (0V), and will turn off when Vin is high (+12V). current to make sure it remains saturated at this collector Otherwise everything works just as before, and the value of current level. base resistor R2 is worked out in the same way as for R1. In To work this out, we simply make sure that the base current fact because the minimum hFE of the BC327/328 PNP is greater than this collector current divided by the transistor’s transistors is also 100 at 100mA, you could use exactly the minimum DC current gain hFE. So as the BC337/338 has a same values of R2 to suit each relay resistance/current. minimum hFE of 100 (at 100mA), we’d need to provide it with The simple transistor driver circuits of A and B are very low at least 50mA/100 = 0.5mA of base current. in cost, and are generally fine for driving most relays. However In practice, you’d give it roughly double this value, say 1mA there may be occasions, such as when your control circuit is of base current, just to make sure it does saturate. So if your based on CMOS logic, where the base current needed by control signal Vin was switching between 0V and +12V, you’d these circuits is a bit too high. give R1 a value of say 11kΩ, to provide the 1mA of base For these situations the circuit shown in C might be of current needed to turn on both Q1 and the relay. interest, because it needs rather less input current. As you can see it uses a readily available and very low cost 555 IC as the relay driver, plus only one extra component: bypass capacitor +5V C1. RLY3 Although we normally think of the 555 as a timer/oscillator, D3 it’s actually very well suited for driving a small relay. Output pin 4 8 3 can both source and sink 200mA (enough to handle most 7 small relays comfortably), and the internal flipflop which 6 IC1 3 controls its output stage is triggered swiftly between its two Vin R3 states by internal comparators connected to the two sensing 555 2 inputs on pins 2 and 6. When these pins are taken to a voltage above 2/3 the supply voltage, the output switches low (0V); 1 5 then they are taken below 1/3 the supply voltage, the output C1 swings high. And the 555 can happily work at 5V, as you can 0.1uF see, so it’s very suitable for driving a 5V relay coil from this supply voltage. C. 555 'timer' IC as relay driver. Relay on for Vin > 2/3Vcc (3.3V), Because the sensing inputs of the 555 are voltage sensing & off for Vin < 1/3Vcc (1.66V) and need only a microamp or so of current, the value of input
  • 2. Electus Distribution Reference Data Sheet: RELAYDRV.PDF (2) resistor R3 can be much larger than for the transistor driver circuit, but want to make the relay operate when Vin is low circuits. Typically you’d use a value of say 100kΩ, or even rather than high, simply connect the relay coil and D3 from pin 220kΩ for a circuit operating from 12V. 3 of the 555 to ground — just like the arrangement shown in Although the push-pull output stage of the 555 automatically diagram B. shunts the relay coil when pin 3 is high, damping the back-EMF, Finally in all of these circuits, it’s a good idea to fit the supply it’s probably still a good idea to fit diode D3 as well — line of the relay/driver stage with a reasonably high value of especially when using this circuit from a 12V supply. That’s bypass capacitor (say 100uF), to absorb the current transients because the negative-going back-EMF pulse could cause damage when the relay turns on and off. This will ensure more reliable to the transistors inside the 555. operation, and help prevent interference with the operation of Capacitor C1 is fitted to make sure that the 555 doesn’t your control circuitry. turn on the relay in response to noise spikes on te supply line. (Copyright © Electus Distribution, 2001) By the way if you need the very low input current of this THE MAJOR INTERNATIONAL TESTING AGENCIES Most of the developed countries have national testing agencies and certification bodies, which perform testing and issue licences to certify that equipment complies with the electrical safety standards of that country (which are often based on, or derived from international standards). Some of the main national testing/certification agencies are shown at right, together with the symbols that are used on equipment to certify that it has been tested and complies to their standards. Australia’s standards and certification agency is Standards Australia (SA), of PO Box 1055, Strathfield (www.standards.org.au). The testing is done by accredited testing laboratories.