1. 6.9 BATTERIES AND INVERTERS6.9 BATTERIES AND INVERTERS ENERGY use213
Batteries and Inverters
Batteries and inverters store renewable
energy turning it into useable electricity.
A complete renewable energy system has
a number of components, as discussed in
this fact sheet.
Grid connected systems require an inverter
and metering system. Battery banks can be
installed if back up supply is required.
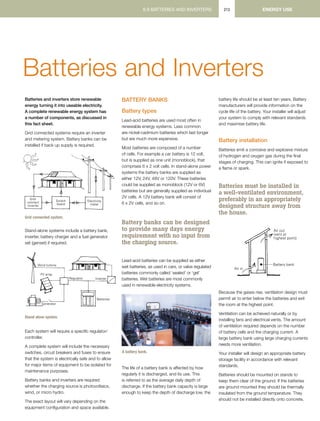
Grid connected system.
Stand-alone systems include a battery bank,
inverter, battery charger and a fuel generator
set (genset) if required.
Stand alone system.
Each system will require a specific regulator/
controller.
A complete system will include the necessary
switches, circuit breakers and fuses to ensure
that the system is electrically safe and to allow
for major items of equipment to be isolated for
maintenance purposes.
Battery banks and inverters are required
whether the charging source is photovoltaics,
wind, or micro hydro.
The exact layout will vary depending on the
equipment configuration and space available.
Battery Banks
Battery types
Lead-acid batteries are used most often in
renewable energy systems. Less common
are nickel-cadmium batteries which last longer
but are much more expensive.
Most batteries are composed of a number
of cells. For example a car battery is 12 volt,
but is supplied as one unit (monoblock), that
comprises 6 x 2 volt cells. In stand-alone power
systems the battery banks are supplied as
either 12V, 24V, 48V or 120V. These batteries
could be supplied as monoblock (12V or 6V)
batteries but are generally supplied as individual
2V cells. A 12V battery bank will consist of
6 x 2V cells, and so on.
Battery banks can be designed
to provide many days energy
requirement with no input from
the charging source.
Lead-acid batteries can be supplied as either
wet batteries, as used in cars, or valve regulated
batteries commonly called ‘sealed’ or ‘gel’
batteries. Wet batteries are most commonly
used in renewable electricity systems.
The life of a battery bank is affected by how
regularly it is discharged, and its use. This
is referred to as the average daily depth of
discharge. If the battery bank capacity is large
enough to keep the depth of discharge low, the
battery life should be at least ten years. Battery
manufacturers will provide information on the
cycle life of the battery. Your installer will adjust
your system to comply with relevant standards
and maximise battery life.
Battery installation
Batteries emit a corrosive and explosive mixture
of hydrogen and oxygen gas during the final
stages of charging. This can ignite if exposed to
a flame or spark.
Batteries must be installed in
a well-ventilated environment,
preferably in an appropriately
designed structure away from
the house.
Because the gases rise, ventilation design must
permit air to enter below the batteries and exit
the room at the highest point.
Ventilation can be achieved naturally or by
installing fans and electrical vents. The amount
of ventilation required depends on the number
of battery cells and the charging current. A
large battery bank using large charging currents
needs more ventilation.
Your installer will design an appropriate battery
storage facility in accordance with relevant
standards.
Batteries should be mounted on stands to
keep them clear of the ground. If the batteries
are ground mounted they should be thermally
insulated from the ground temperature. They
should not be installed directly onto concrete,
Grid
connect
inverter
Switch
board
Electricity
meter
Grid connected system
Wind turbine
PV array
Regulator
Batteries
Inverter
Generator
Stand alone power system (SAPS)
GeoffStapleton
A battery bank.
)
2. 6.9 BATTERIES AND INVERTERSENERGY use 214
as concrete will cool to ground temperature,
causing the electrolyte to stratify. This is
detrimental to a battery’s long-term life and
performance. Low electrolyte temperatures
also reduce the capacity of a battery.
Batteries must not be installed where they
will be exposed to direct sunlight, as high
temperatures may cause electrodes to buckle.
The typical area required for the installation
of a battery bank is:
12V 1.4m x 0.3m or 0.7m x 0.6m
24V 1.4m x 0.6m
48V 2.8m x 0.6m
The batteries can be as high as 700mm, and
if installed in a box it must have a removable
lid or at least 500mm clearance above them
to allow access for a hygrometer to check the
charge level.
Access to the battery room or container
should be limited to responsible people
trained in system maintenance and shut
down procedures.
Safety signs are required in accordance with
Australian Standards.
The installation must include a switch/fuse
near the batteries to enable the bank to be
electrically isolated from the rest of the system.
Battery maintenance
Battery maintenance includes keeping terminals
clean and tight and ensuring the electrolyte is
kept above minimum levels. Use only distilled
water when topping up the electrolyte level.
Batteries are dangerous items and must
be treated cautiously. There are three main
dangers with batteries:
> Explosion or fire from the battery gases.
Short-circuiting the terminals.
Acid burns from wet, lead-acid batteries.
Ensure that when working with batteries you
do not short across the battery terminals.
Under Australian Standards the terminals
must be covered (shrouded) to prevent
accidental shorting.
Wet, lead-acid batteries hold a fluid electrolyte
that contains sulphuric acid. This can cause
serious burns to the skin and eyes. Always
wear protective clothing and eye protection.
If ‘acid’ is spilt on the floor or equipment, it
must be diluted with water and neutralised with
sodium bi-carbonate. These should be readily
accessible and stored near the battery bank.
Batteries need specific charge regimes that
include equalisation charging. The system
designer will explain this process. The
equalisation charge will either be controlled by
the system or require the owner to connect a
generator and battery charger. Specific gravity
readings are the best method to determine the
charge level. A safe method for performing this
will be explained by the system designer.
System owners should read and fully
understand the manufacturer’s manual for their
battery bank.
Battery disposal
Batteries contain lead and acid that are harmful
to the environment. When a battery bank is
being replaced the old batteries should be
disposed of at a battery recycling station or
other suitable site.
Inverter Installation
Inverters are commonly a part of battery based
stand alone and grid connected systems.
Inverters convert DC power from batteries or
solar modules into useable AC, normally 240V
AC (single phase) or 415V AC (three phase)
power. Inverters are complex electronic devices
and must be installed in dust free environments.
Inverters can be either wall or shelf mounted.
They are heavy – a 5kW unit could measure
0.6m x 0.6 x 0.4m and weigh 60kg.
Inverters become very warm or hot when
operating at large power outputs and need
suitable ventilation and cooling air-flow. Insects
often like to nest in the heat dissipation vents.
To prevent this, inverters should be carefully
sited and regularly checked.
Inverters must not be installed in direct sunlight.
Inverters should be readily accessible in case
they need to be electrically isolated in an
emergency.
Lightning can damage inverters. The risk should
be assessed by the designer and appropriate
protection installed if required.
Only a suitably trained
and qualified person may
undertake AC hard wiring
to an inverter.
Grid connected systems
Grid connected inverters convert power
from solar modules, wind or micro hydro into
AC power that feeds into the grid.
On the DC side, the grid inverter is connected
directly to the renewable charging source –
generally PV.
The AC output of the inverter interconnects
with the building switchboard in accordance
with regulations.
The inverter can be installed in any suitable
location between the renewable energy source
and the switchboard.
Battery based systems
The DC currents in the battery leads between
the inverter and battery can be very large.
To avoid problems due to overheating and
voltage drop, these must be sized accordingly
and should be kept to a minimum length.
Situate the inverter as close as possible to the
battery bank.
The battery charger can be a separate unit or
be incorporated within a combined inverter/
charger. The inverter supplies 240V AC power
from the battery bank. When the generator
starts, the inverter passes the load to the
generator and becomes a battery charger.
Each battery charging source requires a
regulator/ controller to prevent overcharging the
batteries. These can be manual or automatic.
In automatic controls the generator is started
when the batteries reach a low charge level or
the load is greater than the maximum power
output of the inverter. In manual controls the
state of battery charge must be regularly
monitored.
3. 6.9 BATTERIES AND INVERTERS6.9 BATTERIES AND INVERTERS ENERGY use215
Battery charger installation
If the stand alone power system installation
includes a separate battery charger, it should
be treated in a similar manner to the inverter.
Chargers are generally no larger than 0.4m x
0.4 x 0.6m and weigh up to 40kg.
The charger must be installed close to the
batteries and can be floor or shelf mounted.
The input power to the charger must be a
generator-only power point.
Generator Installation
The generator should be installed in a separate
room or enclosure. If installed in the same room
as the rest of the system it should be located as
far away from other components as possible.
This helps prevent excessive heating and
contamination from a malfunctioning exhaust.
Sufficient space should be allowed around the
generator for maintenance.
Generators can be noisy, so locate and design
the enclosure to minimise noise.
The generator fuel must be kept in an approved
container in a safe location.
Additional REading
Contact your State / Territory government or local
council for further information on renewable energy,
including what rebates are available.
www.gov.au
ReNew, Batteries Buyers Guide, Issue 98 and
Inverters Buyers Guide, Issue 87.
www.renew.org.au
Principal authors:
Geoff Stapleton
Geoff Milne
Contributing author:
Chris Riedy
4. 10th Edition • Solar Electric Products Catalog • March 2003
While an inverter can account for a good portion of the cost of
a PV system, it is really a sub-system that requires a number of
additional components.To make a safe, reliable, code compliant
installation one should provide the following:
Inverter to battery cabling
Because of the high current required on low voltage circuits,
this cable is large, commonly #2 to 4/0 in size. Smaller
conductors than required are unsafe and will not allow the
inverter to perform to its full rating.
DC input disconnect and overcurrent
protection
It is important to have safe installation with a properly sized
DC rated, UL listed disconnect.Typically the disconnect works in
conjunction with an overcurrent protection device such as a
fuse or circuit breaker.These components are usually installed
in an enclosure which can also house shunts and additional
equipment or circuit breakers.
Shunts
Used to read the amperage flowing between the battery and
inverter, this device is installed in the negative conductor. It can
easily be housed in the disconnect or its own enclosure.
AC output disconnect and overcurrent
protection
If the breaker panel, which is fed from the inverter, is adjacent to
the inverter, then the main breaker will serve as the inverter
output disconnect and overcurrent protection.
If, however, this panel is not grouped with the inverter, then a
separate unit should be installed.This also holds true for AC
circuits coming into the inverter from a generator or utility
source. A second breaker may be needed if these breakers are
not grouped.
INVERTERS
The inverter is a basic component of PV systems and it converts DC power from the batteries or in the case of grid-tie,directly from the PV
array into high voltage AC power as needed.Inverters of the past were inefficient and unreliable while today’s generation of inverters are
very efficient (85 to 94%) and reliable.
Today,the majority,if not all of the loads in a typical remote home operate at 120 VAC from the inverter.Most stand-alone inverters
produce only 120 VAC,not 120/240 VAC as in the typical utility-connected home.The reason being,once electrical heating appliances are
replaced with gas appliances,there is little need for 240 VAC power.Exceptions include good-sized submersible pumps and shop tools
which can either be powered by a generator,step-up transformer,or possibly justify the cost of adding a second inverter.Several utility
line-tie inverters do produce 240 VAC.
Two types of stand-alone inverters predominate the market – modified sine and sine wave inverters.Modified sine wave units are less
expensive per watt of power and do a good job of operating all but the most delicate appliances.Sine wave units produce power which is
almost identical to the utility grid,will operate any appliance within their power range,and cost more per watt of output.
Utility-tie systems / sine wave inverters for utility interactive photovoltaic applications,provide direct conversion of solar electric energy to
utility power with or without a battery storage system.These systems are designed to meet or exceed utility power company requirements
and can be paralleled for any power level requirement.They are listed to UL 1741 for photovoltaic power systems.
Inverter Component
Checklist
Batteries in Vented Enclosure
Inverter with Built-in
Battery Charger
Inverter
Breaker
Generator
Breaker
To AC
House
Panel
From
Generator
Inverter Sub-System Checklist
_____ Inverter to battery cabling
_____ DC disconnect and overcurrent device
_____ Inverter conduit boxes
_____ Inverter output breaker box
_____ Generator input breaker box
_____ Shunt(s) if required for monitoring
See the Sizing Tables in the
Appendix D for cable and
overcurrent device sizing for
the inverter you select.
INVERTERS
5. INVERTERS
Most larger
inverters can
operate as battery
chargers as well.
This is easily and
economically
accomplished
because of the design of most inverters. Inverters step up low
voltage DC power and change it to 120VAC power. Battery
chargers do the reverse of this.
Transfer switches are also incorporated into these Inverter /
Chargers so that the AC loads can be powered directly from the
generator when the battery charger is operating.
From a reliability, performance, and economical standpoint,
built-in battery chargers are the way to go.
Comparing Inverters
Inverters are compared by three factors:
• Continuous wattage rating. Hour after hour, what
amount of power in watts can the inverter deliver.
• Surge Power. How much power and for how
long can an inverter deliver the power needed
to start motors and other loads.
• Efficiency. How efficient is the inverter at low,
medium and high power draws. How much
power is used at idle.
A typical 12-volt
lead-acid battery
must be taken to
approximately
14.2-14.6 VDC
before it is fully
charged. (For 24
volt systems double these figures for 48 volt, multiply by four.) If
taken to a lesser voltage level, some of the sulfate deposits that
form during discharge will remain on the battery’s lead plates.
Over time, these deposits will cause a 200 amp-hour battery to
act more like a 100 amp-hour battery, and battery life will be
shortened considerably. Once fully charged, batteries should be
held at a lower float voltage to maintain their charge – typically
13.2 to 13.4 volts. Higher voltage levels will gas the battery
and boil off electrolyte, requiring more frequent maintenance.
Most automotive battery charger designs cannot deal with the
conflicting voltage requirements of the initial“bulk charge”and
subsequent“float”or maintenance stage.These designs can
accommodate only one charge voltage, and therefore must use
a compromise setting – typically 13.8 volts.The result is a slow
incomplete charge, sulfate deposit build-up, excessive gassing
and reduced battery life.
The charger available in our inverters automatically cycles
batteries through a proper three stage sequence (bulk,
absorption and float) to assure a rapid and complete charge
without excessive gassing.
Factory battery charger settings on most inverter-charger
combinations are optimal for a lead acid (liquid electrolyte)
battery bank of 250-300 amp hours in a 70°F environment. If
your installation varies from these conditions, you will obtain
better performance from your batteries if you adjust the control
settings.
The Maximum Charge Rate in amps should be set to 20-25% of
the total amp-hour rating of a liquid electrolyte battery bank.
For example, a 400 amp-hour bank should be charged at no
more than an 80 -100 amp rate. Excessive charge rates can
damage batteries and create a safety hazard.
The Bulk Charge Voltage of typical liquid electrolyte lead acid
batteries should be about 14.6 VDC.There is no one correct
voltage for all types of batteries. Incorrect voltages will limit
battery performance and useful life. Check the battery
manufacturer’s recommendations.
The Float Voltage setting should hold the batteries at a level
high enough to maintain a full charge, but not so high as to
cause excessive gassing which will boil off electrolyte. For a
12-volt liquid electrolyte battery at rest, a float voltage of 13.2-
13.4 is normally appropriate; gel cells are typically maintained
between 13.5 and 13.8. If the batteries are being used while in
the float stage, slightly higher settings may be required.
Charge voltage guidelines used here are based on ambient
temperatures of 70°F. If your batteries are not in a 70°F
environment, the guidelines are not valid.Temperature
Compensation automatically adjusts the voltage settings to
compensate for the differences between ambient temperature
and the 70°F baseline.Temperature compensation is important
for all battery types, but particularly gel cell, valve-regulated
types which are more sensitive to temperature.
Built-In Battery
Chargers
Multi-Stage
Battery Charging
7. Safety Information
IMPORTANT
Read all the Cautions and Warnings before installing and using the power inverter. The
inverter must be properly installed.
IMPORTANT
If you are not familiar with 12 volt high current wiring, it is recommended that you have a
professional automotive installer install the inverter.
CAUTION
The power inverter generates 115 VAC power from your 12 volt car battery. Treat the 115
VAC output just like you treat the 115 VAC in your house. Keep children away from the
unit.
Do not connect the unit to AC distribution wiring.
Keep the unit away from water. Do not allow water to drip or splash on to the power inverter.
Keep the unit in cool environments. Ambient air temperature should be between 32 degrees and
75 degrees F. Keep out of direct sunlight and away from heating vents.
Keep the unit away from flammable material or in any location which may accumulate flammable
fumes or gases, such as the battery compartment of your car, boat, RV or truck.
With heavy use, the unit will become warm and possibly hot. So keep it away from any heat
sensitive materials.
Make sure the opening to the fan and vent holes are not blocked.
Do not open the unit. High voltages are inside.
Use proper size wiring. High power inverters can draw many amps from the 12 volt source and
can melt wires if not fused and sized properly.
IMPORTANT
Sima Products Corporation does not authorize any products to be used in life support
devices or systems.
Serial # ____________________________
Date Purchased ___________
page 2
8. Table of Contents
Safety Information ...................................................................................................2
Introduction..............................................................................................................4
Key Features ............................................................................................................4
Package Includes......................................................................................................4
Needed for Installation (not included).....................................................................4
Overview of the Power Inverter...............................................................................5
Installation ...............................................................................................................6
Installation Overview....................................................................................................................6
Step #1: Mounting the Inverter .....................................................................................................6
Step #2: Wiring Inverter to 12 volt Power ....................................................................................7
Permanent Installation...............................................................................................................8
Wiring Steps..............................................................................................................................8
Advanced Installation................................................................................................................9
Step #3: Testing the Power Inverter..............................................................................................9
Operation .................................................................................................................9
Equipment Power Usage...............................................................................................................9
Battery Life .................................................................................................................................10
Lights and Alarms.......................................................................................................................11
How the Inverter Works.........................................................................................12
Troubleshooting.....................................................................................................13
Product Specifications ...........................................................................................14
Warranty ................................................................................................................15
page 3
9. Introduction
Congratulations on your purchase of a Sima Products Corporation power inverter. It provides 115
VAC anywhere you have 12 DC volts in your car, truck, RV or boat. It is designed to be easy to use
and provide years of dependable service.
Key Features
High-efficiency operation to provide the most output with the least battery power.
Advanced protection
• Thermal Protection shuts the unit off to guard against the unit getting too hot
• Overload Protection protects the unit from excessive loads
• Under Voltage Protection turns the unit off to protect the battery from being over
discharged
The STP-1000T power inverter produces a modified sine wave output that is suitable for most AC
loads. This includes lights, appliances, motors, TVs and most electronics.
Caution: A few battery chargers are not compatible with modified sine wave
operation. These are typically small, rechargeable, battery operated devices like
razors and flashlights that can be plugged directly into an AC receptacle to
recharge. Some chargers for battery packs used in power tools also should not be
used with an inverter. These chargers typically have a warning label indicating
that dangerous voltages are present at the battery terminals. Only a true sine
wave inverter should be used with these types of appliances. Damage to the
device could result if you attempt to use them with any type of modified sine wave
inverter. Do not use this power inverter with the above devices.
Package Includes
Inverter (STP-1000T)
Cables
This manual
Needed for Installation (not included)
Mounting hardware for the inverter
12 volt DC power wiring, fuse block and connectors
Tools – Drill and drill bit, small socket set, wire crimpers, volt meter
Optional: wiring kit from Sima Model SK-200
page 4
10. Overview of the Power Inverter
The STP-1000T power inverters are electronic devices that convert the low voltage 12 VOLTS DC
from a battery or other power source to 115 VAC to run standard household appliances.
See the section on How it Works to learn more about the technology used in these power inverters.
DC Side (12 VOLTS Input) AC Side (115 VAC Output)
STP-1000
Figure #1, DC and AC Sides of the STP-1000T Inverter
page 5
11. Installation
Installation Overview
There are three basic steps you need to follow when installing the power inverter.
1) Mounting: Mount the inverter securely
2) Wiring: Wire the inverter to a 12 VOLT source
3) Testing: Test for proper operation
Step #1: Mounting the Inverter
The power inverter should be secured to a solid flat surface capable of handling the weight of the
unit. It is very important that the unit be secured using the proper size mounting hardware (not
included) to keep the unit from moving around or becoming loose in emergency situations.
The power inverter should be placed with space around the unit for proper ventilation. Do not block
the air entrance to the fan or block the exhaust holes located on the side or bottom of the unit.
The unit must be mounted in a dry, cool area. Do not allow water to drip or splash onto the inverter.
The ambient air temperature should be between 32 deg F and 75 deg F.
The unit must not be mounted in an area with batteries or in any area capable of storing flammable
liquids such as gasoline.
To minimize cable lengths, the unit should be mounted as close as possible to the battery, but not in
the same compartment. If you have a choice, it is better to run longer AC wires than DC cables.
Caution: The power inverter must be mounted securely in any type of moving
vehicle. In an emergency situation, if the power inverter is not securely mounted,
it could cause bodily injury
Figure 2, Mounting the power inverter
page 6
12. Step #2: Wiring Inverter to 12 volt Power
The power inverter requires connection to a standard 12 volt DC power source as found in most cars,
trucks, RVs and boats. The power source must provide between 11 and 15 volts DC. The power
source must be able to provide sufficient current to power the load. See the chart below that shows
minimal wire sizing and current draw at full load.
Inverter Model Current at
rated power
Suggested
User
Installed 12
volt Fuse
Size
Suggested
Wire gauge,
less than-10’
Suggested
Wire gauge,
10’ to 25’
STP-1000T 94 Amps 100A 2 AWG 0 AWG
Wire Size Chart
Always connect the positive, red (+) terminal to the positive connection and the negative, black (-)
terminal to the negative or ground side of the power system.
WARNING
Failure to connect the correct polarity may cause damage to the power inverter
and/or your electrical system and is not covered by the warranty.
Installation Tip
To minimize electrical interference, keep the DC power cables as short as possible
and twist them with 1 to 3 twists per foot. This minimizes radiated interference
from the cables.
page 7
13. Permanent Installation
Figure 3, Wiring the STP-1000T power inverter
Caution: Always use adequate wire size and fusing for any installation
Wiring Steps
• Disconnect the positive battery terminal before doing any wiring to the inverter.
• Using proper sized copper wire and proper terminations, wire the inverter to the electrical
system and fuse block. See your local RV dealer or automotive shop for wire, connectors, fuse
block and other wiring parts. Tighten all connections firmly, but do not over tighten.
Remember to recheck all connections every few months of operation.
WARNING
Do not operate the power inverter without a fuse installed.
page 8
14. • Double check all wiring for proper polarity.
• Install the fuse and reconnect the wire to the battery. Note, a slight spark and beep from the
inverter is normal when the unit is first connected to 12 volt power.
Advanced Installation
Large inverters can draw high currents from your battery and charging system especially when used
with appliances and tools that use a lot of power. In these applications, you may need to increase the
capacity of your 12 volt system. There are several ways to do this.
High Capacity Batteries
You can purchase high capacity batteries that are specially designed for deep discharge operation.
Contact your automotive or RV specialist for more information.
Multiple Batteries
In systems with more than one battery, you typically wire the system with the batteries in parallel
(negative to negative and positive to positive) with a battery isolator between the positive
terminals. The isolator allows a single alternator to charge all batteries but lets the inverter only
use the second battery so the vehicle’s battery is not discharged during operation. Contact your
automotive or RV specialist for more information about battery isolators and wiring.
Larger Alternator
Typical automotive alternators may not be able to supply the power required for continuous
operation of the inverter at high power usage. Contact your automotive or RV specialist for more
information about larger output alternators.
Step #3: Testing the Power Inverter
After you make sure the 12 volt power is wired properly to the power inverter, with nothing plugged
into the 115 VAC outlets, turn the power switch on the power inverter to On. The green POWER
light will light.
Note: If the inverter does not operate properly and the POWER light does not illuminate, turn the
power switch off and check your wiring and external fuse.
With the inverter turned off, plug the appliance you want to use into the 115 VAC power outlet on
the unit. Turn the power switch on the power inverter on so the green POWER light is illuminated.
Turn on the appliance. The appliance should now be operational.
Check the Troubleshooting section if you have any difficulties.
Operation
Equipment Power Usage
It is important to use only products that draw less than the power rating of the power inverter. Use of
products greater than the rated power rating may either cause the protection circuitry of the power
page 9
15. inverter to shut down or the fuse to blow. Repeated use of excessive power draw can cause failure of
the power inverter.
How to calculate power usage. Most products have a power rating on them such as 45 watts.
Others may be marked with their current draw, such as .9 amps. To convert the current to watts
multiply the current by 115. (Example: .9 amps x 115 = 104 watts)
Typical Power Usage Chart
Typical Appliance Current Draw
TV/VCR combo 120 watts
19” TV 160 watts
Blender 650 watts
Small power drill 3/8” 500 watts
Toaster 850 watts
Vacuum 900
Some products draw a high surge current to start up. If the appliance does not operate and the
inverter turns off, you may need a larger inverter. Also, check that the battery and the 12 volt wiring
to the inverter is large enough to handle the current draw and that the battery is fully charged.
Important: The power inverters may not operate some appliances designed to produce
heat such as hair dryers, heaters, toasters and coffee makers. Always check the power
rating before using these kinds of products to be sure they do not exceed the power
capability of the inverter.
Battery Life
Important: The power inverter can draw lots of amps from your car’s battery when operating. If you
are using it for extended periods of time, you will want to operate your car occasionally to maintain
the charge in your car’s battery. In addition, the power inverter will also draw a small current, less
than 0.1 amp, when turned off and not operating. Therefore, it should be disconnected from your
car’s battery if your vehicle will not be used for more than a day. The following chart shows typical
operation time for typical car batteries with the engine not running for various loads. Check the size
of your battery.
page 10
16. Battery Life Chart
Power
Usage
Approximate
12 volt
Current
Typical operation time
with 50 amp-hour car
battery
Typical operation
time with 100 amp-
hour car battery
100 watt 9 Amps 5.5 hours 11 hours
200 watt 19 Amps 2.6 hours 5.2 hours
500 watt 47 Amps 1 hour 2 hours
Actual Current Draw
Approximate 12 volt current draw is the load in watts divided by 10. Thus a 60 watt light bulb
plugged into the inverter will cause the inverter to draw 6 amps (60 / 10 = 6) from the 12 volt
supply.
Batteries are rated in several different ways:
Peak cranking amps - This has little to do with how long an inverter can supply power, so it
is not a useful number for inverter operation.
Battery reserve capacity - This number shows how long a battery can supply a given current,
typically 25 amps, before the battery voltage reaches a low voltage. Therefore, a battery
rated at 200 minutes reserve can deliver 25 amps for 200 minutes before it is discharged.
Ampere-hour capacity - This rating indicates how many amps a battery can deliver over a
period of time, typically 20 hours. Therefore, a 100 amp-hour battery can deliver 5 amps
for 20 hours (5 x 20 = 100).
Actual operating time from a battery will depend upon the current draw from the battery. A
battery will deliver less total power (energy) as you draw higher amps. A 100 amp-hour
battery can deliver 5 amps for 20 hours (100 amp-hours) but it will only deliver 50 amps
for 1 ½ hours (50 x 1.5 = 75) or 75 amp-hours at the higher rate.
Also remember, battery life is decreased if the battery is discharged fully. Lead acid
batteries have the longest life, if they are kept fully charged.
Lights and Alarms
POWER Indicator (Green)
This light will illuminate when the inverter is turned on and is operating normally. If this light goes
out the 12 volt power is missing (possible blown fuse). These fault conditions include output
overload, output short circuit, low input voltage and over temperature of the unit. This can happen if
a device has a large turn on surge, if an appliance (like a drill or saw) is stalled or if the inverter does
not have a supply of cool air.
Fault Indicator (Red) Fault conditions include output overload, output short circuit, low input
voltage and over temperature of the unit. This can happen if a device has a large turn on surge, if an
appliance (like a drill or saw) is stalled or if the inverter does not have a supply of cool air.
Fuse Replacement
If you overload the power inverter, it is possible that the external fuse might blow. Always determine
the cause of the fuse blowing and remedy the problem before using the power inverter again.
page 11
17. How the Inverter Works
The Sima Products Corporation power inverter has two electronic sections. The first section converts
12 volts DC to approximately 160 volts DC using modern high frequency conversion techniques that
uses small lightweight efficient transformers. The second section converts the 160 volts DC to 115
VAC using high efficiency power MOSFET transistor devices. The inverters generate a modified sine
wave that works with almost every product on the market.
CAUTION: Do not use the following products with an inverter with a modified sine
wave output.
Small battery operated devices like razors, flashlights and night lights that can be
plugged directly into an AC outlet to recharge
A few battery chargers for power tool battery packs that have warnings about high
voltage present on the battery terminals.
Smooth Start
The Smooth Start feature of the STP line of power inverters is designed to handle the power surge that
is created when some appliances are turned on. This feature helps protect both the appliance and the
inverter from excessive power draws and surges.
When the power switch is turned on, the STP inverter smoothly brings up the AC power. This circuitry
also activates under excessive loads, even short circuits, to quickly turn off power to protect the device
and the inverter. The STP inverter then attempts to smoothly bring up the AC power, unless it detects
an excessive load.
page 12
18. Troubleshooting
Problem Cause Solution
Unit does not operate Input voltage is below
10 volts
Attach to proper supply
Fuse blown Determine cause for fuse blowing
and then replace fuse feeding
inverter.
Unit operates for a
short period and
then turns off
Load is trying to draw too
much current
Be sure load is less than rated watts
of inverter. Remove excessive
load. Turn inverter off and back
on to reset.
Unit operates for a
while and gets warm
Inverter is in thermal
shutdown mode
Allow inverter to cool down. Turn
inverter off and back on to reset.
Low battery alarm is
on
Input voltage is below
10.2 volts
Make sure car engine is running.
Check condition of wiring.
Battery may be low and needs
recharging.
Television and stereo
interference
RF interference from
power inverter
Position the power inverter and
wiring as far as possible from
electronic equipment, antenna and
cables and reorient as necessary.
115 VAC Output
voltage reads
incorrectly
Modified sine wave
output can cause
incorrect reading on a
typical multimeter
Use a true RMS meter like a Fluke
8060A or Triplett 4200 to measure
correct voltage.
Light Status Chart
Power
Switch
Power
Light
Beeper Fan Fault Light Mode
Off Off Off Off Off Unit is off
On On Off On Off Normal Operation
On On On On Off Low input voltage, 10.2 to 9.7 volts
On On On On On Low input voltage, less than 9.7 volts
On On Off On On High Input voltage, greater than 15V
On On Off On On Unit over temperature or overloaded
On Off Off Off Off No 12 VOLTS input to inverter
page 13
19. Product Specifications
Key Features STP-1000T
Input 12 - 15 volts DC
Input no-load current .6 A
Output type modified sine wave
Output, Watts,
10 minutes
continuous
1,000W
800W
Output, peak 2,000W
Frequency, +/- 1% 60 Hz
Efficiency 85 - 90%
Outlets 2
Protection
Thermal
Low battery alarm (10.2v)
Low battery shutdown (9.7v)
Output short circuit
Over voltage (15V)
yes
yes
yes
yes
yes
Size (inches) 3” x 4.75” x 13”
Weight: unit/gross 7.1/11 lb
Package Includes:
User Manual
Cables with ring terminals
yes
yes (2.5’)
page 14
22. Index
TN/TS-1500 Instruction ManualInverter
1. Safety Guidelines 1
1
2
2
3
3
5
9
12
14
17
17
12
13
4
3
4
5
6
8
9
9
10
12
2. Introduction
3. User Interface
4. Explanation of Operating Logic
5. Initial Setup of TN/TS-1500
6. Protection
7. Installation Wiring
8. Failure Correction Notes
9. Warranty
2.1 Features
3.2 LED Indicator on Front Panel
3.1 Front Panel
2.2 Main Specification
2.3 System Block Diagram
3.3 Functional Indication and Alarm
3.4 Rear Panel
4.1 Explanation of UPS Mode Control Logic
4.2 Explanation of Energy Saving Mode Control Logic
5.1 Initial State
5.2 Initial Set Point for Transition Voltages
5.3 Procedure of Setting Operating Mode, Output Voltage,
5.4 Remote Monitoring Software
Frequency, and Saving Mode
6.1 Input Protection
6.2 Output Protection
...............................................................................
........................................................................................
........................................................................................
........................................................................
..................................................................
......................................................................................
....................................................................................
......................................................
................................................
....................................................................................
..................................................................................
...............................................................
......................................................
.......................................................
...........................................................................................
...........................................................................
........................................................................
..........................................................................
...................................................................
.............................................................................................
.....................................
........................................................
....................................
...................
Feb. 2013 Version 13
23. Inverter Inverter
Inverter Inverter
1
Don't
disassemble
Away from
moisture
Away from fire or
high temperature
Don't stack on
the inverter
Keep good
ventilation
1.Safety Guidelines (Please read through this manual before assembling
TN/TS-1500)
‧Risk of electrical shock and energy hazard. All failures should be examined by
the qualified technician. Please do not remove the case of the inverter by
‧After connecting the AC input of the inverter to the utility, the AC outlet of the
‧It is highly recommended to mount the unit horizontally.
‧Please do not install the inverter in places with high moisture or near water.
‧Please do not install the inverter in places with high ambient temperature or
‧Please only connect batteries with the same brand and model number in one
‧Never allow a spark or flame in the vicinity of the batteries because they may
‧Make sure the air flow from the fan is not obstructed at both sides (front and
‧Please do not stack any object on the inverter.
‧Fully digital controlled by an advanced CPU, TN-1500 is a true sine wave
‧TS-1500 series only possess the inverter function. It uses batteries as the input
‧TN-1500 is capable of drawing energy from solar panel thus provide
yourself!
inverter will have AC output even if the power switch on the front panel is in the
OFF position.
under direct sunlight.
battery bank. Using batteries from different manufacturers or different capacity
generate explosive gases during normal operation.
back) of the inverter. (Please allow at least 15cm of space)
inverter equipped with an AC charger and solar charger. It can also operate
source and converts the energy into AC output.
uninterrupted power (UPS mode). Besides providing uninterrupted power, it
also has user adjustable energy saving mode. The main purposes of energy
reduction and building an independent sub power station are realized. We can
say that TN-1500 series is a m ulti-functional and designed to be
environmentally friendly.
under UPS and Energy saving modes. (Descriptions which are high lighted
represents functions only for the TN-1500 series)
is strictly prohibited!
2.Introduction
WARNING:
It is suggested to execute regular battery maintenance
Batteries will have aging problem after years of operation.
(e.g. every year). Once aged, the batteries should be changed
by professional technician, or the failed batteries may cause
fire or other hazards.
24. 2.2 Main Specification
2.1 Features
‧True sine wave output (THD3%)
‧Selectable UPS or Energy saving mode
‧1500W rated output
‧High efficiency up to 90%
‧Complete LED indication for operating status
‧Battery low alarm and indicator
‧Surge power capability up to 3000W
‧Output voltage / frequency selectable
‧Fully digital controlled
‧Compliance to UL458 / FCC / E / CE13
‧Can be used for most of electronic products with AC input
‧3 year global warranty
‧Solar charging current 30A max
‧Fast transfer time 10ms (Typ.)
1500W max. continuously, 1750W max. for 180 seconds, 1875W max. for 10 seconds,
3000W for 30 cycle
I
N
P
U
T
C
H
A
R
G
E
R
BAT. VOLTAGE
DC CURRENT
EFFICIENCY
OFF MODE
CURRENT
DRAW
PROTECTION
CHARGE
VOLTAGE
AC CHARGE
CURRENT
SOLAR OPEN
CIRCUIT
VOLTAGE
CHARGE
SOLAR
10.5 ~ 15.0V
150A
87%
14.5V
5.5A 0.5A±
25Vmax
30A max.
Under 1.0mA at power switch OFF
21.0 ~ 30.0V
75A
89%
29.0V
2.7A 0.4A±
45Vmax
42.0 ~ 60.0V
37.5A
58.0V
1.35A 0.2A±
75Vmax
10.5 ~ 15.0V
150A
88%
14.5V
5.5A 0.5A±
25Vmax
21.0 ~ 30.0V
75A
90%
29.0V
2.7A 0.4A±
45Vmax
42.0 ~ 60.0V
37.5A
91%
58.0V
1.35A 0.2A±
75Vmax
MODEL
Rated
power
Output voltage
Frequency
Surge
Current
Factory
setting
WAVEFORM
O
U
T
P
U
T
PROTECTION
112 124 148 212 224 248
110V 60Hz
100 / 110 / 115 / 120V
True sine wave (THD 3.0%)
AC short Overload Over Temperature、 、
230V 50Hz
200 / 220 / 230 / 240V
Over current battery polarity reverse by fuse battery low shutdown battery low alarm、 、 、
CURRENT
2
‧TN-1500 series will automatically detect the input sources (whether AC main or
‧With pure sine wave output, TN/TS-1500 can provide 1500W continuously,
solar panels exist) and then adjust its internal setting. Users can also set up the
operating mode, output voltage, frequency, and saving mode by themselves
based on their special needs, geographic area, and environmental conditions.
1750W for 3 minutes, or 20~40A of peak current for all kinds of load such as
inductive, capacitive, or resistive. General applications include PC, ITE,
vehicles, yachts, home appliances, motors, power tools, industrial control
equipments, AV system, and etc...
89%
60 0.1Hz± 50 0.1Hz±
25. 3
2.3 System Block Diagram
Figure 2.1 System Block Diagram
TN-1500 Inverter
AC
Input
AC
Output
AC charger
Solar charger
Battery
Fuse
Fuse
12V/24V/48V
DC/DC
Converter
Solar Panel
EMI
filter
200V DC
CPU
Controller
Polarity
detect
DC/AC
Inverter
LOAD
120V/230V
Circuit
Breaker
50Hz/60H z/400VDC
LED
Display
A
B
C
D
E
F
G
3.1 Front Panel
POWER on/off switch: The inverter will turn OFF if the switch is in the OFF
AC output outlet: To satisfy application demand of different geographic areas
No Fuse Breaker; Reset: Under Bypass Mode, when the AC output is
Ventilation holes: The inverter requires suitable ventilation to work properly.
Function Setting: Operating Mode, Output voltage, frequency, and saving
LED Indicating Panel: Operating status, load condition, and all types of
Communication Port: For remote monitoring purpose, the unit can be
position.
all over the world, there are many optional AC outlets to choose from.
shorted or the load current exceeds the rated current of the No Fuse Breaker,
Please make sure there is good ventilation and the lifespan of the inverter can
mode can be set through this button.
warnings will be displayed on this panel.
connected to a PC through this communication port by using the optional cable
and monitoring software.
preserved.
the No Fuse Breaker will open and that stops bypassing energy from the utility
getting to prevent possible danger. When the abnormal operating condition is
removed, user can press down on the Reset button to resume operation.
3.User interface
26. 4
3.2 LED Indicator on Front Panel
3.3 Function Indication and Alarm
LED 1 ON
LED 1 ON
LED 1~ 2 ON
LED 1~ 2 ON
LED 1 ~ 3 ON
LED 1 ~ 3 ON
LED 1 ~ 4 ON
LED 1 ~ 4 ON
Battery
Capacity
Battery
Capacity
LED Display
LED Display
0 ~ 25% 26 ~ 50% 51 ~ 75% 76 ~ 100%
AC OUTPU T
SOLA R CHARGE
AC CHARGE
B F
A
C
BATTERY
100
0
1 00
0
Saving
Bat Low
On
SettingLOA D
INV ERT ER
BY PAS SAC I N
E
G
Figure 3.1: Front Panel (TN-1500)
D
ON
OFF
Remote
port
0 ~ 30% 30 ~ 50% 50 ~ 75% 75 ~ 100%
Battery Capacity Indicator: represents the remaining capacity of external
◎ On : The inverter started up and output is normal.
◎ Bat Low : Voltage of external batteries is too low. The inverter will send out
◎ Saving : The inverter is operating under the Saving Mode and there's no
a Beep sound to warn the users.
AC output.
batteries.
Load Condition Indicator: represents the magnitude of output loads.
◎ AC CHARGE : The built-in AC charger is charging external batteries.
◎ SOLAR CHARGE : The external solar panels are providing energy to the
◎ AC IN: The status of utility is normal.
◎ BYPASS: The unit is working under Bypass Mode. The AC electricity
◎ INVERTER: The unit is working under Inverter Mode The AC electricity
◎BATTERY: Display the remaining capacity of external batteries.
◎LOAD: Display the output load status.
external batteries through the built-in solar charger.
consumed by the loads is provided by the utility instead of the inverter.
consumed by the loads is converted from the batteries.
27. 3.4 Rear Panel
Battery input (+), (-).
Utility / AC inlet (IEC320).
Solar panel input terminal.
Frame ground (FG).
A
B
C
D
Fig 3.2: Rear Panel (TN-1500)
5
4.Explanation of Operating Logic
TN-1500 (CPU controlled inverter) is designed to achieve the goal of energy
saving and possesses both UPS and Energy saving modes. These 2 modes are
user adjustable. The unit will be factory set in the UPS mode. Depending on
weather and utility conditions, users can manually adjust or use the monitoring
software to switch to the Energy saving mode.
The main difference between UPS and Energy saving mode is the amount of
energy conserved. Under the UPS mode, the unit will remain in the Bypass mode
as long as utility is available. Thus less energy is conserved (refer to Fig. 4.1 for
UPS mode control logic). Under the Energy saving mode, the priority of input
source chosen is solar panel AC main battery. If available, the CPU will select
external solar panels as its first priority in order to conserve energy. In case of
insufficient solar power and utility failure, battery power will be drawn as the last
resort. When the capacity of batteries is around 10~20%, the CPU will remind
end users by continuously sending out warning siren until the system shuts down.
B
A
D
C
AC INPUT
Chassis
Ground
Reverse Polarity
Will Damage The
Unit.
Solar Input
(30A max)
NEG POS
DC
INPUT
Cat.No.(1GG1HS-212)
Wire Ran ge(10-4AWG Str
Cu Soldered Wires)
Torque (17.7-26.5 in lb)
28. 6
4.1 Explanation of UPS Mode Control Logic
ON
28.5V
26.5V
28.5V 28.5V
ON
OFF
ONON
By pass
mode
Inverter
Mode
Battery
voltage
ON
OFF
Solar charger
state
AC charger
state
ON
OFF
ON
OFF
OFF
26.5V
28.5V
OFF
ON
29.0V
ON
OFF
OFF
ON
Power-On Re-power-on
21V(Shut-down)
t
t
t
t
t
Utility
Power
ON
OFF
22.5V
(Alarm)
ON
OFF
OFF
OFF
ON
OFF
ON
OFF
25.4V
t1 t2 t3 t4 t5 t6 t8 t9 t10 t11 t12t7
26.5V
Figure 4.1: Diagram of UPS Mode Control Logic
t1: To ensure the battery is at full capacity, when the TN-1500 is turned on, the
t2: When the batteries are full (battery voltage around 28.5V), both the AC and
CPU will execute the Bypass Mode automatically connecting the AC main to
the load. In the meantime, it will activate both the AC charger and solar
solar charger will be turned off by the CPU to prevent overcharging and
reducing the battery lifetime. In the meantime, the system will remain in the
Bypass Mode and AC electricity provided to the loads is coming from public
utility.
charger to simultaneously charge the batteries.
29. 7
t3: At this time period, TN-1500 is still in the Bypass mode. The battery voltage
t4: If the energy provided by the charger is larger than what is consumed by the
t5: Since the chargers are in the OFF mode, the battery voltage will gradually
t6: Once utility recovers, the CPU will switch back to the bypass mode.
t7: When battery voltage drops to below 26.5V, the battery charger will be
t8: Same as t4.
t9: Due to lack of utility, TN-1500 will switch to the inverter mode. AC charging
t10: As the battery discharges to below 26.5V and utility remains unavailable.
t11: Same as Energy Saving mode.
t12: When solar charger is providing current of larger than 3A, the voltage level of
level will decrease gradually due to standby power dissipation. When the
batteries are consumed to around 75% of their capacity (battery voltage
around 26.5V) the CPU will restart the charger. The CPU will use charging
current of 3A as a guide point. When the provided charging current is under
3A, the AC charger will be turned ON (e.g. Night time or cloudy day). As for
load, voltage of battery bank will increase gradually until 28.5V is reached
then the CPU will be shut off the charger to prevent overcharging. At this
decrease to the range of 26.5~28.5V (floating voltage level). If utility were to
fail at this moment, the CPU will automatically switch (10ms) to the inverter
mode insuring uninterrupted power.
activated to charge the battery bank (refer to t3 for detailed description).
function will be turned off. Since AC output relies purely on battery power, the
Only the solar charger is turned ON. The battery bank could be depleted
rather quickly.
the battery bank will rise slowly. Once the battery voltage reaches inverter
mode reactivation level, the inverter will be revived.
battery bank will be depleted rather quickly.
charging current of over 3A, the solar charger will be turned ON instead.
point, output load is still supplied by utility.
30. 4.2 Explanation of Energy Saving Mode Control Logic
ON
OFF
28.5V
26.5V
28.5V
22V
28.5V
ON
OFF
ONON
OFF
Bypass
mode
Inverter
mode
Battery
voltage
ON
OFF
Solar charger
state
ON
26.5V
ON ON
OFF
OFF
26.5V
28.5V
OFF
ON
ON
OFFOFF
ON
21.0V (Sh ut-down)
t
t
t
t
Utility
Power
Power-On
ON
OFF
22.5V
(Alarm) 22.5V
(Alarm)
AC charger
state
t1 t2 t3 t4 t5 t6 t7 t8
OFF OFF
t
Figure 4.2 Diagram of Energy Saving Mode Control Logic
8
t1 : When the TN-1500 is turned on, CPU will execute the Bypass Mode
t2 : When the batteries are full (battery voltage around 28.5V), both the AC and
t3: When the batteries are depleted to around 75% of their capacity (battery
t4: If the energy provided by the solar panels is larger than the load requirement,
automatically connecting the AC main to the load. In the mean time, it will
activate both the AC charger and solar charger to simultaneously charge the
solar charger will be turned off to prevent overcharging and reducing the
battery lifetime. In the meantime, the system will switch to the Inverter Mode
and the AC electricity provided to the loads will be coming from the batteries.
voltage around 26.5V), CPU will restart the solar charger but not the AC
voltage of battery bank will increase gradually until reaching 90% capacity
(battery voltage around 28.5V) and then the solar charger will be shut off to
charger to achieve the purpose of energy-saving.
prevent the batteries from overcharging.
batteries.
31. 9
Factory Setting
AC Charger
Transition Voltage
AC Charger
Start Up Voltage
Solar Charger
Start Up Voltage
112 212 124 224 148 248
14.3V
11V
13.3V
28.5V
22V
26.5V
57V
44V
53V
Solar Charger
Shut Down Voltage
Inverter
Shut Down
14.3V
10.5V
28.5V
21V
57V
42V
t5: When the capacity of batteries go down to about 75% (battery voltage around
t6: If the energy provided by the solar panels is lower than consumed by the loads,
t7: If the power consumption of the loads does not decrease and the AC main is
t8: When lacking AC main, the CPU will shut down the whole system if the capacity
26.5V), solar charger will restart and begin charging.
the users to take proper action.
Solar Charger charge the batteries to achieve the goal of energy-saving.
the CPU will provide LED indication to the user know why the inverter has shut
off.
requiring powering the inverter OFF and ON.
voltage of battery bank will decrease gradually to 20% of its capacity
(battery voltage around 22V), the built-in buzzer will be activated and inform
normal, CPU will detect this and the unit will be transferred to Bypass Mode.
The utility will provide energy to the loads and charge the battery bank at the
same time in order to prevent the unit from shutting off. If the solar current is
higher than 3A, the CPU will not activate the AC charger and just let the
of external battery bank is less than 10% (battery voltage around 21V)
in order to prevent over-discharging and reducing its lifetime. After shut down,
5. Initial Setup of TN/TS-1500 (Operating Mode, Output Voltage, Frequency,
and Saving Mode)
TN/TS-1500
5.1 Initial State
5.2 Initial Set Point for Transition Voltages
The initial state of TN/TS-1500 is 120Vac/60Hz or 230Vac/50Hz and both the
UPS mode and Saving Mode is activated. If the users need to revise it for
certain application, it can be done through the setting button on the front panel
(Please refer to section 5.3). The unit will start up automatically after the
setting procedure is finished and the new settings will be executed. These
new settings will be kept even if AC, battery, and solar is disconnected or
occurrence of fault conditions leading to failure of output voltage thus
32. Energy Saving
Mode
UPS Mode
Bat Low
Bat Low
Saving
Saving
On
On
● Light
○ Dark
★ Flashing
●
★
★
★
★
○
Table 5.1 Operating Mode
Figure 5.1: Adjustment of Output Mode, Output Voltage,
Frequency, and Saving Mode
Use an insulated stick to
press this setting button
ON
AC OUTPUT
SOLAR CHARGE
AC CHARGE
OFF
BATTERY
100
0
10 0
0
Saving
Bat Low
On
Settin gLOAD
INVERTE R
BY PASSAC IN
Remote
port
10
5.3 Procedure of Setting Operating Mode, Output Voltage, Frequency, and
Saving Mode
Note: TS-1500 does not have Step 3~5.
STEP 1: The inverter should be turned off while resetting. Input batteries
STEP 2: Use an insulated stick to press the setting button and then turn on the
STEP 3: Please refer to Table 5.1 and check the LED status to see if the
STEP 4: The LEDs will change state by pressing the setting button for 1
STEP 5: After selecting the Operating Mode, press the setting button for 3~5
STEP 6: Please refer to Table 5.2 and check whether the combination of
should be connected, AC main can either be connected or
power switch. After pressing for 5 seconds, the inverter will send out
Operating Mode is the one you need. If yes, please skip to STEP 5.
second and then release. Operating Mode can be adjusted as
seconds and the inverter will send out a Beep sound. The button
output voltage and frequency is the one you need. If yes, please skip
to STEP 8. If change is required, please follow STEP 7~11.
can be released and you can go on to the setting section of
Voltage/frequency.
required.
If change is required, please follow STEP 4~11.
a Beep sound. Users can release the button and go into the setting
procedure.
disconnected, and the loads should be removed.
33. Bat Low
Bat Low
Saving
Saving
On
On
Table 5.3 LED Indication for Saving Mode ON/OFF
● Light
○ Dark
★ Flashing
●
★
★
★
★
○
Figure 5.2: State Circulation Diagram of Output Voltage and Frequency
Table 5.2 : LED Indication of Output Voltage / Frequency Combination
50Hz
60Hz
100Vac 110Vac 115Vac 120Vac
(200Vac)
●On
On
●
●
●
●
●
●
● Light
●
○ Dark
●●
●●
○Bat Low
Bat Low
○
○Saving
Saving
○
★ ★ Flashing★★★
○ ○
○ ○
(220Vac) (230Vac) (240Vac)
Output
Voltage
Frequency
100Vac
(200Vac)50Hz
110Vac
(220Vac)50Hz
115Vac
(230Vac)50Hz
100Vac
(200Vac)60Hz
120Vac
(240Vac)50Hz
120Vac
(240Vac)60Hz 110Vac
(220Vac)60Hz115Vac
(230Vac)60Hz
Saving Mode
ON
Saving Mode
OFF
11
STEP 7: The LEDs will change state by pressing the setting button for 1
second and then release (refer to Figure 5.2). Please select the
combination of output voltage and frequency you need.
STEP 8: After selecting the output voltage and frequency, press the setting
STEP 9: Please refer to Table 5.3 and check whether the Saving Mode is set
button for 3~5 seconds and the inverter will send out a Beep
as required. If yes, please skip to STEP 11. If change is required,
please follow STEP 10~11.
sound. The button can be released and it will go into the setting
section for Saving Mode.
34. 12
STEP 10: The LEDs will change state by pressing the setting button for 1
STEP 11: After activating or canceling the Saving Mode, press the setting
second and then release. You can activate or cancel the Saving
button for around 5 seconds and the inverter will send out a Beep
sound. The button can be released and all the settings are finished.
The inverter will automatically store all the settings and then start
to operate.
Mode function by this adjustment.
5.4 Remote Monitoring Software
6.1 Input Protection
(A)Battery Polarity Protection: If the battery input is connected in reverse
(B)Battery Under Voltage Protection: When the battery voltage is lower than
(C)Battery Over Voltage Protection: When the battery voltage is too high,
(D)Solar Charger Over Current Protection: The maximum charging current
Please choose suitable batteries that is within the rated input DC
voltage of TN/TS-1500 (refer to the SPEC). If the input DC voltage is
too low (ex. using 12Vdc battery bank for 24Vdc input models), TN/TS-
1500 can't be started up properly. If the input DC voltage is too high
(ex. using 48Vdc battery bank for 24Vdc input models), TN/TS-1500
WARNING:
will be damaged!
polarity, the internal fuse will blow and the inverter should be send back to
the preset value, the inverter will automatically terminate the output and
inverter will automatically terminate the output and the built-in buzzer will
of the built-in solar charger is 30A. If the charging current is too high, the
internal fuse will blow and the inverter should be send back to MEAN WELL
for repair.
activate to inform the users. Please refer to Table 6.1 for more detail about
the failure signals displayed through the Load Meter.
Battery Low signal on the front panel will light up. Please refer to Table 6.1
for more detail about the failure signals displayed through the Load Meter.
MEAN WELL for repair.
(A)Users can also make Operating Mode, voltage/frequency, saving mode,
(B)DB9-USB conversion cable should not be used because it will not be
and transition voltage adjustments by using this software. Software update
compatible with the monitoring software.
can be downloaded from the MW website. Please contact us or our
distributor if you have any questions.
6. Protection
35. 13
100
0
0
LOAD
100 10 0
1 00
100
0 0
0
LOAD LOA D
LO AD
LOAD
Table 6.1: Failure Messages On Front Panel
10 0
100
100
100
0
0
0
0
LOAD
LOA D
LOA D
LOA D
(1875W)
Output
Overload
Output
Overload
(1500W~1750W)
Failure
Message
Output
Overload
Over
Temperature
(1750W~1875W)
LED
Indicator
LED
Indicator
AC Output
Short Circuit
Failure
Message
Abnormal
AC Output
Voltage
Abnormal
Battery
Voltage
6.2 Output Protection
(A)Bypass Mode: Uses No Fuse Breaker as automatic over current
(B)Inverter Mode: Under the Inverter Mode, if any abnormal situation
(1)Over Temperature Protection: When the internal temperature is higher
(2)AC Output Abnormal Protection: When the AC output voltage of the
(3)AC Output Short Circuit Protection: When a short circuit situation
(4)Battery Voltage Abnormal Protection: When the battery voltage is too
(5)Output Overload Protection: When output is overloaded between 1500W
protection. When over current occurs, the button of the circuit breaker on
occurs, the front panel will send out failure messages through the Load
than the limit value, the Over Temperature Protection will be activated.
inverter is too high or too low, the unit will turn off and should be restarted
occurs at the output side of the inverter or the load increase greatly in a
high or too low, this protection will be activated. The inverter will auto-
~ 1750W, the inverter can continuously provide power for 3 minutes. After
that, if the overload condition is not removed, the overload protection will
be activated. When the load is higher than 1875W, the overload protection
will activate instantly. For these overload protections, once activated, you
should reset the unit.
recover once the battery voltage go back to a safe level and users do not
need to restart it.
short period of time, the unit will turn off and should be restarted again.
again.
The unit will automatically turn off and should be restarted again.
Meter (Please refer to Table 6.1).
the front panel will pop up and the inverter will shut down. At this time,
users should remove the loads, restart the inverter and press down on the
button of the circuit breaker and the AC output can now be provided
normally.
36. 14
(B)Suggested Battery Type and Capacity
5A ~ 25A
Battery Type
Battery
Capacity
Lead-acid
12V / 120Ah ~ 24V / 60Ah ~ 48V / 30Ah ~
12V / 400Ah 24V / 200Ah 48V / 100Ah
112 212 124 224 148 248
TN/TS-1500
10A ~ 13A 1.25
1.5
2.5
4
6
10
16
25
35
50
16 Choosing suitable
wires based on the
rating of solar panels
and distance from
the inverter
14
12
10
8
6 Models using 48V
batteries
Models using 24V
batteries
Models using 12V
batteries
4
2
1
0
13A ~ 16A
16A ~ 25A
25A ~ 32A
32A ~ 40A
40A ~ 63A
63A ~ 80A
80A ~ 100A
100A ~ 125A
≧125A
Cross-section of
Lead (mm )
2
Rated Current of
Equipment (Amp)
Table 7.1: Suggestion for Wire Selection
Input Current
from Solar Panel
(A)Wiring for Batteries: Wire connections should be as short as possible and
less than 1.5 meter is highly recommended. Make sure that suitable wires are
chosen based on Safety requirement and rating of current. Too small cross-
section will result in lower efficiency, less output power, and the wires may
also become overheated and cause danger. Please refer to Table 7.1 and
consult our local distributor if you have any questions.
7. Installation Wiring
(C)Requirement of Installation:
The unit should be mounted on a flat surface or holding rack with suitable
strength. In order to ensure the lifespan of the unit, you should refrain from
operating the unit in environment of high dust or moisture. This is a power
supply with built-in DC fan. Please make sure the ventilation is not blocked.
We recommend that there should be no barriers within 15cm of the ventilating
holes.
37. 15
Solar Panel
LOAD
TN/TS-1500
Inverter
AC O/P
AC I/P DC I/P
- +
Chassis
Solar I/P
Wall or system FG
+ -
Battery
(D)Example of System Diagram
Figure 7.1: Example of Installation
15cm
Inverter Air
15cm
Air
As short as possible
Larger
Larger
than
than
15cm
15cm
Should less than 1.5m
Based on the actual length of wiring and
choose suitable cross-section of the leads
Where, the DC I/P and chassis fix manner as following :
38. 16
Chassis
0 10 20 30 40 50 60 70
20
40
60
80
100
21VDC 23VDC 30VDC (HORIZONTAL)
20
40
60
80
100
(E)Derating
Battery Input Voltage (V) - 24V ModelAmbient Temperature ( )℃
Figure 7.2: Output Derating Curve Figure 7.3: Input Derating Curve
1. Company Name : Mean Well Enterprises Co Ltd
2. Model Name : 1GG1HS-191
3. Rating : 150A
4. Torque : 106.2 Ib.in max.
5. Suitable Wire : Copper wire (temp rating : 75C )
6. Intended for termination onto a Listed ring tongue connector
7. To Be Sold Only With Installation Instructions
8. A mounting screw that is first inserted through the tang and is threaded
into the connector to secure the connector to the tang shall be torqued
to 32 in-lbs minimum
9. Mounting Screws - Plated Steel. Two provided, size M4
Cat.No.(1G G1HS-212)
Wire Range(10-4 AWG
Str Cu Soldered Wires)
Torque (17.7-26.5 in lb)
(F) Notes on Output Loads:
TN/TS-1500 Series can power most of equipments that need an AC
source of 1500W. But for certain specific type of load, the unit may not
work properly.
(1)Since inductive loads or motor based equipments need a large start up
(2)When the output are capacitive or rectified equipments (such as switching
current (6~10 times of its rated current), please make sure this start up
power supply), we suggest operating these equipment at no load or light
load condition. Increase the loads slightly only after the TN/TS-1500 has
started up to ensure proper operation.
current is less than the maximum current capability of the inverter.
39. Malfunction of the charger
(no charging voltage)
Repair required. Please send it back
to us or any of our distributors
Clog with foreign objects Remove the foreign objects
Fan does
not spin Malfunction of the fan
Repair required. Please send it back
to us or any of our distributors
Short circuit protection
Make sure the output is not
overloaded or short circuit
Batteries are aging or broken Replace the batteries
Discharging
period of
batteries is
too short
Battery capacity is too small
Reconfirm the specification and enlarge
the battery capacity as suggested
Status Possible Reasons Ways to Eliminate
Abnormal input
Check the AC or DC input sources.
Make sure the voltage is within the
required range.
No input (battery, AC main,
or solar energy)
Make sure the wiring and polarity
is correct.
Over temperature
protection
Make sure that the ventilation is not
blocked or whether the ambient
temperature is too high. Please
derate output usage or reduce the
ambient temperature.
Overload protection
Make sure the output load does not
exceed the rated value or the
instantaneous start up current is not
too high (for inductive or capacitive
loads).
No AC output
voltage
17
TN/TS-1500 should serviced by a professional technician. Improper usage or
modification may damage the unit or result in shock hazard. If you are not able to
clear the failure condition, please contact Mean WELL or any of our distributors
for repair service.
8. Failure Correction Notes
Three years of global warranty is provided for TN/TS-1500 under normal
operating conditions. Please do not change components or modify the unit
by yourself or MEAN WELL may reserve the right not to provide the complete
warranty.
9.Warranty
40. N o.28, Wuquan 3rd Rd., Wugu Dist., New Taipe i City 248, Taiwan
43. 3R
Important Safety Instructions
SAVE THESE INSTRUCTIONS!
This manual contains important instructions and warnings that should be followed during the installation, operation and storage of all Tripp Lite
Inverter/Chargers.
Location Warnings
• Install your Inverter/Charger (whether for a mobile or stationary application) in a location or compartment that minimizes exposure to
heat, dust, direct sunlight and moisture.
• Although your Inverter/Charger is moisture resistant, it is NOT waterproof. Flooding the unit with water will cause it to short circuit
and could cause personal injury due to electric shock. Never immerse the unit, and avoid any area where standing water might
accumulate. Mounting should be in the driest location available.
• Leave a minimum of 2 clearance at front and back of the Inverter/Charger for proper ventilation. To avoid automatic Inverter/Charger
shutdown due to overtemperature, any compartment that contains the Inverter/Charger must be properly ventilated with adequate
outside air flow. The heavier the load of connected equipment, the more heat will be generated by the unit.
• Do not install the Inverter/Charger directly near magnetic storage media, as this may result in data corruption.
• Do not install near flammable materials, fuel or chemicals.
Battery Connection Warnings
• The Inverter/Charger will not operate (with or without utility power) until batteries are connected.
• Multiple battery systems must be comprised of batteries of identical voltage, age, amp-hour capacity and type.
• Because explosive hydrogen gas can accumulate near batteries if they are not kept well ventilated, your batteries should not be
installed (whether for a mobile or stationary application) in a “dead air” compartment. Ideally, any compartment would have some
ventilation to outside air.
• Sparks may result during final battery connection. Always observe proper polarity as batteries are connected.
• Do not allow objects to contact the two DC input terminals. Do not short or bridge these terminals together. Serious personal injury
or property damage could result.
Equipment Connection Warnings
Do not use a Tripp Lite RV Inverter/Charger in life support or healthcare applications where a malfunction or failure of a
Tripp Lite RV Inverter/Charger could cause failure of, or significantly alter the performance of, a life support device or
medical equipment.
• Corded models: Do not modify the Inverter/Charger’s plug or receptacle in a way that eliminates its ground connection. Do not use
power adapters that will eliminate the plug’s ground connection.
• Connect your Inverter/Charger only to a properly grounded AC power outlet or hardwired source. Do not plug the unit into itself; this
will damage the device and void your warranty.
• You may experience uneven performance results if you connect a surge suppressor, line conditioner or UPS system to the output of
the Inverter/Charger.
Operation Warnings
• Your Inverter/Charger does not require routine maintenance. Do not open the device for any reason. There are no user serviceable parts
inside.
• Potentially lethal voltages exist within the Inverter/Charger as long as the battery supply and/or AC input are connected. During any
service work, the battery supply and AC input connection (if any) should therefore be disconnected.
• Do not connect or disconnect batteries while the Inverter/Charger is operating in either inverting or charging mode. Operating Mode
Switch should be in the OFF position. Dangerous arcing may result.
44. 4R
Feature Identification
Identify the premium features on your specific model and quickly locate instructions on how to maximize their use.
Configuration DIP Switches: optimize Inverter/Charger
operation depending on your application. See pages 6-7 for
setting instructions.
Operating Mode Switch: controls Inverter/Charger operation.
The “AUTO/REMOTE” setting ensures your equipment
receives constant, uninterrupted AC power. It also enables the
Inverter/Charger to be remotely monitored and controlled with
an optional remote module (Tripp Lite model APSRM2, sold
separately or included with select models). The “CHARGE
ONLY” setting allows your batteries to return to full charge faster
by turning the inverter off which halts battery discharging. See
page 5 for setting instructions.
Operation Indicator Lights: intuitive “traffic light” signals
show whether the Inverter/Charger is operating from AC line
power or DC battery power. It also warns you if the connected
equipment load is too high. See page 5 for instructions on
reading indicator lights.
Battery Indicator Lights: intuitive “traffic light” signals show
approximate charge level of your battery. See page 5 for
instructions on reading indicator lights.
DC Power Terminals: connect to your battery terminals. See
page 10 for connection instructions.
Ground Fault Interrupter (GFI) AC Receptacles (not on
hardwire models): allow you to connect equipment that would
normally be plugged into a utility outlet. They feature ground
fault interrupter switches that trip if there is excessive current
on the ground safety wire.
AC Input Cord (not on hardwire models): connects the
Inverter/Charger to any source of utility- or generator-supplied
AC power. See page 11 for connection instructions.
Hardwire AC Input/Output Terminals (not on corded
models): securely connect the Inverter/Charger to vehicle or
facility electrical system input and recommended GFCI receptacle
output. See page 11 for connection instructions.
Resettable Circuit Breaker: protect your Inverter/Charger against
damage due to overload. See page 5 for resetting instructions.
Remote Control Module Connector: allows remote monitoring
and control with an optional module (Tripp Lite model
APSRM2, sold separately or included with select models). See
remote module owner’s manual for connection instructions.
Battery Charge Conserver (Load Sense) Dial (not on 612
models): conserves battery power by setting the low-load level
at which the Inverter/Charger’s inverter automatically shuts off.
See page 7 for setting instructions.
Main Ground Lug: properly grounds the Inverter/Charger to
vehicle grounding system or to earth ground. See page
10 for connection instructions.
Multi-Speed Cooling Fan: quiet, efficient fan prolongs equipment
service life.
DC Power Terminal Cover Plate
Hardwire AC Input/Output Cover Plate
Battery Temperature Sensing Connector (not on 612 models):
prolongs battery life by adjusting charge based on battery tem-
perature. Use with cable (included on select models). See page
7 for details.
Automatic Generator Start Connector (not on 612 models):
automatically cycles generator based on battery voltage. Use
with user-supplied cable. See page 7 for details.
1
2
3
4
5
6
7
8
9
10
11
12
13
14
15
HOT IN
NEUTRAL IN
GROUND IN
GROUND OUT
HOT OUT
“FOR USE WITH COPPER WIRE ONLY”
NEUTRAL OUT
1 24 3
5
9
10 1113
14
8 15
Front View (Single Input/Output Hardwire Models)
12
Rear View (Single Input/Output Hardwire Models and Select Corded Models)
AC IN 1
HOT - BROWN
NEU - BLUE
GND - GRN/YEL
AC IN 2
HOT - GRAY
NEU - WHITE
GND - GRN/YEL
AC OUT 1
HOT - BLACK
NEU - YELLOW
GND - GRN/YEL
AC OUT 2
HOT - ORANGE
NEU - RED
GND - GRN/YEL
1 24 3
5
9
10 1113
Front View (Dual Input/Output Hardwire Models)
Front View (Corded Models)
* 612 models have only one set of DIP Switches. ** Select models include front-mounted ground lug. † Available on all models except 612 models.
24 3
5
6
7
9
10 11†1314 1*
12**
8
16
17
16†
17†
Side Mounted,
Not Shown
Side Mounted,
Not Shown
16
17
Side Mounted,
Not Shown
Side Mounted,
Not Shown
16
17
12
45. 5R
Operation
Switch Modes
After configuring, mounting and connecting your Inverter/Charger,
you are able to operate it by switching between the following oper-
ating modes as appropriate to your situation:
AUTO/REMOTE: Switch to this mode when you need
constant, uninterrupted AC power for connected
appliances and equipment. The Inverter/Charger will
continue to supplyAC power to connected equipment and
to charge your connected batteries while utility- or
generator-supplied AC power is present. Since the inverter is ON (but in
Standby) in this mode, it will automatically switch to your battery
system to supply AC power to connected equipment in the absence
of a utility/generator source or in over/under voltage situations.
“AUTO/REMOTE” also enables an optional remote control module
(Tripp Lite model APSRM2, sold separately or included with select
models) to function when connected to the unit.
CHARGE ONLY: Switch to this mode when you
are not using connected appliances and equipment in
order to conserve battery power by disabling the
inverter. The Inverter/Charger will continue to supply
AC power to connected equipment and charge con-
nected batteries while utility- or generator-supplied AC power is
present. However, since the inverter is OFF in this mode, it WILLNOT
supply AC power to connected equipment in the absence of a
utility/generator source or in over/under voltage situations.
OFF: Switch to this mode to shut down the
Inverter/Charger completely, preventing the inverter
from drawing power from the batteries, and prevent-
ing utility AC from passing through to connected
equipment or charging the batteries. Use this switch
to automatically reset the unit if it shuts down due to overload or
overheating. First remove the excessive load or allow the unit to suf-
ficiently cool (applicable to your situation). Switch to “OFF”, then
back to “AUTO/REMOTE” or “CHARGE ONLY” as desired. If
unit fails to reset, remove more load or allow unit to cool further and
retry. Use an optional remote control module (Tripp Lite model
APSRM2, sold separately or included with select models) to reset
unit due to overload and overtemperature.
Indicator Lights
Your Inverter/Charger (as well as an optional Tripp Lite Remote
Control Module, sold separately or included with select models) is
equipped with a simple, intuitive, user-friendly set of indicator lights.
These easily-remembered “traffic light” signals will allow you, shortly
after first use, to tell at a glance the charge condition of your batteries,
as well as ascertain operating details and fault conditions.
LINE Green Indicator: If the operating mode
switch is set to “AUTO/REMOTE”, this light will
ILLUMINATE CONTINUOUSLY when your con-
nected equipment is receiving continuous AC power
supplied from a utility/generator source.
If the operating mode switch is set to “CHARGE ONLY”, this light
will BLINK to alert you that the unit’s inverter is OFF and will NOT
supply AC power in the absence of a utility/generator source or in
over/under voltage situations.
INV (Inverting) Yellow Indicator: This light will
ILLUMINATE CONTINUOUSLY whenever connected
equipment is receiving battery-supplied, inverted AC
power (in the absence of a utility/generator source or in
over/under voltage situations). This light will be off
whenAC power is supplying the load. This light will BLINK to alert you if
theloadis less than the Battery Charge Conserver (Load Sense) setting.
LOAD Red Indicator: This red light will ILLUMI-
NATE CONTINUOUSLY whenever the inverter is
functioning and the power demanded by connected
appliances and equipment exceeds 100% of load
capacity. The light will BLINK to alert you when the
inverter shuts down due to a severe overload or overheating. If this
happens, turn the operating mode switch “OFF”; remove the over-
load and let the unit cool. You may then turn the operating mode
switch to either “AUTO/REMOTE” or “CHARGE ONLY” after it
has adequately cooled. This light will be off when AC power is sup-
plying the load.
BATTERY Indicator Lights: These three lights will illuminate in
several sequences to show the approximate charge level of your con-
nected battery bank and alert you to two fault conditions:
Approximate Battery Charge Level*
Battery Lights Battery Capacity
Illuminated (Charging/Discharging)
Green 91%–Full
Green Yellow 81%–90%
Yellow 61%–80%
Yellow Red 41%–60%
Red 21%–40%
All three lights off 1%–20%
Flashing red 0% (Inverter
shutdown)
* Charge levels listed are approximate. Actual conditions vary
depending on battery condition and load.
Fault Condition
Battery Lights Fault
Illuminated Condition
All three lights Excessive discharge
flash slowly* (Inverter shutdown)
All three lights Overcharge (Charger
flash quickly** shutdown)
*Approximately ½ second on, ½ second off. See Troubleshooting section. ** Approximately ¼
second on, ¼ second off. May also indicate a battery charger fault exists. See Troubleshooting
section.
Resetting Your Inverter/Charger to
Restore AC Power
Your Inverter/Charger may cease supplying AC power or DC charg-
ing power in order to protect itself from overload or to protect your
electrical system. To restore normal functioning:
Overload Reset: Switch operating mode switch to “OFF” and
remove some of the connected electrical load (ie: turn off some of
the AC devices drawing power which may have caused the overload
of the unit). Wait one minute, then switch operating mode switch
back to either “AUTO/REMOTE” or “CHARGE ONLY.”
Output Circuit Breaker Reset: Alternatively, check output circuit
breaker(s) on the unit's front panel. If tripped, remove some of the elec-
trical load, then wait one minute to allow components to cool before
resetting the circuit breaker. See Troubleshooting for other possible
reasons AC output may be absent.
1
2
3
4
5
6
7
1
2
1 2 3
4 5 6
7
1 2
46. 6R
Select Battery Type—REQUIRED
(All models)
CAUTION: The Battery Type DIP Switch setting must
match the type of batteries you connect, or your batteries
may be degraded or damaged over an extended period of
time. See “Battery Selection,” p. 8 for more information.
Battery Type Switch Position
Gel Cell (Sealed) Battery Up
Wet Cell (Vented) Battery Down (factory setting)
Select High AC Input Voltage Point
for Switching to Battery—OPTIONAL*
(All Models)
Voltage Switch Position
145V Up
135V Down (factory setting)
Configuration
Set Configuration DIP Switches
Using a small tool, set the Configuration DIP Switches (located on the front panel, see diagram) to optimize Inverter/Charger operation
depending on your application. RV612UL and RV612ULH models include one set of four DIP Switches. All other models include an additional set
of four DIP switches to configure additional operational functions. Refer to the appropriate section to review the instructions for your
specific model.
A1A2A3A4 A1A2A3A4
INPUT C/B 10A OUTPUT C/B 12A
B4 B3 B2 B1 A4 A3 A2 A1
Group B Dip Switches (Not on 612 Models) Group A Dip Switches (All Models)
Group A DIP Switches (All Models)
Using a small tool, configure your Inverter/Charger by setting the four Group A DIP Switches (located on the front panel of your unit; see
diagram) as follows:
Select Low AC Input Voltage Point
for Switching to Battery—
OPTIONAL*
Switch
Voltage Position
105V #A4 Up #A3 Up
95V #A4 Up #A3 Down
85V #A4 Down #A3 Up
75V #A4 Down #A3 Down
(factory setting)
A1A2A3A4
A1A2A3A4
A1A2A3A4
A1A2A3A4
A1 A2
A3A4
B2B1
A1A2A3A4
A3A4
A3
* Most of your connected appliances and equipment will perform adequately when your Inverter/Charger’s High AC Input Voltage Point (DIP Switch #2 of Group A) is set to 135V and its Low AC Voltage Input Point (DIP Switches #3 and #4 of Group A or DIP Switch #3 for
612 models) are set to 95V. However, if the unit frequently switches to battery power due to momentary high/low line voltage swings that would have little effect on equipment operation, you may wish to adjust these settings. By increasing the High AC Voltage Point and/or
decreasing the Low AC Voltage Point, you will reduce the number of times your unit switches to battery due to voltage swings.
Group B DIP Switches (Not on 612 Models)
Select Load Sharing—OPTIONAL (Not on 612 Models)
Your Inverter/Charger features a high-output battery charger that can draw a significant amount of AC power from your utility source or
generator when charging at its maximum rate. If your unit is supplying its full AC power rating to its connected heavy electrical loads at the
same time as this high charging occurs, the AC input circuit breaker could trip, resulting in the complete shut off of pass-through utility power.
To reduce the chance of tripping this breaker, all RV Inverter/Chargers (except models RV612ULand RV612ULH) may be set to automatically limit
the charger output. This keeps the sum of the unit’s AC load and charge power within the circuit breaker rating. This charger-limiting func-
tion has four settings, allowing you to reduce the charger’s draw lower and lower, as needed, if the AC input circuit breaker keeps tripping
under the normal AC loads of devices you have connected downline from the unit. The figures on the next page show how to set your DIP
Switches to determine how heavy the connected load can be on your Inverter/Charger before charger-limiting begins.
Set Battery Charging Amps Type—
OPTIONAL
Check specifications on for your unit’s high- and
low-charging amp options. By setting on high
charging, your batteries will charge at maximum
speed and your RV 12V DC system loads will be well-supplied. When setting on
low charging, you lengthen the life of your batteries (especially smaller ones).
A4
Select Low AC Input Point for Switching
to Battery—OPTIONAL
Voltage Switch Position
105V Up
95V Down (factory setting)
Settings
612 Models OnlyAll Models Except 612 Models
Battery Charger Switch Position
High Charge Amp Up
Low Charge Amp Down (factory setting)
High Charge Amp
Low Charge Amp
A1A2A3A4