

Recomendados
Recomendados
Más contenido relacionado
Similar a SmartBoard for the Foreign Language Classroom
Similar a SmartBoard for the Foreign Language Classroom (20)
Más de Catherine Ritz
Más de Catherine Ritz (19)
Último
Último (20)
SmartBoard for the Foreign Language Classroom
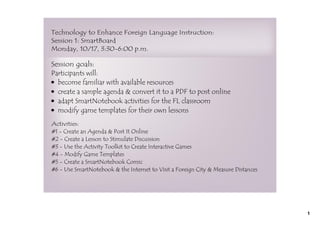
- 1. Technology to Enhance Foreign Language Instruction: Session 1: SmartBoard Monday, 10/17, 3:30-6:00 p.m. Session goals: Participants will: • become familiar with available resources • create a sample agenda & convert it to a PDF to post online • adapt SmartNotebook activities for the FL classroom • modify game templates for their own lessons Activities: #1 - Create an Agenda & Post It Online #2 - Create a Lesson to Stimulate Discussion #3 - Use the Activity Toolkit to Create Interactive Games #4 - Modify Game Templates #5 - Create a SmartNotebook Comic #6 - Use SmartNotebook & the Internet to Visit a Foreign City & Measure Distances 1
- 2. General Layout / Checking for Updates / SMART Exchange • Help - Check for Updates • Page sorter • Gallery • Lesson Activity Toolkit • Files • Properties Tab • Large Icon Bar • SMART Exchange **Please take a minute to browse the resources** 2
- 3. Activity #1: Create an Agenda for Your Class 3
- 4. Add accents Unfortunately, there is no way to insert an accent as in MS word. Either copy & paste from Word or use accent codes! Hold down the ALT key and type using the numeric keypad. à 0224 á 0225 â 0226 ñ 0241 ä 0228 è 0232 é 0233 ê 0234 ë 0235 ì 0236 í 0237 î 0238 ï 0239 ò 0242 ó 0243 ô 0244 ö 0246 ù 0249 ú 0250 û 0251 ü 0252 4
- 5. Add links (to documents & Internet) and images to your agenda AdjectiveETRE celebrity review.ppt Le Figaro **Please take a few minutes to add to your agenda** 5
- 6. • Create a sample agenda for one of your classes for this week • Include title, date, goals, activities, homework • Add links and images, and change the background color Be sure to: • Change size, font, color of text • Move text to different areas of the page • Add a background (Gallery Essential -> Background & Themes) **Please take a few minutes to create your agenda** 6
- 7. Save Your Agenda as a PDF and post it online Students do not have SmartBoard software at home, so you must save your agenda as a PDF first! 7
- 8. Activity #2: Create a Lesson to Generate Class Discussion • Re-use knowledge of modifying text, adding images, adding links • Re-use knowledge of adding backgrounds • Add links within your SmartBoard document & to images • Save images, images with links, documents and links to your My Contents file • Use Screen Shade 8
- 9. Let's open a new file and see how to make this! 9
- 10. Create your own lesson to generate discussion. Be sure to: • Include images from the Internet or the Gallery • Add these images to your My Content file • Add links to these images to the Internet • Add links to these images to other slides within your document • Use Screen Shade to cover part of your slide **Please take a few minutes to create your own lesson to generate class discussion** 10
- 11. Activity #3: Use Lesson Gallery Activity Templates Available Activity Templates: • Anagrams • Category Sort (for Image or Text) • Hot Spots • Image Arrange, Match, Select • Keyword Match • Multiple Choice • Note reveal • Pairs • Sentence Arrange • Tiles • Timeline Reveal • Vortex Sort (for Image or Text) • Word Biz, Word Guess 11
- 12. Anagrams: 12
- 13. Category Search (for Image or Text): 13
- 14. Hot Spots: 14
- 15. Image Arrange: 15
- 16. Image Match: 16
- 17. Image Select: 17
- 18. Keyword Match: 18
- 19. Multiple Choice: 19
- 20. Note reveal: 20
- 21. Pairs: 21
- 22. Sentence Arrange: 22
- 23. Tiles: 23
- 24. Timeline Reveal: 24
- 25. Vortex Sort: 25
- 26. Word Biz: 26
- 27. Word Guess: 27
- 28. Pick Two SmartBoard Activities & Adapt Them for Your Class **Please take a few minutes to create your activities** 28
- 29. Activity #4: Modify Game Templates Go to: worldlanguagefileshare.wikispaces.com Click on "Templates" (on left) for blank template. Or click on "Expresate" (on left) for my completed templates. There are tons more templates to search from on SmartExchange! **Choose your favorite template and modify it for a lesson** 29
- 30. Activity #5: Create a SmartNotebook Comic with Audio SmartNotebook Comics 30
- 31. 1. La Poste Voilà le facteur qui va distribuer le courrier. 31
- 32. 2. La Poste Merci, monsieur! Il met les lettres dans la boîte aux lettres. 32
- 33. 3. La Poste e m ond du Il ya ui ! … urd’h là là t aujo e! O h e ueu gui ch la q au sf ont gen Les 33
- 34. 4. La Poste Le facteur pèse mon colis sur la balance. Ouf ! Il est lourd ! 34
- 35. 5. La Poste Merci ! Et au revoir ! Il met un timbre sur mon colis et je paie. C’est pas trop cher ! 35
- 36. Student Sample #1: Students created a 1st draft on paper. 36
- 37. J'achete un timbre qui est pour une lettre. 37
- 38. J'envoie la lettre a mon amie Isabelle qui est en France. 38
- 39. Je vais a la poste que j'envoie le colis. 39
- 40. Le colis a une adresse de un nom, un numero, unerue, un code postal, et une ville. 40
- 41. Je donne le colis au employe de poste que il pese avec la balance. 41
- 42. J'achete une enveloppe pour une lettre que j'envoie ce soir. 42
- 43. Student Sample #2: 43
- 44. Un jour, Nicolas a entré une nouvelle école qui n'était pas tres jolie (Melrose High) Je suis excité pour l'ecole! 44
- 45. b Bonjour, je m'appelle Betty On y va! Il avait beaucoup des peurs jusqu'a il a fait le ? connaisance de Betty et Jessie qui étaient les meilleurs. 45
- 47. Mdr.... ? La fille dont Nicolas était amourse est Bette, qui était le prémier de la classe 47
- 48. Melrose High Chez Jessie Apres l'ecole, Betty, Jess et Nicolas ont rentre chez Jessie, pres de lequel était Melrose High 48
- 49. Au revoir La maison, ou ils ont fait les devoirs, était tres grande. Nicolas a l'aime. Apres les devoir il a dit "au revoir!", ce qui etait dommage. 49
- 50. Technical How-To Set a Background: - click on "Gallery" tab - click on "Background and Themes" - choose your background 50
- 51. Technical How-To Insert Comic "Frame" - click on the "Shapes" button - choose the shape you want - click and insert it on the page 51
- 52. Technical How-To Insert Images: 1. - search for an image on-line - copy & paste it into your presentation 2. - search for an image in the "Gallery" tab - select the image and place it in your presentation 52
- 53. Technical How-To Insert Speech/Thought Bubbles: 1. - click on the "Shapes" button - scroll right for one speech, one thought bubble - click and insert it on the page 2. - search for a speech bubble in the "Gallery" tab - select the speech bubble and place it in your presentation 53
- 54. Technical How-To Insert Text: - begin typing anywhere on the page - highlight the text to change font, color, size, etc. - when done, click outside of text box - text can now be moved around the page like an image 54
- 55. Technical How-To Group Text & Speech/Thought Bubbles: - size your text and place it in the speech/thought bubble - drag the mouse around the text & speech/thought bubble so that both are selected - click "CTRL + G," or select drop-down arrow on either and select "Grouping," "Group" - text & speech/thought bubbles now move together *you will no longer be able to modify text 55
- 56. Technical How-To Record Sound: - open the "Sound Recorder" from the program menu - use a microphone or the built-in microphone on your computer to record your voice - save file (saves as .wav or .wma, not .mp3) *check compatibility with your version of SB software. If SB only accepts .mp3, check for updates. 56
- 57. Technical How-To Attach Sound: - select the text or speech/thought bubble you want to attach sound to - click on the drop-down arrow and select "Sound" - browse for and select your sound recording - click on "object," then ok - the sound file will be coverted 57
- 58. Technical How-To Attach Sound Effects from Internet: - find the sound effect from on-line - save to your computer (right-click "save link as") and follow same steps to attach sound recordings *Some free on-line sound effect websites: http://www.pacdv.com/sounds/index.html http://www.findsounds.com/ **Try creating your own Comic!** http://www.soundjay.com/ 58
- 59. Activity #6: Use SmartNotebook & the Internet to visit a foreign city The transparent background icon will allow your SB page to "disappear," but will save all work you do as if you were still on it. Why use the transparent background? - look at content on-line or on the computer, take notes and save them - create a class record of notes/discussion without constantly re-opening Smart Notebook 59
- 60. *Note that this slide does NOT have a background! 60
- 61. http://www.lonelyplanet.com/france/paris Activity #1: Visit Paris What are the key monuments in Paris? 61
- 62. Technical How-To Create Text Boxes: - click on "Shapes" button - select the shape you want to encircle your text - size it around your text 62
- 63. Technical How-To Fill Text Boxes: - click on the text box you've created - click on the "Properties" tab on the left - select the color/style you want 63
- 64. Technical How-To Send Text Boxes to Back: - click on the text box - click on the drop-down arrow - select "Order," then "Send to Back" Practice 64
- 65. Technical How-To Group Text & Text Boxes: - drag the mouse around the text & text box so that both are selected - click "CTRL + G," or select drop-down arrow on either and select "Grouping," "Group" - text & text box now move together *you will no longer be able to modify text Practice 65
- 66. Screen Capture: The screen capture icon will allow your to select certain parts of the page you're looking at and save it to a SB page. Area capture will allow your to select certain parts of the page you're looking at and save it to a SB page. Window capture will allow your to select a window within the page you're looking at and save it to a SB page. Full screen capture will allow your to save the entire page you're looking at and save it to a SB page. Freehand capture will allow your to select a part page you're looking at and save it to a SB page. 66
- 67. Area capture will allow your to select certain parts of the page you're looking at and save it to a SB page. Un-check "Capture to new page" if you want content on same page as the one you're working on. 67
- 68. Window capture will allow your to select a window within the page you're looking at and save it to a SB page. 68
- 69. Full screen capture will allow your to save the entire page you're looking at and save it to a SB page. 69
- 70. Freehand capture will allow your to select a part page you're looking at and save it to a SB page. 70
- 71. Rulers & Compasses: measurement tools ruler protractor Geodreieck protractor compass 71
- 72. Magic Pen: - Circle with magic pen = spotlight - Square with magic pen = magnifying glass - Write with magic pen = disappearing ink 72
- 73. http://maps.google.com/maps Activity #2: Measuring Distances On-Line What is the distance from the Eiffel Tower to Notre Dame? 73
- 74. Ink Aware: Ink Aware Programs: MS Word, PPT, Excel Insert as Image Insert as Text Save to SB page 74
- 75. Ink Aware in MS 2007: Word: - MS Word 2007 requires a complicated and temperamental activation - if you simply pick up your SB pen, all ink-aware products will work in Word regardless of the version! 75
- 76. Ink Aware in MS 2007: Excel & PowerPoint: 76
- 77. Contact Info Please feel free to contact me with questions or lesson ideas: catherineritz@yahoo.com www.catherineritz.org 77
- 78. Attachments Melrose Study 1200 Feb 2011.pdf Boston Globe Le Figaro AdjectiveETRE celebrity review.ppt Bourses___form4506.pdf