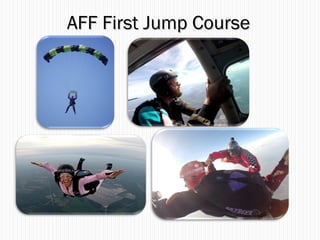
First Jump Course
•Descargar como PPT, PDF•
10 recomendaciones•3,474 vistas

A First Jump Course presentation for AFF training. Some things to keep in mind: we do not teach how to alter a landing pattern by modifying the base leg until the Category C jump, we use 2500' for a decision altitude for malfunctions and alternate landing area, we teach emergency procedures using the one hand/one handle method, and we differ slightly from the SIM with our treatment of two canopies out.

Recomendados
Más contenido relacionado
La actualidad más candente
La actualidad más candente (20)
Similar a First Jump Course
Similar a First Jump Course (20)
Último
Último (20)
First Jump Course
- 1. AFF First Jump CourseAFF First Jump Course
- 2. Introductions 2 Your name What do you do during the week? Have you skydived before? Why do you want to get certified?
- 3. Course Objectives: 3 Equipment AltitudeAwareness Freefall Body Position Pull Priorities Canopy Control Landing Landing Hazards Equipment Problems Emergency Procedures Dive Flow Written Exam
- 4. United States Parachute Association (USPA) Official organization recognized by the FAA to oversee skydiving activities in the U.S. according to FAR 105. USPA develops: Standardized Instruction Safety Standards Licensing and Ratings Membership: provides 3rd party liability insurance and monthly magazine 4
- 5. Equipment Overview 5 Harness/Container, including leg straps and chest strap Reserve parachute and closing pin Main parachute and closing pin Deployment handle 3 ring release Cutaway handle (RED) Reserve ripcord handle (SILVERSILVER) RSL – Reserve Static Line AAD – Automatic Activation Device
- 6. Equipment Overview Main Deployment handle/pilot chute (activation) Main closing pin Deployment bag (begin deployment phase) Lines Slider (begin inflation phase) Main Canopy Risers Toggles/Brakes
- 7. Personal Equipment 7 Helmet Altimeter – reads in thousands of feet Jumpsuit Goggles Radio (one way) Shoes (no boots with hooks or sandals)
- 8. Altitude Awareness Skydivers fall 1000 ft every 5.5 seconds! Check your altimeter: After every maneuver When encountering difficulty When uncertain of altitude Every 3 – 5 seconds If you don’t know your altitude – PULL!PULL! 8
- 9. Equipment Checks All equipment will be checked 3 times 1. Before putting the equipment on 2. Before boarding aircraft 3. Before exiting the aircraft Ask if you do not receive them!
- 10. Freefall Position Belly-to-Earth or Arch position: 1. Most stable position to learn Leaf versus badminton birdie 1. Best (but not the only) position for deployment
- 11. Freefall Position: “Arch” Pelvis forward Legs shoulder width apart Legs 45o at the knees with toes pointed towards the sky Arms 90o /90o with relaxed, floppy hands Chin up Relaxed 11
- 12. Hand Signals Pelvis Forward/Arch Extend Legs until you see a thumbs up Circle of Awareness (Heading, Altitude, Reserve side, Main side) Toe Taps/Bring knees together 12 Practice Touch Check Arm Position Relax – show floppy hands in response Pull – Arch, Reach, Throw, immediately! ***finger can be pointing in any direction
- 13. Other Signals Shaking on exit – ARCH! Instructor is slapping your wrist (either side) – check altitude Instructor is tapping your chin – get your chin up Thumbs up – you are doing well
- 14. Main Deployment/Pull Sequence 14 Wave off “Arch! Reach!Throw!” As the right hand reaches for deployment handle the left hand stretches in front of your head to maintain balance. Deploy the pilot chute and return to neutral position “Check Right! Check Left!” Time to practice!Time to practice!
- 15. Pull Priorities 15 In the following order: 1. Pull 2. Pull at appropriate altitude 3. Pull with stability at appropriate altitude Most importantlyMost importantly: PULL!!!
- 16. Loss of Instructors If you lose one instructor: keep going with the dive flow If neither instructor is in physical contact with you: PULL!
- 17. Controlling the Parachute Half–brake setting requires you to “release your brakes” Toggles up = full speed Pulling one toggle will cause the canopy to turn Look first Parachute continues to turn while the toggle is held down Speed of the turn is directly proportional to how far down the toggle is pulled Pull both toggles = flare Time to Practice!
- 18. Effect of Wind Speed on Ground Speed Assume your canopy has a forward speed of 28 mph. What is your ground speed when you are traveling with a 9 mph wind? 18 mph9 mph Ground speed? 9 mph + 28 mph = 37 mph = Ground speed +
- 19. Effect of Wind Speed on Ground Speed Assume your canopy has a forward speed of 28 mph. What is your ground speed when you are traveling against a 9 mph wind? 18 mph9 mph Ground speed? 28 mph – 9 mph = 19 mph = Ground speed +
- 20. Left Hand Landing Pattern 20 600’ Base leg Downwind leg 1000’ Remain upwind before entering pattern (Holding Area) Flare at 15 ft. (wind sock height) 300’ Final leg Straight In Approach
- 21. DZ orientation from 13,000 ft 05/28/15 15:3021
- 22. Time toTime to practice!practice! 22 Downwindleg Finalleg 600’ Base leg 300’ Holding Area 1000’
- 23. Time toTime to practice!practice! 23 Downwind leg Final leg 600’ Baseleg 300’ HoldingArea 1000’
- 24. Final Approach <200’ Fly straight, only small corrections Canopy seems to fly slowly…until near the ground on final approach Look at 45˚ angle Put feet and knees together, prepare for PLF 3 second canopy flare at ~15 ft. Flare converts forward speed into lift Letting the toggles up after a flare causes a steep dive. If flaring too high, hold the toggles where they are and finish flare at appropriate height
- 25. Parachute Landing Fall (PLF) Before landing 1. Look ahead, 45o to the horizon. 2. Feet and knees together (slightly bent) 3. Flare the canopy, both hands together in the front of your body Upon ground contact 1. Feet First 2. Lay onto the side of one calf 3. Roll onto your thigh 4. Roll onto your hip (side of butt) 5. Roll diagonally across your back to the opposite shoulder (throw legs overhead if necessary) 25
- 26. Landing Priorities 26 1. Land withWing Level 2. Land in a clear and open area 3. Flare to at least half brakes 4. Always be prepared for a PLF ONLY SMALL CORRECTIONS WHEN <200’ONLY SMALL CORRECTIONS WHEN <200’ Landing into the wind is NEVER a priority
- 27. Landing Obstacles AVOID THEM! “Only fly over things that you would want to land on” 1000’ and below Gently steer away, give slight corrections 27
- 28. DZ from 13,000 ft – identify landing hazards 28
- 29. You did not avoid the obstacle 29
- 30. You did not avoid the obstacle Trees: protect your face while flaring, aim for the strongest part (generally the trunk) Water: loosen chest strap, land close to something if possible Power lines: drop anything metal, do not touch more than one wire at a time Buildings: Landing into the side: Protect your face while flaring Landing on top: Disconnect RSL.After landing, may need to cutaway
- 31. Off Field Landings “Half way down, half way back” Decide if you can make it back by 2,500 ft.2,500 ft. Find clear area to land Look for and avoid obstacles – small correctionssmall corrections below 200 feet!below 200 feet! Transpose landing pattern to new spot, if possible Prepare to PLF Wait for assistance or further instructions Respect property and be polite to property owners 31
- 32. High Winds 32 Once safely landed, pull in one toggle hand over hand Stand up and run towards back of canopy If you are still being dragged, disconnect RSL and pull REDRED
- 33. Normal Canopy Safe Canopy Criteria: Square (symmetric) Stable Straight lines Slider completely down Steerable 33
- 34. Steerability/Controllability Check 1. Unstow Toggles/Release Your Brakes. 2. Look Left, Turn Left. Look Right, Turn Right. 3. Practice Flare. Head for the airport and your holding area.Head for the airport and your holding area. Time to practice!Time to practice!
- 35. Equipment Problems 35 If the parachute fails criteria you must make the decision to initiate emergency procedures by: Decision Altitude = 2,500 ft.2,500 ft. IS IT THERE? IS IT SQUARE? IS IT STEERABLE? There is a parachute out. Parachute is inflated, rectangular, and regular in shape. You can turn left and right and flare.
- 36. Emergency Procedures 36 1. Look RED 2. Grab RED 3. Look SILVERSILVER 4. Grab SILVERSILVER 5. Peel, Pull RED (down), clear 6. Peel, Pull SILVERSILVER (down), clear 7. Arch IF BELOW 1,000 ft.WITHOUTA LANDABLE PARACHUTE, IMMEDIATELY PULL SILVERSILVER
- 37. Problem: Pilot Chute Hesitation 37 Pilot chute stays within the burble created by your body traveling in free fall Check over each shoulder to change airflow, allowing pilot chute to clear burble and initiate activation
- 38. Canopy is Not There Missing or Stuck Deployment Handle: Slide hand across the bottom of the pack from one side to other and feel for the handle Two attempts, Two seconds, then execute Emergency Procedures 38
- 39. Canopy is Not There 39 • If you can see the bag, an inflated pilot chute, and/or lines, but no canopy, execute Emergency Procedures
- 40. Canopy is Not There Two tries, Two seconds to deploy main parachute If you cannot locate the deployment handle, execute Emergency Procedures If deployment results in a malfunction initiate emergency procedures 40
- 41. Canopy is Not Square Wait two seconds to see if it is a normal deployment If not initiate emergency procedures 41
- 42. Canopy is Not Square Asymmetric Canopy may begin to turn on its own Initiate emergency procedures 42
- 43. Canopy is Not Controllable 43 More than two broken lines: Initiate emergency procedures Hole as large as your head: Initiate emergency procedures Broken steering line (lost toggle): Initiate emergency procedures Broken riser: Initiate emergency procedures
- 44. Problem: Line Twists Very common Pull risers apart and bicycle kick to correct If not corrected by 2,5002,500 ft.ft. initiate Emergency Procedures 44
- 45. Problem: End Cell Closure Common – especially for smaller people under large canopies While releasing brakes, hold toggles at waist a few seconds then return toggles to full up position. May require several attempts to inflate end cells If canopy is not controllable by 2500’, execute Emergency Procedures 45
- 46. Problem: Stuck Slider Smoothly pump toggles (after releasing brakes). Repeat as necessary until the slider works its way down If canopy is not controllable by 2500’, execute Emergency Procedures 46
- 47. Problem: Good canopy, but turning Try releasing the brakes If canopy is not controllable by 2500’, execute Emergency Procedures
- 48. Both Parachutes Deployed Bi-plane 1. Do not cut away 2. Gently steer front canopy with rear risers 3. Do not flare and perform a PLF Side-by-Side If two canopies are not entangled: Cut away the main If main canopy is not clear of the reserve: 1. Gently steer the larger canopy using the rear risers 2. Perform a PLF Downplane Cut away the main canopy immediately 48
- 49. Canopy Collision Avoid! Look before you turn If approaching a head-on collision: Both jumpers turn RIGHT If below 1000ft and canopies are entangled: Both jumpers should deploy their reserves 49 “Keep your head on a swivel”
- 50. Aircraft Procedures 1. Approach, enter, and move about the aircraft, engine running or not, only when accompanied by your instructor. 2. To avoid contact with the propeller, always approach fixed- wing aircraft from the rear. 3. Be mindful of the size of the parachute equipment and location of handles when moving about the aircraft. 4. The pilot and the jumper are jointly responsible that seat belts are worn during taxi, takeoff, and landing (if landing with aircraft).
- 51. Aircraft Emergencies Listen to your instructor If you see anything that you think is odd (pilot chute or canopy is out), tell your instructor loudly and immediately.
- 52. Dive Flow 52 Set up in the door Check in – get O.K. from instructor Check Prop, up, down, arch COA (Heading,Altimeter, Reserve side, Main side) 3 practice touches (Arch, Reach,Touch) COA (HARM) “Short” circles (Heading,Altitude,Arch, Legs, Relax) 6,000 ft. = Lock on 5,500 ft. = wave off, arch, reach, throw, check, check
- 53. Relative Wind You should exit the aircraft in your arch position, hips pointing into the “relative wind.” Expect to feel like you are standing up for a bit You will transition to belly to earth orientation within a few seconds.
- 54. Exit Cadence/Exit Count No matter which aircraft you are exiting, the exit cadence is important for both you and your instructors. Your exit cadence establishes the tone of the entire skydive.
- 55. How to pass the Cat A skydive 1. Be stable during at least the second half of the jump 2. Be aware – respond to hand signals 3. Have at least an assisted pull
- 56. Important Altitudes 6,000 ft = Lock on 5,500 ft = wave off, arch, reach, pull 2,500 ft = Decision altitude for emergency procedures and finding an alternate landing area 1,000 ft = Do not cut away 1,000, 600, 300 ft – landing pattern 05/28/15 15:30 56
- 57. Questions? Time to take the test. 57
Notas del editor
- Please no cell phone distractions.
- Set the tone and introduce yourself: your name, number of years in the sport, number of jumps, and ratings held.
- Students should feel free to ask questions at any time, as this should be a laid back environment. The entire course will last 4-6 hours.
- FAA=Federal Aviation Administration
- Have appropriate equipment on hand: a student rig equipped with an AAD and an RSL. Put on the rig briefly so that everyone can easily see the chest straps and leg straps. Begin by telling students that they have 2 parachutes. Identify the equipment, but realize that it will be easier to explain the function of some equipment after the rig has been opened up (e.g. RSL)
- Show the 3 stages of a parachute opening: activation, deployment, and inflation. This is more easily done with an assistant wearing the rig for you. Introduce the concept of packing a parachute in half brakes and show how to release the brakes. Have students show you where these items are located after your explanation. Show how to disconnect the RSL.
- Make sure that all students understand how an altimeter reads.
- Pass around altimeter
- Stress that it is the student’s responsibility to make sure that they get all 3 equipment checks.
- Someone doesn’t know what a badminton birdie is? You can also demonstrate a piece of paper falling through the air (similar to the leaf). Then, fold the piece of paper in half to show that now it falls (almost) straight down. Arching is similar to putting that crease in our body.
- Demonstrate standing up first…using a wall (stand about 1 foot away) or a doorframe. Practice first without adding the arms and then add the arms in the proper position once everyone demonstrates a proper arch from the pelvis. Demonstrate while laying down and have students practice. Be sure to give the feeling of “air pressure” on their legs, and you can show that it is easier to lift their thighs off of the surface when they extend their legs to the correct position. Practice many times.
- Hand signals require a physical response from the student. Check arm position and practice touches seem to be the most forgotten hand signals. The practice touch signal looks like their deployment handle. The check arm position has the two extended fingers showing a 90° angle.
- Review hand signals with students.
- Demonstrate the deployment method facing away from them, and check your altimeter before beginning the sequence. Student needs to be able to throw a pilot chute. Begin by having the student check their altimeter and wave off. Next, have the student practice moving their arms in a coordinated fashion. Finally, the student should practice the entire sequence. Remember to be very hands-on in the beginning so that you may stop mistakes before they become ingrained. This section takes a lot of time and the majority of it should be performed standing up so that the student does not tire too quickly.
- Ask an applied question, such as, “You find yourself on your back at 5000 feet. What will you do?”
- You should stress that the instructor should be in physical contact as a student may be severely backsliding and have an instructor in sight close by.
- You should begin with a brief introduction as to why the parachute flies and why it turns when a control toggle is used. A piece of paper can be used for visual representation. Demonstrate how to smoothly make turns under parachute (look first!) and how to make small corrections. Have them stand up and demonstrate to you canopy flying as many times as it takes until they get it right
- Students having problems with wind speed versus ground speed? You can also use the idea of paddling with or against a current, or a person walking with or against a moving walkway.
- A landing pattern should be demonstrated by working backwards the first time. Read the wind sock first and determine landing direction. From there the landing pattern can be worked out. After this has been explained students should feel free to work backwards or forwards as they choose.
- Add your own DZ photo.
- These are practice problems using the photo of our student landing area. Having students work on a white board is also a great way to have a group each solve their own landing pattern and the group should be encouraged to evaluate each other’s work.
- Have them show you a left hand landing pattern with appropriate altitudes on an aerial photo or flight planner Have them demonstrate as many times as it takes until they get it right
- Demonstrate the approach, settle, and stall process during flare with a paper or your hand. Watch other skydivers as they fly their landing pattern and flare.
- Take home message of the PLF: keep arms and legs together so that nothing is broken during landing. Make sure there is nothing in their pockets and that they wear a helmet while practicing PLFs.
- Landing into the wind is merely a preference; the parachute can land downwind or crosswind equally as well as into the wind.
- Identify landing hazards-this could also be done when you took the trip to the student landing area.
- Show how to put heels together (to be used as a sight) and look down you body to determine actual position over the ground when up high.
- We teach one hand, one handle.
- Have students recite their emergency procedures each time you read the words “Emergency Procedures” on theses slides. The names of malfunctions are unimportant at this stage (begin teaching in Category B). It is more important to see that the students are properly evaluating the situation by going through the questions in order (Is it there? Is it square? Is it steerable?)
- We differ from the SIM and follow the military recommendation to leave all brakes stowed so that the parachutes continue flying at relatively the same speed. Main: multicolor with yellow toggles Reserve: Solid color with red toggles and no pilot chute
- This should be a quick introduction to the dive flow. Talk about why we do COAs and Practice Touches. Full training will begin following the written exam.
- Questions?