Cara Menggugurkan Sperma Yang Masuk Rahim Biyar Tidak Hamil
Swmm quick start tutorial
1.
SWMM QUICK START TUTORIAL
1. Example study area
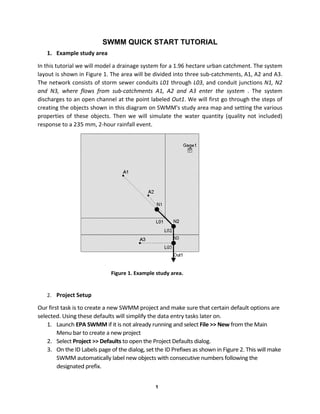
In this tutorial we will model a drainage system for a 1.96 hectare urban catchment. The system
layout is shown in Figure 1. The area will be divided into three sub‐catchments, A1, A2 and A3.
The network consists of storm sewer conduits L01 through L03, and conduit junctions N1, N2
and N3, where flows from sub‐catchments A1, A2 and A3 enter the system . The system
discharges to an open channel at the point labeled Out1. We will first go through the steps of
creating the objects shown in this diagram on SWMM's study area map and setting the various
properties of these objects. Then we will simulate the water quantity (quality not included)
response to a 235 mm, 2‐hour rainfall event.
Figure 1. Example study area.
2. Project Setup
Our first task is to create a new SWMM project and make sure that certain default options are
selected. Using these defaults will simplify the data entry tasks later on.
1. Launch EPA SWMM if it is not already running and select File >> New from the Main
Menu bar to create a new project
2. Select Project >> Defaults to open the Project Defaults dialog.
3. On the ID Labels page of the dialog, set the ID Prefixes as shown in Figure 2. This will make
SWMM automatically label new objects with consecutive numbers following the
designated prefix.
1
2.
Figure 2. Default ID labeling for tutorial example
4. On the Subcatchments page of the dialog set the following default values:
% Slope 2
N‐Imperv. 0.01
N‐Perv. 0.10
Dstore‐Imperv. 0.05
Dstore‐Perv 0.05
%Zero‐Imperv. 25
Infil. Model <click to edit>
‐ Method Curve Number
5. On the Nodes/Links page, set the Flow Units to CMS.
6. Click OK to accept these choices and close the dialog. If you wanted to save these
choices for all future new projects you could check the Save box at the bottom of the
form before accepting it.
Next we will set some map display options so that ID labels and symbols will be displayed as
we add objects to the study area map, and links will have direction arrows.
2
3.
1. Select Tools>> Map Display Options to bring up the Map Options dialog (see Figure 3).
2. Select the Subcatchments page, set the Fill Style to Diagonal and the Symbol Size to 5.
3. Then select the Nodes page and set the Node Size to 5.
4. Select the Annotation page and check on the boxes that will display ID labels for
Subcatchments, Nodes, and Links. Leave the others un‐checked.
5. Finally, select the Flow Arrows page, select the Filled arrow style, and set the arrow
size to 7.
6. Click the OK button to accept these choices and close the dialog.
Figure 3. Map Options dialog.
Before creating the network objects, it is important to select the proper units. This can be done
by selecting proper flow units (
Finally, look in the status bar at the bottom of the main window and check that the Auto‐
Length feature is off and double check that your units are CMS.
3. Drawing Objects
We are now ready to begin adding components to the Study Area Map. We will start with the
subcatchments.
1. Begin by clicking the button on the Object Toolbar. (If the toolbar is not
visible then select View >> Toolbars >> Object). Notice how the mouse cursor changes
shape to a pencil.
2. Move the mouse to the map location where one of the corners of subcatchment A1
lies and left‐click the mouse.
3
5.
4. Repeat this procedure for conduits L02 and L03.
Although all of our conduits were drawn as straight lines, it is possible to draw a curved link by
left‐clicking at intermediate points where the direction of the link changes before clicking on
the end node.
To complete the construction of our study area schematic we need to add a rain gage.
1. Click the Rain Gage button on the Object Toolbar.
2. Move the mouse over the Study Area Map to where the gage should be located and
left‐ click the mouse.
At this point we have completed drawing the example study area. Your system should look
like the one in Figure 1. If a rain gage, subcatchment or node is out of position you can move it
by doing the following:
1. If the button is not already depressed, click it to place the map in Object
Selection mode.
2. Click on the object to be moved.
3. Drag the object with the left mouse button held down to its new position.
To re‐shape a subcatchment's outline:
1. With the map in Object Selection mode, click on the subcatchment's centroid
(indicated by a solid square within the subcatchment) to select it.
2. Then click the button on the Map Toolbar to put the map into Vertex Selection
mode.
3. Select a vertex point on the subcatchment outline by clicking on it (note how the
selected vertex is indicated by a filled solid square).
4. Drag the vertex to its new position with the left mouse button held down.
5. If need be, vertices can be added or deleted from the outline by right‐clicking the
mouse and selecting the appropriate option from the popup menu that appears.
6. When finished, click the button to return to Object Selection mode.
This same procedure can also be used to re‐shape a link.
4. Setting Object Properties
As visual objects are added to our project, SWMM assigns them a default set of properties. To
change the value of a specific property for an object we must select the object into the
Property Editor (see Figure 5). There are several different ways to do this. If the Editor is
already visible, then you can simply click on the object or select it from the Data page of the
Browser Panel of the main window. If the Editor is not visible then you can make it appear by
one of the following actions:
• double‐click the object on the map,
• or right‐click on the object and select Properties from the pop‐up menu that appears,
• or select the object from the Data page of the Browser panel and then click the Browser’s
5
6.
button.
Whenever the Property Editor has the focus you can press the F1 key to obtain a more detailed
description of the properties listed.
Two key properties of our subcatchments that need to be set are the rain gage that
supplies rainfall data to the subcatchment and the node of the drainage system that
receives runoff from the subcatchment. Since all of our subcatchments utilize the same rain
gage, Gage1, we can use a shortcut method to set this property for all subcatchments at once:
1. From the main menu select Edit >>Select All.
2. Then select Edit >> Group Edit to make a Group Editor dialog appear (see Figure 6).
3. Select Subcatchment as the type of object to edit, Rain Gage as the property to edit,
and type in Gage1 as the new value.
4. Click OK to change the rain gage of all subcatchments to Gage1. A confirmation dialog
will appear noting that 3 subcatchments have changed. Select “No” when asked to continue
editing.
Figure 5. Property Editor window.
6
12.
• The Conduit Surcharge Summary table shows that Conduit L01, was surcharged and
therefore appears to be undersized.
Viewing Results on the Map
Simulation results (as well as some design parameters, such as subcatchment area, node invert
elevation, and link maximum depth) can be viewed in color‐coded fashion on the study area
map. To view a particular variable in this fashion:
1. Select the Map page of the Browser panel.
2. Select the variables to view for Subcatchments, Nodes, and Links from the dropdown
combo boxes appearing in the Themes panel. In Figure 11, subcatchment runoff and
link flow have been selected for viewing.
3. The color‐coding used for a particular variable is displayed with a legend on the study
area map. To toggle the display of a legend, select View >> Legends.
4. To move a legend to another location, drag it with the left mouse button held down.
5. To change the color‐coding and the breakpoint values for different colors, select View >>
Legends >> Modify and then the pertinent class of object (or if the legend is already
visible, simply right‐click on it). To view numerical values for the variables being
displayed on the map, select Tools >> Map Display Options and then select the
Annotation page of the Map Options dialog. Use the check boxes for Subcatchment
Values, Node Values, and Link Values to specify what kind of annotation to add.
6. The Date / Time of Day / Elapsed Time controls on the Map Browser can be used to
move through the simulation results in time. Figure 11 depicts results at 1 hours and 30
minutes into the simulation.
7. You can use the controls in the Animator panel of the Map Browser (see Figure 11) to
animate the map display through time. For example, pressing the button will run
the animation forward in time.
12
15.
After a plot is created you can:
• customize its appearance by selecting Report >> Customize or right clicking on the plot,
• copy it to the clipboard and paste it into another application by selecting Edit >>
Copy To or clicking on the Standard Toolbar
• print it by selecting File >> Print or File >> Print Preview (use File >> Page Setup first to
set margins, orientation, etc.).
Viewing a Profile Plot
SWMM can generate profile plots showing how water surface depth varies across a path of
connected nodes and links. Let's create such a plot for the conduits connecting junction N1 to
the outfall Out1 of our example drainage system. To do this:
1. Select Report >> Graph >> Profile or simply click on the Standard Toolbar.
2. Either enter N1 in the Start Node field of the Profile Plot dialog that appears (see Figure
14) or select it on the map or from the Data Browser and click the button next to
the field.
3. Do the same for node Out1 in the End Node field of the dialog.
4. Click the Find Path button. An ordered list of the links forming a connected path
between the specified Start and End nodes will be displayed in the Links in Profile box.
You can edit the entries in this box if need be.
5. Click the OK button to create the plot, showing the water surface profile as it exists at
the simulation time currently selected in the Map Browser (see Figure 15).
Figure 14. Profile Plot dialog.
15