SlideShare una empresa de Scribd logo
1 de 93
IMPACTION
LATIN origin from "Impactus" the past principle and of "IMPINGO", "IN", "ON" and
pingo or strike.
DEFINITION: LYTLE (1979)
A tooth that has failed to erupt into normal functional position beyond the tissue usually
expected for such appearance (eruption date) is impacted. Eruption is prevented by
adjacent by hard / soft tissue including overlying teeth.
Impact teeth are those prevented from erupting by some physical barrier in the eruption
path.
BY ARCHER
• A tooth which is completely or partially unerupted and is positioned against another
tooth, hard or soft so that its further eruption is unlikely described according to its
anatomic position.
• Defined as a cessation of the eruption of a tooth caused by a clinically or
radiographically detectable, physical barrier in the eruption path or by an ectopic
position of the tooth.
DEFINITION
General: An organ / structure which because of an abnormal mechanical condition has
been prevented from assuming its normal position.
ORDER OF FREQUENCY
1. Maxillary third molars
2. Mandibular third molars
3. Maxillary cuspids
4. Mandibular biscupids
5. Mandibular cuspids
6. Maxillary central incisors
7. Maxillary lateral incisors
PRIMARY RETENTION (unerupted / embedded tooth) - cessation of eruption before
gingival emergence without a recognizable physical barrier in the eruption path and
ectopic position.
Eg : is osteopetrosis, clidocranial dysplasia
SECONDARY RETENTION (half retention, reimposition, reinclusion and ankylosis)
- cessation of eruption of a tooth after gingival emergence, without a physical barrier in
its path / ectopic position of the tooth.
CAUSES
3 main causes for tooth impaction
1) Ectopic position of the tooth germ :
• Extraction of primary predecessor
• Surgical uncovering with or without enamel exposure with / without
orthodontic traction
• Surgical repositioning
• No treatment
2) Obstruction of the eruption pathway
a) Crowding (lack of space)
Treatment - Orthodontic expansion
- Extraction of the unerupted tooth or an adjacent tooth.
Treatment - Removal of one of the colliding tooth germ
c) Compact bone
- Surgical uncovering with / without enamel exposure and with / without
orthodontic treatment.
d) Scar tissue, giant cell fibromatosis, unattached oral mucosa, odontogenic tumors.
Treatment - Surgical uncovering with enamel exposure
e) Supernumery tooth / odontomas
Treatment - Removal of hard tissue obstacle
3) Follicle or PDL defects
Treatment - Surgical uncovering with enamel exposure
- surgical repositioning
Theories for the etiology of impaction
1) Phylogenic theory
Civilization which has eliminated the common need for large, powerful jaws has
decreased the size of maxilla and mandibles.
As a direct result in a surprisingly large number of adults. The lower third molar
occupies an abnormal position and may be considered a vestigial organ without purpose
or function.
2) Mandelian theory
Individual may receive small jaws from one parent in the same way from the
other parent a compliment of large teeth leads to impaction.
3) Endocrine theory
Lack of growth of the jaws may be due to lack of function of the anterior lobe of
the pituitary gland.
4) Pathological theory
Existence of osteosclerosis in the 3rd
molar area as a result of early disease of the
adjacent molars may lead to impaction of third molars.
5) Orthodontic theory
The
constricted and narrowed arches of early mouth breathers have high percentage of
impactions.
Etiology
1. Lack of space in the third molar region
2. Third molar angulation
3. Ectopic position
4. Obstruction of eruption pathway
5. Late 3rd
molar mineralization / early physical maturity.
6. Racial differences
Causes for impaction
Local Systemic
Local Causes
1. Irregularity in the position and pressure from an adjacent tooth.
2. Density of overlying / surrounding bone.
3. Long continued chronic inflammation with resultant increase density of overlying
mucous membrane.
4. Lack of space due to underdeveloped jaws.
5. Long retention of primary teeth.
6. Premature loss of primary teeth.
7. Acquired diseases such as : (a) Neurosis due to infection or abscess.
8. Inflammatory changes in the bone due to exanthematous disease in children.
9. Ectopic position.
10. Third molar.
11. Late mineralization / early physical maturative phase.
12. Racial difference.
13. Obstruction in eruption pathway.
Systemic causes
a) Is prenatal causes:
i) Heredity
ii) Misgeneration
b) Post natal causes:
i) Rickets
ii) Anaemia
iii) Congenital syphilis
iv) Tuberculosis
v) Endocrine dysfunction
vi) Malnutrition
c) Rare conditions
i) Cleidocranial dysostosis
ii) Oxycephaly
iii) Progeria
iv) Achondroplasia
v) Cleft palate
IMPACTED MANDIBULAR 3RD
MOLARS
Surgical Anatomy
1) From below the wisdom tooth socket lies on a prominent ledge or shelf of lingual
bone - extraction easy by breaking lingual plate.
2) The distal incision should not be extended backwards in the direction of the
medially inclined plane of the alveolar are risk of damage to the lingual nerve.
3) Calcification of bony canal is complete before the 3rd molar formed, so growing
roots may impinge on neurovascular bundle of inferior alveolar nerve.
4)According to Schytman, Devato & Arial (1967) the branches of mandibular vessels
emerges through retromandibular fossa /triangle result in brisk heamorraghe if distal
incision is carried up the ramus not taken laterally towards the cheek nutrient canal
orifice, damage to vessels.
5) Facial artery and anterior facial vein cross the inferior border of mandible just at
the arteroinferior angle of masseter and have close relationship with the 2nd
molar. So
possibility of cutting the vessels by vertical incision which is directed downwards - So
direct the blade upwards towards the teeth - saw motion.
6) Lingual nerve at the apices of molars at lingual side should be given care in
lingual split technique.
7) Displacement of tooth / root to lingual pouch
8) Stripping of tendons of temporalis cause post operative pain.
9) Bone trajectories (grains / run parallel to lower border - so always vertical
limiting cut first and then horizontal (linking).
Development and eruption of 3rd
molars
Bjork (1956) found that there are 3 factors significant in the development of mandible
and which are related to the amount of space for 3rd
molar.
1) A predominantly vertical direction of condylar growth resulting in little resorption
of the anterior border of the ramus.
2) Insufficient mandibular growth in length and proportion to the amount of tooth
structure.
3) A backwardly directed trend of eruption of dentition will diminish the length of
the arch.
CLASSIFICATION :
The purpose is to create an orderly approach to the diagnostic evaluation and surgical
approach to 3rd
molar surgery. It is necessary so that we can determine in advance just
what difficulties we will encounter in their removal and plan the type of surgical
procedures intelligently. For classification their anatomic position must be determined by
a radiographic examination. The radiographs necessary are :
1) Intraoral periapical radiographs
2) Lateral jaw radiographs
3) Bitewing radiograph
4) Occlusal radiograph
5) Panoramic radiograph
Classification based on salient features
1) Position of crown.
2) Character of root formation.
3) Nature of bone surrounding the root.
4) Position of the 3rd
molar in relation to 2nd
molar .
CLASSIFICATION :
By Pell,Gregory and Winter (George Winter):
a) Relation of tooth to the ramus of the mandible and the 2nd
molar.
Depending on the availability of space to 3rd
molar.
Class - I : There is a sufficient amount of space between ramus and the distal side of
the second molar for the accommodation of the mesiodistal diameter of the crown of the
3rd
molar-Most favourable.
Class-II The space between the ramus and the distal side of the second molar is less than
the mexiodistal diameter of the crown of the 3rd
molar.
Class-III All or most of the 3rd
molar is located within the ramus - least favourable
b) Relative depth of the 3rd
molar in bone
Position - A : The highest portion of the tooth is on a level with above the occlusal line
of 2nd
molar.
Position - B : The highest portion of the tooth is below the level of the occlusal plane,
but above the cervical line of the second molar.
Position - C : The highest portion of the tooth is below the cervical line of the second
molar.
C) The position of the long axis of the impacted mandibular 3rd
molar in relative to
the long axis of the second molar.
1. Winter classification (1926)
Depending on the angulation
1. Vertical - Parallel to long axis of 2nd
molar
2. Horizontal right angle to long axis of 2nd
molar
3. Inverted - Occlusal surface facing inferior border
4. Mesioangular - Mesially inclined
5. Distoangular - distally inclined
6. Buccoangular - Oclusal surfaces facing cheek
7. Linguoangular - Occlusal surface facing tongue
These may also occur simultaneously in
a) Buccal version
b) Lingual version
c) Torso version
2) Kay's classification
For surgical practice and to plan the treatment.
Based on angulation and position, state of eruption and number of roots.
a) Angulation and position
- vertical
- Mesioangular
- Distoangular
- Horizontal
- Transverse
- Buccoangular, linguoangular, inverted
- Aberrant position
b) State of eruption
- Erupted
- Partially erupted - incomplete eruption may be seen clinically, but
frequently malposed always covered to some extent with soft tissue / bone.
- Unerupted - may be below soft or bony tissue
a) Soft tissue impaction
b) Complete bony impaction
c) Number of roots
- Favourable
Straight
- Unfavourable Distal
Mesial
- Fused roots
- Two roots
- Multiple roots
Other Considerations are :
1) The amount of space i.e., present between anterior border of ramus and
mandibular second molar closer to ramus - difficult
2) Relation of crown of impacted tooth to mandibular occlusal plane - deeper is both
difficult.
3) Buccal / Lingual position of the crown in relation to mandibular second molar -
closer to 2nd
molar and to apex difficult to remove.
4) Killey & Lyttle - Based on the state of eruption.
a) Partial impaction : a tooth that is incompletely erupted
b) Complete bony impaction : A tooth i.e., completely contained with in the
bone of the jaw.
c) Partial bony impaction, a tooth i.e., partially covered with bone.
d) Potential impaction - are unerupted tooth that still retains the potency for
eruption, but which will most likely won't erupt into normal position and function
when obstruction, unless surgical intervention occurs.
System of scoring for assessment of difficulty of removed (3rd
molar) by A.J.
MacGregar.
Six factors -WHARFE
Bizzare impactions and impactions in edentulous jaws are excluded, extremely deep teeth
also.
Category Score
W - winters classification Horizontal 2
Mesioangular 1
Vertical 0
Distoangular 2
H - Height of mandible (mm) 1 - 30 0
30 - 34 1
35 - 39 2
A – angle of second molar (degrees) 1 - 59 0
60 - 69 1
70 - 79 2
80 - 89 3
90 4
R - Root shape and development Less than 1/3 complete 2
1/3 to 2/3 complete 1
More than 2/3 complete - complex 3
Unfavorable 2
Favorable 1
F - Follicle Normal 0
Possible enlarged 1
Enlarged 2
Impaction relieved 3
E - Exit path Space 0
Distal cusp covered 1
Mesial 2
All covered 3
Impaction sequelae
1) Caries - Mesioangular and horizontal caries chances increases is 7
- balance between pathogens and host resistance
2) Pericoronites
Positions of mandibular 3rd
molars favoring deep distal / distobuccal pockets,
positions close to / above the occlusal level and positions that may favour food impaction
in the distal part of the pocket have been significantly linked to pericoronites - other
factors are
- Poor oral hygiene
- General infections, URT infections
- Cold weather / winter season
Organisms : More flora is anerobic (peptostreptococcus, spirochaetes, fusobacterium and
bacteriodes
Mutans streptococci and lactobacilli
Opportunistic bacteria are prevotella intermedia, porphyromonas gingivalis, actiobacillus.
Actinomycetan comitans (commeansal). In vertical and distoangular impaction incidence
is more.
Clinical features: Affects 20 - 30 years age group 2 :1 Male : Female.
Acute pericoronitis : Sharp or throbbing pain, redness body swelling in gingiva,
discharge of puss from pericoronal space, partial trismus, dysphagia, fever
lymphadinopathy.
Subacute pericoronitis : Continuous dull ache, intraoral swelling, bad breath or taste,
restriction in mouth opening and difficulty in swallowing.
Discharge of pus & food remnants on gentle pressure over gum flap, ulceration of
gingiva due to trauma from opposing tooth.
Chronic percoronitis dull pain for one or two days and then symptoms for long time, bad
breath pressure of cheek biting on affected side.
Periodontal considerations : predictor of post operative intrabony defects on the distal
surface of the adjacent second molar after impacted mandibular molar surgery.
- Pre operative intrabory defects distal to second molar.
Age of the patient at time of surgery - more after 25 years.
Size of contact region between the 3rd
and 2nd
molar.
Root resorption of the molar.
Probing depth on the distal surface of adjacent molar post operatively.
Pathologically undivided third molar follicle.
Kuglbergs risk index M3
If a patient fulfills extraction of 8,predictors after the clinical and radiographic
examination of second molar region adjacent to the extraction side there is a high risk of
deep remaining defects after surgery. The predictors are;
- Visible plaque distal of 2nd
molar.
- Probing depth > 6mm distal of 2nd
molar.
- Intrabony defect > 3mm distal of 2nd
molar.
- Sagittal inclination of 3rd
molar > 50 degrees.
- Large contact area between 2nd
& 3rd
molar.
- Root resorption of distal aspect of 2nd
molar.
- Mesially undivided follicle of 3rd
molar > 2.5mm .
- Patient is a smoker.
If a person over 30 years of age has an asymptomatic impacted 3rd
molar with the above
mentioned risk it is better to avoid surgery until symptoms are favorable.
Orthodontic considerations.:
Mandibular 3rd
molar removal for allevation or prevention of mandibular incisor
irregularity. (Crowding - does not to be justified based on present evidence only in cases
where distalization of I and II molars is desired,surgical removal of III molar indicated
for orthodontic reasons.
Retention or resorption of II molar:
Mere removal of the impacted III molar can lead to both periodontal healing and
preservation of pulp vitality in the II molar. The treatment plan in relation to II molar
resorption should therefore not incorporate endodontic if unless subsequent radiographic
or clinical examination shows definite pulpal complications.
Focus of infection:
In conditions like organ transplantation, implantation of artificial heart values. Patient
under immunosuppressive ,cytoxic therapy for malignancy,irradiation case, infective
endocarditis, acute MI, infections of brain, eyes, lung and implants , removal of dental
foci including 3rd
molar with pericoronitis is justified.
Impacted third molar in jaw fracture lines :
All teeth involved in a jaw fracture line should as a rule be preserved unless they show
severe marginal or periodontal pathology only semierupted third molar should be
considered a hazard to facture healing.Cysts & tumors ( dentigenious cyst and
odentokaratocyst / odontogenic tumours.)
Impacted 3rd
molar in edentulous jaw:
Symptomatic- one which is causing pressure and pain under denture to be removed.
Asymptomatic case- to be kept under observation .
Impacted or developing tooth.
Orthognathic surgery.
Adviced to remove impacted tooth 6 - 12 months before orthognathic surgery in order to
prevent bad split and for firm fixation.
Fractures - the impacted teeth are weakening factor because of the displacement of bone
and it can lead to fracture of maxilla or mandible.
CLINICAL FEATURES
- Ringing or buzzing in the ear
- Crowding of teeth in the anterior region
- Otitis
- Eye may be affected
a) Dimness of vision
b) Blindness
c) Iritis
d) Pain stimulating that of glaucoma
Contraindications
1) Acute inflammatory condition - ANUG, acute pericoronitic
2) Possible damage to adjacent structure - vital structure (nerve loss of adjacent
tooth)
3) Compromised physical status - debilitating patients who cannot bear the trauma -
like patient having severe CV disease, recent severe myocardial infarction.
4) Completely asymptomatic in elderly patients with deeply embedded, encased in
bone and possibly fused to bone in an individual of mature years with little apparent risk
that cysts will form and no prosthetic device in prospect, leave impacted tooth and keep
him under observation.
5) When there is some question regarding future status of 2nd
molar-like grossly
destructed, R.C.T. ,bone loss, etc.,
Remove 2nd
and keep 3rd molar for abutment.
Even in the terminally ill and elderly symptomatic impactions should be removed if it is
judged the patient can tolerate the procedure and be made more comfortable during his
remaining life span.
These indications and contraindications are intended as general guidelines only. Each
patient must be considered on an individual basis.
1) For the protection of retromolar pad and tuberosity for prosthetic support better to
leave impacted teeth, unless until strong indication for removal.
2) Removal of 3rd
molar contribute to periodontal pocket in distal aspects of 2nd
but
less likely if removed early in their development.
3) When max 3rd
molar is traumatising the mandibular pericoronal tissue, first
remove maxillary 3rd
molar and then after acute symptoms subsides remove mandibular
3rd
molar.
Diagnosis
Based on history, clinical examination and radiographs
History
- No complaint in the absence of infection other than missing tooth.
- Presence of infection - acute symptoms
Clinical examination (routine)
- Look for missing permanent teeth, retained deciduous teeth.
- Examine for signs of infection such as swelling, discharge ,trismus,enlarged tender
lymph nodes.
- The degree of difficulty experienced during the removal of an impacted tooth may be
influenced by both general and local factors
- The patients age, temperament or general medical condition may cause problems.
- Small mouth / mandibular retrusion with only hinge type of movement - opening
limited and access is poor and vice versa.
- Large external oblique ridge situated behind the tooth, access is good, when if the ridge
is either along side / in front of the third molar access is poor.
Radiography: Dental radiography is the only means that allows the operator to
adequately visualize the impacted tooth.
- Preoperative radiographs is must for all lower molars even when the tooth is fully
erupted and appears amenable to single forceps extraction.
- Radiographs in two planes at right angle to one another are required to show dearly the
position of the tooth and the degree of impaction.
X-rays
- IOPA,
- Occlusal (Donovon)
- Paroramic radiograph
- Conventional tomograph
- CT scanning and
- MRI – imaging.(expensive in ectopic conditions, But usefull when close to major
vessels, nerves, eye etc. )
Multimodal radiography - scanora which combines the principles of narrow beam
radiography and spiral tomography.
- Object to show - whole of the unerupted tooth, the size of its crown and the shape of its
roots together with the direction in which they curve. The presence of hypercentosis /
widening of the root particularly in the apical third.
In multirooted teeth the number of roots and whether they are fused / divergent is
important. The position of the tooth in the jaws and its relationship to inferior alveolar
canal and to other teeth including the degree of impaction are an indication of the
difficulty of the operation.
Secondary conditions such as caries, an increases in the size of the follicle, resorption of
adjacent tooth roots / of bone.
- In the mandible an intra oral periapical and an occlusal film and extra oral lateral,
oblique views and ortho pantonographs are useful.
- The periapical radiographs (conventional directing central ray beam at 90 to the film
surface) should demonstrate.
a) Whole wisdom tooth
b) The immediate investing bone
c) The width and vertical dimension of the pericoronal space
d) The neurovascular canal
e) A true lateral (enamel cap) view of the 2nd
molar against which the sharp image of
the 3rd
molar can be matched so that degrees of vertical bone and curterning and
horizontal intermolar overlap can be accurately assessed.
To achieve the above points - the periapical film should be taken in such a manner that
the x-ray beam is directed parallel to the occusal surface of the 2nd
molar and passess
through the distal cusp of that tooth.
Difficulty is due to
(1) gagging on the part of the patient
a). medial defection of the film by the soft tissues overlying the ramus
(2) Occlusal film : taken right angle to periapical film help to
a) Show the buccolingual position of completely buried tooth
b) Reveal the shape of the roots of horizontal teeth particularly those which are
buccolingually placed
c) demonstrate any apical dilaceration of root
d) Indicate the relative thickness of bone on the buccal and lingual aspects
3) Lateral oblique view :
Enforcement on the intra oral film when patient is uncooperative and when there
is gagging, trismus.
a) This will show deeply placed teeth and ectopic in the ramus tooth.
b) Concomitant pathology - eg : cyst
c) Vertical depth of mandible so that the foesible risk of jaw fracture can be assured
d) Depth of overlying bone
Bite wing radiographs
Visuzalization of actual relationship of the crowns of the 2nd
and 3rd
molar in class I and
class II. Donovan type : The use of periapical x-ray film to record in occlusal view.
Modified tube shift concept of Clark's and Richard method by Frank : Most reliable
used to determine whether the mandibular canal is lingual or buccal or below the
impacted mandibular 3rd
molar.
This helps in planning surgical technique to avoid trauma to the neurovascular bundle
preventing anesthesia or parastheria of the lower lip and teeth.
Principle : By placing 2 films in the same positions in the mouth (medial end of the
film positioned at least to the middle of the 1st
molar and superior edge parallel ) to the
occlusal surface and x-raying a lower impacted 3rd
molar 1st
film keeping like x-ray
parallel to the occlusal surface of the 2nd
molar (standard I.O.P.) and the 2nd
film in some
position and changing the position of the x-ray angle by shifting the tube 15° - 25°
downwards still of right angles to the 1st
and 2nd
molar and compare both film (keeping
that distant object move parallel to cone) i.e., the distant object move downward in
relation to one object in the lingual side i.e., if canal lies lingual to impaction. It will
move downwards on relation to roots of 3rd
molar, if it is moved upward - buccally
placed. It is placed direct below the roots or in a groove in the root substance apically
lingually or buccally.
If the canal remains in the same position it is line on the standard radiograph, using 3
distinctive colours as white, amber and red lines respectively called WAR LINES.
In case of likely hood of damage to the neurovascular bundle patient should be warned in
advance the possibilities of inadvertent trauma. And after effect of trauma.
White line : Drawn along the occlusal surface of the errupted mandibular molars and
extended posteriorly over the 3rd
molar region - indicates
I Axial inclination of impacted.
a) Vertical - occlusal surface parallel to white line
b) Disto angular - occlusal surface and white line converges towards another.
c) Merioangular - Occlusal surface and white line diverges towards anterior
II Depth at which the tooth is lying in the mandible position A, B, C can be known
surface and white line diverges towards anterior
Amber line : drawn from the surface of the bone lying distally to the 3rd
molar to the
crest of the interdental septum between the 1st
and 2nd
mandibular molar (to be careful
about shadow of external oblique ridge) - indication.
- State of eruption of tooth - whether soft tissue or hard and how much of tooth material
is above bone, when soft tissue is reflected and the remainder enclosed within the
alveolar bone.
Red line: drawn perpendicular from the amber line to an imaginary point of application
for an elevator at cementoenamel junction
Disto angular - distal CEJ
Merio angular - merial CEJ
Indicates - the depth at which the impacted tooth lies within the mandible.
Longer the red line : - more deeply placed and more difficult to remove
- 5mm or more - done under G.
- 9mm or more length - may be below apex of 1/17
3) Axial inclination of impacted tooth by comparing interdental septum
Vertical impaction : Anteroposterior width of the interdental septum between the
2nd
and 3rd
molar is similar to that of the septum between the 1st
and 2nd
molar.
Disto angular : Anteroposterior width of the interdental septum narrower in 2nd
and 3rd
molar than between 1st
and 2nd
Merioangular : Interdental septum broader in 2nd
and 3rd
than 1st
and 2nd
molar .
4) Root pattern of an impacted mandibular 3rd
molar
(No curvature pathology)
Indicate line of with drawl and point of application of elevator
- Type of surgical technique - bone removal (odentomy) or bone removal with
tooth direction
- line of withdrawal
- favourability or unfavourability
- odentomy
5) Shape of crown :
- large crown and prominent cusp are more difficult to remove than small conical
and flat cusp tooth impaction - line of withdrawal obstructed by 2nd
molar - tooth division
to prevent damage to 2nd
molar.
6) Position and root pattern of the 2nd
molar (condition of 7 – weather R.C.T. done,
proximal caries presence of large restoration) if distally tilt create difficulty by increasing
with impaction. Conical root - dislodge easily during elevator application for removal of
3rd
molar.
Distance between ascending ramus and distal surface of 2nd
molar.
7) Texture of the investing bone : Varies according age and presence of pathology
noted, marble bone dicast (oprtropetrosis), leontiasis ossea, condensing ostities,
ortroporosis, paget's disease.
Young individual - more cancellous bone, wide inter trabecular space and bone structure
fine - so usually elastic.
Old individual - less cancellous spaces are small and the bone shadow dense and bone is
less elastic pathology - sclerotic bone.
8) Relationship to inferior dental canal
Howe and Poynton (1960) shown the relationship of canal to 3rd
molar root from
radiograph. The canal may pass above / below the level of the 3rd
molar apex / apices and
lie in the line with the root (s) or buccal / lingual to it. Occasionally the neurovascular
contents of the canal may groove / perforate a root / notch the apex of the root.
If the canal is located near the upper / middle 3rd
of the root the nerve will obviously lie
buccal to the root.
When canal is closed to apex it may be directly beneath the root, or buccal / lingual to it.
The condensed bone, forming the roof a floor of the canal (which appears as radiopoque
line) are represented on the radiograph by parallel bones of radiopaque bands.
Relation of the third molar to the mandibular canal
50 - 75% buccally placed
6 - 7% lingual position
25% below the apices
a) The presence of decreased radiopacity of the size of the canal in the root at the
point where the canal is crossed, indicates that the root is grooved by the inferior dental
canal (due to decreased amount of tooth substance)
b) Interruption of the continuity of the one / both parallel radiopaque bands / canal,
as they cross the root and increased radiolucency of the band implies deep grooving.
c) Narrowing of the band (sometimes with maximum construction) with loss of
periapheral radiopaque lines and increased radioluverncy of the band certainly indicates
that the root has been pierced by the nerve
- Sectional method / dividing nerve by blade and ends replaced in canal / regeneration in
6 months)
d) If the radiolucent band crosses the apex of the tooth root and only the upper white
line is broken an apical notch is present.
e) A bifid apex may occasionally form a notch which staddles the nerve, the root
becomes more translucent at the point of contact. Usually growing on the lingual surface
of the roots.
Attempt to avoid / to minimize damaging inferior dental nerve
- If inevitable patient should be warned preoperatively of this contergency.
- Generous removal of bone, tooth division and gentle use of instruments help in least
possible damage.
The following features indicates true relationship
1. Lanina dura loss (superior / inferior ) where the canal passes the 3rd
molar
2. Radiducent band crossing the root
3. Narrowing of the mandibular canal as it passes the roots of the 3rd
molar.
4. Angulation of the mandibular canal in the region next to the 3rd
molar roots.
Defelction of 3rd
molar roots by the mandibular canal.
5. In root perforation in addition to lack of lamina dura, radiolucent band across the
roots, the only difference from above is that both borders of the mandibular canal are
found to be constricted, not found in simple root grooving.
Apical root bends; an increased radiopacity of the apical region is indicative of a bend
coinciding with direction of the x-ray beam.
9) Condition of the impacted tooth : Partially erupted - caries / periodontally
attached uncrupted - evidence of internal or external resorption root
Loft tissue impaction / bony
10) Width of the periodontal space : Decrease is older age, sometimes due to non
functioning
11) Resorption followed by repair lead to ankylosis or impacted tooth
The size of the follicular space should be noted. The narrower the space, more difficult
procedure. An increase in space between crown and according bone may indicate cyst
formation.
Apart from x-ray, patients blood and urine are also examined.
Treatment :
1) Treatment may include
2) Removal of the tooth
3) Moving the tooth to the proper location in the aveolar ridge by orthodontic / by
surgical near
4) Auto transplantation and in rare occasions by leaving it in
1) Conservative to bring the tooth into useful occlusion in the area.
2) Auto transplantation
3) Extraction
4) Leave in situ
Conservative treatment
In young patient where tooth can be brought into occlusion. Where neighbouring
standing tooth is carries / heavily filled - when needs extraction. Do autotransplantation /
remove 7 and allow 8 to erupt and correct later by orthodontic method / this as an
abutment for bridge.
Treatment planning in various age groups
9 - 10 years Prophylactic removal possible but too early to predict impaction
10 - 12 years Extraction of primary molar to be considered.
12 - 14 years Extraction of second molar to be considered (in case of crown
malformation, extensive caries and to prevent upper and supraeruption.
15 - 19 years Auto transplantation to be considered with / without pulpal involvement to
8 position. If needed, when pathology associated with 6 ( eg : caries, malformation of
crown, fracture and juvenile periodontitis)
18 - 21 years : Ideal age for decision about preservation or removal of 3rd
molar
depending on condition of eruption.
a) Full eruption - advised removal when no antagonest, presence of caries gingintis /
periodontitis
b) Partial cruption : Advised removal only.
c) Impaction : Removal in enlarged follicle with / without signs of infection, root
resorption of second molar close proximity to the gingival crevice of the second
molar.
Initial / progressive marginal periodontitis of second molar.
22 - 25 years : Removal of tooth when caries, periodontitis, gingintis, pericoronitis,
increased healing time and difficulty in removal to be considered.
After 25 years : Risk of post operative complications (alveolitis, inferior alveolar nerve
complications)
Extraction indication for removal
- Infection (periocoronitis)
- potential damage to second molar root.
- Second molar status - early removal of semi impacted third molars results in more
optimal healing condition distal to second molar than late removal.
- Presence of follicular cyst and other pathologic complications related to 3rd
molar
(tumors, osteomyelitis)
- Orthodontic / prosthetic reasons - in case of interference.
When conservation is not possible due to age bar, infection, unfavourable position etc.
There are 2 principle methods employed for the removal of 3rd
molars.
1) Bone is excised to permit removal of the tooth in one piece.
2) Tooth is sectioned so that it can be removed in parts (odontomy)
3) Combination of both odentetory is a term used for the removal of partly erupted
unerupted teeth / retained roots that cannot be extracted by the forceps technique
therefore must be removed by surgical exercise.
Prophylactic odentectomy : Ideally done when the roots are 2/3 complete, before this the
crown may be difficult to elevate as it tends to turn in its socket like the ball, in a ball and
socket joints.
- Generally all four third molars are removed at a time under G.A.
- Done to prevent later complication and to avoid later surgery which may be difficult
due to bulbous root, curved root, sclerosed bone, infection etc.
Pre operative consultation
The surgeon should consult the patients physician regarding any relevant positive
findings in the medical / dental history / physical examination.
These consultations may be necessary to alter the patients medications, change the type
of anaesthesia to local, intraverous sedation, or general / change the location of the
procedure from OP to hospital.
SURGICAL TECHNIQUE FOR REMOVAL OF IMPACTED LOWER 3RD
MOLAR
The removal of impacted mandibular 3rd
molars is a complicated surgical procedure
involving soft tissues, muscle and some of the hardest bone in the skeleton.
The site of operation is in restricted area, difficult of access. The field is highly vascular
and flooded with saliva, making the continuous use of the suction apparatus a necessity.
Strict asepsis should be maintained. The operation must be carefully thought out in
advance.
Basic steps before planning operative procedures : Study the radiographs carefully.
1) Determine that your radiographs show exactly actual size, not elongated /
shortened and the actual form of the tooth also the number, size, curvature of roots and
the proximity of roots / crowns to adjacent teeth / vital structures.
2) Classify the impaction
3) Study the occlusal views to ascertain buccal - lingual position of the tooth.
4) Carefully note the relationship of the roots to the inferior alveolar canal.
5) Review the results of the visual and digital examinations of the hard and soft
tissues surrounding the operative site
Plan the operative procedure by considering (x-ray)
1) Position of the tooth in jaw.
2) Its natural line of withdrawal.
3) The obstacles to its extraction and how these may best be overcome either by
sectional / not .
4) The points of application for elevators.
5) Raising the flap and removal of adequate amount of bone to gain access.
During surgery this plan is made in the reverse order.
Surgical plan for removal of impaction :
1) Outline the extent of M.P. flap keeping in view ideal requirements of flaps,
nerves, vessels and muscles in the field.
2) Decide removal of impacted tooth either only by some removal bone removal or
by sectioning of tooth /by combination.
3) Extent of bone removal for good exposure for point of application.
4) Method of removal of bone with bur / chisel or by combination.
5) Selecting best direction of removal of tooth / root.
6) Keep in mind the factors, which complicate the removal of tooth.
Ankylosis , unfavorable curvature of root, hypercementosis, relationship to inferior dental
canal, extreme density of bone, small mouth and uncontrollable tongue.
Natural line of withdrawal- dictated on curvature of its roots, least resistant and
unimpeded movement of tooth i.e., no obstacles.
Obstacles to elevation of tooth: Resistance to elevation should be foreseen and plans
made to overcome it. These occur along its natural line of withdrawal.
SECTIONING METHOD :
Intrinsic : Shape of the tooth, no of rods, curvature, and size of roots.
Extrinsic : Due to bone, adjacent, teeth or vital structure inferior dental nerve
etc.,
Point of Application:
To be created mesial, distal or buccal to the tooth depending on axial inclination of tooth
& its root curvature.
No tooth should be divided until an adequate point of application on the fraction that is to
be left in the bone has been prepared & after tooth luxation.
Access: By raising adequate size of mucoperiostial flap & bone removal - up to greatest
circumference of the crown to pass freely out of the bone along the planned line of
withdrawal to provide access for dividing the tooth if necessary.
1. Outline the extent of soft tissue flaps to be used, keeping in mind the necessity for
adequate exposure with maintenance of a good blood supply to the flaps
subsequent support of the soft tissue flaps after operation. Keep in mind about the
muscles or any foramina or vessels exist, in that area.
2. Decide whether or not this impaction could be removed :
a) By the removal of surrounding bone to elevate the tooth in one piece.
b) Sectioning the tooth.
c) Combination of some bone removal and the sectioning technique.
3. Estimate the amount of surrounding osseous tissue that must be removed in order
to give adequate exposure & create space into which the impaction can be moved
in route to its removal.
4. Plan the logical method and choose the best instruments for the removal of thin
underlying and surrounding bone - whether bur alone, chisels alone or a
combination.
5. Select the best direction for the removal of impacted with and only minimum
trauma should be there.
6. When to remove 2nd
Molar :
Unfortunately 2nd
molar are extracted unnecessarily are too frequently to facilitate
the removal of impacted 3rd
molar. This removal of 2nd
molar is justified only when the
impacted tooth is present below the roots of 2nd
molar or fused with the 2nd
molar or when
decayed or infected.
7. Difficult access to the operative field because of:
a) Small orbicularis oris muscle or a mandibular retursion.
b) Inability to open the mouth wide.
c) A large and uncontrollable tongue.
d) When TMJ involvement is mainly of hinge variety.
e) Relationship of external oblique ridge and to 3rd
molar if ridge situated
behind the tooth access is good whilst if ridge is along side or in front
access as per and difficult extraction.
PRELIMINARY CONSIDERATIONS :
1. Presence of Infection :
Infection in the form of pericoronitis should be treated before surgery. An acute
pericoronitis is around a mandibular 3rd
molar usually responds to the extraction
or maxillary 3rd
molar of the later is impinging on the infected mandibular tissues.
Probing with a sterile silver probe under the flap on the buccal side for the release
of pus, subsequent irrigation and antibiotic therapy may aid in treatment with
satisfactory antibiotic level, the tooth can be removed. The removal of crown
only will allow the pericoronitis to subside.
2. Premedication & preparation of patient.
Hospitalization in prophylactic odontectomy if done under G.A.
Premedication depends on type of patient and the method of anesthesia. Orally an
average dose for an out patient is 0.1 gm pentobarbital sodium. Premedication is
important when impacted tooth is removed under G.A. However 1 - 2 ml of
pentobarbital sodium can be given I.V. The pt. remains ambulatory but requires
some one to accompany him / her home. 3 - 20 mg of Diazapam I.V. can also be
used. Preparation of the pt. starts with a mouth wash of any suitable antiseptic
agent to reduce the intraoral bacterial count. Anti cholinergic drugs : Atropine -
0.4 mg also used (anti sialogogue).
3. Draping :
Drapes in the form of sterile towels will provide a sterile field as well as cover the
eyes, thereby reducing the psychological trauma. A sterile towel is placed around
the pt's chest below the neck. Sterile gloves may be worn - Apply petroleum jelly
to lips.
4. Chair position - The chair position should be low enough that the operator's right
elbow is opposite the pt's right shoulder.
5. Sponges: A curtain sponge is placed to isolate the field of operation if the Chisel
technique is used. Gauge sponges are kept under his tongue to keep the saliva
away.
6. Retractors : The assistant should be trained to hold retractors in right hand. The
tongue is not held toward the midline. When operating on pt's left side - the tip
of the retractor is held under the mucoperiostial flap against bone. Heavy pulling
of the flap by the assistant will cause excessive post operative lymphedema.
7. Armamentarium : The chisels are resharpened after each use and they are
frequently changed during the operation. Many operators prefer to use burs.
Instruments :
 Cartridge syringec hypodermic needle.
 Xylocaine 2%c 1 : 80,000 adernaline
 B.P. blade No.15
 Howrath periosteal elevator
 Kilner double ended retractor
 Rack's retractor
 Killey's retractor
 Ward's double ended cheek retractor
 Rowel's lingual retractor
 Kay's modified Austin retractor
 Eastman chisel 7 inch long 1 ¼ inch wide with carbide tip
 Down's stainless steel mallet 255 gms
 Meisinger tapered fissure Bur no.8
 Meisinger rose head Bur No.8
Electric
 Dental engine
turbine
 Chip syringe
 Warwick james elevator
 Coupland chisel
 Haldstead's mosquito artery (12.7cm) long
 Jansen - middle - ton double action bone nibbles
 Dani's brown - (55.4mm) cutting needle / ooo black silk
 Mayo needle holder
 6 inch tooth dissecting forceps
 Gilley's hook / MC indoe scissors / suction apparatus
 Probe, mouth probe.
 Forceps, mouth prop. Sterile drape.
Assuming the pt. to be free from local & systemic problems we will consider removal of
impacted tooth.
Standard Operative Technique :
Durbeck divided into stages :
a) Intra Oral Approach:
1) Design of mucoperiosteal flap to obtain access to the area (intra orally) or
skin extra orally.
2) Removal of adequate amount of bone.
3) Delivery of the tooth.
4) Debridement and toilet of the wound.
5) Wound closure / packing.
6) After care.
Extra Oral Approach :
In ectopic condition and when tooth is situated on the inferior border of mandible (Risdon
approach).
1. Design of Mucoperiosteal flap:
Flap Design :
a) Second molar sulcus incision flap (envelope flap)
b) 2nd
& 1st
molar sulcus incision flap (envelope flap)
c) 2nd
molar incision flapc vestibular extention - Bayonet flap
d) 2nd
molar paramarginal flap with vestibular extension - L Shaped flap
e) Lingual flap.
Terren's Wards incision :
The anterior vertical incision of about 6mm in length starts & curves forwards at 450
angle in a slanting way from the distobuccal corner of the crown of the 2nd
molar and
ends along side the mesiobuccal cusp of that tooth. The incision should be made through
mucoperiostium and should not extend into the refection of mucous membrane at suclus
(the incision on also be started from below).
The cut then passes around the gingival margin of posterior 1/3rd
and 2nd
molar (any
epithelium) present in the gingival crevice in partially erupted tooth must be excised by
placing reverse bevel incision using No.12 blade & continue cervically on the distal
aspect to approximately the mid points of the tooth (when 3rd
molar is unerrupted) and
from this posterior part of the incision must slope outwards (bucally) as well as
backwards up the ascending ramus along the line of external oblique ridge using either
scissor / scalpel). The posterior part of incision should be down to bone until the line of
attachment of the buccinator is reached and then it should penetrate the tissue at mucosal
depth for only about 1" or 25mm in length.
Advantages :
1. Provides excellent visual and mechanical access.
2. Only buccal & lingual flap closure by one suture.
3. The risk of developing periodontal pocket post operatively can be minimized by
putting transverse posterior incision suture as close to 2nd
molar distal surface
(bucco- lingually).
Why taking bucally?
 Avoids cutting the retromolar canal vessels which may emerge from the retromolar
triangle or fossa.
 To minimize post operative infection, parapharyngeal abscess & trismus.
 Flap will fall away from bone easily and minimum hamorrhage.
 To prevent trauma to the lingual nerve & in order to reduce the possibility of a sub
maxillary / parapharyngeal abscess.
Howrath's periostial elevator is used at the anterior end of the incision and slide firmly
beneath the mucoperiosteal flap and latter is pieced off from the bone before backwards.
If the flap attached to the follicle (in soft tissue infection, the dissection is necessary).
After reflection of buccal flap. Lingual soft tissue should be reflected using periostial
elevator.
The tip of the blunt instrument is kept under the periosteum and close to the lingual
cortex draws aside the lingual root thus the lingual nerve & soft tissue damage can be
avoided during bone removal and to expose at least 5mm of bone lying behind the tooth
at distolingual aspect (i.e., distolingual spur) lengthening the lingual flap anteriorly
relieves tension and thus minimize trauma to the soft tissue during retraction.
The buccal and lingual flaps are reflected to produce an adequate exposure on lingual,
occlusal and buccal aspects of the retromolar triangle where impacted tooth is embedded.
Occassionally in case of horizontal impaction, larger buccal mucoperiostial flap is
necessary to obtain adequate access.
The anterior vertical incision should be commenced at the disto buccal corner of the
crown of the lower 1st
molar and extended forward along side that tooth, this vertical
incision should then continue through the buccal gingival crevice of the 2nd
molar and
continued posteriorly as previously described.
There are other flap designs for impacted 3rd
molar
1. Moore's flap
2. Envelope flap- Durbeck 1957(leaves the interdental papilla)
3 Modified lingual split flap (Lewis)
4. Kammishi flap
5. Osteoperiostial flap, Edentulous flap.
Lateral Trephination(Bowler,Henrey,Attowe) – oblique incision from the
retromolar region forwards, crossing external oblique ridge & passing inferiorly to
run along the reflection of anterior border of 1st
molar. 5mm width of soft tissue is
left in situ distobuccal to 2nd
molar.
Advantage: less periodontal complication.
Any flap can be followed by taking the basic requirement of Buccal flap.
1. It should provide adequate exposure of the post operative site.
2. It should have a wide base to assure a good blood supply to the soft tissues.
3. It should be large enough so that the soft tissue surrounding the operative site is
not traumatized during the operative and so that when the flap is replaced, the
edges rest on a wide shelf of bone.
4. After removal of the impacted tooth the incision should be capable of being
closed without tension.
Flap retraction :
Using Austin retractor & periosteal elevator flap rests against the base of retractor
without movement, safely protect from the other operating instruments.
2. Removal of adequate amount of bone
Removal of bone depends on the type of impaction, position of the tooth, access
to the area in which the tooth is located and size of the tooth.
Sufficient bone must be removed to allow the tooth to be lifted from its bed
without the necessity of heavy pressure.
Bone removal not only for tooth delivery but also for obtaining a satisfactory
point of application on the tooth for an elevator.
Bone removal should be conservative to avoid weaking of the mandible.
Bone removal by Chisel or a bur or combination of both.
General indications for the use of bur:
1. Patient with old, brittle bone which breaks unpredictably when cutc a chisel.
2. When external or internal oblique ridge or both are far forward in relationship to
the tooth so that guttering is necessary.
3. Where transverse section at neck and root separation required.
4. Operations performed under local analgesia.
General indications for the use of chisel:
1. Young elastic bone exhibiting well defined grain.
2. External oblique ridge or at least slightly below the level of the bone enclosing 3rd
molar.
3. Internal oblique ridge slightly behind the 3rd
molar so that distolingual corner of
the tooth sits in a thin balcony of bone.
4. tooth does not require sectioning.
5. Operations performed under G.A. or an adequately premedicated patients.
Bone burs :
No.6 and No.8 fissure bur or No.8 rose head burc straight hand piece.
Use sharp burs to start cutting through the dense cortical plate of bone. Bone cutting is
done to allow optimal visibility, for access to the impacted tooth, for subsequent healing
of the surgically created defect. When the leaves or cutting edges become clogged with
the bone chips, Clean the bur to avoid over heating and burnishing of the bone which
results in post operative pain and death of bone cells.
Cut holes in the bone overlying the impacted at a distances of 4mm from center to center.
Drill down to the impacted tooth with minimum pressure and speed. No drilling is done
with bone burs on the side adjacent to 2nd
molar because of danger of injury to this tooth.
Flush the operative site constantly with sterile water when drilling. Use suction tip at the
same time.
Advantages of use of surgical air turbine and burs for the removal of bone :
1. This method is 50% more effective than other methods.
2. Healing and bone repair were enhanced.
3. Trauma or post operative pain were reduced to 50% .
4. Lips were not injured and there is no much heat in hand piece.
5. No pain is referred to TMJ or to inferior part of mandible.
6. Post operative swelling is slightly reduced.
7. Length of surgery time required is reduced by 60%.
8. Less fatigue for the surgeon.
9. Sterile conditions were maintained.
Chisels:
By means of burs, chisels, connect the previously drilled holes & remove the bone
overlying the impacted tooth. This method gives less trauma. Chisels should be sharp.
Sterilize the chisels in a cold sterilizing medium so that not to trim the cutting edge.
Two types of chisels
1. Hand pressure chisel - least desirable and dangerous
2. Hand mallet and chisel- better than 1st
.
After the bone is removed over the impacted tooth, remove that from its height of
contour. Sectioning of the crown will facilitate the removal of the tooth and conserve
investing bone. Efficient instruments in 3rd
molar surgery less post operative trauma,
clean cut bone.
Disadvantages:
1. Undesirable for psychological reasons in consequent fracture.
2. To avoid its use in thin or price jaws to prevent fracture.
Specific technique of removal of bone using chisel or bur or both
Bone removal in several ways :
Chisel:
1. Window technique
2. Shaving technique
3. Lingual split technique (SIR William Kelsey Fryle)
4. Distal - lingual splitting technique by Davis.
Bur :
1. Ginding away the bone
2. Postage stamp method
3. Guttering technique
4. Collar technique (Moore / Gillbe)
5. Lateral trephination (where only crown is formed 10 - 16 years. Henry 1938,
Howe 1973)
Removal of window in buccal bonec chisel :
The elementary principle is that chisel is driven into bone by a mallet it moves towards
the direction of its plane or flat surface. So with Bevel upper most deep cut will result.
The bone lying beneath bevel tends to be crushed or impact, so the bevel should face the
bone to be removed.
Two vertical stop cuts or limiting cuts are made in the buccal bone at the junction of the
lower 2nd
and 3rd
molar (6mm) and distobuccal to the 3rd
molar (4 mm). The chisel is
positioned at right angles to the free upper edge of alveolous and the bevel of the chisel
should face towards the bone which has to be removed i.e., during mesial stop cut bevel
should face distally and distal stop cut bevel should be mesially facing. The length
depends on the depth of impaction. Next the chisel with the bevel facing downwards is
placed horizontally at the lower end of the limiting cuts (stop cut) and a linking cut is
made parallel to the superior border of the jaw with a single tap.
The buccal part encasing the tooth is gently split offc this limiting cuts. Slices of bone
each about 3mm in depth are chiseled away one at a time.
The preliminary stop cuts prevent horizontal split from extending forwards or backwards
due to horizontal grain. The removal of buccal window provides suitable point of
application.
After window, any body resistance to be cleared off for free elevation.
2. Shaving technique:
Using the chisel, bevel facing forward. The marginal alveolar bone around the
impacted tooth (partially erupted) is removed bit by bit by enhancing till the
suitable point of application is obtained.
3. Split bone technique of Sir William Kelsey Fry - Except buccoversion
impaction it can be used for all types of impaction
It is mainly splitting of lingual cortex and elevating the tooth in dentolingual
direction.
Originally described by Ward (1986)
1. Under G.A. is preferable
2. Soft tissues are reflected to expose the bone enclosing the impacted tooth
(Terrence ward incision)
3. A small window in the buccal aspect is created by vertical 5mm ht and 4mm and
horizontal cuts using chisel.
One immediately distal to 2nd
molar 5mm and 2nd
distobuccal to the 3rd
molar (4
mm) buccal cortex and these 2 are joined by horizontal cut.
4. A point of application for an elevator is made with the chisel by excising the
triangular piece of bone bounded anteriorly by the lower end of the stop cut and
above by the anterior end of the horizontal cut.
5. The distolingual bone (lingual place) is then fractured inwards using 5 mm chisel,
by placing distal to the crown of 3rd
molar and near to the lingual plate (dotted
line).
6. The chisel head at an angle of 45-600
to the bone surface (horizontal) and bevel
facing lingually pointing in the direction of 2nd
lower premolar on the other side.
7. The cutting edge of the chisel should be kept parallel to the external oblique line.
8. Few light tapsc mallet drives the chisel blade towards the lingual plate at the
required depth and the latter will fracture at the inter-dental space between the
lower 2nd
and 3rd
molars.
9. The peninsula of one which than remains distal to the tooth and between buccal
and lingual cuts is excised.
10. Deliver the tooth using elevator
11. Thin lingual plate is grafted with fine hemostat and fractured the lingual plate is
then lifted from the wound.
12. Smoothen the cut bone edgesc bone file.
13. Wound closure.
Advantages :
Faster tooth removal
Lees risk to mandibular nerve
Lessened risk of damage to the periodontium of the 2nd
molar
Less risk to socket healing problem.
Disadvantages :
Risk of damage to the lingual nerve.
Increased risk of post operative infection & greater danger of spread
Risk of augmentation of post operative inflammatory sequelae (pain, swelling and
trismus).
Patient discomfort due to the use of a chisel and mallet for lingual bone removal or
fracture.
Advantage of Split bone technique (Ward 1956) :
1. It is one of the quickest method of removing impacted mandibular 3rd
molar.
2. The elimination of distolingual bone in this technique allows the lingual tissue to
fall in this reducing the size of residual socket. By means of saucerization and
minimize the Blood clot.
3. The procedure is comparatively atraumatic. The bone is clean, fresh cut and there
is little or no late sequestration.
4. Rapid healing with minimum discomfort.
5. Suitable in young patientsc elastic bone in which grain is prominent.
Disadvantages of technique :
1. Error in placing the cutting edge of chisel parallel to the internal oblique ridge
instead of parallel to external oblique ridge may result in extension of lingual split
to the coronoid process (Killey, 1975)
2. Extreme care should be taken to prevent operative procedures from passing into
the dead space lying below the mylohyoid ridge.
3. The possibility of extension of infection from above the mylohyoid muscle to
structure lying below it. Pre operative hygiene program and antibiotic cover can
prevent this (Ward, 1956).
4. Injury to lingual nerve and subsequent impaired lingual sensation. But this can be
prevented by the identification of the nerve and its proper retraction.
5. The removal of lingual bone frequently exposure gingival distolingual portion of
the root of 2nd
molar. New bone does not replace this lost bone and to a surgical
periodontal pocket is produced. This can be prevented by not removing this piece
or lingual bone if it is having sufficient periosteal attachment. To hold the
lingual plate in portion during heaving, a 2nd
suture may be placed just distal to
neck of 2nd
molar.
6. Desirability of G.A. since most of the pt. will not be able to tolerate the chisel
under G.A.
7. Submental transient analgesia in the post operative period, due to injury in the
sensory branches of mylohyoid nerve.
8. Hazard of edema in the proximity of airway with the sagittal osteotomy now
adopted as a routine procedure, any question of airway compromise resulting
from surgical procedure on the lingual side of mandible must be dispelled.
Lewis (1980) - Modified the Lingual Split Technique by minimizing periosteal
reflection and buccal bone removal and by preserving the fractured lingual plate.
Advantage :
1. Reduce the possibility of lingual nerve damage.
2. Minimize periodontal pocket formation.
3. Improve chances for primary wound heating.
Distal - Lingual Splitting Technique:
Modified lingual split to minimize trauma to the lingual nerve and to eliminate the
elevation of lingual periosteum, which sometime causes excessive bleeding &
preserves any bone attached to periosteum.
 Less flap reflection because minimal bone removal in buccal.
 3 main areas of bone removal.
a) Anterior margin (mesial) of the impaction for point of application to
elevation.
1st
cut vertically and parallel to the long axis of 2nd
molar, the inferior end
(lower end) of this cut defined on the depth of mesial surface of impacted
tooth.
b) Bone is then removed to expose inferior and lateral aspect to the height of
contour of the crown.
c) Then distal or superior bone sectioned and mobilized in small pieces but
not removal if attached to periostium.
The fracturing of bone in small pieces rather than trying to split large segments
prevents the osteotome from becoming bound within the bone. The bevel of the
osteotome should be rotated as needed it should not be wedged between the tooth
and bone as this may cause fracture of mandible. The lingual plate will usually
split in a green stick fashion. The lingual periosteum is usually attached in mobile
lingual fragment.
The tooth can be easily removed once the distal superior bone has been mobilized
and distal superior bone has been mobilized and lingual plate has been split.
The elevator is applied with gentle force to the mesial aspect of impaction and
tooth delivered in distolingual or lingual occlusal direction.
Using bur :
1. Bone may be removed to expose the buried tooth by grinding it way using rose
head or fissure burs i.e., removing by piece meal with large No.12 valcanite bur.
2. Postage stamp: Small round bur No.3 is used to make series of holes 3mm apart
out lining the portion of bone to be sacrificed or a window shape or round shape
in an embedded tooth to deroof the investing bone and then these holes are joined
up by either bur or chisel cuts.
This is a neat and precise method or bone removal but time consuming.
3. Guttering technique:
No.6 round bur or fissure bur employed to create a gutter with in the bone along
side the crown of the tooth or in the plane of periodontal membrane, keeping the
bur parallel, to the long axis of the tooth, bone is guttered away from the impacted
tooth along to remaining buccal side and distal surface of the tooth.
Attention to clear the distobuccal angle.
The depth of gutter should be 1/3rd
- 1/2 the root length.
Preserve a partial thickness of buccal wall which reduce the risk of fracture and
maintenance of the height of the alveolar plate and can be used as fulcrum for
leverage.
Useful in removal of vertical, mesioangular or distoangular impaction.
Incase of distoangular - the bur must be taken round the back of the tooth and
lingually until it just reaches the lingual plate - protect lingual nerve.
Horizontal crown must be completely exposed down to its mesial surface for
point for application.
When necessary bone removal has been completed the delivery of the tooth
should be done.
Disadvantages :
1. Access and visibility are not good and distolingual bone is retained.
2. Buccal cortical plate is leftc a very poor blood supply as it is stripped of
periostium.
3. Thin wall of bone is easily crushed by elevators.
4. Collar Technique (Moore / Gillbe)
Modification of Sir William Kelsey Fry's split using No.6 fissure bur, the 1st
cut
starts distal to the 2nd
molar and is taken downwards upto the proposed point of
application for an elevator (at mesial C.E.J. for 3rd
molar)
The bur is moved distally at this level making sure that the full depth of buccal
plate is cut through, when the distal aspect of the buried tooth is reached the cut
continues backwards for 2mm and then curved distally and lingually until is just
penetrate the lingual plate.
Using couplands elevator at lingual side of the distal cut the lingual plate to be
fractured at the point where it is thinned by the crown of the tooth (i.e., b/w 2nd
and 3rd
molar) by giving gentle rotation. The whole collar of bone is lifted out of
the wound leaving the crown of the tooth exposed.
Tooth delivery done intact or by splitting.
Advantages :
Calculated amount of bone can be removed as a block including distolingual
angle of bone
Used to explore horizontally impacted tooth prior sectioning.
Disadvantages :
Not suitable for distoangular impaction.
5. Lateral trephination (Bowdler, Henry and Howe)
Prophylactic removal of developing mandibular 3rd
molar only when crown has
formed by low buccal approach, in those individual or when it is likely to be
impacted.
By Window Method:
The wall or root of bony crypt is not removed but the window is created on lateral
buccal aspect over the bony crypt of the crown and the tooth delivered out
through the opening without destroying the root.
Benefit :
The bone preservation as distal aspect of 2nd
molar.
Abortion of lower 3rd
molar :
Henry's procedure:
Probable impaction of the mandibular 3rd
molar may be diagnosed from
Skiagrams in children between the ages of nine and eleven years and sometimes
earlier, depending upon the development of the individual. All children should be
radiographed and annual intervals to watch the formation and eruption of those
molars in those subjects in whom insufficient rooms for full eruption of 3rd
molar
become evident, it is wiser to enuleate the follicles of this tooth immediately at
the bud before or immediately after initiation of cusp or calcification stage.
Removal of the bud at the age of 7 to nine years is surprisingly ____ to the
difficulty of extension of deep impaction in adute - than to leave the case until the
tooth has become fully formed and grossly impacted.
Advantages :
Relieves spaces for the 2nd
molar development and better development many occur.
Disadvantages :
Unpredictable caries free 1st
molar, out dated - due to problems in predicting at an early
age due to psychologic and management probems as early age.
Delivery of the impacted tooth from its bed :
When the necessary bone removal has been completed the delivery of the tooth should be
effected. Sufficient bone must be removed distal to the impaction to create a space into
which the impaction can be moved. 1st
use forceps rather than evelator. When forceps
extraction proves impracticable, elevator is used to force the tooth out of its socket and
along the line of least resistance. Never use excessive force. This line of withdrawal of
a tooth is the path along which it will move out of its socket when individual force is
applied to it and is largely determined by the long axis. While elevation the operators left
hand index finger should rest on the occlusal surface of the 3rd
molar to confirm
movement and the thumb should be placed beneath the chin to brace the jaw.
If a tooth resists elevation the elevator should be put down and the cause of the difficulty
bought and reminded. If insufficient bone has been removed remove more bone.
If still resistance due to may factors, it will be necessary to divide the tooth and root walls
and remove the separated roots along their individual lines of withdrawal.
Splitting of or tooth division technique for the removal of impacted teeth.
The tooth division is necessary in those where tooth impaction exists or the roots have
unfavorable curvature and when impaction is heavy or where a large amount of bone
would otherwise have to be removed or conflicting lines of withdrawal.
Teeth may be conveniently divided by means of osteotomes or bur or combination.
Splitting technique or the process of reducing the crown into small pieces that are then
removed, creating a space into which the remaining portion of the roots can be moved
and then levered out.
Advantages :
1. The field of operation may be kept small.
2. Since less work is done posterior to the tooth the incisions are less extensive.
This means port operative swelling and trismas.
3. Bone removal is eliminated or considerably reduced so much bone is preserved,
less post operative pain.
4. The operating time is shortened.
5. Trismus due to injury of TMJ, ligaments are prevented because small elevator are
used. Forceful elevation not needed.
6. No damage to adjacent tooth and bone.
7. Less effort to force the split tooth part the convexity tooth in front so bone is not
subjected to great pressure, prevents neurosis and sequestration.
8. The risk of jaw fracture, muscle trimus is reduced because most fracture occur
from forced elevation.
9. Numbness of lower lip prevented, by preventing damage to inferior alveolar
nerve.
10. Injury to vessels are reduced.
Osteotome used to section two rooted.
Mesioangular or Horizontal teeth longitudinally and between the roots. The site of
application is at 'lines of cleavage' and sharply pressed top of mallet split the teeth.
Many prefers using bur than osteotome Tapered fissure bur are better for tooth division
than flat fissure bur. The bur division should take place among the transverse or
horizontal axis of the tooth i.e., separating crown from roots.
Vertical sectioning down the long axis is less convenient.
Horizontal impaction the crown must be completely exposed down to its mesial surface
so that an elevator blade can be inserted between this and the underlying bone. Tooth
division through neck using an oblique cut. This division should be executed efficiently
so that body of the tooth is completely sliced.
Sometimes necessary to divide the root wall with bur and deliver each root separately.
Greater the depth of impaction more bone removal and sectioning of tooth.
In many instances it is convenient to begin tooth division with a bur and complete it with
an osteotome , combining the advantages of both.
Cut the dental tissue at the cervical margin into the pulp cavity and a little beyond using
round surgical bur. The resultant hole is then enlarged by the use of large bur and
extends medially and distally until only the intact lingual enamel unites the crown and the
root wall. Division of tooth can be done by inserting osteotome into the groove and
rotating it around its long axis.
Advantages of Osteolome :
1. Quick and clean when performed by skill.
Disadvantages :
1. The tooth which has been previously loosened in its socket cannot be split.
2. Does not create any space for manipulation and is entirely dependent on the line
of cleavage.
3. Teeth with shallow grooves do not split.
4. Teeth in elderly patience are difficult to split.
5. In some cases are difficult to place osteotome in line with the long axis of tooth.
6. Damage to lingual nerve when splitting lingual plate.
7. Fracture of jaw when incorrectly placed and inadvertent force.
8. Patients in general are disturbed by mallet blow.
Advantages of Bur :
1. In the preceeding instance the alternate is use of bur
2. Permit the operator to place and angle the cut in the exact position he desires and
leaves a wide cut through the tooth substance rather than a linear crack.
Disadvantages
Time consuming, creates much more debris, delayed healing at the distal aspect of 2nd
molar.
Debridement and wound toilet :
 Carefully suction out the sockets and expose them with structure or bone or
granuloma.
 If remnants of the dental follicle are present excise this semisac carefully from the
surrounding soft tissue in order to prevent formation of cyst / tumour.
 Smooth the periphery of the alveolus with round surgical bur.
 Remove any sharp or ragged edges and traumatized bone end.
 Bleeding point is controlled by pressure pack.
 Gently irrigate with saline, particularly under the base of buccal flap where debris
collect.
5. Closure of wound : Vertical incision line is left with out closure for an adequate
drainage.
 A single suture is usually sufficient to close lower 3rd
molar incision -
(Sufficient to hold the flap in position for primary intentional healing).
 The needle is passed through the lingual mucoperiostium just distal to the 2nd
molar and after correct positioning of the buccal tissue a wide bite is taken in
the buccal flap and the suture is then tied without too much tension.
 In long incision 2 suture necessary.
 Apply triadcortyl to lips post operatively.
6. Post operative care:
To minimize discomfort, speed healing and recovery during post operative period.
1. Prophylactic antibiotic cover - 1st
hr before operation followed by suitable
oral preparation for 4 - 5 days.
2. Analgesics for pain - severity of pain 4 - 8 hrs and later begin to diminish.
3. Prescribe basic vitamins.
4. Mouth bath - avoid for the 12 hrs after surgery then hot saline mouth bath
frequently every 4 hrs.
5. Prescribe alternate hot and cold applications 1 hr each until bed time.
6. Instruct to avoid violent exercise, stimulant or very hot food in order to
minimize risk of post operative hemorrhage.
7. In case of hemorrhage - pressure pack for 30 min instruct pt. how to
control by using clean cloth - stick tie - lingual mucoperiosteum, bleedy,
suture with all layer.
8. Advice pt. to consult immediately in case of any emergency.
9. Warn the pt of the possibility of swelling and echymosis post operatively.
10. Warn about temporary anesthesia lip and tongue - when there is trauma to
nerve bundle.
11. Give appointment next day.
12. Irrigate the cavity with normal saline.
13. Haematoma - firm and tender on palpation, remove suture, hot saline
mouth pack or surgical drainage.
14. Edema - increases for approximately 24 - 36 hrs following surgery and
diminishes if not result in haematoma.
External application of ice immediately following surgery to minimize -
30 min on and 30 min off for 1st
6 - 8 hrs.
15. Trismus – advice jaw exercise by chew gum,if persists 5th
day risk for
hematoma infection, ecchymosis.
16. Sutures removed after 5 days.
Disruption ofvascular & lymphatic pathways that drain the surgical area are part
of surgical trauma, results in inadequate removal of lymphatic fluid , cellular breakdown
& accumulation of extracellular fluid & in most areas by diapedesis of blood through
intact vessels.
More surgical trauma more pain excessive bleeding during surgery – less post
operative swelling. Explanation:- swelling is promoted by ischaemia which could be
vasoconsrictor added to the L.A .
Algogenic substances produce pain by acting on specific pain receptors
(nocioceptors) of primary afferent neurons. Some algogenic substances produce pain
directly while others acts indirectly by promoting productive of directly acting algogenic
substances of by scrutinizing nociceptors.
These substances are derived from plasma (bradykinin) inflammatory cells
( eicosanoides,histamine, serotonin, ATP, ion, cytokines) the primary afferent neuron
(neuropeptides and post ganglionic sympathetic neurons (catecholamines, eicosanoides)
 Primary hyperalgesia is a reduction in pain threshold at the site of injury and is
caused by production of algogenic sub at the site.
 Secondary hyperalgesia implies spread of the painful area beyond that of primary
hyperalgeric and is caused by certain mechanisms initiated by perihpheral noxious
input.
Factories complicating the removal of impacted mandibular molar :
The degree of difficulty experienced during the removal of an impacted lower 3rd
molar
may be influenced, by both general and local factors. Most of the local factors causing
difficulty may be diagnosed and can overcome by the careful interrogation of the pre-
operative X-ray.
1. Abnormal root curvature
2. Hypercementosis
3. Proximity to mandibular canal
4. Extreme bone density especially in elderly pts.
5. Follicular space filled with bone most frequently seen in pts over 25 years of age
6. Ankylosis - resorption of bone followed by deposition result in ankylosis.
7. Difficult access to the operative field because of
a) Small orbicularis oris or a mandibular retrusion.
b) Inability to open the mouth wide.
c) A large and uncontrollable tongue
d) When T.M.J. is mainly of hinge variety
e) Relationship of external oblique ridge and to the 3rd
molar - if ridge and to
the 3rd
molar - if ridge situated behind -access good. whilst of alongside or
in front access is poor and difficult extraction.
Hot and Cold Packs :
IT has been held that dilalation or construction of blood vessels could be directly affected
by application of external cold / hot.
This is undesirably true is extremely superficial areas but very questionable in deeper
parts. It appears illogical that head / cold of such consideration or to be tolerated by
human skin, would even slightly alter the place of impacted mandibular 3rd
molar socket
or exert control of the vasoconstriction or vasodilation of the part.
Complications
Operative : Haemorrhage, apply gelatin syringe, oxidized cellulose, if root tip present
and presence of bleeding control bleeding and removal of root tip after 10 weeks.
2. Injury to inferior alveolar nerves lead to anaesthesia or pararthesia. Remove
spicules of bone carefully which is present in canal.
If nerve is torn / divided - effort should be made to reposition it in the canal and ends
should be approximated closely.
Lingual nerve damage : If root tip which is vital is in close contact with the canal or
lining (3 - 5mm) can be lift in little - inform pt.
Post operative
1. Post extention, pyogenic granuloma
2. Failure to prepare debride the wound or remove bone. Compress during
extraction will lead to infection and result in suppuration or excessive
proliferation of granulation tissue.
Treatment : Open the wound - to permit damage remove sequestrum be gentle care then
irrigate the socket.
Technique of removal of impacted 3rd
molar .
Mandibular mesioangular - impactions :
1. Prior to removal of the impaction. The patient and field of operation have been
prepared adequately and a L.A. has been administered.
2. A curtaining sponge is placed in the mouth to isolate the operative site. Another
sponge is used to dry the exposed oral area.
3. Incision - Oblique and horizontal into the tissues distal to 2nd
molar forward into
the buccal tissues.
It is important to palpate the tissue before incision because to keep the incision
over the bone.
4. Mucoperiostial flap is raised carefully with a sharp No.4 most level, starting in the
vertical incision. Where periostium is not attached to bone. The instrument work
portion is towards alveolar ridge. When the operative site is widely exposed, a
suitable retractor is placed under the flap and held against bone.
5. Direction is started in a vertical fashion parallel to and just back of the distal root
of 2nd
molar.
6. Tooth is exposed by angling one edge of the chisel is towards the tooth in making
a horizontal cut to create a ditch in the spongiosa between the tooth and the
cortical plate. The bone on distal and tip of the tooth should be removed.
7. The tooth is sectioned and new chisel is placed in the buccal grove, directed
distally toward the distal anatomical neck of the tooth (not lingually which may
fracture the lingual plate) and struck sharply. The tooth will often split on the 1st
attempt. The sectioned distal portion of the crown is removed from the wound.
8. A biangled spear point elevator is placed under the crown and upward motion is
made. The upper edge of the elevator lift the tooth when the tooth moves, it will
be forced to move in a arc. Often the tooth will move upwards for enough to clear
the 2nd
molar for enough to use the mechanical advantage of the elevator placed
between the teeth. A long winter elevator is placed in the root bifurcation with
buccal cortical plate used as a fulcrum will elevate the tooth out.
9. Bone fragments are removed using a curette. The soft tissue remnants in the
socket are also removed. Edges of the bony socket are smoothed with curette a
small fragment of sulphnamide tablet is placed in the wound. Suture is placed
over the socket from lingual to buccal.
10. A ½" round cutting needle and No.3 - 0 silk is used although No.3 -0
catgut does not have to be removed. One nature is usually sufficient. The vertical
cut is almost never closed. A drain is placed and gauge sponge is placed over the
area.
11. Post operatively :
a) Take only cold food stuff - to reduce bleeding
b) Gauge pack is kept and ask the pt. to bite ½ hr.
c) Remove after ½ hr
d) Antibiotics or analgesic are given
Mandibular Horizontal Impaction :
1) It needs deep vertical bone cut, upto apex of 2nd
molar. Horizontal cut should be
sufficient to expose the anatomical neck of tooth.
2) Split at the anatomical neck of 3rd
molar is done to decide the crown from the
root. This is done with a chisel / bur. The distal or mesial portion of the crown can be
split and removed. Bone from the crest of ridge is removed after splitting the tooth,
splitting of tooth is done 1st
other wise to split a loose tooth is difficult.
3) A further split in a near vertical (downward) direction can be made at this line.
The exposed dentin or pulp can be split easily.
4) Various superficial fragments are removed. The root portion is removed with an
elevator with or without further tooth section. Mesial portion of crown is removed last.
Mandibular vertical impaction :
It is difficult because we cannot keep any instrument between 7 & 8 and the space is too
small for bone removal.
1) A long, vertical bone cut is made to expose the anatomic neck of impaction.
Bone is removed well behind from the impacted tooth (distal)
2) A vertical split is obtained from the buccal groove through the distal portion of
the tooth below the anatomical neck. This portion is removed. A thin spear point
elevator is forced between the teeth if possible and the tooth is elevated. If not possible, a
No.14 elevator can engage the area of bifurcation on the bucal side and force straight
upward can be exerted.
Mandibular Distoangular impaction:
It is sufficient to remove because its bulk lies in the vertical ramus.
1) A generous mucoperiosteal flap is raised and usual vertical and horizontal bone
cuts are made
2) The tooth is sectioned in a vertical direction
3) Mesial bulk of tooth is removed 1st
by upward movement using a spearpoint
elevator placed on the mesial side of the tooth. The No.4 elevator placed in the area of
bifurcation and the distal sectioned crown portion may be directed out of the bone 1st
. The
tooth then is rotated distally into the space created. It is easy to section the crown from
the root in the distoangular impaction, remove the crown, split the root, if possible and
remove the separate root portion.
Bur Technique
The high speed surgical drill is employed in the removal of impacted tooth and root life.
The technique has several advantage
1) When dealing with a unsedated patients.
2) The placement of handpiece in patients mouth is a familiar experience.
3) The physical blow due to chisel and mallet is elevated.
4) Fewer personnel are required in the operatory.
5) Due to the heat produced because of bur, used irrigation and this will help to clean
the surgical area.
6) The operator has the ability to trench around the impaction in a delicate and
controlled fashion in order to remove the ossesous tissue so that an instrument purchase
can be obtained. This eliminates apically directed forces such as occur in the case of an
elevator purchase under or next to the impacted fragment. The instrument purchase can
be enhanced when a notch is made with the bur on the remaining portion of the tooth
allowing an elevation to engage it move freely.
For the removal of impacted teeth 2 method are used
1) Removal of the intact tooth after sufficient bone has been removed.
2) By sectioning of the tooth so that less bone would have to be removed for its
delivery. The present day technique is combination of this basic points of
high speed bur chisel technique are:
Dense bone is removed with a high speed.
The chisel is used to remove thin layer of relatively soft bone that commonly are
encountered in the removal of maxillary 3rd molars.
The use of a chisel in tooth split is usually limited to a single split along natural
cleavage lines. Additional sectioning is carried out with a high speed bur usually in
dentin.
Dense bone adjacent to the crown, which is to be sectioned with the chisel, frequently
is removed not only to provide path of delivery put also to aid in splitting the tooth.
Elevation of mandibular 3rd
molar impaction is impeded by one or more following
factors:
a) Overlying bone
b) Interior border of the ascending ramus
c) Adjacent 2nd
molar
d) Unfavorable root formation
e) Proximity to inferior alveolar nerve
f) Thin lingual plate
g) Lack of visibility
h) Restricted access
i) Abnormal bone formation
Vertical Impaction : Bone removal is begun at the mesiobuccal angle of 3rd
molar. The
initial bone cut is made vertically down to expose the height of convexity of crown. The
bur is passed distally at this depth to the distoangular line angle and then lingually around
the distal surface of the tooth. A mallet and chisel are then used to section the distal 3rd
from the crown. If the impaction (vertical) is not coming out then a high speed bur is
used to cut a groove on the root bifurcation into the distal root. Then distal root is
removed, then mesial root is removed.
Standard Operative Technique :
Durbeck divided into stages :
a) Intra Oral Approach:
1) Design of mucoperiosteal flap to obtain access to the area (intra orally) or
skin extra orally.
2) Removal of adequate amount of bone.
3) Delivery of the tooth.
4) Debridement and toilet of the wound.
5) Wound closure / packing.
6) After care.
Extra Oral Approach :
In ectopic condition and when tooth is situated on the inferior border of mandible (Risdon
approach).
1. Design of Mucoperiosteal flap:
Flap Design :
a) Second molar sulcus incision flap (envelope flap)
b) 2nd
& 1st
molar sulcus incision flap (envelope flap)
c) 2nd
molar incision flapc vestibular extention - Bayonet flap
d) 2nd
molar paramarginal flap with vestibular extension - L Shaped flap
e) Lingual flap.
Terren's Wards incision :
The anterior vertical incision of about 6mm in length starts & curves forwards at 450
angle in a slanting way from the distobuccal corner of the crown of the 2nd
molar and
ends along side the mesiobuccal cusp of that tooth. The incision should be made through
mucoperiostium and should not extend into the refection of mucous membrane at suclus
(the incision on also be started from below).
The cut then passes around the gingival margin of posterior 1/3rd
and 2nd
molar (any
epithelium) present in the gingival crevice in partially erupted tooth must be excised by
placing reverse bevel incision using No.12 blade & continue cervically on the distal
aspect to approximately the mid points of the tooth (when 3rd
molar is unerrupted) and
from this posterior part of the incision must slope outwards (bucally) as well as
backwards up the ascending ramus along the line of external oblique ridge using either
scissor / scalpel). The posterior part of incision should be down to bone until the line of
attachment of the buccinator is reached and then it should penetrate the tissue at mucosal
depth for only about 1" or 25mm in length.
Advantages :
1. Provides excellent visual and mechanical access.
2. Only buccal & lingual flap closure by one suture.
3. The risk of developing periodontal pocket post operatively can be minimized by
putting transverse posterior incision suture as close to 2nd
molar distal surface
(bucco- lingually).
Why taking bucally?
 Avoids cutting the retromolar canal vessels which may emerge from the retromolar
triangle or fossa.
 To minimize post operative infection, parapharyngeal abscess & trismus.
 Flap will fall away from bone easily and minimum hamorrhage.
 To prevent trauma to the lingual nerve & in order to reduce the possibility of a sub
maxillary / parapharyngeal abscess.
Howrath's periostial elevator is used at the anterior end of the incision and slide firmly
beneath the mucoperiosteal flap and latter is pieced off from the bone before backwards.
If the flap attached to the follicle (in soft tissue infection, the dissection is necessary).
After reflection of buccal flap. Lingual soft tissue should be reflected using periostial
elevator.
The tip of the blunt instrument is kept under the periosteum and close to the lingual
cortex draws aside the lingual root thus the lingual nerve & soft tissue damage can be
avoided during bone removal and to expose at least 5mm of bone lying behind the tooth
at distolingual aspect (i.e., distolingual spur) lengthening the lingual flap anteriorly
relieves tension and thus minimize trauma to the soft tissue during retraction.
The buccal and lingual flaps are reflected to produce an adequate exposure on lingual,
occlusal and buccal aspects of the retromolar triangle where impacted tooth is embedded.
Occassionally in case of horizontal impaction, larger buccal mucoperiostial flap is
necessary to obtain adequate access.
The anterior vertical incision should be commenced at the disto buccal corner of the
crown of the lower 1st
molar and extended forward along side that tooth, this vertical
incision should then continue through the buccal gingival crevice of the 2nd
molar and
continued posteriorly as previously described.
There are other flap designs for impacted 3rd
molar
1. Moore's flap
2. Envelope flap- Durbeck 1957(leaves the interdental papilla)
3 Modified lingual split flap (Lewis)
4. Kammishi flap
5. Osteoperiostial flap, Edentulous flap.
Lateral Trephination(Bowler,Henrey,Attowe) – oblique incision from the
retromolar region forwards, crossing external oblique ridge & passing inferiorly to
run along the reflection of anterior border of 1st
molar. 5mm width of soft tissue is
left in situ distobuccal to 2nd
molar.
Advantage: less periodontal complication.
Any flap can be followed by taking the basic requirement of Buccal flap.
1. It should provide adequate exposure of the post operative site.
2. It should have a wide base to assure a good blood supply to the soft tissues.
3. It should be large enough so that the soft tissue surrounding the operative site is
not traumatized during the operative and so that when the flap is replaced, the
edges rest on a wide shelf of bone.
4. After removal of the impacted tooth the incision should be capable of being
closed without tension.
Flap retraction :
Using Austin retractor & periosteal elevator flap rests against the base of retractor
without movement, safely protect from the other operating instruments.
2. Removal of adequate amount of bone
Removal of bone depends on the type of impaction, position of the tooth, access
to the area in which the tooth is located and size of the tooth.
Sufficient bone must be removed to allow the tooth to be lifted from its bed
without the necessity of heavy pressure.
Bone removal not only for tooth delivery but also for obtaining a satisfactory
point of application on the tooth for an elevator.
Bone removal should be conservative to avoid weaking of the mandible.
Bone removal by Chisel or a bur or combination of both.
General indications for the use of bur:
1. Patient with old, brittle bone which breaks unpredictably when cutc a chisel.
2. When external or internal oblique ridge or both are far forward in relationship to
the tooth so that guttering is necessary.
3. Where transverse section at neck and root separation required.
4. Operations performed under local analgesia.
General indications for the use of chisel:
1. Young elastic bone exhibiting well defined grain.
2. External oblique ridge or at least slightly below the level of the bone enclosing 3rd
molar.
3. Internal oblique ridge slightly behind the 3rd
molar so that distolingual corner of
the tooth sits in a thin balcony of bone.
4. tooth does not require sectioning.
5. Operations performed under G.A. or an adequately premedicated patients.
Bone burs :
No.6 and No.8 fissure bur or No.8 rose head burc straight hand piece.
Use sharp burs to start cutting through the dense cortical plate of bone. Bone cutting is
done to allow optimal visibility, for access to the impacted tooth, for subsequent healing
of the surgically created defect. When the leaves or cutting edges become clogged with
the bone chips, Clean the bur to avoid over heating and burnishing of the bone which
results in post operative pain and death of bone cells.
Cut holes in the bone overlying the impacted at a distances of 4mm from center to center.
Drill down to the impacted tooth with minimum pressure and speed. No drilling is done
with bone burs on the side adjacent to 2nd
molar because of danger of injury to this tooth.
Flush the operative site constantly with sterile water when drilling. Use suction tip at the
same time.
Advantages of use of surgical air turbine and burs for the removal of bone :
1. This method is 50% more effective than other methods.
2. Healing and bone repair were enhanced.
3. Trauma or post operative pain were reduced to 50% .
4. Lips were not injured and there is no much heat in hand piece.
5. No pain is referred to TMJ or to inferior part of mandible.
6. Post operative swelling is slightly reduced.
7. Length of surgery time required is reduced by 60%.
8. Less fatigue for the surgeon.
9. Sterile conditions were maintained.
Chisels:
By means of burs, chisels, connect the previously drilled holes & remove the bone
overlying the impacted tooth. This method gives less trauma. Chisels should be sharp.
Sterilize the chisels in a cold sterilizing medium so that not to trim the cutting edge.
Two types of chisels
1. Hand pressure chisel - least desirable and dangerous
2. Hand mallet and chisel- better than 1st
.
After the bone is removed over the impacted tooth, remove that from its height of
contour. Sectioning of the crown will facilitate the removal of the tooth and conserve
investing bone. Efficient instruments in 3rd
molar surgery less post operative trauma,
clean cut bone.
Disadvantages:
1. Undesirable for psychological reasons in consequent fracture.
2. To avoid its use in thin or price jaws to prevent fracture.
Specific technique of removal of bone using chisel or bur or both
Bone removal in several ways :
Chisel:
1. Window technique
2. Shaving technique
3. Lingual split technique (SIR William Kelsey Fryle)
4. Distal - lingual splitting technique by Davis.
Bor :
1. Ginding away the bone
2. Postage stamp method
3. Guttering technique
4. Collar technique (Moore / Gillbe)
5. Lateral trephination (where only crown is formed 10 - 16 years. Henry 1938,
Howe 1973)
Removal of window in buccal bonec chisel :
The elementary principle is that chisel is driven into bone by a mallet it moves towards
the direction of its plane or flat surface. So with Bevel upper most deep cut will result.
The bone lying beneath bevel tends to be crushed or impact, so the bevel should face the
bone to be removed.
Two vertical stop cuts or limiting cuts are made in the buccal bone at the junction of the
lower 2nd
and 3rd
molar (6mm) and distobuccal to the 3rd
molar (4 mm). The chisel is
positioned at right angles to the free upper edge of alveolous and the bevel of the chisel
should face towards the bone which has to be removed i.e., during mesial stop cut bevel
should face distally and distal stop cut bevel should be mesially facing. The length
depends on the depth of impaction. Next the chisel with the bevel facing downwards is
placed horizontally at the lower end of the limiting cuts (stop cut) and a linking cut is
made parallel to the superior border of the jaw with a single tap.
The buccal part encasing the tooth is gently split offc this limiting cuts. Slices of bone
each about 3mm in depth are chiseled away one at a time.
The preliminary stop cuts prevent horizontal split from extending forwards or backwards
due to horizontal grain. The removal of buccal window provides suitable point of
application.
After window, any body resistance to be cleared off for free elevation.
2. Shaving technique:
Using the chisel, bevel facing forward. The marginal alveolar bone around the
impacted tooth (partially erupted) is removed bit by bit by enhancing till the
suitable point of application is obtained.
3. Split bone technique of Sir William Kelsey Fry - Except buccoversion
impaction it can be used for all types of impaction
It is mainly splitting of lingual cortex and elevating the tooth in dentolingual
direction.
Originally described by Ward (1986)
1. Under G.A. is preferable
2. Soft tissues are reflected to expose the bone enclosing the impacted tooth
(Terrence ward incision)
3. A small window in the buccal aspect is created by vertical 5mm ht and 4mm and
horizontal cuts using chisel.
One immediately distal to 2nd
molar 5mm and 2nd
distobuccal to the 3rd
molar (4
mm) buccal cortex and these 2 are joined by horizontal cut.
4. A point of application for an elevator is made with the chisel by excising the
triangular piece of bone bounded anteriorly by the lower end of the stop cut and
above by the anterior end of the horizontal cut.
5. The distolingual bone (lingual place) is then fractured inwards using 5 mm chisel,
by placing distal to the crown of 3rd
molar and near to the lingual plate (dotted
line).
6. The chisel head at an angle of 45-600
to the bone surface (horizontal) and bevel
facing lingually pointing in the direction of 2nd
lower premolar on the other side.
7. The cutting edge of the chisel should be kept parallel to the external oblique line.
8. Few light tapsc mallet drives the chisel blade towards the lingual plate at the
required depth and the latter will fracture at the inter-dental space between the
lower 2nd
and 3rd
molars.
9. The peninsula of one which than remains distal to the tooth and between buccal
and lingual cuts is excised.
10. Deliver the tooth using elevator
11. Thin lingual plate is grafted with fine hemostat and fractured the lingual plate is
then lifted from the wound.
12. Smoothen the cut bone edgesc bone file.
13. Wound closure.
Advantages :
Faster tooth removal
Lees risk to mandibular nerve
Lessened risk of damage to the periodontium of the 2nd
molar
Less risk to socket healing problem.
Disadvantages :
Risk of damage to the lingual nerve.
Increased risk of post operative infection & greater danger of spread
Risk of augmentation of post operative inflammatory sequelae (pain, swelling and
trismus).
Patient discomfort due to the use of a chisel and mallet for lingual bone removal or
fracture.
Advantage of Split bone technique (Ward 1956) :
1. It is one of the quickest method of removing impacted mandibular 3rd
molar.
2. The elimination of distolingual bone in this technique allows the lingual tissue to
fall in this reducing the size of residual socket. By means of saucerization and
minimize the Blood clot.
3. The procedure is comparatively atraumatic. The bone is clean, fresh cut and there
is little or no late sequestration.
4. Rapid healing with minimum discomfort.
5. Suitable in young patientsc elastic bone in which grain is prominent.
Disadvantages of technique :
1. Error in placing the cutting edge of chisel parallel to the internal oblique ridge
instead of parallel to external oblique ridge may result in extension of lingual split
to the coronoid process (Killey, 1975)
2. Extreme care should be taken to prevent operative procedures from passing into
the dead space lying below the mylohyoid ridge.
3. The possibility of extension of infection from above the mylohyoid muscle to
structure lying below it. Pre operative hygiene program and antibiotic cover can
prevent this (Ward, 1956).
4. Injury to lingual nerve and subsequent impaired lingual sensation. But this can be
prevented by the identification of the nerve and its proper retraction.
5. The removal of lingual bone frequently exposure gingival distolingual portion of
the root of 2nd
molar. New bone does not replace this lost bone and to a surgical
periodontal pocket is produced. This can be prevented by not removing this piece
or lingual bone if it is having sufficient periosteal attachment. To hold the
lingual plate in portion during heaving, a 2nd
suture may be placed just distal to
neck of 2nd
molar.
6. Desirability of G.A. since most of the pt. will not be able to tolerate the chisel
under G.A.
7. Submental transient analgesia in the post operative period, due to injury in the
sensory branches of mylohyoid nerve.
8. Hazard of edema in the proximity of airway with the sagittal osteotomy now
adopted as a routine procedure, any question of airway compromise resulting
from surgical procedure on the lingual side of mandible must be dispelled.
Lewis (1980) - Modified the Lingual Split Technique by minimizing periosteal
reflection and buccal bone removal and by preserving the fractured lingual plate.
Advantage :
1. Reduce the possibility of lingual nerve damage.
2. Minimize periodontal pocket formation.
3. Improve chances for primary wound heating.
Impaction of teeth-Notes

Más contenido relacionado

La actualidad más candente

Mandibular third moalr impaction
Mandibular third moalr impactionMandibular third moalr impaction
Mandibular third moalr impactionAshish Soni
 
Vestibuloplasty- ridge extension procedures
Vestibuloplasty- ridge extension proceduresVestibuloplasty- ridge extension procedures
Vestibuloplasty- ridge extension proceduresZeeshan Arif
 
TEMPORIZATION IN PROSTHODONTICS
TEMPORIZATION IN PROSTHODONTICSTEMPORIZATION IN PROSTHODONTICS
TEMPORIZATION IN PROSTHODONTICSDrPrakashNidawani
 
mandibular molar Impactions
mandibular molar Impactionsmandibular molar Impactions
mandibular molar ImpactionsNishant Tewari
 
Mandibular Angle Fractures
Mandibular Angle FracturesMandibular Angle Fractures
Mandibular Angle FracturesAhmed Adawy
 
Hypermobility and ankylosis
Hypermobility and ankylosisHypermobility and ankylosis
Hypermobility and ankylosisHanan Shanab
 
Working length determination
Working length determinationWorking length determination
Working length determinationSaeed Bajafar
 
Operative Dentistry Viva ques
Operative Dentistry Viva quesOperative Dentistry Viva ques
Operative Dentistry Viva quesDr. Almas A
 
6 maxillary osteotomies
6  maxillary osteotomies6  maxillary osteotomies
6 maxillary osteotomiesvasanramkumar
 
Combination syndrome revised
Combination syndrome revisedCombination syndrome revised
Combination syndrome revisedDheeraj Sudhir
 
Wiring techniques in maxillofacial surgery
Wiring techniques in maxillofacial surgeryWiring techniques in maxillofacial surgery
Wiring techniques in maxillofacial surgerySyed Abuthagir
 

La actualidad más candente (20)

IMPACTION IN ORAL SURGERY
IMPACTION IN ORAL SURGERYIMPACTION IN ORAL SURGERY
IMPACTION IN ORAL SURGERY
 
Mandibular third moalr impaction
Mandibular third moalr impactionMandibular third moalr impaction
Mandibular third moalr impaction
 
Transalveolar Extraction
Transalveolar ExtractionTransalveolar Extraction
Transalveolar Extraction
 
Impaction
ImpactionImpaction
Impaction
 
Vestibuloplasty- ridge extension procedures
Vestibuloplasty- ridge extension proceduresVestibuloplasty- ridge extension procedures
Vestibuloplasty- ridge extension procedures
 
Pre Prosthetic Surgery
Pre Prosthetic SurgeryPre Prosthetic Surgery
Pre Prosthetic Surgery
 
TEMPORIZATION IN PROSTHODONTICS
TEMPORIZATION IN PROSTHODONTICSTEMPORIZATION IN PROSTHODONTICS
TEMPORIZATION IN PROSTHODONTICS
 
Impaction
ImpactionImpaction
Impaction
 
Oroantral Communication and Fistula
Oroantral Communication and FistulaOroantral Communication and Fistula
Oroantral Communication and Fistula
 
mandibular molar Impactions
mandibular molar Impactionsmandibular molar Impactions
mandibular molar Impactions
 
Endodontic surgery
Endodontic surgeryEndodontic surgery
Endodontic surgery
 
Mandibular Angle Fractures
Mandibular Angle FracturesMandibular Angle Fractures
Mandibular Angle Fractures
 
Hypermobility and ankylosis
Hypermobility and ankylosisHypermobility and ankylosis
Hypermobility and ankylosis
 
Working length determination
Working length determinationWorking length determination
Working length determination
 
Operative Dentistry Viva ques
Operative Dentistry Viva quesOperative Dentistry Viva ques
Operative Dentistry Viva ques
 
Endodontic emergencies
Endodontic emergenciesEndodontic emergencies
Endodontic emergencies
 
6 maxillary osteotomies
6  maxillary osteotomies6  maxillary osteotomies
6 maxillary osteotomies
 
Combination syndrome revised
Combination syndrome revisedCombination syndrome revised
Combination syndrome revised
 
working length
working lengthworking length
working length
 
Wiring techniques in maxillofacial surgery
Wiring techniques in maxillofacial surgeryWiring techniques in maxillofacial surgery
Wiring techniques in maxillofacial surgery
 

Destacado

Tooth impaction
Tooth impactionTooth impaction
Tooth impactionHiba Hamid
 
Mandibular 3rd molar impactions
Mandibular 3rd molar impactionsMandibular 3rd molar impactions
Mandibular 3rd molar impactionsMohammad Akheel
 
General Technique of Third Molar Removal
General Technique of Third Molar RemovalGeneral Technique of Third Molar Removal
General Technique of Third Molar RemovalAndres Cardona
 
Overdenture /orthodontic courses by Indian dental academy 
Overdenture /orthodontic courses by Indian dental academy Overdenture /orthodontic courses by Indian dental academy 
Overdenture /orthodontic courses by Indian dental academy Indian dental academy
 
Dental caries / dental implant courses
Dental caries / dental implant coursesDental caries / dental implant courses
Dental caries / dental implant coursesIndian dental academy
 
K-prosthodontic-lec3 Retention stability-and-support
K-prosthodontic-lec3 Retention stability-and-supportK-prosthodontic-lec3 Retention stability-and-support
K-prosthodontic-lec3 Retention stability-and-supportYahya Almoussawy
 
Retention,stability& support in dentures / dental implant courses by Indian d...
Retention,stability& support in dentures / dental implant courses by Indian d...Retention,stability& support in dentures / dental implant courses by Indian d...
Retention,stability& support in dentures / dental implant courses by Indian d...Indian dental academy
 
Overdentures / orthodontic straight wire technique
Overdentures / orthodontic straight wire techniqueOverdentures / orthodontic straight wire technique
Overdentures / orthodontic straight wire techniqueIndian dental academy
 
Treatment and complications of impactions
Treatment and complications of impactionsTreatment and complications of impactions
Treatment and complications of impactionsSuparn Kelkar
 
Impacted teeth | by Dr.Basma Elbeshlawy
Impacted teeth | by Dr.Basma ElbeshlawyImpacted teeth | by Dr.Basma Elbeshlawy
Impacted teeth | by Dr.Basma ElbeshlawyDenTeach
 
Diagnostic setup. opg, xeroradiography,clarks technique /certified fixed orth...
Diagnostic setup. opg, xeroradiography,clarks technique /certified fixed orth...Diagnostic setup. opg, xeroradiography,clarks technique /certified fixed orth...
Diagnostic setup. opg, xeroradiography,clarks technique /certified fixed orth...Indian dental academy
 
Management of impacted teeth /certified fixed orthodontic courses by Indi...
Management of impacted  teeth    /certified fixed orthodontic courses by Indi...Management of impacted  teeth    /certified fixed orthodontic courses by Indi...
Management of impacted teeth /certified fixed orthodontic courses by Indi...Indian dental academy
 

Destacado (20)

Impaction
Impaction Impaction
Impaction
 
Impactions
ImpactionsImpactions
Impactions
 
Tooth impaction
Tooth impactionTooth impaction
Tooth impaction
 
Mandibular 3rd molar impactions
Mandibular 3rd molar impactionsMandibular 3rd molar impactions
Mandibular 3rd molar impactions
 
General Technique of Third Molar Removal
General Technique of Third Molar RemovalGeneral Technique of Third Molar Removal
General Technique of Third Molar Removal
 
Tooth impaction
Tooth impactionTooth impaction
Tooth impaction
 
Impaction
ImpactionImpaction
Impaction
 
Teeth impaction
Teeth impactionTeeth impaction
Teeth impaction
 
Overdenture /orthodontic courses by Indian dental academy 
Overdenture /orthodontic courses by Indian dental academy Overdenture /orthodontic courses by Indian dental academy 
Overdenture /orthodontic courses by Indian dental academy 
 
Dental caries / dental implant courses
Dental caries / dental implant coursesDental caries / dental implant courses
Dental caries / dental implant courses
 
K-prosthodontic-lec3 Retention stability-and-support
K-prosthodontic-lec3 Retention stability-and-supportK-prosthodontic-lec3 Retention stability-and-support
K-prosthodontic-lec3 Retention stability-and-support
 
Retention,stability& support in dentures / dental implant courses by Indian d...
Retention,stability& support in dentures / dental implant courses by Indian d...Retention,stability& support in dentures / dental implant courses by Indian d...
Retention,stability& support in dentures / dental implant courses by Indian d...
 
Overdentures / orthodontic straight wire technique
Overdentures / orthodontic straight wire techniqueOverdentures / orthodontic straight wire technique
Overdentures / orthodontic straight wire technique
 
Treatment and complications of impactions
Treatment and complications of impactionsTreatment and complications of impactions
Treatment and complications of impactions
 
Impacted teeth
Impacted teethImpacted teeth
Impacted teeth
 
Impacted teeth
Impacted teethImpacted teeth
Impacted teeth
 
Impacted teeth | by Dr.Basma Elbeshlawy
Impacted teeth | by Dr.Basma ElbeshlawyImpacted teeth | by Dr.Basma Elbeshlawy
Impacted teeth | by Dr.Basma Elbeshlawy
 
Diagnostic setup. opg, xeroradiography,clarks technique /certified fixed orth...
Diagnostic setup. opg, xeroradiography,clarks technique /certified fixed orth...Diagnostic setup. opg, xeroradiography,clarks technique /certified fixed orth...
Diagnostic setup. opg, xeroradiography,clarks technique /certified fixed orth...
 
Overdentures and attachments part 1
Overdentures and attachments part 1Overdentures and attachments part 1
Overdentures and attachments part 1
 
Management of impacted teeth /certified fixed orthodontic courses by Indi...
Management of impacted  teeth    /certified fixed orthodontic courses by Indi...Management of impacted  teeth    /certified fixed orthodontic courses by Indi...
Management of impacted teeth /certified fixed orthodontic courses by Indi...
 

Similar a Impaction of teeth-Notes

Mandibular3rdmolarimpactions 130421031302-phpapp02
Mandibular3rdmolarimpactions 130421031302-phpapp02Mandibular3rdmolarimpactions 130421031302-phpapp02
Mandibular3rdmolarimpactions 130421031302-phpapp02mausam93
 
MANDIBULAR 3RD MOLAR IMPACTION
MANDIBULAR 3RD MOLAR IMPACTIONMANDIBULAR 3RD MOLAR IMPACTION
MANDIBULAR 3RD MOLAR IMPACTIONankitaraj63
 
Management of Impacted third molars
Management of Impacted third molarsManagement of Impacted third molars
Management of Impacted third molarsDr Rayan Malick
 
management of Impactions /prosthodontic courses
management of Impactions /prosthodontic coursesmanagement of Impactions /prosthodontic courses
management of Impactions /prosthodontic coursesIndian dental academy
 
Mandibular 3rd molar impacion
Mandibular 3rd molar impacionMandibular 3rd molar impacion
Mandibular 3rd molar impacionReshaGhosh1
 
Management of Impacted Third Molars
Management of Impacted Third MolarsManagement of Impacted Third Molars
Management of Impacted Third MolarsDibya Falgoon Sarkar
 
IMPACTION IN ORAL SURGERY UPDATED.pptx
IMPACTION IN ORAL SURGERY UPDATED.pptxIMPACTION IN ORAL SURGERY UPDATED.pptx
IMPACTION IN ORAL SURGERY UPDATED.pptxWasswa2
 
Canine Impaction and Its Importance in Orthodontics
Canine Impaction and Its Importance in OrthodonticsCanine Impaction and Its Importance in Orthodontics
Canine Impaction and Its Importance in OrthodonticsAnalhaq Shaikh
 
Impaction of mandibular 3rd molar
Impaction of mandibular 3rd molarImpaction of mandibular 3rd molar
Impaction of mandibular 3rd molarAswanth E.P
 
Impacted lower 3rd molar
Impacted lower 3rd molar Impacted lower 3rd molar
Impacted lower 3rd molar OlaMR
 
Impacted heena seminar
Impacted heena seminarImpacted heena seminar
Impacted heena seminarHeena Agarwal
 
Furcations-PPT.ppt
Furcations-PPT.pptFurcations-PPT.ppt
Furcations-PPT.pptmalti19
 
4 EVALUATION OF IMPACTED THIRD MOLARS seminar 4.pptx
4 EVALUATION OF IMPACTED THIRD MOLARS seminar 4.pptx4 EVALUATION OF IMPACTED THIRD MOLARS seminar 4.pptx
4 EVALUATION OF IMPACTED THIRD MOLARS seminar 4.pptxsneha
 

Similar a Impaction of teeth-Notes (20)

Mandibular3rdmolarimpactions 130421031302-phpapp02
Mandibular3rdmolarimpactions 130421031302-phpapp02Mandibular3rdmolarimpactions 130421031302-phpapp02
Mandibular3rdmolarimpactions 130421031302-phpapp02
 
Impaction.pptx
Impaction.pptxImpaction.pptx
Impaction.pptx
 
Impaction
ImpactionImpaction
Impaction
 
MANDIBULAR 3RD MOLAR IMPACTION
MANDIBULAR 3RD MOLAR IMPACTIONMANDIBULAR 3RD MOLAR IMPACTION
MANDIBULAR 3RD MOLAR IMPACTION
 
Management of Impacted third molars
Management of Impacted third molarsManagement of Impacted third molars
Management of Impacted third molars
 
management of Impactions /prosthodontic courses
management of Impactions /prosthodontic coursesmanagement of Impactions /prosthodontic courses
management of Impactions /prosthodontic courses
 
Mandibular 3rd molar impacion
Mandibular 3rd molar impacionMandibular 3rd molar impacion
Mandibular 3rd molar impacion
 
Maxillary impactions
Maxillary impactionsMaxillary impactions
Maxillary impactions
 
Management of Impacted Third Molars
Management of Impacted Third MolarsManagement of Impacted Third Molars
Management of Impacted Third Molars
 
IMPACTION IN ORAL SURGERY UPDATED.pptx
IMPACTION IN ORAL SURGERY UPDATED.pptxIMPACTION IN ORAL SURGERY UPDATED.pptx
IMPACTION IN ORAL SURGERY UPDATED.pptx
 
THIRD MOLAR IMPACTION (BASIC)
THIRD MOLAR IMPACTION (BASIC)THIRD MOLAR IMPACTION (BASIC)
THIRD MOLAR IMPACTION (BASIC)
 
Management of impacted3rd molar
Management of impacted3rd molarManagement of impacted3rd molar
Management of impacted3rd molar
 
Canine Impaction and Its Importance in Orthodontics
Canine Impaction and Its Importance in OrthodonticsCanine Impaction and Its Importance in Orthodontics
Canine Impaction and Its Importance in Orthodontics
 
Impaction of mandibular 3rd molar
Impaction of mandibular 3rd molarImpaction of mandibular 3rd molar
Impaction of mandibular 3rd molar
 
Impacted lower 3rd molar
Impacted lower 3rd molar Impacted lower 3rd molar
Impacted lower 3rd molar
 
Impacted heena seminar
Impacted heena seminarImpacted heena seminar
Impacted heena seminar
 
Extraction patterns for begg trt
Extraction patterns for begg trtExtraction patterns for begg trt
Extraction patterns for begg trt
 
Furcations-PPT.ppt
Furcations-PPT.pptFurcations-PPT.ppt
Furcations-PPT.ppt
 
4 EVALUATION OF IMPACTED THIRD MOLARS seminar 4.pptx
4 EVALUATION OF IMPACTED THIRD MOLARS seminar 4.pptx4 EVALUATION OF IMPACTED THIRD MOLARS seminar 4.pptx
4 EVALUATION OF IMPACTED THIRD MOLARS seminar 4.pptx
 
Impaction
ImpactionImpaction
Impaction
 

Último

High Profile Call Girls Jaipur Vani 8445551418 Independent Escort Service Jaipur
High Profile Call Girls Jaipur Vani 8445551418 Independent Escort Service JaipurHigh Profile Call Girls Jaipur Vani 8445551418 Independent Escort Service Jaipur
High Profile Call Girls Jaipur Vani 8445551418 Independent Escort Service Jaipurparulsinha
 
See the 2,456 pharmacies on the National E-Pharmacy Platform
See the 2,456 pharmacies on the National E-Pharmacy PlatformSee the 2,456 pharmacies on the National E-Pharmacy Platform
See the 2,456 pharmacies on the National E-Pharmacy PlatformKweku Zurek
 
VIP Call Girls Lucknow Nandini 7001305949 Independent Escort Service Lucknow
VIP Call Girls Lucknow Nandini 7001305949 Independent Escort Service LucknowVIP Call Girls Lucknow Nandini 7001305949 Independent Escort Service Lucknow
VIP Call Girls Lucknow Nandini 7001305949 Independent Escort Service Lucknownarwatsonia7
 
Call Girls Jayanagar Just Call 7001305949 Top Class Call Girl Service Available
Call Girls Jayanagar Just Call 7001305949 Top Class Call Girl Service AvailableCall Girls Jayanagar Just Call 7001305949 Top Class Call Girl Service Available
Call Girls Jayanagar Just Call 7001305949 Top Class Call Girl Service Availablenarwatsonia7
 
Mumbai Call Girls Service 9910780858 Real Russian Girls Looking Models
Mumbai Call Girls Service 9910780858 Real Russian Girls Looking ModelsMumbai Call Girls Service 9910780858 Real Russian Girls Looking Models
Mumbai Call Girls Service 9910780858 Real Russian Girls Looking Modelssonalikaur4
 
Book Call Girls in Yelahanka - For 7001305949 Cheap & Best with original Photos
Book Call Girls in Yelahanka - For 7001305949 Cheap & Best with original PhotosBook Call Girls in Yelahanka - For 7001305949 Cheap & Best with original Photos
Book Call Girls in Yelahanka - For 7001305949 Cheap & Best with original Photosnarwatsonia7
 
College Call Girls Pune Mira 9907093804 Short 1500 Night 6000 Best call girls...
College Call Girls Pune Mira 9907093804 Short 1500 Night 6000 Best call girls...College Call Girls Pune Mira 9907093804 Short 1500 Night 6000 Best call girls...
College Call Girls Pune Mira 9907093804 Short 1500 Night 6000 Best call girls...Miss joya
 
Hemostasis Physiology and Clinical correlations by Dr Faiza.pdf
Hemostasis Physiology and Clinical correlations by Dr Faiza.pdfHemostasis Physiology and Clinical correlations by Dr Faiza.pdf
Hemostasis Physiology and Clinical correlations by Dr Faiza.pdfMedicoseAcademics
 
Book Call Girls in Kasavanahalli - 7001305949 with real photos and phone numbers
Book Call Girls in Kasavanahalli - 7001305949 with real photos and phone numbersBook Call Girls in Kasavanahalli - 7001305949 with real photos and phone numbers
Book Call Girls in Kasavanahalli - 7001305949 with real photos and phone numbersnarwatsonia7
 
Call Girls Electronic City Just Call 7001305949 Top Class Call Girl Service A...
Call Girls Electronic City Just Call 7001305949 Top Class Call Girl Service A...Call Girls Electronic City Just Call 7001305949 Top Class Call Girl Service A...
Call Girls Electronic City Just Call 7001305949 Top Class Call Girl Service A...narwatsonia7
 
Russian Call Girls Chickpet - 7001305949 Booking and charges genuine rate for...
Russian Call Girls Chickpet - 7001305949 Booking and charges genuine rate for...Russian Call Girls Chickpet - 7001305949 Booking and charges genuine rate for...
Russian Call Girls Chickpet - 7001305949 Booking and charges genuine rate for...narwatsonia7
 
Call Girls Thane Just Call 9910780858 Get High Class Call Girls Service
Call Girls Thane Just Call 9910780858 Get High Class Call Girls ServiceCall Girls Thane Just Call 9910780858 Get High Class Call Girls Service
Call Girls Thane Just Call 9910780858 Get High Class Call Girls Servicesonalikaur4
 
Call Girl Koramangala | 7001305949 At Low Cost Cash Payment Booking
Call Girl Koramangala | 7001305949 At Low Cost Cash Payment BookingCall Girl Koramangala | 7001305949 At Low Cost Cash Payment Booking
Call Girl Koramangala | 7001305949 At Low Cost Cash Payment Bookingnarwatsonia7
 
call girls in Connaught Place DELHI 🔝 >༒9540349809 🔝 genuine Escort Service ...
call girls in Connaught Place  DELHI 🔝 >༒9540349809 🔝 genuine Escort Service ...call girls in Connaught Place  DELHI 🔝 >༒9540349809 🔝 genuine Escort Service ...
call girls in Connaught Place DELHI 🔝 >༒9540349809 🔝 genuine Escort Service ...saminamagar
 
Sonagachi Call Girls Services 9907093804 @24x7 High Class Babes Here Call Now
Sonagachi Call Girls Services 9907093804 @24x7 High Class Babes Here Call NowSonagachi Call Girls Services 9907093804 @24x7 High Class Babes Here Call Now
Sonagachi Call Girls Services 9907093804 @24x7 High Class Babes Here Call NowRiya Pathan
 
Artifacts in Nuclear Medicine with Identifying and resolving artifacts.
Artifacts in Nuclear Medicine with Identifying and resolving artifacts.Artifacts in Nuclear Medicine with Identifying and resolving artifacts.
Artifacts in Nuclear Medicine with Identifying and resolving artifacts.MiadAlsulami
 
Russian Call Girl Brookfield - 7001305949 Escorts Service 50% Off with Cash O...
Russian Call Girl Brookfield - 7001305949 Escorts Service 50% Off with Cash O...Russian Call Girl Brookfield - 7001305949 Escorts Service 50% Off with Cash O...
Russian Call Girl Brookfield - 7001305949 Escorts Service 50% Off with Cash O...narwatsonia7
 
Call Girls Hosur Just Call 7001305949 Top Class Call Girl Service Available
Call Girls Hosur Just Call 7001305949 Top Class Call Girl Service AvailableCall Girls Hosur Just Call 7001305949 Top Class Call Girl Service Available
Call Girls Hosur Just Call 7001305949 Top Class Call Girl Service Availablenarwatsonia7
 

Último (20)

High Profile Call Girls Jaipur Vani 8445551418 Independent Escort Service Jaipur
High Profile Call Girls Jaipur Vani 8445551418 Independent Escort Service JaipurHigh Profile Call Girls Jaipur Vani 8445551418 Independent Escort Service Jaipur
High Profile Call Girls Jaipur Vani 8445551418 Independent Escort Service Jaipur
 
See the 2,456 pharmacies on the National E-Pharmacy Platform
See the 2,456 pharmacies on the National E-Pharmacy PlatformSee the 2,456 pharmacies on the National E-Pharmacy Platform
See the 2,456 pharmacies on the National E-Pharmacy Platform
 
VIP Call Girls Lucknow Nandini 7001305949 Independent Escort Service Lucknow
VIP Call Girls Lucknow Nandini 7001305949 Independent Escort Service LucknowVIP Call Girls Lucknow Nandini 7001305949 Independent Escort Service Lucknow
VIP Call Girls Lucknow Nandini 7001305949 Independent Escort Service Lucknow
 
Call Girls Jayanagar Just Call 7001305949 Top Class Call Girl Service Available
Call Girls Jayanagar Just Call 7001305949 Top Class Call Girl Service AvailableCall Girls Jayanagar Just Call 7001305949 Top Class Call Girl Service Available
Call Girls Jayanagar Just Call 7001305949 Top Class Call Girl Service Available
 
Mumbai Call Girls Service 9910780858 Real Russian Girls Looking Models
Mumbai Call Girls Service 9910780858 Real Russian Girls Looking ModelsMumbai Call Girls Service 9910780858 Real Russian Girls Looking Models
Mumbai Call Girls Service 9910780858 Real Russian Girls Looking Models
 
Book Call Girls in Yelahanka - For 7001305949 Cheap & Best with original Photos
Book Call Girls in Yelahanka - For 7001305949 Cheap & Best with original PhotosBook Call Girls in Yelahanka - For 7001305949 Cheap & Best with original Photos
Book Call Girls in Yelahanka - For 7001305949 Cheap & Best with original Photos
 
College Call Girls Pune Mira 9907093804 Short 1500 Night 6000 Best call girls...
College Call Girls Pune Mira 9907093804 Short 1500 Night 6000 Best call girls...College Call Girls Pune Mira 9907093804 Short 1500 Night 6000 Best call girls...
College Call Girls Pune Mira 9907093804 Short 1500 Night 6000 Best call girls...
 
Hemostasis Physiology and Clinical correlations by Dr Faiza.pdf
Hemostasis Physiology and Clinical correlations by Dr Faiza.pdfHemostasis Physiology and Clinical correlations by Dr Faiza.pdf
Hemostasis Physiology and Clinical correlations by Dr Faiza.pdf
 
Book Call Girls in Kasavanahalli - 7001305949 with real photos and phone numbers
Book Call Girls in Kasavanahalli - 7001305949 with real photos and phone numbersBook Call Girls in Kasavanahalli - 7001305949 with real photos and phone numbers
Book Call Girls in Kasavanahalli - 7001305949 with real photos and phone numbers
 
Escort Service Call Girls In Sarita Vihar,, 99530°56974 Delhi NCR
Escort Service Call Girls In Sarita Vihar,, 99530°56974 Delhi NCREscort Service Call Girls In Sarita Vihar,, 99530°56974 Delhi NCR
Escort Service Call Girls In Sarita Vihar,, 99530°56974 Delhi NCR
 
Call Girls Electronic City Just Call 7001305949 Top Class Call Girl Service A...
Call Girls Electronic City Just Call 7001305949 Top Class Call Girl Service A...Call Girls Electronic City Just Call 7001305949 Top Class Call Girl Service A...
Call Girls Electronic City Just Call 7001305949 Top Class Call Girl Service A...
 
sauth delhi call girls in Bhajanpura 🔝 9953056974 🔝 escort Service
sauth delhi call girls in Bhajanpura 🔝 9953056974 🔝 escort Servicesauth delhi call girls in Bhajanpura 🔝 9953056974 🔝 escort Service
sauth delhi call girls in Bhajanpura 🔝 9953056974 🔝 escort Service
 
Russian Call Girls Chickpet - 7001305949 Booking and charges genuine rate for...
Russian Call Girls Chickpet - 7001305949 Booking and charges genuine rate for...Russian Call Girls Chickpet - 7001305949 Booking and charges genuine rate for...
Russian Call Girls Chickpet - 7001305949 Booking and charges genuine rate for...
 
Call Girls Thane Just Call 9910780858 Get High Class Call Girls Service
Call Girls Thane Just Call 9910780858 Get High Class Call Girls ServiceCall Girls Thane Just Call 9910780858 Get High Class Call Girls Service
Call Girls Thane Just Call 9910780858 Get High Class Call Girls Service
 
Call Girl Koramangala | 7001305949 At Low Cost Cash Payment Booking
Call Girl Koramangala | 7001305949 At Low Cost Cash Payment BookingCall Girl Koramangala | 7001305949 At Low Cost Cash Payment Booking
Call Girl Koramangala | 7001305949 At Low Cost Cash Payment Booking
 
call girls in Connaught Place DELHI 🔝 >༒9540349809 🔝 genuine Escort Service ...
call girls in Connaught Place  DELHI 🔝 >༒9540349809 🔝 genuine Escort Service ...call girls in Connaught Place  DELHI 🔝 >༒9540349809 🔝 genuine Escort Service ...
call girls in Connaught Place DELHI 🔝 >༒9540349809 🔝 genuine Escort Service ...
 
Sonagachi Call Girls Services 9907093804 @24x7 High Class Babes Here Call Now
Sonagachi Call Girls Services 9907093804 @24x7 High Class Babes Here Call NowSonagachi Call Girls Services 9907093804 @24x7 High Class Babes Here Call Now
Sonagachi Call Girls Services 9907093804 @24x7 High Class Babes Here Call Now
 
Artifacts in Nuclear Medicine with Identifying and resolving artifacts.
Artifacts in Nuclear Medicine with Identifying and resolving artifacts.Artifacts in Nuclear Medicine with Identifying and resolving artifacts.
Artifacts in Nuclear Medicine with Identifying and resolving artifacts.
 
Russian Call Girl Brookfield - 7001305949 Escorts Service 50% Off with Cash O...
Russian Call Girl Brookfield - 7001305949 Escorts Service 50% Off with Cash O...Russian Call Girl Brookfield - 7001305949 Escorts Service 50% Off with Cash O...
Russian Call Girl Brookfield - 7001305949 Escorts Service 50% Off with Cash O...
 
Call Girls Hosur Just Call 7001305949 Top Class Call Girl Service Available
Call Girls Hosur Just Call 7001305949 Top Class Call Girl Service AvailableCall Girls Hosur Just Call 7001305949 Top Class Call Girl Service Available
Call Girls Hosur Just Call 7001305949 Top Class Call Girl Service Available
 

Impaction of teeth-Notes

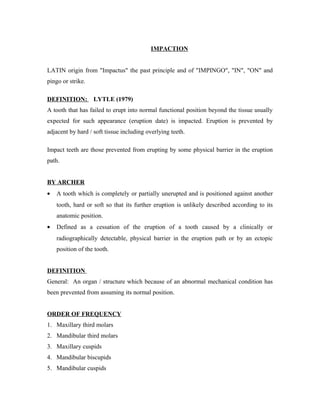
  • 1. IMPACTION LATIN origin from "Impactus" the past principle and of "IMPINGO", "IN", "ON" and pingo or strike. DEFINITION: LYTLE (1979) A tooth that has failed to erupt into normal functional position beyond the tissue usually expected for such appearance (eruption date) is impacted. Eruption is prevented by adjacent by hard / soft tissue including overlying teeth. Impact teeth are those prevented from erupting by some physical barrier in the eruption path. BY ARCHER • A tooth which is completely or partially unerupted and is positioned against another tooth, hard or soft so that its further eruption is unlikely described according to its anatomic position. • Defined as a cessation of the eruption of a tooth caused by a clinically or radiographically detectable, physical barrier in the eruption path or by an ectopic position of the tooth. DEFINITION General: An organ / structure which because of an abnormal mechanical condition has been prevented from assuming its normal position. ORDER OF FREQUENCY 1. Maxillary third molars 2. Mandibular third molars 3. Maxillary cuspids 4. Mandibular biscupids 5. Mandibular cuspids
  • 2. 6. Maxillary central incisors 7. Maxillary lateral incisors PRIMARY RETENTION (unerupted / embedded tooth) - cessation of eruption before gingival emergence without a recognizable physical barrier in the eruption path and ectopic position. Eg : is osteopetrosis, clidocranial dysplasia SECONDARY RETENTION (half retention, reimposition, reinclusion and ankylosis) - cessation of eruption of a tooth after gingival emergence, without a physical barrier in its path / ectopic position of the tooth. CAUSES 3 main causes for tooth impaction 1) Ectopic position of the tooth germ : • Extraction of primary predecessor • Surgical uncovering with or without enamel exposure with / without orthodontic traction • Surgical repositioning • No treatment 2) Obstruction of the eruption pathway a) Crowding (lack of space) Treatment - Orthodontic expansion - Extraction of the unerupted tooth or an adjacent tooth. Treatment - Removal of one of the colliding tooth germ c) Compact bone - Surgical uncovering with / without enamel exposure and with / without orthodontic treatment.
  • 3. d) Scar tissue, giant cell fibromatosis, unattached oral mucosa, odontogenic tumors. Treatment - Surgical uncovering with enamel exposure e) Supernumery tooth / odontomas Treatment - Removal of hard tissue obstacle 3) Follicle or PDL defects Treatment - Surgical uncovering with enamel exposure - surgical repositioning Theories for the etiology of impaction 1) Phylogenic theory Civilization which has eliminated the common need for large, powerful jaws has decreased the size of maxilla and mandibles. As a direct result in a surprisingly large number of adults. The lower third molar occupies an abnormal position and may be considered a vestigial organ without purpose or function. 2) Mandelian theory Individual may receive small jaws from one parent in the same way from the other parent a compliment of large teeth leads to impaction. 3) Endocrine theory Lack of growth of the jaws may be due to lack of function of the anterior lobe of the pituitary gland. 4) Pathological theory Existence of osteosclerosis in the 3rd molar area as a result of early disease of the adjacent molars may lead to impaction of third molars. 5) Orthodontic theory
  • 4. The constricted and narrowed arches of early mouth breathers have high percentage of impactions. Etiology 1. Lack of space in the third molar region 2. Third molar angulation 3. Ectopic position 4. Obstruction of eruption pathway 5. Late 3rd molar mineralization / early physical maturity. 6. Racial differences Causes for impaction Local Systemic Local Causes 1. Irregularity in the position and pressure from an adjacent tooth. 2. Density of overlying / surrounding bone. 3. Long continued chronic inflammation with resultant increase density of overlying mucous membrane. 4. Lack of space due to underdeveloped jaws. 5. Long retention of primary teeth. 6. Premature loss of primary teeth. 7. Acquired diseases such as : (a) Neurosis due to infection or abscess. 8. Inflammatory changes in the bone due to exanthematous disease in children. 9. Ectopic position. 10. Third molar. 11. Late mineralization / early physical maturative phase. 12. Racial difference.
  • 5. 13. Obstruction in eruption pathway. Systemic causes a) Is prenatal causes: i) Heredity ii) Misgeneration b) Post natal causes: i) Rickets ii) Anaemia iii) Congenital syphilis iv) Tuberculosis v) Endocrine dysfunction vi) Malnutrition c) Rare conditions i) Cleidocranial dysostosis ii) Oxycephaly iii) Progeria iv) Achondroplasia v) Cleft palate IMPACTED MANDIBULAR 3RD MOLARS Surgical Anatomy 1) From below the wisdom tooth socket lies on a prominent ledge or shelf of lingual bone - extraction easy by breaking lingual plate. 2) The distal incision should not be extended backwards in the direction of the medially inclined plane of the alveolar are risk of damage to the lingual nerve. 3) Calcification of bony canal is complete before the 3rd molar formed, so growing roots may impinge on neurovascular bundle of inferior alveolar nerve.
  • 6. 4)According to Schytman, Devato & Arial (1967) the branches of mandibular vessels emerges through retromandibular fossa /triangle result in brisk heamorraghe if distal incision is carried up the ramus not taken laterally towards the cheek nutrient canal orifice, damage to vessels. 5) Facial artery and anterior facial vein cross the inferior border of mandible just at the arteroinferior angle of masseter and have close relationship with the 2nd molar. So possibility of cutting the vessels by vertical incision which is directed downwards - So direct the blade upwards towards the teeth - saw motion. 6) Lingual nerve at the apices of molars at lingual side should be given care in lingual split technique. 7) Displacement of tooth / root to lingual pouch 8) Stripping of tendons of temporalis cause post operative pain. 9) Bone trajectories (grains / run parallel to lower border - so always vertical limiting cut first and then horizontal (linking). Development and eruption of 3rd molars Bjork (1956) found that there are 3 factors significant in the development of mandible and which are related to the amount of space for 3rd molar. 1) A predominantly vertical direction of condylar growth resulting in little resorption of the anterior border of the ramus. 2) Insufficient mandibular growth in length and proportion to the amount of tooth structure. 3) A backwardly directed trend of eruption of dentition will diminish the length of the arch. CLASSIFICATION : The purpose is to create an orderly approach to the diagnostic evaluation and surgical approach to 3rd molar surgery. It is necessary so that we can determine in advance just what difficulties we will encounter in their removal and plan the type of surgical procedures intelligently. For classification their anatomic position must be determined by a radiographic examination. The radiographs necessary are :
  • 7. 1) Intraoral periapical radiographs 2) Lateral jaw radiographs 3) Bitewing radiograph 4) Occlusal radiograph 5) Panoramic radiograph Classification based on salient features 1) Position of crown. 2) Character of root formation. 3) Nature of bone surrounding the root. 4) Position of the 3rd molar in relation to 2nd molar . CLASSIFICATION : By Pell,Gregory and Winter (George Winter): a) Relation of tooth to the ramus of the mandible and the 2nd molar. Depending on the availability of space to 3rd molar. Class - I : There is a sufficient amount of space between ramus and the distal side of the second molar for the accommodation of the mesiodistal diameter of the crown of the 3rd molar-Most favourable. Class-II The space between the ramus and the distal side of the second molar is less than the mexiodistal diameter of the crown of the 3rd molar. Class-III All or most of the 3rd molar is located within the ramus - least favourable b) Relative depth of the 3rd molar in bone
  • 8. Position - A : The highest portion of the tooth is on a level with above the occlusal line of 2nd molar. Position - B : The highest portion of the tooth is below the level of the occlusal plane, but above the cervical line of the second molar. Position - C : The highest portion of the tooth is below the cervical line of the second molar. C) The position of the long axis of the impacted mandibular 3rd molar in relative to the long axis of the second molar. 1. Winter classification (1926) Depending on the angulation 1. Vertical - Parallel to long axis of 2nd molar 2. Horizontal right angle to long axis of 2nd molar 3. Inverted - Occlusal surface facing inferior border 4. Mesioangular - Mesially inclined 5. Distoangular - distally inclined 6. Buccoangular - Oclusal surfaces facing cheek 7. Linguoangular - Occlusal surface facing tongue These may also occur simultaneously in a) Buccal version b) Lingual version c) Torso version 2) Kay's classification For surgical practice and to plan the treatment. Based on angulation and position, state of eruption and number of roots.
  • 9. a) Angulation and position - vertical - Mesioangular - Distoangular - Horizontal - Transverse - Buccoangular, linguoangular, inverted - Aberrant position b) State of eruption - Erupted - Partially erupted - incomplete eruption may be seen clinically, but frequently malposed always covered to some extent with soft tissue / bone. - Unerupted - may be below soft or bony tissue a) Soft tissue impaction b) Complete bony impaction c) Number of roots - Favourable Straight - Unfavourable Distal Mesial - Fused roots - Two roots
  • 10. - Multiple roots Other Considerations are : 1) The amount of space i.e., present between anterior border of ramus and mandibular second molar closer to ramus - difficult 2) Relation of crown of impacted tooth to mandibular occlusal plane - deeper is both difficult. 3) Buccal / Lingual position of the crown in relation to mandibular second molar - closer to 2nd molar and to apex difficult to remove. 4) Killey & Lyttle - Based on the state of eruption. a) Partial impaction : a tooth that is incompletely erupted b) Complete bony impaction : A tooth i.e., completely contained with in the bone of the jaw. c) Partial bony impaction, a tooth i.e., partially covered with bone. d) Potential impaction - are unerupted tooth that still retains the potency for eruption, but which will most likely won't erupt into normal position and function when obstruction, unless surgical intervention occurs. System of scoring for assessment of difficulty of removed (3rd molar) by A.J. MacGregar. Six factors -WHARFE Bizzare impactions and impactions in edentulous jaws are excluded, extremely deep teeth also. Category Score W - winters classification Horizontal 2 Mesioangular 1
  • 11. Vertical 0 Distoangular 2 H - Height of mandible (mm) 1 - 30 0 30 - 34 1 35 - 39 2 A – angle of second molar (degrees) 1 - 59 0 60 - 69 1 70 - 79 2 80 - 89 3 90 4 R - Root shape and development Less than 1/3 complete 2 1/3 to 2/3 complete 1 More than 2/3 complete - complex 3 Unfavorable 2 Favorable 1 F - Follicle Normal 0 Possible enlarged 1 Enlarged 2 Impaction relieved 3 E - Exit path Space 0 Distal cusp covered 1 Mesial 2 All covered 3 Impaction sequelae 1) Caries - Mesioangular and horizontal caries chances increases is 7 - balance between pathogens and host resistance 2) Pericoronites Positions of mandibular 3rd molars favoring deep distal / distobuccal pockets, positions close to / above the occlusal level and positions that may favour food impaction
  • 12. in the distal part of the pocket have been significantly linked to pericoronites - other factors are - Poor oral hygiene - General infections, URT infections - Cold weather / winter season Organisms : More flora is anerobic (peptostreptococcus, spirochaetes, fusobacterium and bacteriodes Mutans streptococci and lactobacilli Opportunistic bacteria are prevotella intermedia, porphyromonas gingivalis, actiobacillus. Actinomycetan comitans (commeansal). In vertical and distoangular impaction incidence is more. Clinical features: Affects 20 - 30 years age group 2 :1 Male : Female. Acute pericoronitis : Sharp or throbbing pain, redness body swelling in gingiva, discharge of puss from pericoronal space, partial trismus, dysphagia, fever lymphadinopathy. Subacute pericoronitis : Continuous dull ache, intraoral swelling, bad breath or taste, restriction in mouth opening and difficulty in swallowing. Discharge of pus & food remnants on gentle pressure over gum flap, ulceration of gingiva due to trauma from opposing tooth. Chronic percoronitis dull pain for one or two days and then symptoms for long time, bad breath pressure of cheek biting on affected side. Periodontal considerations : predictor of post operative intrabony defects on the distal surface of the adjacent second molar after impacted mandibular molar surgery. - Pre operative intrabory defects distal to second molar. Age of the patient at time of surgery - more after 25 years. Size of contact region between the 3rd and 2nd molar. Root resorption of the molar. Probing depth on the distal surface of adjacent molar post operatively.
  • 13. Pathologically undivided third molar follicle. Kuglbergs risk index M3 If a patient fulfills extraction of 8,predictors after the clinical and radiographic examination of second molar region adjacent to the extraction side there is a high risk of deep remaining defects after surgery. The predictors are; - Visible plaque distal of 2nd molar. - Probing depth > 6mm distal of 2nd molar. - Intrabony defect > 3mm distal of 2nd molar. - Sagittal inclination of 3rd molar > 50 degrees. - Large contact area between 2nd & 3rd molar. - Root resorption of distal aspect of 2nd molar. - Mesially undivided follicle of 3rd molar > 2.5mm . - Patient is a smoker. If a person over 30 years of age has an asymptomatic impacted 3rd molar with the above mentioned risk it is better to avoid surgery until symptoms are favorable. Orthodontic considerations.: Mandibular 3rd molar removal for allevation or prevention of mandibular incisor irregularity. (Crowding - does not to be justified based on present evidence only in cases where distalization of I and II molars is desired,surgical removal of III molar indicated for orthodontic reasons. Retention or resorption of II molar: Mere removal of the impacted III molar can lead to both periodontal healing and preservation of pulp vitality in the II molar. The treatment plan in relation to II molar resorption should therefore not incorporate endodontic if unless subsequent radiographic or clinical examination shows definite pulpal complications. Focus of infection: In conditions like organ transplantation, implantation of artificial heart values. Patient under immunosuppressive ,cytoxic therapy for malignancy,irradiation case, infective
  • 14. endocarditis, acute MI, infections of brain, eyes, lung and implants , removal of dental foci including 3rd molar with pericoronitis is justified. Impacted third molar in jaw fracture lines : All teeth involved in a jaw fracture line should as a rule be preserved unless they show severe marginal or periodontal pathology only semierupted third molar should be considered a hazard to facture healing.Cysts & tumors ( dentigenious cyst and odentokaratocyst / odontogenic tumours.) Impacted 3rd molar in edentulous jaw: Symptomatic- one which is causing pressure and pain under denture to be removed. Asymptomatic case- to be kept under observation . Impacted or developing tooth. Orthognathic surgery. Adviced to remove impacted tooth 6 - 12 months before orthognathic surgery in order to prevent bad split and for firm fixation. Fractures - the impacted teeth are weakening factor because of the displacement of bone and it can lead to fracture of maxilla or mandible. CLINICAL FEATURES - Ringing or buzzing in the ear - Crowding of teeth in the anterior region - Otitis - Eye may be affected a) Dimness of vision b) Blindness c) Iritis d) Pain stimulating that of glaucoma Contraindications 1) Acute inflammatory condition - ANUG, acute pericoronitic
  • 15. 2) Possible damage to adjacent structure - vital structure (nerve loss of adjacent tooth) 3) Compromised physical status - debilitating patients who cannot bear the trauma - like patient having severe CV disease, recent severe myocardial infarction. 4) Completely asymptomatic in elderly patients with deeply embedded, encased in bone and possibly fused to bone in an individual of mature years with little apparent risk that cysts will form and no prosthetic device in prospect, leave impacted tooth and keep him under observation. 5) When there is some question regarding future status of 2nd molar-like grossly destructed, R.C.T. ,bone loss, etc., Remove 2nd and keep 3rd molar for abutment. Even in the terminally ill and elderly symptomatic impactions should be removed if it is judged the patient can tolerate the procedure and be made more comfortable during his remaining life span. These indications and contraindications are intended as general guidelines only. Each patient must be considered on an individual basis. 1) For the protection of retromolar pad and tuberosity for prosthetic support better to leave impacted teeth, unless until strong indication for removal. 2) Removal of 3rd molar contribute to periodontal pocket in distal aspects of 2nd but less likely if removed early in their development. 3) When max 3rd molar is traumatising the mandibular pericoronal tissue, first remove maxillary 3rd molar and then after acute symptoms subsides remove mandibular 3rd molar. Diagnosis Based on history, clinical examination and radiographs History - No complaint in the absence of infection other than missing tooth.
  • 16. - Presence of infection - acute symptoms Clinical examination (routine) - Look for missing permanent teeth, retained deciduous teeth. - Examine for signs of infection such as swelling, discharge ,trismus,enlarged tender lymph nodes. - The degree of difficulty experienced during the removal of an impacted tooth may be influenced by both general and local factors - The patients age, temperament or general medical condition may cause problems. - Small mouth / mandibular retrusion with only hinge type of movement - opening limited and access is poor and vice versa. - Large external oblique ridge situated behind the tooth, access is good, when if the ridge is either along side / in front of the third molar access is poor. Radiography: Dental radiography is the only means that allows the operator to adequately visualize the impacted tooth. - Preoperative radiographs is must for all lower molars even when the tooth is fully erupted and appears amenable to single forceps extraction. - Radiographs in two planes at right angle to one another are required to show dearly the position of the tooth and the degree of impaction. X-rays - IOPA, - Occlusal (Donovon) - Paroramic radiograph - Conventional tomograph - CT scanning and - MRI – imaging.(expensive in ectopic conditions, But usefull when close to major vessels, nerves, eye etc. ) Multimodal radiography - scanora which combines the principles of narrow beam radiography and spiral tomography.
  • 17. - Object to show - whole of the unerupted tooth, the size of its crown and the shape of its roots together with the direction in which they curve. The presence of hypercentosis / widening of the root particularly in the apical third. In multirooted teeth the number of roots and whether they are fused / divergent is important. The position of the tooth in the jaws and its relationship to inferior alveolar canal and to other teeth including the degree of impaction are an indication of the difficulty of the operation. Secondary conditions such as caries, an increases in the size of the follicle, resorption of adjacent tooth roots / of bone. - In the mandible an intra oral periapical and an occlusal film and extra oral lateral, oblique views and ortho pantonographs are useful. - The periapical radiographs (conventional directing central ray beam at 90 to the film surface) should demonstrate. a) Whole wisdom tooth b) The immediate investing bone c) The width and vertical dimension of the pericoronal space d) The neurovascular canal e) A true lateral (enamel cap) view of the 2nd molar against which the sharp image of the 3rd molar can be matched so that degrees of vertical bone and curterning and horizontal intermolar overlap can be accurately assessed. To achieve the above points - the periapical film should be taken in such a manner that the x-ray beam is directed parallel to the occusal surface of the 2nd molar and passess through the distal cusp of that tooth. Difficulty is due to (1) gagging on the part of the patient a). medial defection of the film by the soft tissues overlying the ramus
  • 18. (2) Occlusal film : taken right angle to periapical film help to a) Show the buccolingual position of completely buried tooth b) Reveal the shape of the roots of horizontal teeth particularly those which are buccolingually placed c) demonstrate any apical dilaceration of root d) Indicate the relative thickness of bone on the buccal and lingual aspects 3) Lateral oblique view : Enforcement on the intra oral film when patient is uncooperative and when there is gagging, trismus. a) This will show deeply placed teeth and ectopic in the ramus tooth. b) Concomitant pathology - eg : cyst c) Vertical depth of mandible so that the foesible risk of jaw fracture can be assured d) Depth of overlying bone Bite wing radiographs Visuzalization of actual relationship of the crowns of the 2nd and 3rd molar in class I and class II. Donovan type : The use of periapical x-ray film to record in occlusal view. Modified tube shift concept of Clark's and Richard method by Frank : Most reliable used to determine whether the mandibular canal is lingual or buccal or below the impacted mandibular 3rd molar. This helps in planning surgical technique to avoid trauma to the neurovascular bundle preventing anesthesia or parastheria of the lower lip and teeth. Principle : By placing 2 films in the same positions in the mouth (medial end of the film positioned at least to the middle of the 1st molar and superior edge parallel ) to the occlusal surface and x-raying a lower impacted 3rd molar 1st film keeping like x-ray parallel to the occlusal surface of the 2nd molar (standard I.O.P.) and the 2nd film in some position and changing the position of the x-ray angle by shifting the tube 15° - 25°
  • 19. downwards still of right angles to the 1st and 2nd molar and compare both film (keeping that distant object move parallel to cone) i.e., the distant object move downward in relation to one object in the lingual side i.e., if canal lies lingual to impaction. It will move downwards on relation to roots of 3rd molar, if it is moved upward - buccally placed. It is placed direct below the roots or in a groove in the root substance apically lingually or buccally. If the canal remains in the same position it is line on the standard radiograph, using 3 distinctive colours as white, amber and red lines respectively called WAR LINES. In case of likely hood of damage to the neurovascular bundle patient should be warned in advance the possibilities of inadvertent trauma. And after effect of trauma. White line : Drawn along the occlusal surface of the errupted mandibular molars and extended posteriorly over the 3rd molar region - indicates I Axial inclination of impacted. a) Vertical - occlusal surface parallel to white line b) Disto angular - occlusal surface and white line converges towards another. c) Merioangular - Occlusal surface and white line diverges towards anterior II Depth at which the tooth is lying in the mandible position A, B, C can be known surface and white line diverges towards anterior Amber line : drawn from the surface of the bone lying distally to the 3rd molar to the crest of the interdental septum between the 1st and 2nd mandibular molar (to be careful about shadow of external oblique ridge) - indication. - State of eruption of tooth - whether soft tissue or hard and how much of tooth material is above bone, when soft tissue is reflected and the remainder enclosed within the alveolar bone. Red line: drawn perpendicular from the amber line to an imaginary point of application for an elevator at cementoenamel junction
  • 20. Disto angular - distal CEJ Merio angular - merial CEJ Indicates - the depth at which the impacted tooth lies within the mandible. Longer the red line : - more deeply placed and more difficult to remove - 5mm or more - done under G. - 9mm or more length - may be below apex of 1/17 3) Axial inclination of impacted tooth by comparing interdental septum Vertical impaction : Anteroposterior width of the interdental septum between the 2nd and 3rd molar is similar to that of the septum between the 1st and 2nd molar. Disto angular : Anteroposterior width of the interdental septum narrower in 2nd and 3rd molar than between 1st and 2nd Merioangular : Interdental septum broader in 2nd and 3rd than 1st and 2nd molar . 4) Root pattern of an impacted mandibular 3rd molar (No curvature pathology) Indicate line of with drawl and point of application of elevator - Type of surgical technique - bone removal (odentomy) or bone removal with tooth direction - line of withdrawal - favourability or unfavourability - odentomy 5) Shape of crown : - large crown and prominent cusp are more difficult to remove than small conical and flat cusp tooth impaction - line of withdrawal obstructed by 2nd molar - tooth division to prevent damage to 2nd molar. 6) Position and root pattern of the 2nd molar (condition of 7 – weather R.C.T. done, proximal caries presence of large restoration) if distally tilt create difficulty by increasing
  • 21. with impaction. Conical root - dislodge easily during elevator application for removal of 3rd molar. Distance between ascending ramus and distal surface of 2nd molar. 7) Texture of the investing bone : Varies according age and presence of pathology noted, marble bone dicast (oprtropetrosis), leontiasis ossea, condensing ostities, ortroporosis, paget's disease. Young individual - more cancellous bone, wide inter trabecular space and bone structure fine - so usually elastic. Old individual - less cancellous spaces are small and the bone shadow dense and bone is less elastic pathology - sclerotic bone. 8) Relationship to inferior dental canal Howe and Poynton (1960) shown the relationship of canal to 3rd molar root from radiograph. The canal may pass above / below the level of the 3rd molar apex / apices and lie in the line with the root (s) or buccal / lingual to it. Occasionally the neurovascular contents of the canal may groove / perforate a root / notch the apex of the root. If the canal is located near the upper / middle 3rd of the root the nerve will obviously lie buccal to the root. When canal is closed to apex it may be directly beneath the root, or buccal / lingual to it. The condensed bone, forming the roof a floor of the canal (which appears as radiopoque line) are represented on the radiograph by parallel bones of radiopaque bands. Relation of the third molar to the mandibular canal 50 - 75% buccally placed 6 - 7% lingual position
  • 22. 25% below the apices a) The presence of decreased radiopacity of the size of the canal in the root at the point where the canal is crossed, indicates that the root is grooved by the inferior dental canal (due to decreased amount of tooth substance) b) Interruption of the continuity of the one / both parallel radiopaque bands / canal, as they cross the root and increased radiolucency of the band implies deep grooving. c) Narrowing of the band (sometimes with maximum construction) with loss of periapheral radiopaque lines and increased radioluverncy of the band certainly indicates that the root has been pierced by the nerve - Sectional method / dividing nerve by blade and ends replaced in canal / regeneration in 6 months) d) If the radiolucent band crosses the apex of the tooth root and only the upper white line is broken an apical notch is present. e) A bifid apex may occasionally form a notch which staddles the nerve, the root becomes more translucent at the point of contact. Usually growing on the lingual surface of the roots. Attempt to avoid / to minimize damaging inferior dental nerve - If inevitable patient should be warned preoperatively of this contergency. - Generous removal of bone, tooth division and gentle use of instruments help in least possible damage. The following features indicates true relationship 1. Lanina dura loss (superior / inferior ) where the canal passes the 3rd molar 2. Radiducent band crossing the root 3. Narrowing of the mandibular canal as it passes the roots of the 3rd molar. 4. Angulation of the mandibular canal in the region next to the 3rd molar roots. Defelction of 3rd molar roots by the mandibular canal.
  • 23. 5. In root perforation in addition to lack of lamina dura, radiolucent band across the roots, the only difference from above is that both borders of the mandibular canal are found to be constricted, not found in simple root grooving. Apical root bends; an increased radiopacity of the apical region is indicative of a bend coinciding with direction of the x-ray beam. 9) Condition of the impacted tooth : Partially erupted - caries / periodontally attached uncrupted - evidence of internal or external resorption root Loft tissue impaction / bony 10) Width of the periodontal space : Decrease is older age, sometimes due to non functioning 11) Resorption followed by repair lead to ankylosis or impacted tooth The size of the follicular space should be noted. The narrower the space, more difficult procedure. An increase in space between crown and according bone may indicate cyst formation. Apart from x-ray, patients blood and urine are also examined. Treatment : 1) Treatment may include 2) Removal of the tooth 3) Moving the tooth to the proper location in the aveolar ridge by orthodontic / by surgical near 4) Auto transplantation and in rare occasions by leaving it in 1) Conservative to bring the tooth into useful occlusion in the area. 2) Auto transplantation 3) Extraction
  • 24. 4) Leave in situ Conservative treatment In young patient where tooth can be brought into occlusion. Where neighbouring standing tooth is carries / heavily filled - when needs extraction. Do autotransplantation / remove 7 and allow 8 to erupt and correct later by orthodontic method / this as an abutment for bridge. Treatment planning in various age groups 9 - 10 years Prophylactic removal possible but too early to predict impaction 10 - 12 years Extraction of primary molar to be considered. 12 - 14 years Extraction of second molar to be considered (in case of crown malformation, extensive caries and to prevent upper and supraeruption. 15 - 19 years Auto transplantation to be considered with / without pulpal involvement to 8 position. If needed, when pathology associated with 6 ( eg : caries, malformation of crown, fracture and juvenile periodontitis) 18 - 21 years : Ideal age for decision about preservation or removal of 3rd molar depending on condition of eruption. a) Full eruption - advised removal when no antagonest, presence of caries gingintis / periodontitis b) Partial cruption : Advised removal only. c) Impaction : Removal in enlarged follicle with / without signs of infection, root resorption of second molar close proximity to the gingival crevice of the second molar. Initial / progressive marginal periodontitis of second molar. 22 - 25 years : Removal of tooth when caries, periodontitis, gingintis, pericoronitis, increased healing time and difficulty in removal to be considered. After 25 years : Risk of post operative complications (alveolitis, inferior alveolar nerve complications)
  • 25. Extraction indication for removal - Infection (periocoronitis) - potential damage to second molar root. - Second molar status - early removal of semi impacted third molars results in more optimal healing condition distal to second molar than late removal. - Presence of follicular cyst and other pathologic complications related to 3rd molar (tumors, osteomyelitis) - Orthodontic / prosthetic reasons - in case of interference. When conservation is not possible due to age bar, infection, unfavourable position etc. There are 2 principle methods employed for the removal of 3rd molars. 1) Bone is excised to permit removal of the tooth in one piece. 2) Tooth is sectioned so that it can be removed in parts (odontomy) 3) Combination of both odentetory is a term used for the removal of partly erupted unerupted teeth / retained roots that cannot be extracted by the forceps technique therefore must be removed by surgical exercise. Prophylactic odentectomy : Ideally done when the roots are 2/3 complete, before this the crown may be difficult to elevate as it tends to turn in its socket like the ball, in a ball and socket joints. - Generally all four third molars are removed at a time under G.A. - Done to prevent later complication and to avoid later surgery which may be difficult due to bulbous root, curved root, sclerosed bone, infection etc. Pre operative consultation The surgeon should consult the patients physician regarding any relevant positive findings in the medical / dental history / physical examination.
  • 26. These consultations may be necessary to alter the patients medications, change the type of anaesthesia to local, intraverous sedation, or general / change the location of the procedure from OP to hospital. SURGICAL TECHNIQUE FOR REMOVAL OF IMPACTED LOWER 3RD MOLAR The removal of impacted mandibular 3rd molars is a complicated surgical procedure involving soft tissues, muscle and some of the hardest bone in the skeleton. The site of operation is in restricted area, difficult of access. The field is highly vascular and flooded with saliva, making the continuous use of the suction apparatus a necessity. Strict asepsis should be maintained. The operation must be carefully thought out in advance. Basic steps before planning operative procedures : Study the radiographs carefully. 1) Determine that your radiographs show exactly actual size, not elongated / shortened and the actual form of the tooth also the number, size, curvature of roots and the proximity of roots / crowns to adjacent teeth / vital structures. 2) Classify the impaction 3) Study the occlusal views to ascertain buccal - lingual position of the tooth. 4) Carefully note the relationship of the roots to the inferior alveolar canal. 5) Review the results of the visual and digital examinations of the hard and soft tissues surrounding the operative site Plan the operative procedure by considering (x-ray) 1) Position of the tooth in jaw. 2) Its natural line of withdrawal. 3) The obstacles to its extraction and how these may best be overcome either by sectional / not . 4) The points of application for elevators. 5) Raising the flap and removal of adequate amount of bone to gain access.
  • 27. During surgery this plan is made in the reverse order. Surgical plan for removal of impaction : 1) Outline the extent of M.P. flap keeping in view ideal requirements of flaps, nerves, vessels and muscles in the field. 2) Decide removal of impacted tooth either only by some removal bone removal or by sectioning of tooth /by combination. 3) Extent of bone removal for good exposure for point of application. 4) Method of removal of bone with bur / chisel or by combination. 5) Selecting best direction of removal of tooth / root. 6) Keep in mind the factors, which complicate the removal of tooth. Ankylosis , unfavorable curvature of root, hypercementosis, relationship to inferior dental canal, extreme density of bone, small mouth and uncontrollable tongue. Natural line of withdrawal- dictated on curvature of its roots, least resistant and unimpeded movement of tooth i.e., no obstacles. Obstacles to elevation of tooth: Resistance to elevation should be foreseen and plans made to overcome it. These occur along its natural line of withdrawal.
  • 28. SECTIONING METHOD : Intrinsic : Shape of the tooth, no of rods, curvature, and size of roots. Extrinsic : Due to bone, adjacent, teeth or vital structure inferior dental nerve etc., Point of Application: To be created mesial, distal or buccal to the tooth depending on axial inclination of tooth & its root curvature. No tooth should be divided until an adequate point of application on the fraction that is to be left in the bone has been prepared & after tooth luxation. Access: By raising adequate size of mucoperiostial flap & bone removal - up to greatest circumference of the crown to pass freely out of the bone along the planned line of withdrawal to provide access for dividing the tooth if necessary. 1. Outline the extent of soft tissue flaps to be used, keeping in mind the necessity for adequate exposure with maintenance of a good blood supply to the flaps subsequent support of the soft tissue flaps after operation. Keep in mind about the muscles or any foramina or vessels exist, in that area. 2. Decide whether or not this impaction could be removed : a) By the removal of surrounding bone to elevate the tooth in one piece. b) Sectioning the tooth. c) Combination of some bone removal and the sectioning technique. 3. Estimate the amount of surrounding osseous tissue that must be removed in order to give adequate exposure & create space into which the impaction can be moved in route to its removal. 4. Plan the logical method and choose the best instruments for the removal of thin underlying and surrounding bone - whether bur alone, chisels alone or a combination.
  • 29. 5. Select the best direction for the removal of impacted with and only minimum trauma should be there. 6. When to remove 2nd Molar : Unfortunately 2nd molar are extracted unnecessarily are too frequently to facilitate the removal of impacted 3rd molar. This removal of 2nd molar is justified only when the impacted tooth is present below the roots of 2nd molar or fused with the 2nd molar or when decayed or infected. 7. Difficult access to the operative field because of: a) Small orbicularis oris muscle or a mandibular retursion. b) Inability to open the mouth wide. c) A large and uncontrollable tongue. d) When TMJ involvement is mainly of hinge variety. e) Relationship of external oblique ridge and to 3rd molar if ridge situated behind the tooth access is good whilst if ridge is along side or in front access as per and difficult extraction. PRELIMINARY CONSIDERATIONS : 1. Presence of Infection : Infection in the form of pericoronitis should be treated before surgery. An acute pericoronitis is around a mandibular 3rd molar usually responds to the extraction or maxillary 3rd molar of the later is impinging on the infected mandibular tissues. Probing with a sterile silver probe under the flap on the buccal side for the release of pus, subsequent irrigation and antibiotic therapy may aid in treatment with satisfactory antibiotic level, the tooth can be removed. The removal of crown only will allow the pericoronitis to subside. 2. Premedication & preparation of patient. Hospitalization in prophylactic odontectomy if done under G.A.
  • 30. Premedication depends on type of patient and the method of anesthesia. Orally an average dose for an out patient is 0.1 gm pentobarbital sodium. Premedication is important when impacted tooth is removed under G.A. However 1 - 2 ml of pentobarbital sodium can be given I.V. The pt. remains ambulatory but requires some one to accompany him / her home. 3 - 20 mg of Diazapam I.V. can also be used. Preparation of the pt. starts with a mouth wash of any suitable antiseptic agent to reduce the intraoral bacterial count. Anti cholinergic drugs : Atropine - 0.4 mg also used (anti sialogogue). 3. Draping : Drapes in the form of sterile towels will provide a sterile field as well as cover the eyes, thereby reducing the psychological trauma. A sterile towel is placed around the pt's chest below the neck. Sterile gloves may be worn - Apply petroleum jelly to lips. 4. Chair position - The chair position should be low enough that the operator's right elbow is opposite the pt's right shoulder. 5. Sponges: A curtain sponge is placed to isolate the field of operation if the Chisel technique is used. Gauge sponges are kept under his tongue to keep the saliva away. 6. Retractors : The assistant should be trained to hold retractors in right hand. The tongue is not held toward the midline. When operating on pt's left side - the tip of the retractor is held under the mucoperiostial flap against bone. Heavy pulling of the flap by the assistant will cause excessive post operative lymphedema. 7. Armamentarium : The chisels are resharpened after each use and they are frequently changed during the operation. Many operators prefer to use burs. Instruments :  Cartridge syringec hypodermic needle.
  • 31.  Xylocaine 2%c 1 : 80,000 adernaline  B.P. blade No.15  Howrath periosteal elevator  Kilner double ended retractor  Rack's retractor  Killey's retractor  Ward's double ended cheek retractor  Rowel's lingual retractor  Kay's modified Austin retractor  Eastman chisel 7 inch long 1 ¼ inch wide with carbide tip  Down's stainless steel mallet 255 gms  Meisinger tapered fissure Bur no.8  Meisinger rose head Bur No.8 Electric  Dental engine turbine  Chip syringe  Warwick james elevator  Coupland chisel  Haldstead's mosquito artery (12.7cm) long  Jansen - middle - ton double action bone nibbles  Dani's brown - (55.4mm) cutting needle / ooo black silk  Mayo needle holder  6 inch tooth dissecting forceps  Gilley's hook / MC indoe scissors / suction apparatus  Probe, mouth probe.  Forceps, mouth prop. Sterile drape.
  • 32. Assuming the pt. to be free from local & systemic problems we will consider removal of impacted tooth. Standard Operative Technique : Durbeck divided into stages : a) Intra Oral Approach: 1) Design of mucoperiosteal flap to obtain access to the area (intra orally) or skin extra orally. 2) Removal of adequate amount of bone. 3) Delivery of the tooth. 4) Debridement and toilet of the wound. 5) Wound closure / packing. 6) After care. Extra Oral Approach : In ectopic condition and when tooth is situated on the inferior border of mandible (Risdon approach). 1. Design of Mucoperiosteal flap: Flap Design : a) Second molar sulcus incision flap (envelope flap) b) 2nd & 1st molar sulcus incision flap (envelope flap) c) 2nd molar incision flapc vestibular extention - Bayonet flap d) 2nd molar paramarginal flap with vestibular extension - L Shaped flap e) Lingual flap. Terren's Wards incision : The anterior vertical incision of about 6mm in length starts & curves forwards at 450 angle in a slanting way from the distobuccal corner of the crown of the 2nd molar and ends along side the mesiobuccal cusp of that tooth. The incision should be made through mucoperiostium and should not extend into the refection of mucous membrane at suclus (the incision on also be started from below).
  • 33. The cut then passes around the gingival margin of posterior 1/3rd and 2nd molar (any epithelium) present in the gingival crevice in partially erupted tooth must be excised by placing reverse bevel incision using No.12 blade & continue cervically on the distal aspect to approximately the mid points of the tooth (when 3rd molar is unerrupted) and from this posterior part of the incision must slope outwards (bucally) as well as backwards up the ascending ramus along the line of external oblique ridge using either scissor / scalpel). The posterior part of incision should be down to bone until the line of attachment of the buccinator is reached and then it should penetrate the tissue at mucosal depth for only about 1" or 25mm in length. Advantages : 1. Provides excellent visual and mechanical access. 2. Only buccal & lingual flap closure by one suture. 3. The risk of developing periodontal pocket post operatively can be minimized by putting transverse posterior incision suture as close to 2nd molar distal surface (bucco- lingually). Why taking bucally?  Avoids cutting the retromolar canal vessels which may emerge from the retromolar triangle or fossa.  To minimize post operative infection, parapharyngeal abscess & trismus.  Flap will fall away from bone easily and minimum hamorrhage.  To prevent trauma to the lingual nerve & in order to reduce the possibility of a sub maxillary / parapharyngeal abscess. Howrath's periostial elevator is used at the anterior end of the incision and slide firmly beneath the mucoperiosteal flap and latter is pieced off from the bone before backwards. If the flap attached to the follicle (in soft tissue infection, the dissection is necessary).
  • 34. After reflection of buccal flap. Lingual soft tissue should be reflected using periostial elevator. The tip of the blunt instrument is kept under the periosteum and close to the lingual cortex draws aside the lingual root thus the lingual nerve & soft tissue damage can be avoided during bone removal and to expose at least 5mm of bone lying behind the tooth at distolingual aspect (i.e., distolingual spur) lengthening the lingual flap anteriorly relieves tension and thus minimize trauma to the soft tissue during retraction. The buccal and lingual flaps are reflected to produce an adequate exposure on lingual, occlusal and buccal aspects of the retromolar triangle where impacted tooth is embedded. Occassionally in case of horizontal impaction, larger buccal mucoperiostial flap is necessary to obtain adequate access. The anterior vertical incision should be commenced at the disto buccal corner of the crown of the lower 1st molar and extended forward along side that tooth, this vertical incision should then continue through the buccal gingival crevice of the 2nd molar and continued posteriorly as previously described. There are other flap designs for impacted 3rd molar 1. Moore's flap 2. Envelope flap- Durbeck 1957(leaves the interdental papilla) 3 Modified lingual split flap (Lewis) 4. Kammishi flap 5. Osteoperiostial flap, Edentulous flap. Lateral Trephination(Bowler,Henrey,Attowe) – oblique incision from the retromolar region forwards, crossing external oblique ridge & passing inferiorly to run along the reflection of anterior border of 1st molar. 5mm width of soft tissue is left in situ distobuccal to 2nd molar. Advantage: less periodontal complication. Any flap can be followed by taking the basic requirement of Buccal flap. 1. It should provide adequate exposure of the post operative site.
  • 35. 2. It should have a wide base to assure a good blood supply to the soft tissues. 3. It should be large enough so that the soft tissue surrounding the operative site is not traumatized during the operative and so that when the flap is replaced, the edges rest on a wide shelf of bone. 4. After removal of the impacted tooth the incision should be capable of being closed without tension. Flap retraction : Using Austin retractor & periosteal elevator flap rests against the base of retractor without movement, safely protect from the other operating instruments. 2. Removal of adequate amount of bone Removal of bone depends on the type of impaction, position of the tooth, access to the area in which the tooth is located and size of the tooth. Sufficient bone must be removed to allow the tooth to be lifted from its bed without the necessity of heavy pressure. Bone removal not only for tooth delivery but also for obtaining a satisfactory point of application on the tooth for an elevator. Bone removal should be conservative to avoid weaking of the mandible. Bone removal by Chisel or a bur or combination of both. General indications for the use of bur: 1. Patient with old, brittle bone which breaks unpredictably when cutc a chisel. 2. When external or internal oblique ridge or both are far forward in relationship to the tooth so that guttering is necessary. 3. Where transverse section at neck and root separation required. 4. Operations performed under local analgesia. General indications for the use of chisel:
  • 36. 1. Young elastic bone exhibiting well defined grain. 2. External oblique ridge or at least slightly below the level of the bone enclosing 3rd molar. 3. Internal oblique ridge slightly behind the 3rd molar so that distolingual corner of the tooth sits in a thin balcony of bone. 4. tooth does not require sectioning. 5. Operations performed under G.A. or an adequately premedicated patients. Bone burs : No.6 and No.8 fissure bur or No.8 rose head burc straight hand piece. Use sharp burs to start cutting through the dense cortical plate of bone. Bone cutting is done to allow optimal visibility, for access to the impacted tooth, for subsequent healing of the surgically created defect. When the leaves or cutting edges become clogged with the bone chips, Clean the bur to avoid over heating and burnishing of the bone which results in post operative pain and death of bone cells. Cut holes in the bone overlying the impacted at a distances of 4mm from center to center. Drill down to the impacted tooth with minimum pressure and speed. No drilling is done with bone burs on the side adjacent to 2nd molar because of danger of injury to this tooth. Flush the operative site constantly with sterile water when drilling. Use suction tip at the same time. Advantages of use of surgical air turbine and burs for the removal of bone : 1. This method is 50% more effective than other methods. 2. Healing and bone repair were enhanced. 3. Trauma or post operative pain were reduced to 50% . 4. Lips were not injured and there is no much heat in hand piece. 5. No pain is referred to TMJ or to inferior part of mandible. 6. Post operative swelling is slightly reduced. 7. Length of surgery time required is reduced by 60%. 8. Less fatigue for the surgeon.
  • 37. 9. Sterile conditions were maintained. Chisels: By means of burs, chisels, connect the previously drilled holes & remove the bone overlying the impacted tooth. This method gives less trauma. Chisels should be sharp. Sterilize the chisels in a cold sterilizing medium so that not to trim the cutting edge. Two types of chisels 1. Hand pressure chisel - least desirable and dangerous 2. Hand mallet and chisel- better than 1st . After the bone is removed over the impacted tooth, remove that from its height of contour. Sectioning of the crown will facilitate the removal of the tooth and conserve investing bone. Efficient instruments in 3rd molar surgery less post operative trauma, clean cut bone. Disadvantages: 1. Undesirable for psychological reasons in consequent fracture. 2. To avoid its use in thin or price jaws to prevent fracture. Specific technique of removal of bone using chisel or bur or both Bone removal in several ways : Chisel: 1. Window technique 2. Shaving technique 3. Lingual split technique (SIR William Kelsey Fryle) 4. Distal - lingual splitting technique by Davis. Bur : 1. Ginding away the bone 2. Postage stamp method 3. Guttering technique 4. Collar technique (Moore / Gillbe)
  • 38. 5. Lateral trephination (where only crown is formed 10 - 16 years. Henry 1938, Howe 1973) Removal of window in buccal bonec chisel : The elementary principle is that chisel is driven into bone by a mallet it moves towards the direction of its plane or flat surface. So with Bevel upper most deep cut will result. The bone lying beneath bevel tends to be crushed or impact, so the bevel should face the bone to be removed. Two vertical stop cuts or limiting cuts are made in the buccal bone at the junction of the lower 2nd and 3rd molar (6mm) and distobuccal to the 3rd molar (4 mm). The chisel is positioned at right angles to the free upper edge of alveolous and the bevel of the chisel should face towards the bone which has to be removed i.e., during mesial stop cut bevel should face distally and distal stop cut bevel should be mesially facing. The length depends on the depth of impaction. Next the chisel with the bevel facing downwards is placed horizontally at the lower end of the limiting cuts (stop cut) and a linking cut is made parallel to the superior border of the jaw with a single tap. The buccal part encasing the tooth is gently split offc this limiting cuts. Slices of bone each about 3mm in depth are chiseled away one at a time. The preliminary stop cuts prevent horizontal split from extending forwards or backwards due to horizontal grain. The removal of buccal window provides suitable point of application. After window, any body resistance to be cleared off for free elevation. 2. Shaving technique: Using the chisel, bevel facing forward. The marginal alveolar bone around the impacted tooth (partially erupted) is removed bit by bit by enhancing till the suitable point of application is obtained.
  • 39. 3. Split bone technique of Sir William Kelsey Fry - Except buccoversion impaction it can be used for all types of impaction It is mainly splitting of lingual cortex and elevating the tooth in dentolingual direction. Originally described by Ward (1986) 1. Under G.A. is preferable 2. Soft tissues are reflected to expose the bone enclosing the impacted tooth (Terrence ward incision) 3. A small window in the buccal aspect is created by vertical 5mm ht and 4mm and horizontal cuts using chisel. One immediately distal to 2nd molar 5mm and 2nd distobuccal to the 3rd molar (4 mm) buccal cortex and these 2 are joined by horizontal cut. 4. A point of application for an elevator is made with the chisel by excising the triangular piece of bone bounded anteriorly by the lower end of the stop cut and above by the anterior end of the horizontal cut. 5. The distolingual bone (lingual place) is then fractured inwards using 5 mm chisel, by placing distal to the crown of 3rd molar and near to the lingual plate (dotted line). 6. The chisel head at an angle of 45-600 to the bone surface (horizontal) and bevel facing lingually pointing in the direction of 2nd lower premolar on the other side. 7. The cutting edge of the chisel should be kept parallel to the external oblique line. 8. Few light tapsc mallet drives the chisel blade towards the lingual plate at the required depth and the latter will fracture at the inter-dental space between the lower 2nd and 3rd molars. 9. The peninsula of one which than remains distal to the tooth and between buccal and lingual cuts is excised. 10. Deliver the tooth using elevator 11. Thin lingual plate is grafted with fine hemostat and fractured the lingual plate is then lifted from the wound. 12. Smoothen the cut bone edgesc bone file.
  • 40. 13. Wound closure. Advantages : Faster tooth removal Lees risk to mandibular nerve Lessened risk of damage to the periodontium of the 2nd molar Less risk to socket healing problem. Disadvantages : Risk of damage to the lingual nerve. Increased risk of post operative infection & greater danger of spread Risk of augmentation of post operative inflammatory sequelae (pain, swelling and trismus). Patient discomfort due to the use of a chisel and mallet for lingual bone removal or fracture. Advantage of Split bone technique (Ward 1956) : 1. It is one of the quickest method of removing impacted mandibular 3rd molar. 2. The elimination of distolingual bone in this technique allows the lingual tissue to fall in this reducing the size of residual socket. By means of saucerization and minimize the Blood clot. 3. The procedure is comparatively atraumatic. The bone is clean, fresh cut and there is little or no late sequestration. 4. Rapid healing with minimum discomfort. 5. Suitable in young patientsc elastic bone in which grain is prominent. Disadvantages of technique : 1. Error in placing the cutting edge of chisel parallel to the internal oblique ridge instead of parallel to external oblique ridge may result in extension of lingual split to the coronoid process (Killey, 1975)
  • 41. 2. Extreme care should be taken to prevent operative procedures from passing into the dead space lying below the mylohyoid ridge. 3. The possibility of extension of infection from above the mylohyoid muscle to structure lying below it. Pre operative hygiene program and antibiotic cover can prevent this (Ward, 1956). 4. Injury to lingual nerve and subsequent impaired lingual sensation. But this can be prevented by the identification of the nerve and its proper retraction. 5. The removal of lingual bone frequently exposure gingival distolingual portion of the root of 2nd molar. New bone does not replace this lost bone and to a surgical periodontal pocket is produced. This can be prevented by not removing this piece or lingual bone if it is having sufficient periosteal attachment. To hold the lingual plate in portion during heaving, a 2nd suture may be placed just distal to neck of 2nd molar. 6. Desirability of G.A. since most of the pt. will not be able to tolerate the chisel under G.A. 7. Submental transient analgesia in the post operative period, due to injury in the sensory branches of mylohyoid nerve. 8. Hazard of edema in the proximity of airway with the sagittal osteotomy now adopted as a routine procedure, any question of airway compromise resulting from surgical procedure on the lingual side of mandible must be dispelled. Lewis (1980) - Modified the Lingual Split Technique by minimizing periosteal reflection and buccal bone removal and by preserving the fractured lingual plate. Advantage : 1. Reduce the possibility of lingual nerve damage. 2. Minimize periodontal pocket formation. 3. Improve chances for primary wound heating.
  • 42. Distal - Lingual Splitting Technique: Modified lingual split to minimize trauma to the lingual nerve and to eliminate the elevation of lingual periosteum, which sometime causes excessive bleeding & preserves any bone attached to periosteum.  Less flap reflection because minimal bone removal in buccal.  3 main areas of bone removal. a) Anterior margin (mesial) of the impaction for point of application to elevation. 1st cut vertically and parallel to the long axis of 2nd molar, the inferior end (lower end) of this cut defined on the depth of mesial surface of impacted tooth. b) Bone is then removed to expose inferior and lateral aspect to the height of contour of the crown. c) Then distal or superior bone sectioned and mobilized in small pieces but not removal if attached to periostium. The fracturing of bone in small pieces rather than trying to split large segments prevents the osteotome from becoming bound within the bone. The bevel of the osteotome should be rotated as needed it should not be wedged between the tooth and bone as this may cause fracture of mandible. The lingual plate will usually split in a green stick fashion. The lingual periosteum is usually attached in mobile lingual fragment. The tooth can be easily removed once the distal superior bone has been mobilized and distal superior bone has been mobilized and lingual plate has been split. The elevator is applied with gentle force to the mesial aspect of impaction and tooth delivered in distolingual or lingual occlusal direction.
  • 43. Using bur : 1. Bone may be removed to expose the buried tooth by grinding it way using rose head or fissure burs i.e., removing by piece meal with large No.12 valcanite bur. 2. Postage stamp: Small round bur No.3 is used to make series of holes 3mm apart out lining the portion of bone to be sacrificed or a window shape or round shape in an embedded tooth to deroof the investing bone and then these holes are joined up by either bur or chisel cuts. This is a neat and precise method or bone removal but time consuming. 3. Guttering technique: No.6 round bur or fissure bur employed to create a gutter with in the bone along side the crown of the tooth or in the plane of periodontal membrane, keeping the bur parallel, to the long axis of the tooth, bone is guttered away from the impacted tooth along to remaining buccal side and distal surface of the tooth. Attention to clear the distobuccal angle. The depth of gutter should be 1/3rd - 1/2 the root length. Preserve a partial thickness of buccal wall which reduce the risk of fracture and maintenance of the height of the alveolar plate and can be used as fulcrum for leverage. Useful in removal of vertical, mesioangular or distoangular impaction. Incase of distoangular - the bur must be taken round the back of the tooth and lingually until it just reaches the lingual plate - protect lingual nerve. Horizontal crown must be completely exposed down to its mesial surface for point for application. When necessary bone removal has been completed the delivery of the tooth should be done. Disadvantages :
  • 44. 1. Access and visibility are not good and distolingual bone is retained. 2. Buccal cortical plate is leftc a very poor blood supply as it is stripped of periostium. 3. Thin wall of bone is easily crushed by elevators. 4. Collar Technique (Moore / Gillbe) Modification of Sir William Kelsey Fry's split using No.6 fissure bur, the 1st cut starts distal to the 2nd molar and is taken downwards upto the proposed point of application for an elevator (at mesial C.E.J. for 3rd molar) The bur is moved distally at this level making sure that the full depth of buccal plate is cut through, when the distal aspect of the buried tooth is reached the cut continues backwards for 2mm and then curved distally and lingually until is just penetrate the lingual plate. Using couplands elevator at lingual side of the distal cut the lingual plate to be fractured at the point where it is thinned by the crown of the tooth (i.e., b/w 2nd and 3rd molar) by giving gentle rotation. The whole collar of bone is lifted out of the wound leaving the crown of the tooth exposed. Tooth delivery done intact or by splitting. Advantages : Calculated amount of bone can be removed as a block including distolingual angle of bone Used to explore horizontally impacted tooth prior sectioning. Disadvantages : Not suitable for distoangular impaction. 5. Lateral trephination (Bowdler, Henry and Howe)
  • 45. Prophylactic removal of developing mandibular 3rd molar only when crown has formed by low buccal approach, in those individual or when it is likely to be impacted. By Window Method: The wall or root of bony crypt is not removed but the window is created on lateral buccal aspect over the bony crypt of the crown and the tooth delivered out through the opening without destroying the root. Benefit : The bone preservation as distal aspect of 2nd molar. Abortion of lower 3rd molar : Henry's procedure: Probable impaction of the mandibular 3rd molar may be diagnosed from Skiagrams in children between the ages of nine and eleven years and sometimes earlier, depending upon the development of the individual. All children should be radiographed and annual intervals to watch the formation and eruption of those molars in those subjects in whom insufficient rooms for full eruption of 3rd molar become evident, it is wiser to enuleate the follicles of this tooth immediately at the bud before or immediately after initiation of cusp or calcification stage. Removal of the bud at the age of 7 to nine years is surprisingly ____ to the difficulty of extension of deep impaction in adute - than to leave the case until the tooth has become fully formed and grossly impacted. Advantages : Relieves spaces for the 2nd molar development and better development many occur. Disadvantages : Unpredictable caries free 1st molar, out dated - due to problems in predicting at an early age due to psychologic and management probems as early age. Delivery of the impacted tooth from its bed :
  • 46. When the necessary bone removal has been completed the delivery of the tooth should be effected. Sufficient bone must be removed distal to the impaction to create a space into which the impaction can be moved. 1st use forceps rather than evelator. When forceps extraction proves impracticable, elevator is used to force the tooth out of its socket and along the line of least resistance. Never use excessive force. This line of withdrawal of a tooth is the path along which it will move out of its socket when individual force is applied to it and is largely determined by the long axis. While elevation the operators left hand index finger should rest on the occlusal surface of the 3rd molar to confirm movement and the thumb should be placed beneath the chin to brace the jaw. If a tooth resists elevation the elevator should be put down and the cause of the difficulty bought and reminded. If insufficient bone has been removed remove more bone. If still resistance due to may factors, it will be necessary to divide the tooth and root walls and remove the separated roots along their individual lines of withdrawal. Splitting of or tooth division technique for the removal of impacted teeth. The tooth division is necessary in those where tooth impaction exists or the roots have unfavorable curvature and when impaction is heavy or where a large amount of bone would otherwise have to be removed or conflicting lines of withdrawal. Teeth may be conveniently divided by means of osteotomes or bur or combination. Splitting technique or the process of reducing the crown into small pieces that are then removed, creating a space into which the remaining portion of the roots can be moved and then levered out. Advantages : 1. The field of operation may be kept small. 2. Since less work is done posterior to the tooth the incisions are less extensive. This means port operative swelling and trismas.
  • 47. 3. Bone removal is eliminated or considerably reduced so much bone is preserved, less post operative pain. 4. The operating time is shortened. 5. Trismus due to injury of TMJ, ligaments are prevented because small elevator are used. Forceful elevation not needed. 6. No damage to adjacent tooth and bone. 7. Less effort to force the split tooth part the convexity tooth in front so bone is not subjected to great pressure, prevents neurosis and sequestration. 8. The risk of jaw fracture, muscle trimus is reduced because most fracture occur from forced elevation. 9. Numbness of lower lip prevented, by preventing damage to inferior alveolar nerve. 10. Injury to vessels are reduced. Osteotome used to section two rooted. Mesioangular or Horizontal teeth longitudinally and between the roots. The site of application is at 'lines of cleavage' and sharply pressed top of mallet split the teeth. Many prefers using bur than osteotome Tapered fissure bur are better for tooth division than flat fissure bur. The bur division should take place among the transverse or horizontal axis of the tooth i.e., separating crown from roots. Vertical sectioning down the long axis is less convenient. Horizontal impaction the crown must be completely exposed down to its mesial surface so that an elevator blade can be inserted between this and the underlying bone. Tooth division through neck using an oblique cut. This division should be executed efficiently so that body of the tooth is completely sliced. Sometimes necessary to divide the root wall with bur and deliver each root separately. Greater the depth of impaction more bone removal and sectioning of tooth. In many instances it is convenient to begin tooth division with a bur and complete it with an osteotome , combining the advantages of both.
  • 48. Cut the dental tissue at the cervical margin into the pulp cavity and a little beyond using round surgical bur. The resultant hole is then enlarged by the use of large bur and extends medially and distally until only the intact lingual enamel unites the crown and the root wall. Division of tooth can be done by inserting osteotome into the groove and rotating it around its long axis. Advantages of Osteolome : 1. Quick and clean when performed by skill. Disadvantages : 1. The tooth which has been previously loosened in its socket cannot be split. 2. Does not create any space for manipulation and is entirely dependent on the line of cleavage. 3. Teeth with shallow grooves do not split. 4. Teeth in elderly patience are difficult to split. 5. In some cases are difficult to place osteotome in line with the long axis of tooth. 6. Damage to lingual nerve when splitting lingual plate. 7. Fracture of jaw when incorrectly placed and inadvertent force. 8. Patients in general are disturbed by mallet blow. Advantages of Bur : 1. In the preceeding instance the alternate is use of bur 2. Permit the operator to place and angle the cut in the exact position he desires and leaves a wide cut through the tooth substance rather than a linear crack. Disadvantages Time consuming, creates much more debris, delayed healing at the distal aspect of 2nd molar. Debridement and wound toilet :  Carefully suction out the sockets and expose them with structure or bone or granuloma.
  • 49.  If remnants of the dental follicle are present excise this semisac carefully from the surrounding soft tissue in order to prevent formation of cyst / tumour.  Smooth the periphery of the alveolus with round surgical bur.  Remove any sharp or ragged edges and traumatized bone end.  Bleeding point is controlled by pressure pack.  Gently irrigate with saline, particularly under the base of buccal flap where debris collect. 5. Closure of wound : Vertical incision line is left with out closure for an adequate drainage.  A single suture is usually sufficient to close lower 3rd molar incision - (Sufficient to hold the flap in position for primary intentional healing).  The needle is passed through the lingual mucoperiostium just distal to the 2nd molar and after correct positioning of the buccal tissue a wide bite is taken in the buccal flap and the suture is then tied without too much tension.  In long incision 2 suture necessary.  Apply triadcortyl to lips post operatively. 6. Post operative care: To minimize discomfort, speed healing and recovery during post operative period. 1. Prophylactic antibiotic cover - 1st hr before operation followed by suitable oral preparation for 4 - 5 days. 2. Analgesics for pain - severity of pain 4 - 8 hrs and later begin to diminish. 3. Prescribe basic vitamins. 4. Mouth bath - avoid for the 12 hrs after surgery then hot saline mouth bath frequently every 4 hrs. 5. Prescribe alternate hot and cold applications 1 hr each until bed time. 6. Instruct to avoid violent exercise, stimulant or very hot food in order to minimize risk of post operative hemorrhage.
  • 50. 7. In case of hemorrhage - pressure pack for 30 min instruct pt. how to control by using clean cloth - stick tie - lingual mucoperiosteum, bleedy, suture with all layer. 8. Advice pt. to consult immediately in case of any emergency. 9. Warn the pt of the possibility of swelling and echymosis post operatively. 10. Warn about temporary anesthesia lip and tongue - when there is trauma to nerve bundle. 11. Give appointment next day. 12. Irrigate the cavity with normal saline. 13. Haematoma - firm and tender on palpation, remove suture, hot saline mouth pack or surgical drainage. 14. Edema - increases for approximately 24 - 36 hrs following surgery and diminishes if not result in haematoma. External application of ice immediately following surgery to minimize - 30 min on and 30 min off for 1st 6 - 8 hrs. 15. Trismus – advice jaw exercise by chew gum,if persists 5th day risk for hematoma infection, ecchymosis. 16. Sutures removed after 5 days. Disruption ofvascular & lymphatic pathways that drain the surgical area are part of surgical trauma, results in inadequate removal of lymphatic fluid , cellular breakdown & accumulation of extracellular fluid & in most areas by diapedesis of blood through intact vessels. More surgical trauma more pain excessive bleeding during surgery – less post operative swelling. Explanation:- swelling is promoted by ischaemia which could be vasoconsrictor added to the L.A . Algogenic substances produce pain by acting on specific pain receptors (nocioceptors) of primary afferent neurons. Some algogenic substances produce pain directly while others acts indirectly by promoting productive of directly acting algogenic substances of by scrutinizing nociceptors.
  • 51. These substances are derived from plasma (bradykinin) inflammatory cells ( eicosanoides,histamine, serotonin, ATP, ion, cytokines) the primary afferent neuron (neuropeptides and post ganglionic sympathetic neurons (catecholamines, eicosanoides)  Primary hyperalgesia is a reduction in pain threshold at the site of injury and is caused by production of algogenic sub at the site.  Secondary hyperalgesia implies spread of the painful area beyond that of primary hyperalgeric and is caused by certain mechanisms initiated by perihpheral noxious input. Factories complicating the removal of impacted mandibular molar : The degree of difficulty experienced during the removal of an impacted lower 3rd molar may be influenced, by both general and local factors. Most of the local factors causing difficulty may be diagnosed and can overcome by the careful interrogation of the pre- operative X-ray. 1. Abnormal root curvature 2. Hypercementosis 3. Proximity to mandibular canal 4. Extreme bone density especially in elderly pts. 5. Follicular space filled with bone most frequently seen in pts over 25 years of age 6. Ankylosis - resorption of bone followed by deposition result in ankylosis. 7. Difficult access to the operative field because of a) Small orbicularis oris or a mandibular retrusion. b) Inability to open the mouth wide. c) A large and uncontrollable tongue d) When T.M.J. is mainly of hinge variety e) Relationship of external oblique ridge and to the 3rd molar - if ridge and to the 3rd molar - if ridge situated behind -access good. whilst of alongside or in front access is poor and difficult extraction. Hot and Cold Packs :
  • 52. IT has been held that dilalation or construction of blood vessels could be directly affected by application of external cold / hot. This is undesirably true is extremely superficial areas but very questionable in deeper parts. It appears illogical that head / cold of such consideration or to be tolerated by human skin, would even slightly alter the place of impacted mandibular 3rd molar socket or exert control of the vasoconstriction or vasodilation of the part. Complications Operative : Haemorrhage, apply gelatin syringe, oxidized cellulose, if root tip present and presence of bleeding control bleeding and removal of root tip after 10 weeks. 2. Injury to inferior alveolar nerves lead to anaesthesia or pararthesia. Remove spicules of bone carefully which is present in canal. If nerve is torn / divided - effort should be made to reposition it in the canal and ends should be approximated closely. Lingual nerve damage : If root tip which is vital is in close contact with the canal or lining (3 - 5mm) can be lift in little - inform pt. Post operative 1. Post extention, pyogenic granuloma 2. Failure to prepare debride the wound or remove bone. Compress during extraction will lead to infection and result in suppuration or excessive proliferation of granulation tissue. Treatment : Open the wound - to permit damage remove sequestrum be gentle care then irrigate the socket. Technique of removal of impacted 3rd molar . Mandibular mesioangular - impactions : 1. Prior to removal of the impaction. The patient and field of operation have been prepared adequately and a L.A. has been administered.
  • 53. 2. A curtaining sponge is placed in the mouth to isolate the operative site. Another sponge is used to dry the exposed oral area. 3. Incision - Oblique and horizontal into the tissues distal to 2nd molar forward into the buccal tissues. It is important to palpate the tissue before incision because to keep the incision over the bone. 4. Mucoperiostial flap is raised carefully with a sharp No.4 most level, starting in the vertical incision. Where periostium is not attached to bone. The instrument work portion is towards alveolar ridge. When the operative site is widely exposed, a suitable retractor is placed under the flap and held against bone. 5. Direction is started in a vertical fashion parallel to and just back of the distal root of 2nd molar. 6. Tooth is exposed by angling one edge of the chisel is towards the tooth in making a horizontal cut to create a ditch in the spongiosa between the tooth and the cortical plate. The bone on distal and tip of the tooth should be removed. 7. The tooth is sectioned and new chisel is placed in the buccal grove, directed distally toward the distal anatomical neck of the tooth (not lingually which may fracture the lingual plate) and struck sharply. The tooth will often split on the 1st attempt. The sectioned distal portion of the crown is removed from the wound. 8. A biangled spear point elevator is placed under the crown and upward motion is made. The upper edge of the elevator lift the tooth when the tooth moves, it will be forced to move in a arc. Often the tooth will move upwards for enough to clear the 2nd molar for enough to use the mechanical advantage of the elevator placed between the teeth. A long winter elevator is placed in the root bifurcation with buccal cortical plate used as a fulcrum will elevate the tooth out. 9. Bone fragments are removed using a curette. The soft tissue remnants in the socket are also removed. Edges of the bony socket are smoothed with curette a small fragment of sulphnamide tablet is placed in the wound. Suture is placed over the socket from lingual to buccal. 10. A ½" round cutting needle and No.3 - 0 silk is used although No.3 -0
  • 54. catgut does not have to be removed. One nature is usually sufficient. The vertical cut is almost never closed. A drain is placed and gauge sponge is placed over the area. 11. Post operatively : a) Take only cold food stuff - to reduce bleeding b) Gauge pack is kept and ask the pt. to bite ½ hr. c) Remove after ½ hr d) Antibiotics or analgesic are given Mandibular Horizontal Impaction : 1) It needs deep vertical bone cut, upto apex of 2nd molar. Horizontal cut should be sufficient to expose the anatomical neck of tooth. 2) Split at the anatomical neck of 3rd molar is done to decide the crown from the root. This is done with a chisel / bur. The distal or mesial portion of the crown can be split and removed. Bone from the crest of ridge is removed after splitting the tooth, splitting of tooth is done 1st other wise to split a loose tooth is difficult. 3) A further split in a near vertical (downward) direction can be made at this line. The exposed dentin or pulp can be split easily. 4) Various superficial fragments are removed. The root portion is removed with an elevator with or without further tooth section. Mesial portion of crown is removed last. Mandibular vertical impaction : It is difficult because we cannot keep any instrument between 7 & 8 and the space is too small for bone removal. 1) A long, vertical bone cut is made to expose the anatomic neck of impaction. Bone is removed well behind from the impacted tooth (distal) 2) A vertical split is obtained from the buccal groove through the distal portion of the tooth below the anatomical neck. This portion is removed. A thin spear point elevator is forced between the teeth if possible and the tooth is elevated. If not possible, a No.14 elevator can engage the area of bifurcation on the bucal side and force straight upward can be exerted.
  • 55. Mandibular Distoangular impaction: It is sufficient to remove because its bulk lies in the vertical ramus. 1) A generous mucoperiosteal flap is raised and usual vertical and horizontal bone cuts are made 2) The tooth is sectioned in a vertical direction 3) Mesial bulk of tooth is removed 1st by upward movement using a spearpoint elevator placed on the mesial side of the tooth. The No.4 elevator placed in the area of bifurcation and the distal sectioned crown portion may be directed out of the bone 1st . The tooth then is rotated distally into the space created. It is easy to section the crown from the root in the distoangular impaction, remove the crown, split the root, if possible and remove the separate root portion. Bur Technique The high speed surgical drill is employed in the removal of impacted tooth and root life. The technique has several advantage 1) When dealing with a unsedated patients. 2) The placement of handpiece in patients mouth is a familiar experience. 3) The physical blow due to chisel and mallet is elevated. 4) Fewer personnel are required in the operatory. 5) Due to the heat produced because of bur, used irrigation and this will help to clean the surgical area. 6) The operator has the ability to trench around the impaction in a delicate and controlled fashion in order to remove the ossesous tissue so that an instrument purchase can be obtained. This eliminates apically directed forces such as occur in the case of an elevator purchase under or next to the impacted fragment. The instrument purchase can be enhanced when a notch is made with the bur on the remaining portion of the tooth allowing an elevation to engage it move freely. For the removal of impacted teeth 2 method are used
  • 56. 1) Removal of the intact tooth after sufficient bone has been removed. 2) By sectioning of the tooth so that less bone would have to be removed for its delivery. The present day technique is combination of this basic points of high speed bur chisel technique are: Dense bone is removed with a high speed. The chisel is used to remove thin layer of relatively soft bone that commonly are encountered in the removal of maxillary 3rd molars. The use of a chisel in tooth split is usually limited to a single split along natural cleavage lines. Additional sectioning is carried out with a high speed bur usually in dentin. Dense bone adjacent to the crown, which is to be sectioned with the chisel, frequently is removed not only to provide path of delivery put also to aid in splitting the tooth. Elevation of mandibular 3rd molar impaction is impeded by one or more following factors: a) Overlying bone b) Interior border of the ascending ramus c) Adjacent 2nd molar d) Unfavorable root formation e) Proximity to inferior alveolar nerve f) Thin lingual plate g) Lack of visibility h) Restricted access i) Abnormal bone formation Vertical Impaction : Bone removal is begun at the mesiobuccal angle of 3rd molar. The initial bone cut is made vertically down to expose the height of convexity of crown. The bur is passed distally at this depth to the distoangular line angle and then lingually around the distal surface of the tooth. A mallet and chisel are then used to section the distal 3rd from the crown. If the impaction (vertical) is not coming out then a high speed bur is
  • 57. used to cut a groove on the root bifurcation into the distal root. Then distal root is removed, then mesial root is removed. Standard Operative Technique : Durbeck divided into stages : a) Intra Oral Approach: 1) Design of mucoperiosteal flap to obtain access to the area (intra orally) or skin extra orally. 2) Removal of adequate amount of bone. 3) Delivery of the tooth. 4) Debridement and toilet of the wound. 5) Wound closure / packing. 6) After care. Extra Oral Approach : In ectopic condition and when tooth is situated on the inferior border of mandible (Risdon approach). 1. Design of Mucoperiosteal flap: Flap Design : a) Second molar sulcus incision flap (envelope flap) b) 2nd & 1st molar sulcus incision flap (envelope flap) c) 2nd molar incision flapc vestibular extention - Bayonet flap d) 2nd molar paramarginal flap with vestibular extension - L Shaped flap e) Lingual flap. Terren's Wards incision : The anterior vertical incision of about 6mm in length starts & curves forwards at 450 angle in a slanting way from the distobuccal corner of the crown of the 2nd molar and ends along side the mesiobuccal cusp of that tooth. The incision should be made through mucoperiostium and should not extend into the refection of mucous membrane at suclus (the incision on also be started from below).
  • 58. The cut then passes around the gingival margin of posterior 1/3rd and 2nd molar (any epithelium) present in the gingival crevice in partially erupted tooth must be excised by placing reverse bevel incision using No.12 blade & continue cervically on the distal aspect to approximately the mid points of the tooth (when 3rd molar is unerrupted) and from this posterior part of the incision must slope outwards (bucally) as well as backwards up the ascending ramus along the line of external oblique ridge using either scissor / scalpel). The posterior part of incision should be down to bone until the line of attachment of the buccinator is reached and then it should penetrate the tissue at mucosal depth for only about 1" or 25mm in length. Advantages : 1. Provides excellent visual and mechanical access. 2. Only buccal & lingual flap closure by one suture. 3. The risk of developing periodontal pocket post operatively can be minimized by putting transverse posterior incision suture as close to 2nd molar distal surface (bucco- lingually). Why taking bucally?  Avoids cutting the retromolar canal vessels which may emerge from the retromolar triangle or fossa.  To minimize post operative infection, parapharyngeal abscess & trismus.  Flap will fall away from bone easily and minimum hamorrhage.  To prevent trauma to the lingual nerve & in order to reduce the possibility of a sub maxillary / parapharyngeal abscess. Howrath's periostial elevator is used at the anterior end of the incision and slide firmly beneath the mucoperiosteal flap and latter is pieced off from the bone before backwards. If the flap attached to the follicle (in soft tissue infection, the dissection is necessary).
  • 59. After reflection of buccal flap. Lingual soft tissue should be reflected using periostial elevator. The tip of the blunt instrument is kept under the periosteum and close to the lingual cortex draws aside the lingual root thus the lingual nerve & soft tissue damage can be avoided during bone removal and to expose at least 5mm of bone lying behind the tooth at distolingual aspect (i.e., distolingual spur) lengthening the lingual flap anteriorly relieves tension and thus minimize trauma to the soft tissue during retraction. The buccal and lingual flaps are reflected to produce an adequate exposure on lingual, occlusal and buccal aspects of the retromolar triangle where impacted tooth is embedded. Occassionally in case of horizontal impaction, larger buccal mucoperiostial flap is necessary to obtain adequate access. The anterior vertical incision should be commenced at the disto buccal corner of the crown of the lower 1st molar and extended forward along side that tooth, this vertical incision should then continue through the buccal gingival crevice of the 2nd molar and continued posteriorly as previously described. There are other flap designs for impacted 3rd molar 1. Moore's flap 2. Envelope flap- Durbeck 1957(leaves the interdental papilla) 3 Modified lingual split flap (Lewis) 4. Kammishi flap 5. Osteoperiostial flap, Edentulous flap. Lateral Trephination(Bowler,Henrey,Attowe) – oblique incision from the retromolar region forwards, crossing external oblique ridge & passing inferiorly to run along the reflection of anterior border of 1st molar. 5mm width of soft tissue is left in situ distobuccal to 2nd molar. Advantage: less periodontal complication. Any flap can be followed by taking the basic requirement of Buccal flap. 1. It should provide adequate exposure of the post operative site.
  • 60. 2. It should have a wide base to assure a good blood supply to the soft tissues. 3. It should be large enough so that the soft tissue surrounding the operative site is not traumatized during the operative and so that when the flap is replaced, the edges rest on a wide shelf of bone. 4. After removal of the impacted tooth the incision should be capable of being closed without tension. Flap retraction : Using Austin retractor & periosteal elevator flap rests against the base of retractor without movement, safely protect from the other operating instruments. 2. Removal of adequate amount of bone Removal of bone depends on the type of impaction, position of the tooth, access to the area in which the tooth is located and size of the tooth. Sufficient bone must be removed to allow the tooth to be lifted from its bed without the necessity of heavy pressure. Bone removal not only for tooth delivery but also for obtaining a satisfactory point of application on the tooth for an elevator. Bone removal should be conservative to avoid weaking of the mandible. Bone removal by Chisel or a bur or combination of both. General indications for the use of bur: 1. Patient with old, brittle bone which breaks unpredictably when cutc a chisel. 2. When external or internal oblique ridge or both are far forward in relationship to the tooth so that guttering is necessary. 3. Where transverse section at neck and root separation required. 4. Operations performed under local analgesia. General indications for the use of chisel:
  • 61. 1. Young elastic bone exhibiting well defined grain. 2. External oblique ridge or at least slightly below the level of the bone enclosing 3rd molar. 3. Internal oblique ridge slightly behind the 3rd molar so that distolingual corner of the tooth sits in a thin balcony of bone. 4. tooth does not require sectioning. 5. Operations performed under G.A. or an adequately premedicated patients. Bone burs : No.6 and No.8 fissure bur or No.8 rose head burc straight hand piece. Use sharp burs to start cutting through the dense cortical plate of bone. Bone cutting is done to allow optimal visibility, for access to the impacted tooth, for subsequent healing of the surgically created defect. When the leaves or cutting edges become clogged with the bone chips, Clean the bur to avoid over heating and burnishing of the bone which results in post operative pain and death of bone cells. Cut holes in the bone overlying the impacted at a distances of 4mm from center to center. Drill down to the impacted tooth with minimum pressure and speed. No drilling is done with bone burs on the side adjacent to 2nd molar because of danger of injury to this tooth. Flush the operative site constantly with sterile water when drilling. Use suction tip at the same time. Advantages of use of surgical air turbine and burs for the removal of bone : 1. This method is 50% more effective than other methods. 2. Healing and bone repair were enhanced. 3. Trauma or post operative pain were reduced to 50% . 4. Lips were not injured and there is no much heat in hand piece. 5. No pain is referred to TMJ or to inferior part of mandible. 6. Post operative swelling is slightly reduced. 7. Length of surgery time required is reduced by 60%. 8. Less fatigue for the surgeon.
  • 62. 9. Sterile conditions were maintained. Chisels: By means of burs, chisels, connect the previously drilled holes & remove the bone overlying the impacted tooth. This method gives less trauma. Chisels should be sharp. Sterilize the chisels in a cold sterilizing medium so that not to trim the cutting edge. Two types of chisels 1. Hand pressure chisel - least desirable and dangerous 2. Hand mallet and chisel- better than 1st . After the bone is removed over the impacted tooth, remove that from its height of contour. Sectioning of the crown will facilitate the removal of the tooth and conserve investing bone. Efficient instruments in 3rd molar surgery less post operative trauma, clean cut bone. Disadvantages: 1. Undesirable for psychological reasons in consequent fracture. 2. To avoid its use in thin or price jaws to prevent fracture. Specific technique of removal of bone using chisel or bur or both Bone removal in several ways : Chisel: 1. Window technique 2. Shaving technique 3. Lingual split technique (SIR William Kelsey Fryle) 4. Distal - lingual splitting technique by Davis. Bor : 1. Ginding away the bone 2. Postage stamp method 3. Guttering technique 4. Collar technique (Moore / Gillbe)
  • 63. 5. Lateral trephination (where only crown is formed 10 - 16 years. Henry 1938, Howe 1973) Removal of window in buccal bonec chisel : The elementary principle is that chisel is driven into bone by a mallet it moves towards the direction of its plane or flat surface. So with Bevel upper most deep cut will result. The bone lying beneath bevel tends to be crushed or impact, so the bevel should face the bone to be removed. Two vertical stop cuts or limiting cuts are made in the buccal bone at the junction of the lower 2nd and 3rd molar (6mm) and distobuccal to the 3rd molar (4 mm). The chisel is positioned at right angles to the free upper edge of alveolous and the bevel of the chisel should face towards the bone which has to be removed i.e., during mesial stop cut bevel should face distally and distal stop cut bevel should be mesially facing. The length depends on the depth of impaction. Next the chisel with the bevel facing downwards is placed horizontally at the lower end of the limiting cuts (stop cut) and a linking cut is made parallel to the superior border of the jaw with a single tap. The buccal part encasing the tooth is gently split offc this limiting cuts. Slices of bone each about 3mm in depth are chiseled away one at a time. The preliminary stop cuts prevent horizontal split from extending forwards or backwards due to horizontal grain. The removal of buccal window provides suitable point of application. After window, any body resistance to be cleared off for free elevation. 2. Shaving technique: Using the chisel, bevel facing forward. The marginal alveolar bone around the impacted tooth (partially erupted) is removed bit by bit by enhancing till the suitable point of application is obtained.
  • 64. 3. Split bone technique of Sir William Kelsey Fry - Except buccoversion impaction it can be used for all types of impaction It is mainly splitting of lingual cortex and elevating the tooth in dentolingual direction. Originally described by Ward (1986) 1. Under G.A. is preferable 2. Soft tissues are reflected to expose the bone enclosing the impacted tooth (Terrence ward incision) 3. A small window in the buccal aspect is created by vertical 5mm ht and 4mm and horizontal cuts using chisel. One immediately distal to 2nd molar 5mm and 2nd distobuccal to the 3rd molar (4 mm) buccal cortex and these 2 are joined by horizontal cut. 4. A point of application for an elevator is made with the chisel by excising the triangular piece of bone bounded anteriorly by the lower end of the stop cut and above by the anterior end of the horizontal cut. 5. The distolingual bone (lingual place) is then fractured inwards using 5 mm chisel, by placing distal to the crown of 3rd molar and near to the lingual plate (dotted line). 6. The chisel head at an angle of 45-600 to the bone surface (horizontal) and bevel facing lingually pointing in the direction of 2nd lower premolar on the other side. 7. The cutting edge of the chisel should be kept parallel to the external oblique line. 8. Few light tapsc mallet drives the chisel blade towards the lingual plate at the required depth and the latter will fracture at the inter-dental space between the lower 2nd and 3rd molars. 9. The peninsula of one which than remains distal to the tooth and between buccal and lingual cuts is excised. 10. Deliver the tooth using elevator 11. Thin lingual plate is grafted with fine hemostat and fractured the lingual plate is then lifted from the wound. 12. Smoothen the cut bone edgesc bone file.
  • 65. 13. Wound closure. Advantages : Faster tooth removal Lees risk to mandibular nerve Lessened risk of damage to the periodontium of the 2nd molar Less risk to socket healing problem. Disadvantages : Risk of damage to the lingual nerve. Increased risk of post operative infection & greater danger of spread Risk of augmentation of post operative inflammatory sequelae (pain, swelling and trismus). Patient discomfort due to the use of a chisel and mallet for lingual bone removal or fracture. Advantage of Split bone technique (Ward 1956) : 1. It is one of the quickest method of removing impacted mandibular 3rd molar. 2. The elimination of distolingual bone in this technique allows the lingual tissue to fall in this reducing the size of residual socket. By means of saucerization and minimize the Blood clot. 3. The procedure is comparatively atraumatic. The bone is clean, fresh cut and there is little or no late sequestration. 4. Rapid healing with minimum discomfort. 5. Suitable in young patientsc elastic bone in which grain is prominent. Disadvantages of technique : 1. Error in placing the cutting edge of chisel parallel to the internal oblique ridge instead of parallel to external oblique ridge may result in extension of lingual split to the coronoid process (Killey, 1975)
  • 66. 2. Extreme care should be taken to prevent operative procedures from passing into the dead space lying below the mylohyoid ridge. 3. The possibility of extension of infection from above the mylohyoid muscle to structure lying below it. Pre operative hygiene program and antibiotic cover can prevent this (Ward, 1956). 4. Injury to lingual nerve and subsequent impaired lingual sensation. But this can be prevented by the identification of the nerve and its proper retraction. 5. The removal of lingual bone frequently exposure gingival distolingual portion of the root of 2nd molar. New bone does not replace this lost bone and to a surgical periodontal pocket is produced. This can be prevented by not removing this piece or lingual bone if it is having sufficient periosteal attachment. To hold the lingual plate in portion during heaving, a 2nd suture may be placed just distal to neck of 2nd molar. 6. Desirability of G.A. since most of the pt. will not be able to tolerate the chisel under G.A. 7. Submental transient analgesia in the post operative period, due to injury in the sensory branches of mylohyoid nerve. 8. Hazard of edema in the proximity of airway with the sagittal osteotomy now adopted as a routine procedure, any question of airway compromise resulting from surgical procedure on the lingual side of mandible must be dispelled. Lewis (1980) - Modified the Lingual Split Technique by minimizing periosteal reflection and buccal bone removal and by preserving the fractured lingual plate. Advantage : 1. Reduce the possibility of lingual nerve damage. 2. Minimize periodontal pocket formation. 3. Improve chances for primary wound heating.