

Recomendados
Más contenido relacionado
La actualidad más candente
La actualidad más candente (20)
Destacado
Destacado (20)
Similar a How to prepare greek gyro
Similar a How to prepare greek gyro (20)
Último
Último (20)
How to prepare greek gyro
- 1. How To Prepare Greek Gyro.
- 2. Gyro is cooked on an upright electric rotisserie.
- 3. Thinly sliced pork leg (fresh ham) or shoulder meat
- 4. The slices are placed in layers, each layer lightly sprinkled with the seasoning mixture.
- 5. After seasoning, the meat is sprinkled with white wine vinegar and rubbed to coat the layer of meat. (continued below) During this process, place smaller pieces of meat in a separate container. The white container at the back holds the smaller pieces of meat. They are seasoned, sprinkled with vinegar, and layered, the same as the other slices, however they will be used at the bottom and top of the cone when it's made.
- 6. Repeat until all the meat is seasoned and coated.
- 7. The skewer is set into a wooden base to keep it upright, and the bottom plate for the cone is set in place.
- 8. Smaller pieces of meat are laid on the metal base plate, overlapping with no space between the meat and the skewer.
- 9. As the cone grows, it widens out as larger slices of meat are added. Larger slices are draped around the skewer or threaded over it.
- 10. Moving the cone is an event in itself, and once placed on the rotisserie, Bobby adjusts the distance to the heating elements, turns it on, and cooking starts!
- 11. One hour later, the gyro meat has cooked enough on the outside to be thinly sliced. Now, let's make a gyro sandwich.
- 12. Pita bread is brushed with a little oil and grilled on both sides to brown and soften, and placed on a piece of butcher's paper.
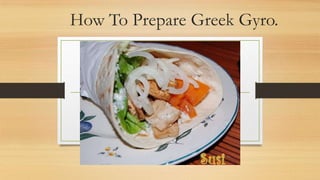
- 13. I asked for a gyro with "the works," and it starts with tzatziki made with thick, creamy Greek yogurt.
- 14. Slices of tomatoes and onions finish off the tasty additions.
- 15. Some places use electric cutters to slice very thin pieces and create more gyro sandwiches out of a cone
- 16. A large portion of meat is added to the gyro sandwich... but we're not done yet...
- 17. In the Greek tradition, fries are added to the gyro sandwich. If you're going to eat this famous "street food," it's more convenient than "fries on the side."
- 18. he (huge) sandwich is wrapped up in the butcher's paper.
- 19. A couple of napkins, and there you have it... ready to eat.