Enerit ISO 50001 Administration Training Presentation
•
1 recomendación•838 vistas

Enerit ISO 50001 software helps implement, manage and maintain and effective energy management system based on ISO 50001 or Superior Energy Performance.

Recomendados
Recomendados
Más contenido relacionado
La actualidad más candente
Similar a Enerit ISO 50001 Administration Training Presentation
Similar a Enerit ISO 50001 Administration Training Presentation (20)
Más de Arantico Ltd
Más de Arantico Ltd (20)
Último
Último (20)
Enerit ISO 50001 Administration Training Presentation
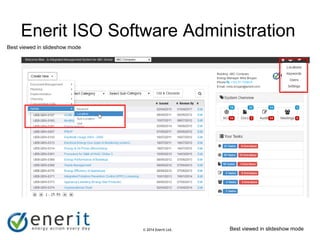
- 1. © 2007 Enerit Ltd. © 2014 Enerit Ltd. Enerit ISO Software Administration Best viewed in slideshow mode Best viewed in slideshow mode
- 2. © 2007 Enerit Ltd. © 2014 Enerit Ltd. Administration 3. Admin - Only Available to Full Licence - Admin users
- 3. © 2007 Enerit Ltd. © 2014 Enerit Ltd. Locations & Sub-Locations Locations are typically at the level of the site address • Creating Location documents allow you to add a number of locations, to help sort actions and documents. Sub-Locations are at the level of the buildings within a site e.g. “Building 1” • Creating a Sub-Location for a Location allows you to further define areas in your organisation and to help sort actions and documents.
- 4. © 2007 Enerit Ltd. © 2014 Enerit Ltd. Creating a Location 1. Click “Create New…” 2. Click “Admin” 3. A blank Location form opens in a new window. 1. Click “Location”
- 5. © 2007 Enerit Ltd. © 2014 Enerit Ltd. Configuring Location Data Entry:(The next slides show an example of a complete Location) Location & ISO Management Systems Configurations: • Title: Enter the title of the Location. This field is mandatory. • Description: Enter a description of the location. • Energy Manager/Health & Safety Manager/Environmental Manager/Quality Manager: • Click “Select” and choose the names for each of the above managers for this location. • Enter Phone and Email details for these functions. • Document Types responsible for: Select the document types that are the responsibility of this manager. This defines the person that new documents will be submitted to for initial review and who can issue these types of documents. The available list is defined in the DocumentType keyword settings for the Document Management module (see related training material.) • Action Types responsible for: Select the nonconformities that are the responsibility of this manager. This defines the person that nonconformities will be submitted to for final approval for these Types of Nonconformities. The Type list is defined in the Keyword settings for the Nonconformity Management module (see related training material.) NOTE: When finished creating a location click on Save in the top left corner and then close the window. You’re new location will then appear on all new documents you create in the software.
- 6. © 2007 Enerit Ltd. © 2014 Enerit Ltd. Configuring a Location (Objectives & Targets) Objectives & Targets: • Target Savings – Electrical (number): Enter the overall electrical energy savings target for this location. Enter in the default units that you have specified in your System Settings document (see later slides.) This is then displayed in the Objectives & Targets Dashboard. This field is a number field. • Target Savings – Thermal (number): Enter the overall thermal energy savings target for this location. Enter in the default units that you have specified in your System Settings document (see later slides.) This is then displayed in the Objectives & Targets dashboard. This field is a number field • Overall Location Objective: Enter statement outlining your objectives. This is a text field. This will be displayed in the Objectives & Targets dashboard. • Energy Efficiency Project Budget (number): Enter the budget that you have allocated for energy efficiency projects. (This feature has not been released yet. Please contact Enerit support if you are interested in finding out more about this feature.)
- 7. © 2007 Enerit Ltd. © 2014 Enerit Ltd. Configuring a Location (Default Chart Configurations) • Enter the URL for the chart in the appropriate box that you want to appear in the position described in the images below. Default Chart Configurations: Main Screen - Objectives & Targets Dashboard - Charts Dashboard Configurations: Main screen “Obj. & Targ.” Main screen “Reports/Chart” Chart Dash. Top LHS Chart Dash. Bottom LHS Chart Dash. Bottom RHS Chart Dash. Top RHS
- 8. © 2007 Enerit Ltd. © 2014 Enerit Ltd. Configuring a Location (Energy Sources – Units and Conversion Factors) Specify the unit that your organisation uses to measure this Energy Source. Enter the Conversion factor to convert from the “Unit of Measure” to the System Unit Specify the cost that your organisation uses to measure the Energy Source Specify the CO2 emission factor related to the Energy Source: used for Improvement Opportunities Estimated Savings
- 9. © 2007 Enerit Ltd. © 2014 Enerit Ltd. 1. Identifying Energy Sources Specify the unit that your organisation measures that Energy Source in Enter the Conversion factor to convert from the “Unit of Measure” to the System Unit Specify the unit that your organisation measures that Energy Source in Specify the CO2 emission factor related to the Energy Source: used for Improvement Opportunities Estimated Savings
- 10. © 2007 Enerit Ltd. © 2014 Enerit Ltd. Completed Location - Example If you are satisfied with the Location details, click on “Save” or “Save & Close”. This will close and finalise the Location details.
- 11. © 2007 Enerit Ltd. © 2014 Enerit Ltd. Creating a Sub-Location (1) 1. Click “Create New…” 2. Click “Admin” 3. Click “Sub-Location” 4. A blank Sub-Location form opens in a new window.
- 12. © 2007 Enerit Ltd. © 2014 Enerit Ltd. Creating a Sub-Location (2) Data Entry: Sub-Location Information: • Location: Choose which location it will apply to. This field is mandatory. • Title: Enter the title of the Sub-Location e.g. “Building 1” • Description: Enter a description of the sub-location. e.g. boundary information. NOTE: When finished creating a Sub-Location click on Save in the top left corner and then close the window. You’re new Sub-Location will then appear on all new documents you create in the software. If you are satisfied with the Sub-Location details, click on “Save” or “Save & Close”. This will close and finalise the Sub- Location details.
- 13. © 2007 Enerit Ltd. © 2014 Enerit Ltd. Enerit ISO 50001 Keywords Keywords help you customise the Enerit software to work for your organisation, to choose words and categories that have real meaning for your organisation For each type of item/document you can create in the Enerit software there are configurable keywords on each to help sort and categorise them. The standard software comes with a default list, but you can create, edit and delete any of these items yourself. The next slide shows an example of the default list for each document Improvement Opportunity Categories is expanded The Sub-Categories for “HVAC” is then expanded By clicking on any Category or sub-category you can edit or delete them Further you can create your own Keywords (see following slide). By thinking about these categories you can really present excellent information e.g. in the Action Plan or in the Dashboard “Energy Savings”
- 14. © 2007 Enerit Ltd. © 2014 Enerit Ltd. Enerit ISO 50001 Keywords Choosing this list wisely is the key to powerful reporting
- 15. © 2007 Enerit Ltd. © 2014 Enerit Ltd. Creating a Keyword (1) 1. Click “Create New…” 2. Click “Admin” 3. A blank Keyword form opens in a new window. 1. Click “Keyword”
- 16. © 2007 Enerit Ltd. © 2014 Enerit Ltd. Creating a Keyword (2) Keyword Details: Keyword Details • Document Type: Choose • Field Name: Enter the title of the Sub-Location e.g. “Building 1” • Keyword: Enter a description of the sub-location. e.g. boundary information. • Keyword Description: Enter a description of the sub-location. e.g. boundary information. • Sub-Keywords: NOTE: When finished creating a Keyword or Sub-Keyword click on Save in the top left corner and then close the window. You’re new Keyword or Sub-Keyword will then appear in the specified document type when you create a new one in the software. If you are satisfied with the Keyword or Sub-Keyword details, click on “Submit” or “Save” button. This will create the Keyword and/or Sub- Keyword. You can view the Keywords in The Administration view
- 17. © 2007 Enerit Ltd. © 2014 Enerit Ltd. To add users to the Enerit software or change licence types, please contact your energy manager or the Enerit help desk help_desk@enerit.com Enerit ISO 50001 Users Full Licence Admin users can enter this area of the software to view users, their contact details and their licence types.
- 18. © 2007 Enerit Ltd. © 2014 Enerit Ltd. Enerit ISO 50001 Units & Settings The Units document does not need to be created in the Enerit software. Only edited as necessary. Enter the Units and settings through the Settings Tab in Admin.
- 19. © 2007 Enerit Ltd. © 2014 Enerit Ltd. Editing Units and Settings (2) Data Entry: Portal Information: • Portal Title: Enter the information your organisation will see when you log in to the software (at the top of the screen). • Attach company logo: Add a company logo that appears in for top RHS of all documents. • Customer URL: Enter the Url for your company website. It will be linked to your company logo. • Partner URL: (not currently available) • Partner Name: Enter the partner name, if applicable. • Show League Tables: (not currently available). Units: • Units: Each unit type chosen here will be then utilised in the various views and forms throughout the software. Unit Conversion Factors: • Electrical (Cost and Emission factor): Enter the cost of electricity and the emission factor for electricity. • Thermal (Cost and Emission factor): Enter the cost of thermal energy and the emission factor for thermal energy. NOTE: • Some inputs in the form are not utilised in this version of Enerit ISO 50001 software. • When finished editing the Units and settings document click on Save in the top left corner and then close the window. You’re new Unit settings will then appear throughout the system and on all new documents you create in the software. Some old documents need to be re-saved to see new units, if changed. • The Enerit ISO 50001 Software “Unit Settings” allows users to customise the software to their needs.