
Recomendados
Más contenido relacionado
La actualidad más candente
La actualidad más candente (19)
Destacado
Destacado (17)
Similar a Unit57 terminology by james fox
Similar a Unit57 terminology by james fox (20)
Más de FreeWavesEntertainment
Más de FreeWavesEntertainment (20)
Último
Último (20)
Unit57 terminology by james fox
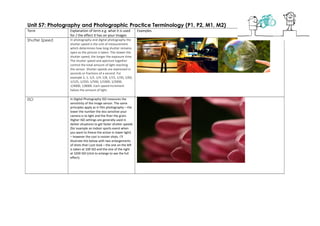
- 1. Unit 57: Photography and Photographic Practice Terminology (P1, P2, M1, M2) Term Explanation of term e.g. what it is used for / the effect it has on your images Examples Shutter Speed In photography and digital photography the shutter speed is the unit of measurement which determines how long shutter remains open as the picture is taken. The slower the shutter speed, the longer the exposure time. The shutter speed and aperture together control the total amount of light reaching the sensor. Shutter speeds are expressed in seconds or fractions of a second. For example 2, 1, 1/2, 1/4, 1/8, 1/15, 1/30, 1/60, 1/125, 1/250, 1/500, 1/1000, 1/2000, 1/4000, 1/8000. Each speed increment halves the amount of light. ISO In Digital Photography ISO measures the sensitivity of the image sensor. The same principles apply as in film photography – the lower the number the less sensitive your camera is to light and the finer the grain. Higher ISO settings are generally used in darker situations to get faster shutter speeds (for example an indoor sports event when you want to freeze the action in lower light) – however the cost is noisier shots. I’ll illustrate this below with two enlargements of shots that I just took – the one on the left is taken at 100 ISO and the one of the right at 3200 ISO (click to enlarge to see the full effect).
- 2. Aperture & Depth of field (F stop) The depth of field does not abruptly change from sharp to unsharp, but instead occurs as a gradual transition. In fact, everything immediately in front of or in back of the focusing distance begins to lose sharpness — even if this is not perceived by our eyes or by the resolution of the camera. Aperture is referred to the lens diaphragm opening inside a photographic lens. The size of the diaphragm opening in a camera lens REGULATES amount of light passes through onto the film inside the camera the moment when the shutter curtain in camera opens during an exposure process. The size of an aperture in a lens can either be a fixed or the most popular form in an adjustable type (like an SLR camera). Aperture size is usually calibrated in f-numbers or f-stops. Automatic Exposure Automatic exposure is an automated digital camera system that sets the aperture and/or shutter speed, based on the external lighting conditions for the photo. With beginner-level digital cameras, photographers usually can select one of three different AE modes. Aperture priority allows the photographer to set the aperture value, and the digital camera then determines the shutter speed. This is called a semi- automatic exposure. Shutter priority
- 3. allows the photographer to set the shutter speed, and the digital camera then determines the aperture setting. This also is called a semi-automatic exposure. Program mode is a fully automatic mode, where the camera sets shutter speed and aperture. This mode sometimes is called Program AE.
- 4. Manual Exposure This is the cool kid’s manual setting, as it gives you 100% control of all three functions, shutter speed, aperture and ISO. There are no set rules with how you adjust these settings, but here’s how I do it. First, I set the ISO. Typically, you can set your ISO and leave it for an entire shoot. Unless there’s a dramatic change in the available light, (you go inside, or step outside) you can set it and forget it. Like I said earlier, you typically want your ISO as low as possible. If you’re outside in the sun, there’s no reason to go above the lowest setting. This will keep the noise to a minimum within your shots. This leaves shutter speed and aperture for you to adjust from shot to shot. Typically I set these two in a somewhat middle of the road position just so the shot is exposed properly. I then set either my aperture or shutter speed to where I want it and adjust back the other to maintain proper exposure. How I determine shutter speed and aperture depend on what I’m shooting, and what I want to get out of the shot. If I’m shooting a waterfall, Ill wants a longer shutter speed to smooth out the falling water, so Ill compensate by decreasing the aperture. If I’m shooting a football game, Ill wants to freeze the action. I can do this by opening the aperture as wide as possible, and decreasing the shutter speed as low as I can. Now, if you don’t want to take the complete plunge to full manual, most cameras come with two other partial manual modes, which allow you to adjust two of the three settings, and the camera will automatically determine the optimum setting for the third depending on the light. While these work, it still requires the camera guess what you want out of your image, and it may not result in the exact exposure you’re looking for.
- 5. Colour Balance Getting the color right can be the most difficult part of photo editing but a little knowledge of how the colors are made will make this much easier. On the right we have a color wheel' to help illustrate the concepts that you need to grasp. All colors are made from three primary colors - red, blue and green. Forget what you learned in Art at school we are now dealing with light not pigments. Where the three colors overlap in the middle of the color wheel we get a neutral gray (somewhere between black and white depending on the intensity of the colors). I have faked it here slightly for the purpose of illustration. Where two of the colors overlap they form other colors known as 'subtractive primary colors Another way of looking at it is that if you remove one color from the middle of the wheel you will get a new color For example, if you remove red from gray you will be left with a mixture of blue and green, this color is called 'cyan'. If you remove or subtract green from neutral gray you are left with a mixture of red and blue known as 'magenta'. Red and green combine to make the third 'subtractive primary color - yellow. Knowledge of these six colors and how they relate to each other will enable you to correct any color cast in a picture.
- 6. Composition Image composition describes how different subjects and visual elements are arranged inside of the image frame. The purpose of image composition is to create a visually compelling picture, a picture that evokes the interest of the viewer. A successful shot attracts the eye for a while. Visual elements that a photographer uses in the composition are for example lines, forms, textures, balance, symmetry, depth, colours, perspective, scale, and lighting. A picture can tell a thousand words but how to create such a photo?
- 7. Rule of thirds The Rule of Thirds means that the frame can be divided into three horizontal sections and three vertical sections and therefore, where the horizontal and vertical lines intersect makes an ideal location for the more important parts of your picture. Using the rule of thirds doesn’t mean you have to put the point of interest on the right hand side and the bottom of the image.
- 8. Complementary Colours Complementary Colours are those which are opposite to each other on the colour wheel. Complements are red and green, blue and orange, or yellow and violet. Complementary colours neutralize each other when mixed together in equal amounts - making a neutral grey. When a small amount of one colour is mixed into its complement, the resulting colour is a less intense, more pleasing version of that colour. Analogous colours Analogous colors are colors that are adjacent or next to one another on a color wheel. An analogous color scheme is one in which only three adjacent colors are used. The theory is that colors work well or harmonize together. Usually one of these colors is dominant or used more than the other two, in the painting.
- 9. Macro Macro photography (or photomacrograph or macrography, and sometimes macrophotograph) is extreme close-up photography, usually of very small subjects, in which the size of the subject in the photograph is greater than life size (though macrophotography technically refers to the art of making very large photographs) By some definitions, a macro photograph is one in which the size of the subject on the negative or image sensor is life size or greater. However in other uses it refers to a finished photograph of a subject at greater than life size
- 10. Macro Macro photography (or photomacrograph or macrography, and sometimes macrophotograph) is extreme close-up photography, usually of very small subjects, in which the size of the subject in the photograph is greater than life size (though macrophotography technically refers to the art of making very large photographs) By some definitions, a macro photograph is one in which the size of the subject on the negative or image sensor is life size or greater. However in other uses it refers to a finished photograph of a subject at greater than life size