Ürban PAD to Unity 3D Workflow
•
1 recomendación•1,298 vistas

With the new Unity 3D export profile, it's easier than ever to get your Ürban PAD content to

Recomendados
Más contenido relacionado
Destacado
Destacado (12)
Último
Último (20)
Ürban PAD to Unity 3D Workflow
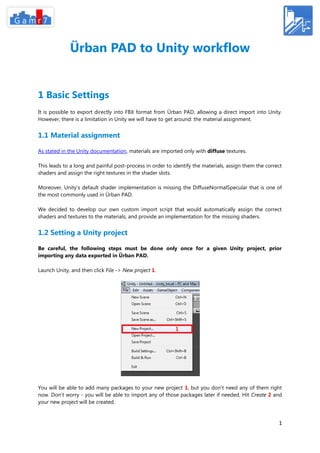
- 1. Ürban PAD to Unity workflow 1 Basic Settings It is possible to export directly into FBX format from Ürban PAD, allowing a direct import into Unity. However, there is a limitation in Unity we will have to get around: the material assignment. 1.1 Material assignment As stated in the Unity documentation, materials are imported only with diffuse textures. This leads to a long and painful post-process in order to identify the materials, assign them the correct shaders and assign the right textures in the shader slots. Moreover, Unity's default shader implementation is missing the DiffuseNormalSpecular that is one of the most commonly used in Ürban PAD. We decided to develop our own custom import script that would automatically assign the correct shaders and textures to the materials, and provide an implementation for the missing shaders. 1.2 Setting a Unity project Be careful, the following steps must be done only once for a given Unity project, prior importing any data exported in Ürban PAD. Launch Unity, and then click File -> New project 1. You will be able to add many packages to your new project 1, but you don't need any of them right now. Don’t worry - you will be able to import any of those packages later if needed. Hit Create 2 and your new project will be created. 1
- 2. Open the Project window by clicking Window -> Project 1. Then right click in the project window and click on Show in explorer 1. . 2
- 3. It will open the project folder in a new explorer window. Open its Assets folder. The Gamr7 custom Unity resources (scripts and shaders) are located in the resources/Unity sub-folder of the Ürban PAD project folder. Copy the content of the resources/Unity folder in the Assets folder previously opened. The resulting folders hierarchy after this operation must look like this: Unity Project |__ Assets |__ Editor |__ G7_UnityImport.js |__ Shaders |__ G7_DiffuseNormalSpecular.shader |__ G7_Alpha-DiffuseNormalSpecular.shader 2 Export from Ürban PAD The export button 1 is located in the top left corner of Ürban PAD. You can also hit Ctrl+e to open the export window. 2.1 Export a sector from Sector Editor Select the Unity format 1. Chose the folder where you want to export your data 2. By default, the export folder is the unity folder located at the root of your Ürban PAD project. Select the usual export options you want to use 3. Hit the validation button 4 and wait for the progress bar to disappear. 3
- 4. 2.2 Export a city from City Editor Select the Unity format 1. Choose the folder where you want to export your data 2. By default, the export folder is the unity folder located at the root of your Ürban PAD project folder. Select the usual export options you want to use 3. o Bu using the Multi Files option, you will divide your city in many files: one per road segment, crossroad or sector. o You can pack your city on a grid, which allows you to choose the size of the city blocks you will obtain. Hit the validation button 4 and wait for the progress bar to disappear. Now that you have exported your city, you should have a folder containing these files and folders: My exported city folder |__ models |__ textures |__ texture_1.png |__ texture_2.tga |__ … |__ multi_export_global_file.xml |__ couple_1.fbx |__ couple_1.xml |__ couple_2.fbx |__ couple_2.xml |__ … 4
- 5. The number of couple of .fbx and .xml files depends on the options you have chosen and the size of your city. 3 Import into Unity There is no import command in Unity. Simply drop your resources into the Assets directory of your project's root folder. Then when you set the focus back to the Unity window, it automatically detects that new assets were added and starts importing them. Here is the procedure to follow to import your data into Unity: Navigate to the location where you exported your Ürban PAD data. Copy the .fbx file(s), the .xml file(s) and the textures folder, and paste them anywhere under the Assets folder. This can be directly in the Assets folder or in any sub-folder. Return to Unity, and you should see an Importing Assets progress bar pop up. When it's finished, your assets will be available in the Unity Project window 1. 3.1 Material Issue How our material process works Along with each .fbx file, we export a .xml file with the same base name. This file lists all the materials used in the corresponding .fbx, identified with their IDs, and provides for each material: The shader format (ex: "D" stands for Diffuse, "DNS" stands for DiffuseNormalSpecular) The list of the textures referenced by the material with their semantic ("diffuse", "normal", "specular"...) Here is an example of our xml data: <material id="material_123" shader_format="DNS"> <texture semantic="specular">default_specular.jpg</texture> <texture semantic="diffuse">grey_pavement.jpg</texture> <texture semantic="normal">grey_pavement_normal.jpg</texture> </material> We have developed a script, named G7_UnityImport.js, that is automatically called during the import process. It parses the .xml materials file and assigns the correct shader and textures to the material being imported. 5
- 6. We added some shader implementations that were missing in Unity default resources, currently: G7_DiffuseNormalSpecular.shader : DNS without transparency G7_Alpha-DiffuseNormalSpecular.shader : DNS with transparency Import models with materials Import your assets as previously described. At the end of the process, a NormalMap settings window might pop up: This is because textures used as Normal Maps must be explicitly declared as such in Unity. Click Fix now 1 to resolve this issue. Add a single model to a Scene To add the model to a Scene, first activate the Scene by double-clicking it in the Project window, then drag and drop the fbx model node from the Project window to the Hierarchy window. The model will be added to the Scene in position (0, 0, 0). By default, you don't have any Scene in the Project window and a new, unsaved Scene is active. You could also drag and drop the model node directly in the Scene window. In that case, you don't have a precise control of the position where the model is added to the Scene. Click the model instance node in the Hierarchy window and adjust the Position in the Transform section of the Inspector window. By default, Unity applies a rotation that gives your model a different orientation than the one it has in Ürban PAD. To restore the original orientation, input the following values for the Rotation in the Transform section of the Inspector window: (-90, 0, 0). For more details on this problem, please see those two links: fbx importer correct orientation 3Ds max to Unity: scene rotated by 180 degree Please note that when importing an entire city the orientation is automatically set to correct values by our script. 6
- 7. Add transparency Transparency can’t be automatically managed by the import script. If one of your materials references textures with transparent parts, then you have to select the material node and change the shader to the equivalent transparent shader in the Inspector window: Bumped Diffuse --> Transparent/Bumped Diffuse 1 Gamr7/Diffuse Normal Specular --> Transparent/Gamr7/Diffuse Normal Specular 2 7
- 8. 3.2 Import city at once How it works As we said before, G7_UnityImport.js is called automatically during the import process. This script will create a Unity prefab and use multi_export_global_file.xml to load and set each individual part of the city at its own place, as a child of the prefab. Import an entire city The process is simple: copy your city folder in the Assets folder of your Unity project directory. It should now look something like this: Unity Project |__ Assets |__ Editor |__ G7_UnityImport.js |__ Shaders |__ G7_DiffuseNormalSpecular.shader |__ G7_Alpha-DiffuseNormalSpecular.shader |__ My exported city folder Return to Unity, wait for it to load the new assets and you will see a prefab with the same name as your imported city's folder in the Hierarchy Window 1. Note that this prefab is available in the project panel, in your city's folder 1. 8
- 9. You can even import many cities this way at one time. A prefab will be created for each city you have imported. 3.3 Export a Package To export a package, in order to sell it on the Assets Store for instance, use the Assets->Export package command 1. An Exporting package window will pop up, letting you select which elements you want to include in the package. After clicking Export, all these elements will be bundled into a unique unitypackage file. The project hierarchy is saved within the package file and you can re-import it in any Unity project using the Assets -> Import package command 1. 9
- 10. 4 Frequently Asked Question 4.1 Can I sell the building/city I created with Ürban PAD on the Unity Asset Store? Yes, there are no limitations to using Ürban PAD to create your Asset Store assets. You can learn about Unity’s Asset Store limitations here : submit your content to the assets store. 4.2 Can I export directly into Unity Asset folder? Yes, you can export your data directly to your Unity project folder, and wherever you want. You just have to use the folder selector 1 in the export options of Ürban PAD. 10
- 11. 4.3 Can I use Ürban PAD-integrated Substances in Unity? We will add this possibility in a future version of Ürban PAD. 4.4 What about colliders and collisions? Keep an eye on upcoming versions of Ürban PAD. These features will be released soon. 11