This document provides steps to implement DNS and LDAP in Tiguin for a Samba PDC. It involves:
1. Installing and configuring Bind9 to setup DNS for the "eclipse.com" domain.
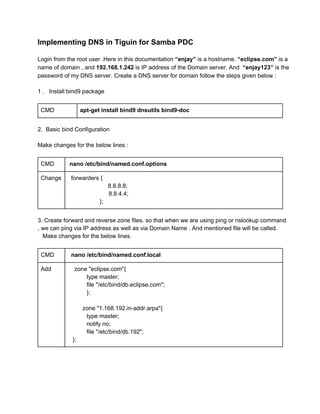
2. Installing slapd and adding LDAP schemas to setup an LDAP server for the "eclipse.com" domain.
3. Installing Samba and configuring it to use the LDAP server for user/group authentication and authorization. This allows central management of users and groups.
2. 4. Building Your DNS Forward Zone
Now edit new forward zone file . Make the changes for the below lines.
CMD cp /etc/bind/db.local /etc/bind/db.eclipse.com
CMD nano /etc/bind/db.eclipse.com
Add/Edit @ IN SOA enjay.eclipse.com. root.localhost. (
@ IN NS enjay.eclipse.com.
enjay IN A 192.168.1.242
server01 IN CNAME enjay.eclipse.com.
5. Building Your Reverse Lookup and edit the reverse lookup file .
CMD cp /etc/bind/db.127 /etc/bind/db.192
CMD nano /etc/bind/db.192
Add/Edit @ IN SOA enjay.eclipse.com. root.localhost. (
@ IN NS enjay.eclipse.com.
242 IN PTR enjay.eclipse.com.
6. Starting your DNS Server.
CMD /etc/init.d/bind9 start
7. Testing your DNS Server
Make the changes in the Network Manager window. Select IPV4 tab.
DNS Server eclipse.com
Search Domain eclipse.com
8. Now that we have DNS setup we can use ping to test that everything is working. Both
3. nslookup and ping are great tools for troubleshooting and testing.
CMD Output
nslookup
192.168.1.242
Server: 192.168.1.242
Address: 192.168.1.242#53
242.1.168.192.inaddr.arpa name = enjay.eclipse.com.
CMD Output
nslookup
eclipse.com
Server: 192.168.1.242
Address: 192.168.1.242#53
Name: eclipse.com
Address: 127.0.0.1
Implementing ldap in Tiguin for Samba PDC
After the successful result from nslookup proceed further with the following steps.
1.
CMD aptget install slapd ldaputils
ldapadd Y EXTERNAL H ldapi:/// f /etc/ldap/schema/cosine.ldif
ldapadd Y EXTERNAL H ldapi:/// f /etc/ldap/schema/nis.ldif
ldapadd Y EXTERNAL H ldapi:/// f /etc/ldap/schema/inetorgperson.ldif
2. You will need to modify the following to include your password and domain name.
CMD nano /etc/ldap/schema/backend.ldif
Add / Edit dn: cn=module,cn=config
objectClass: olcModuleList
cn: module
olcModulepath: /usr/lib/ldap
8. Domain=[ECLIPSE] OS=[Unix] Server=[Samba 3.6.3]
Sharename Type Comment
Home Disk
netlogon Disk Network Logon Service
IPC$ IPC IPC Service (SMB Server)
Anonymous login successful
Domain=[ECLIPSE] OS=[Unix] Server=[Samba 3.6.3]
Server Comment
Workgroup Master
ENJAY.COM MRP
MSHOME MICROSOFTPC
TIGUIN ENJAY
WORKGROUP ENJAY
Create profiles and netlogon directory.
CMD mkdir v m 1777 /home/profiles
CMD mkdir v m 1777 /home/netlogon
CMD cp /usr/share/doc/sambadoc/examples/LDAP/samba.schema.gz
/etc/ldap/schema/
CMD gzip d /etc/ldap/schema/samba.schema.gz
CMD nano /etc/ldap/schema/schema_convert.conf
ADD include /etc/ldap/schema/core.schema
include /etc/ldap/schema/collective.schema
include /etc/ldap/schema/corba.schema
include /etc/ldap/schema/cosine.schema
include /etc/ldap/schema/duaconf.schema
include /etc/ldap/schema/dyngroup.schema
include /etc/ldap/schema/inetorgperson.schema
include /etc/ldap/schema/java.schema
include /etc/ldap/schema/misc.schema
include /etc/ldap/schema/nis.schema
include /etc/ldap/schema/openldap.schema
include /etc/ldap/schema/ppolicy.schema
12. CMD authclientconfig t nss p lac_ldap
CMD pamauthupdate ldap
CMD Make sure there’s an asterisk next to all listed.
getent group
O/P:
Should show similar to:
Domain Admins:*:512:root
Domain Users:*:513:
Domain Guests:*:514:
Domain Computers:*:515:
Administrators:*:544:root
Account Operators:*:548:
Print Operators:*:550:
Backup Operators:*:551:
Replicators:*:552:
CDM Reboot
Create a Domain user called test :
CMD smbldapuseradd a m P test that lead to an error
ERROR root@enjay:~# smbldapuseradd a m P test
Failed to execute: /usr/sbin/smbldappasswd.cmd: No such file or directory at
/usr/sbin/smbldapuseradd line 668.
Solution ln s /usr/sbin/smbldappasswd /usr/sbin/smbldappasswd.cmd
CMD smbldapuseradd a m P test
give password as “123”
CMD smbldapgroupmod m test 'Domain Admins'
Now Connect the user from windows XP.
Settings are as per below:
1. Enter Prefered DNS Server as 192.168.1.242
2 Open Advanced Options in the IP settings window.
3. Click on WINS tab. CLick on Add button and enter 192.168.1.242 as WINS Server.