
Recomendados
Más contenido relacionado
La actualidad más candente
La actualidad más candente (20)
Destacado
Similar a Manage inventory and communications with the SOIN system
Similar a Manage inventory and communications with the SOIN system (20)
Manage inventory and communications with the SOIN system
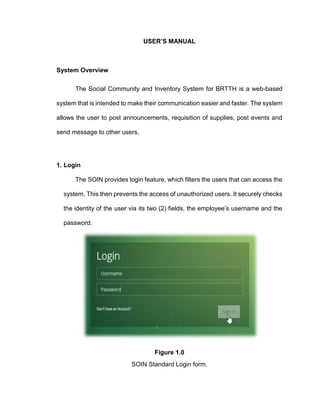
- 1. USER’S MANUAL System Overview The Social Community and Inventory System for BRTTH is a web-based system that is intended to make their communication easier and faster. The system allows the user to post announcements, requisition of supplies, post events and send message to other users. 1. Login The SOIN provides login feature, which filters the users that can access the system. This then prevents the access of unauthorized users. It securely checks the identity of the user via its two (2) fields, the employee’s username and the password. Figure 1.0 SOIN Standard Login form.
- 2. Upon the entry of the authorized user the sidebar menu shows what module/s the user can access with the header that is visible to all types of users. Figure 1.1 SOIN Sidebar Menu Figure 1.2 SOIN Header 1.2.1 Notifications - Alert messages for the users Homepage – everyone can access the homepage. Requisition Button – can only accessed by the admin of the SOIN system and the head of warehouse department. Personnel Button – head of personnel department has the privilege to access the personnel page. Inventory Button – Head and staff of the warehouse department only can see the inventory button. Report Button – this button is only visible for the Head and staff of the warehouse department. Maintenance – this button is only visible on the admin of the SOIN system. 1 2 3 Notifies the user if he/she has new messages. To view all messages, click the
- 3. 1.2.2 Users Dropdown Menu 1.2.3 Chat bar The user can see all other users with its status and the user can send messages by clicking the name of the employee. Color green circle means that the employee is online, and the gray ones suggest the opposite. Alerts the user if there are requests for supplies, soon to expire/expired supplies, when a supplies reached its reorder point, approval of events, and the status of his/her requested supply. To view all notifications, click the 1.2.3.a Chat Box After the user compose the message, he/she should PRESS the ENTER KEY to send the message The user can click this dropdown menu and the link to profile, messages, calendar, help, and logout is seen.
- 4. Figure 2.0 SOIN System Home Page 2.2 Technical Box This is the Technical Box, it is only visible on the home pages of IT Staff. The Technical Box shows the requests of technical support from other employees. 2.1 User Info Shows some of the information of the user who logged in and with the button that links to the department page where he/she belongs.
- 5. 2.3 Posting Field This is where the user can write and compose the announcement he/she wants to post. The announcement can be by text or by file. Drag and Drop Browse File If the user wants to post announcement in a file type he/she will just click the button. There are two ways to add a file by just clicking the to browsing the file or By drag and drop which is dragging the file and dropping it into the box.
- 6. 2.4 Announcement Feed This is where the user can see all the announcements with its comments. The DELETE BUTTON and PIN BUTTON is only visible on the ADMIN. Comment Field – text area where the user can compose his/her comment/ reply to the announcement. Post Comment Button – after composing the comment/reply, the user must click the button to finish the process of leaving the comment.
- 7. 2.5 Requesting of Supplies, Technical Support, and Equipment If the user want to request supplies, technical support or equipment he/she will just click the button. 1 2 1. Delete Row – to remove the entire row. 2. Add Row – to add row for additional supplies. 3. – to submit the supplies entered. The same process and procedures will be done when requesting for Technical Support and Equipment.
- 8. 2.6 Upcoming Events This is where the upcoming event is displayed. To view all Events, click the button
- 9. 2.6.1 Adding of Event Click the button to add event
- 10. 2.6.2 Adding Photo/s of an Event The admin can add photos of the event by dragging and dropping or browsing the file. The photos will be automatically posted on the Announcement Feed.
- 11. 2.7 Item Requests This is where the request/s of the user are displayed with its other details.
- 12. 3.0 Requests This page is only accessible by the admin and head of warehouse department. It is where the requests of supply, posting of events, and posting of announcements is being verified and approved. 3.1 Approval of Request and Issuance Slip (RIS)
- 13. Upon the approval of the request the RIS will be available on the list of Approved Request and the user can view or print the RIS form. To view the RIS form, click the button. The RIS form is ready to be printed for the signature of the employee, who received and issued the request.
- 14. 3.2 Approval for Posting of Announcements This is the verification process for the posting of announcements. The admin can verify the post that will be automatically displayed on the Announcement Feed or delete the post.
- 15. 3.3 Approval for Posting Events This is the verification process for the posting of events. The admin can verify the event that will be automatically displayed on the Home Page or delete the event.
- 16. 4.0 Personnel This is only visible to the head of personnel department. The list is printable. To print, simply click the button. To view the details of an employee, simply click the button. The user/head can also change the designation and privileges of an employee.
- 17. 4.1 Adding of Employee There are two ways to create an account: 1. The user will register on the login page 2. The head of personnel department will create accounts for the employees.
- 18. Both ways will go through verification to make sure the details are correct. If the account has been approved the user be assigned to the designation. Click the button, to complete the process.
- 19. 5.0 Inventory The Inventory page is only visible on the employees that belongs to the warehouse department. Figure 5.1 List of All Supplies The supplies are categorized in tabular form. Each tabs displays list of supplies with its details. To view the STOCK CARD of an item, click button. The button has tooltips to guide the user.
- 20. Figure 5.1.1 Sample Stock Card of an Item The stock card can be printable anytime. Just click the button. To view the details of an item, simply click the button with tooltip VIEW DETAILS. The details of an item can be editable but not the quantity of stocks available.
- 21. 5.2 Inventory of Equipment List of all the equipment is displayed on this page with its details. The same procedures on the inventory of supplies. 5.3 Equipment Profile Figure 5.3 Equipment inventory
- 22. Click the button to assign the equipment to an employee. First, get the barcode of the equipment. Then click the button GO. It will automatically generate the information of the equipment and the user can choose the employee who requested the equipment.
- 23. 5.4 Checking of Inventory This can be done with the help of barcode scanner. First, ENTER/SCAN the property no of the equipment
- 24. Then it the system will display the details of the equipment and should be checked by the employee checking the inventory. If the inventory is true and correct and has been checked by the employee, it will be added on the list of the inventory of equipment. This will appear if the user clicked the +New Inventory, this will reset the list for the new inventory.
- 25. 5.5 Printing of Barcode The user must enter or scan the barcode. Then, it will generate its data for double checking if the code is correct. The user can choose the number of barcode he/she wants to print.
- 26. 6.0 Reports On the Report of Physical Count of Supplies, the user should enter first the category of supply. Figure 5.1 Report on the Physical Count of Supply: Category - ALL
- 27. The same procedures on other reports such as, Report on the physical Count of Property, Plant and Equipment, Work Order and Report on the Supplies and Materials Issued. To print the reports, click the button. This is available to all pages that is printable. The STOCK REPORT are the summary of stocks that is categorized by its status. Figure 5.2 Stock Report
- 28. 7.0 Maintenance Figure 7.1 Maintenance for Adding Department and Sub Department. – means edit the name/text Figure 7.2 Maintenance for Adding Designation
- 29. Figure 7.3 Maintenance for Adding Category of a Supply 7.4 Adding Supplies to the Inventory First, the user must enter/scan the product code, if the product has no product code the system has reserved product code, he/she will just click the ENTER button to proceed Figure 7.4.1 Dialog Box with the Reserved Product Code
- 30. After the user entered/scanned the product code, the system will generate the details of the product if it is already added on the system if not the user will enter supporting details to successfully add the supply. Figure 7.4.2 Form in Adding Supply Finish the process by clicking the button.
- 31. 7.5 Adding of Equipment to the Inventory. First, the user must enter/scan the equipment code, if the equipment has no code the system has provided equipment code, the user will just click the ENTER button to proceed Figure 7.5.1 Form in Adding Equipment
- 32. Figure 7.6 Maintenance in Unit of Supplies Figure 7.6 Maintenance in Technical Problem