
Recomendados
Más contenido relacionado
Similar a Renaissance Photoshop Project
Similar a Renaissance Photoshop Project (20)
Más de KarenBlumberg
Más de KarenBlumberg (19)
Último
Último (20)
Renaissance Photoshop Project
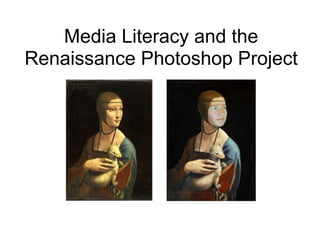
- 1. Media Literacy and the Renaissance Photoshop Project
- 2. What is Photo Manipulation? Photo manipulation is the application of image editing techniques to photographs in order to create an illusion or deception (in contrast to mere enhancement or correction), through analog or digital means.
- 3. From DailyMail: The history of doctoring photographs dates back to the 1860s. Only a few decades after the first photograph in 1814, photographs were already being manipulated. The nearly iconic portrait of U.S. President Abraham Lincoln is a composite of Lincoln’s head and the Southern politician John Calhoun’s body.
- 4. From Media Bistro: National Geographic was accused of altering a photograph so that the Egyptian pyramids were closer together and thus fit on the vertical cover. The editors were allegedly unapologetic about creating a more aesthetically pleasing cover. Rich Clarkson, director of photography at National Geographic during the time, said he had no ethical problem with combining two photographs into a single cover picture, although “some publications could start abusing.”
- 5. From Sree.net: Photographer Brian Walski used his computer to combine elements of the two photographs. The left side of the altered photo is taken from the top left photo, and the right side of the altered photo is from the top right one. Some residents on the left side of the blended photo are visible twice. The altered photo ran on the front page of the Los Angeles Times Monday.
- 6. From China Tibet News: Photographer Liu Weiqiang merged the images of antelope and a high- speed train after waiting for two weeks for the perfect photo with no success. Despite his earnestness, he was eventually blacklisted by several Chinese news outlets
- 7. Images by Seth Taras for History Channel 2010
- 8. Images by Seth Taras for History Channel 2010
- 9. Images by Seth Taras for History Channel 2010
- 10. Dove's "Evolution of Beauty" Ad http://www.youtube.com/watch?v=hibyAJOSW8U
- 11. What are the Permitted and Prohibited uses? Why is it important to read the terms and conditions of a website? Everything you do online is public, permanent, and traceable. Artstor
- 12. Some examples of the project...
- 16. Locate a Renaissance painting online at http://artstor. org
- 17. ●Download a fair use image of a Renaissance painting to your Art Folder. ●Take a self photograph in front of a plain wall or with PhotoBooth. ●Try to mimic the face/head angle.
- 18. ●Open the picture of you in Photoshop. ●Use the Eraser and Magic Wand tools in the left side menu to erase everything unecessary. ●Change the size of the Eraser and/or the tolerance of the Magic Wand. ●The higher the tolerance, the larger the area you will select. ●Zoom in and out for accuracy.
- 19. ●Click on the white area with the Magic Wand tool. ●Go to Select --> Inverse to highlight only your face (or body). Copy this (command + C).
- 20. ●Open a new Photoshop file. ●Give it a good file name like RenaissanceArtProject . ●Change the Width, Height to print either 8.5x11 or 11x8.5 depending on whether your painting is more like a portrait or landscape. ●For good print quality, change the resolution to 150.
- 21. Create two new layers by clicking Layers --> New Layers: ●name the first one painting ●name the second one me Now you have a total of 3 layers: 1. Layer 1 (the background layer) 2. Painting 3. Me
- 22. ●On the me layer, paste the photo of you. ●On the painting layer, paste your chosen painting.
- 23. ●Change the scale or rotate a layer by going to: Edit --> Free Transform ●Hold down the Shift key to keep things proportional (relatively sized). ●Flip the image horizontally or vertically by going to: Edit --> Transform ●Lock your transformation into place by pressing the Return button.
- 24. ●Move the me layer into place using the Move Tool. ●Continue to erase if necessary with the Eraser Tool.
- 25. Adjust the color balance, exposure, contrast, hue under: Image --> Adjustments There are many sliders you can use to experiment.
- 26. A nice final effect is making the "me" layer slighly blurry using a very light eraser or play with the available filters.
- 27. Save your final image as a JPEG in your Art Folder. Upload your JPEG to the class album on The Gallery.
- 28. Is it ART? WHO owns it?
- 29. Leonardo da Vinci, Mona Lisa, ~1519 Is it art? Who owns it?
- 30. Marcel Duchamp, L.H.O.O.Q., 1919 Is it art? Who owns it?
- 31. Andy Warhol, Mona Lisa, 1963 Is it art? Who owns it?
- 32. Yasumasa Morimura, Self Portrait as Art History: Mona Lisa in Its Origin, 1998 Is it art? Who owns it?
- 35. Who owns the Renaissance composites that you created? What about our work?
- 36. Download your work to your Digital Portfolio and write a reflection about your experience during this project. Reflection